Grilled Peach Burrata Salad Fresh and Flavorful Dish

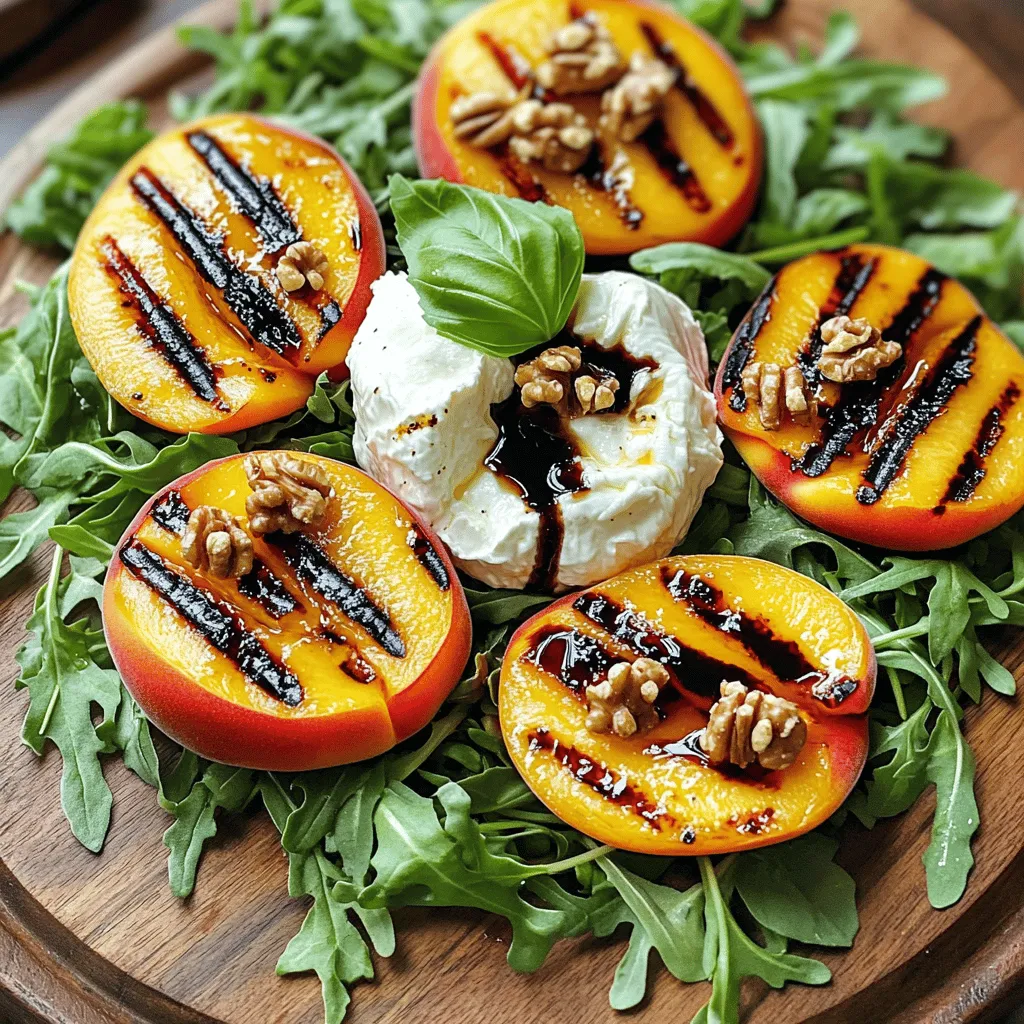
Are you ready to elevate your salad game? This Grilled Peach Burrata Salad combines sweet, juicy peaches with creamy burrata, creating a dish that’s both fresh and flavorful. Perfect for summer gatherings or a light meal, this recipe highlights the importance of using top-notch ingredients. Join me as we explore simple steps to make this vibrant salad, along with tips to customize it to your taste. Let’s dive in!
Ingredients
List of Ingredients for Grilled Peach Burrata Salad
To make this delicious dish, you need the following ingredients:
– 3 ripe peaches, halved and pitted
– 8 oz creamy burrata cheese
– 4 cups fresh arugula
– 1/4 cup rich balsamic glaze
– 1/4 cup walnuts, toasted and roughly chopped
– 2 tablespoons extra virgin olive oil
– Sea salt and freshly ground black pepper, to taste
– Fresh basil leaves, for an aromatic garnish
Substitutions for Key Ingredients
If you can’t find some ingredients, here are some easy swaps:
– Instead of peaches, try nectarines or plums. They grill well too.
– If you don’t have burrata, use fresh mozzarella for a similar taste.
– Arugula can be swapped with spinach or mixed greens if needed.
– For a nut-free option, skip the walnuts or use sunflower seeds instead.
– If balsamic glaze is not available, a simple balsamic vinegar works great.
Importance of Fresh Ingredients
Using fresh ingredients makes a big difference. Fresh peaches bring sweetness and juiciness that cooked ones can’t match. The burrata cheese adds a creamy richness that enhances the dish. Fresh greens, like arugula, add a peppery crunch. The quality of these ingredients makes your salad taste better. When you use fresh items, your dish feels vibrant and healthy. It invites everyone to enjoy every bite. For the best results, always choose the freshest produce you can find. This care shows in your cooking and makes your meals shine.
Step-by-Step Instructions
Prepping the Peaches
Start with three ripe peaches. Halve them and remove the pits. This step is easy. You want them to be fresh and juicy. Brush the cut sides with two tablespoons of extra virgin olive oil. This adds flavor and helps them grill better. Sprinkle sea salt and black pepper on the peaches. This helps bring out their sweetness.
Grilling Instructions
Preheat your grill to a medium-high setting. This helps get nice grill marks on the peaches. Place the peach halves cut side down on the grill. Grill them for about 3 to 4 minutes. Look for those beautiful grill marks. Then, flip the peaches over carefully. Grill for another 2 to 3 minutes until they soften. Once done, take them off the grill and let them cool.
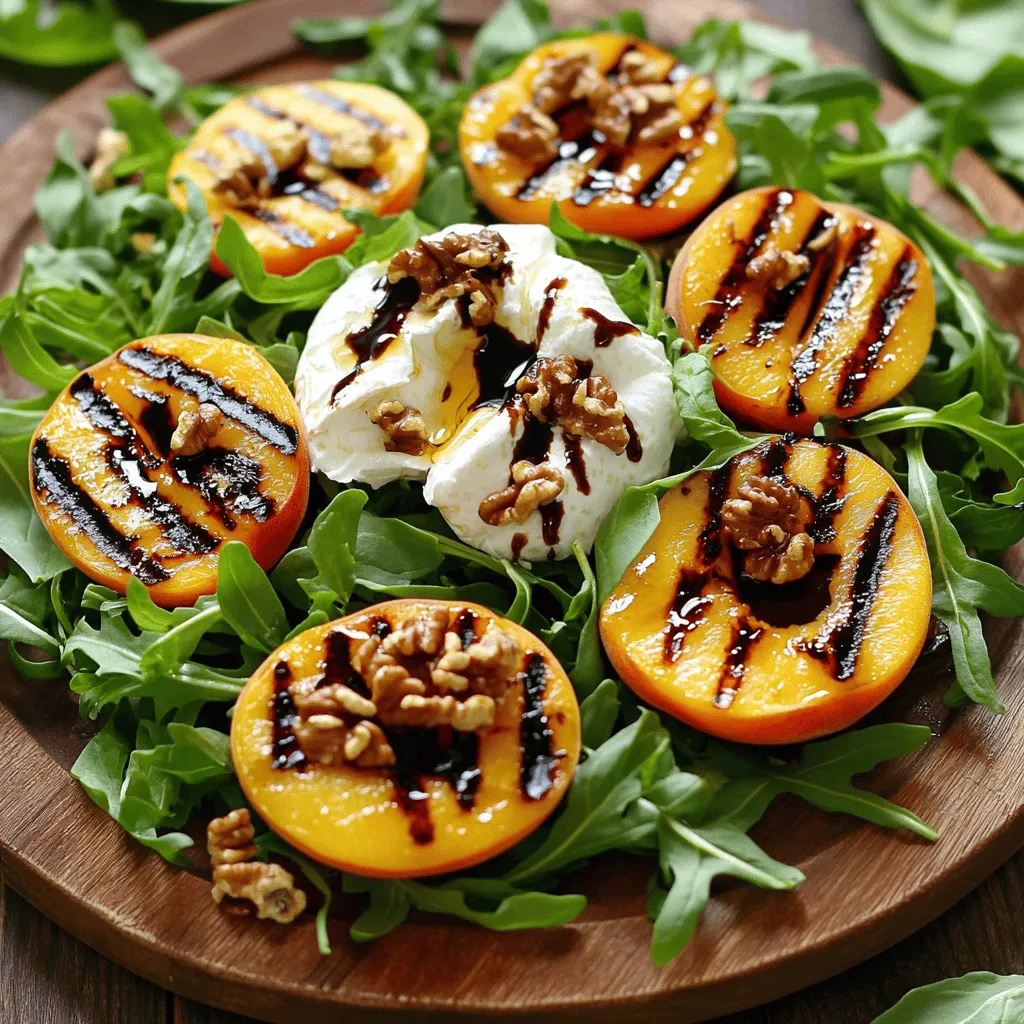
Assembling the Salad
In a large bowl, add 4 cups of fresh arugula. Drizzle with extra virgin olive oil and toss gently. This coats the leaves nicely. Next, arrange the grilled peaches on top of the arugula. Tear the burrata cheese into pieces and place it in the center. Drizzle 1/4 cup of balsamic glaze over everything. Finally, sprinkle the toasted walnuts and fresh basil leaves on top. Adjust the seasoning with more salt and pepper if needed. This dish is ready to impress!
Tips & Tricks
Choosing the Perfect Peaches
For this salad, you want ripe peaches. Look for peaches that feel slightly soft when you press them gently. They should smell sweet and fragrant. Choose yellow or white peaches, as both work well. Avoid peaches with bruises or dark spots. If you can, buy them from a local farmer’s market. This ensures freshness and great flavor.
Best Practices for Grilling
When grilling peaches, preheat your grill to medium-high heat. This gives you a nice char and caramelizes the sugars in the fruit. Brush the cut sides of the peaches with olive oil. This prevents sticking and adds flavor. Place peaches cut side down on the grill, and don’t move them for a few minutes. Perfect grill marks need time to form. Flip them gently and grill for a few more minutes until soft.
Enhancing Flavors with Seasoning
Seasoning is key to enhancing your salad. Use sea salt and freshly ground black pepper to bring out the peach’s natural sweetness. A drizzle of balsamic glaze adds a sweet and tangy finish that pairs beautifully with the creamy burrata. Don’t forget fresh basil leaves for an aromatic boost. They add a lovely green touch and fresh flavor. For a crunch, add walnuts or other nuts of your choice. They bring texture and richness.

Variations
Alternative Cheese Options
If you want to change the cheese in this salad, use fresh mozzarella. It has a similar texture and flavor. Goat cheese is another great option. It adds a tangy twist that pairs well with peaches. Feta cheese can also work well. It brings a salty bite that contrasts with the sweet peaches.
Adding Protein for a Heartier Meal
To make this salad more filling, add grilled chicken or shrimp. Both proteins blend well with the sweet peaches and creamy cheese. You can also use chickpeas for a vegetarian option. They add protein and a nice texture. Simply toss them into the salad for a boost.
Seasonal Variations for Ingredients
Each season brings its own fruits and greens. In summer, try adding strawberries or blueberries. In fall, swap peaches for apples or pears. You can also change the greens. Use spinach or mixed baby greens for different flavors. This way, you keep the salad fresh and exciting year-round.
Storage Info
Proper Storage Techniques
To keep your grilled peach burrata salad fresh, store it in an airtight container. Use a glass or plastic container with a tight lid. If you have leftover grilled peaches, keep them separate from the salad. This way, they stay juicy. Place the burrata in a small container with a bit of olive oil to keep it creamy.
Shelf Life of Leftovers
The salad is best eaten fresh. However, if stored properly, it can last in the fridge for up to three days. Grilled peaches can last about four days. If you notice any strange smells or colors, it is best to throw them away. Always trust your senses!
Reheating and Serving Suggestions
I recommend serving the salad cold. If you want to warm the grilled peaches, place them in the microwave for a few seconds. Be careful not to overheat them. You can also serve the salad with extra balsamic glaze for added flavor. Enjoy the fresh taste of summer any day with this delightful dish!
FAQs
How to make Grilled Peach Burrata Salad in advance?
You can prep some parts of this salad ahead of time. Grill the peaches and store them in the fridge for up to two days. Make sure to keep them in an airtight container. You can also wash and dry the arugula and store it in a separate container. When you are ready, just assemble the salad. Add the burrata, grilled peaches, and drizzle with balsamic glaze just before serving. This keeps everything fresh and tasty.
Can I use frozen peaches for this recipe?
I recommend using fresh peaches for the best flavor. Frozen peaches may lose some texture when grilled. If you have to use frozen peaches, thaw them first and pat them dry. You can grill them, but be aware they might not have the same sweetness or texture as fresh peaches.
What to serve with Grilled Peach Burrata Salad?
This salad pairs well with many dishes. Here are some great options:
– Grilled chicken for added protein
– A light fish like salmon or tilapia
– Crusty bread or baguette
– A glass of chilled white wine
These sides complement the flavors in the salad and make for a well-rounded meal.
Grilled Peach Burrata Salad brings bright, fresh flavors to your table. You need ripe peaches, creamy burrata, and simple dressings. Remember, fresh ingredients make a big difference in flavor.
Follow the prep and grilling tips to enhance this dish. Try adding different cheeses or proteins to mix things up. Store leftovers properly for later enjoyment.
This salad is perfect for summer meals and gatherings. Use these tips to make it even better. Enjoy your delicious creation!


![- 2 large cucumbers, diced into bite-sized cubes - 3 medium tomatoes, diced into equal-sized pieces - 1 red bell pepper, diced Fresh vegetables are the heart of a Greek salad. Cucumbers add crunch and hydration. Tomatoes provide sweetness and color. Red bell peppers add a nice crunch and a touch of sweetness. Together, they make a refreshing mix. - 1 cup Kalamata olives, pitted and halved - 1 red onion, thinly sliced into rings - 1/3 cup feta cheese, crumbled (omit for a vegan version) Next, we have Kalamata olives. They bring a salty, rich flavor to the salad. Red onion adds a sharp bite that balances the sweetness of the other veggies. Feta cheese adds creaminess and a tangy taste. If you prefer a vegan salad, simply leave out the feta. - 1/4 cup extra virgin olive oil - 2 tablespoons red wine vinegar (use apple cider vinegar for a unique flavor twist) - 1 teaspoon dried oregano, preferably Mediterranean The dressing ties everything together. Extra virgin olive oil makes it rich and smooth. Red wine vinegar adds a nice tang. Dried oregano brings a hint of earthiness. This simple dressing enhances the fresh flavors without overpowering them. You can find the full recipe online for detailed steps. Start by washing all your fresh vegetables. Clean them well to remove any dirt. Next, dice the cucumbers and tomatoes into small, even pieces. This helps make each bite enjoyable. Add these diced vegetables to a large mixing bowl. Then, chop the red bell pepper and halve the Kalamata olives. Thinly slice the red onion into rings. Mix all these vibrant ingredients together in the bowl. This colorful blend makes your salad look great! In a small bowl, mix the extra virgin olive oil and red wine vinegar. Whisk them together until they blend well. Add in the dried oregano for that nice Mediterranean flavor. Season your dressing with salt and freshly ground black pepper. This adds taste and balance to the salad. Taste your dressing and adjust the salt if needed. Now, pour the prepared dressing over the bowl of vegetables. Gently toss everything together with a large spoon or salad tongs. Make sure all the vegetables are covered in the dressing. If you want feta cheese, sprinkle the crumbled cheese on top. Toss it lightly again to mix the feta in with the salad. Finally, garnish with chopped fresh parsley for a pop of color. Enjoy your healthy Greek salad! For the complete recipe, see [Full Recipe]. To make your Greek salad shine, start with high-quality olive oil. This oil adds rich taste and depth. Look for extra virgin, as it has the best flavor. A simple drizzle makes a big difference. Next, add a squeeze of fresh lemon juice. This brightens the salad and adds zing. The citrus lifts the flavors and makes each bite refreshing. Use it right before serving for the best taste. When it comes to serving, think about your style. You can serve in a large bowl for a family meal. This lets everyone help themselves. Or, you can serve in individual bowls for a fancy touch. This makes each portion feel special. Garnishes also help with presentation. Fresh herbs like parsley add color. A slice of lemon on the side gives a nice look. These small touches make your salad more inviting. Want to boost the health factor? Add more vegetables. You can include radishes, carrots, or even spinach. Each veggie adds unique nutrients and flavors. More colors mean more vitamins! If you're watching your fat intake, think about cheese options. Use low-fat feta or skip the cheese entirely for a vegan choice. You still get a tasty salad without the extra calories. This way, you can enjoy a healthy Greek salad without worry. For the full recipe, check out the Mediterranean Bliss Greek Salad. {{image_4}} You can easily change the Greek salad to fit your diet. For a vegan version, swap feta cheese with tofu or avocado. Tofu adds protein and a nice texture. Avocado gives a creamy flavor without dairy. Both are great choices. This salad is also gluten-free. All the ingredients are naturally gluten-free. You can enjoy it without worry if you have gluten sensitivities. To add more flavor, think about adding protein. Chickpeas are a great option. They are filling and nutritious. Grilled chicken is another tasty choice if you prefer meat. It adds a smoky taste that pairs well with the salad. You can also introduce different herbs and spices. Fresh dill or mint can brighten the dish. A pinch of red pepper flakes can add a nice kick. Each tweak gives the salad a unique twist. Feel free to switch up the vegetables too. Grape tomatoes are sweeter and add a pop of color. You can also try different colored bell peppers for a vibrant look. Another fun swap is with olives. While Kalamata olives are classic, green olives can give a tangy taste. Each type of olive brings its own flavor, making your salad exciting. For the full recipe, check out the Mediterranean Bliss Greek Salad. To keep your Healthy Greek Salad fresh in the fridge, follow these tips: - Use an airtight container to seal in moisture and flavors. - Place a paper towel inside the container to absorb extra moisture. - Store the salad in the fridge for up to three days. For long-term storage, keep the salad ingredients separate. Here’s how: - Store the vegetables in their own container. This keeps them crisp. - Keep dressing in a small jar or bottle. You can freeze extra dressing for later use. To tell if your salad is no longer fresh, watch for these signs: - Look for wilted greens or soggy vegetables. - Check for an off smell or sour taste. - Discard any ingredients showing mold or discoloration. Proper disposal methods include throwing spoiled food in the trash or composting if safe. Enjoy the Healthy Greek Salad fresh, and savor every bite! For the full recipe, check out the Mediterranean Bliss Greek Salad. Greek salad is full of fresh veggies. These ingredients give many health benefits. Cucumbers keep you hydrated with their high water content. Tomatoes are rich in vitamins A and C, which are good for your skin. Red bell peppers provide antioxidants that help fight disease. Kalamata olives offer healthy fats, which are good for your heart. Feta cheese adds calcium for strong bones, but you can skip it if you prefer vegan options. The dressing made with olive oil is also good for heart health. Eating this salad can help you feel full and satisfied without many calories. Yes, you can prep your Greek salad ahead of time. To keep it fresh, chop the veggies but store them separately from the dressing. This way, they stay crisp and colorful. You can mix the dressing in another bowl. When you are ready to eat, combine everything. This keeps the salad tasting fresh and not soggy. If you want to add feta, do this right before serving, so it stays creamy. Absolutely! This salad is perfect for meal prep. You can easily make a big batch and store it in your fridge. Use airtight containers to keep it fresh. The veggies will stay good for about three days. If you want to eat it later, avoid adding the dressing until just before serving. This keeps the flavors bright and the textures right. Greek salad pairs well with many dishes. You can serve it with grilled chicken for added protein. It also goes great with pita bread or hummus for a light meal. If you are looking for a heartier option, try it with grilled fish. Adding some quinoa or brown rice on the side is also a nice touch. This makes for a balanced meal that is both tasty and healthy. You can find the Full Recipe for a Mediterranean Bliss Greek Salad to try today! In this article, we explored how to make a fresh and healthy Greek salad. I covered the ingredients and steps, plus tips for flavor and presentation. You learned about variations and storage to keep your salad fresh. Remember, this dish is not just tasty but also packed with nutrients. Whether you enjoy it as a side or main dish, its flavors and colors will impress everyone. By adding your twist, you can make it your own. Happy salad making!](https://joymealplan.com/wp-content/uploads/2025/06/c94f07f9-b700-4cfc-a1be-56f301f39c39-768x768.webp)

![To make Pickle Ranch Snack Crackers, you need the following ingredients: - 1 cup all-purpose flour - 1/2 cup cornmeal - 1 teaspoon baking powder - 1/2 teaspoon baking soda - 1/2 teaspoon salt - 1 tablespoon ranch seasoning mix - 1/4 cup dill pickle juice - 1/4 cup melted butter (cooled slightly) - 1/2 cup shredded cheddar cheese - 1/4 cup dill pickle slices (finely chopped) You can swap some ingredients if needed. For the all-purpose flour, try using whole wheat flour for added fiber. If you prefer a gluten-free option, use a gluten-free flour blend. Instead of cornmeal, you can use fine breadcrumbs for a different texture. If you want to skip the ranch seasoning, use herbs like dill, garlic powder, or onion powder to create your own flavor. Each serving, which is about two crackers, provides: - Calories: 120 - Total Fat: 8g - Saturated Fat: 4g - Cholesterol: 20mg - Sodium: 150mg - Carbohydrates: 10g - Fiber: 1g - Sugar: 1g - Protein: 3g These crackers are tasty and balanced, making them a fun snack for any occasion. You can enjoy them without guilt! 1. Preheat your oven to 350°F (175°C). This is key for baking. 2. Line a baking sheet with parchment paper. This helps with easy cleanup. 3. In a large bowl, mix the flour, cornmeal, baking powder, baking soda, salt, and ranch seasoning. Use a whisk to mix well. 4. Slowly add the dill pickle juice and melted butter. Stir until a dough forms. 5. Fold in the cheddar cheese and chopped dill pickles. Make sure they spread evenly in the dough. 6. Roll the dough into small balls, about the size of a quarter. Place them on the sheet, leaving space between them. 1. Flatten each ball gently with a fork or your fingers. Aim for even thickness. 2. Bake the crackers for 12-15 minutes. Watch closely for a light golden brown color. 1. Once baked, let the crackers cool on the sheet for a few minutes. 2. Transfer them to a wire rack to cool completely. This makes them crispier. 3. For a fun serving idea, arrange them on a colorful platter. Add fresh dill sprigs or serve with ranch dip for a tasty snack. Enjoy your Pickle Ranch Snack Crackers! You can find the full recipe above for more details. To get the right texture for your Pickle Ranch Snack Crackers, focus on mixing. Combine the dry ingredients well to avoid lumps. When adding the wet ingredients, mix just until combined. Overmixing can make your crackers tough. Roll the dough into small balls. Keep them uniform in size to ensure even baking. Flatten them gently for a crispier edge. To boost flavor, consider adding more ranch seasoning. You could also try garlic powder or onion powder. A pinch of cayenne can add a nice kick if you like spice. Adding herbs like dill or parsley can enhance the pickle flavor. For extra richness, sprinkle some grated Parmesan cheese on top before baking. One common mistake is using hot melted butter. It can change the dough's texture. Be careful not to skip the cooling step after baking. Allowing them to cool helps the crackers firm up. Also, don’t crowd the baking sheet. If they are too close, they may stick together. Check them often while baking to avoid burning. For a full recipe, refer to the complete instructions. {{image_4}} You can add fun twists to Pickle Ranch Snack Crackers. Want some heat? Try adding cayenne pepper or crushed red pepper flakes. Just a pinch will do! For a cheesy version, swap in pepper jack cheese instead of cheddar. Mixing in some garlic powder can also boost flavor. These tweaks keep your snack game exciting! If you need a gluten-free option, use gluten-free all-purpose flour. It works well in this recipe. You can also try almond flour for a nutty taste. Make sure your ranch seasoning is gluten-free too. This way, everyone can enjoy these tasty crackers without worry. These crackers shine when paired with dips. Creamy ranch dip is a favorite, but you can also serve them with hummus or guacamole. For a fun party snack, arrange them on a platter with fresh veggies. They also taste great with cheese slices or charcuterie. Each bite will surprise your guests! Explore the [Full Recipe] to start making your own delicious Pickle Ranch Snack Crackers today! Store your Pickle Ranch Snack Crackers in an airtight container. This keeps them fresh and crisp. You can use a glass jar or a plastic container. Make sure they are completely cool before sealing. If you live in a humid area, consider adding a small bag of rice to absorb moisture. When stored properly, these crackers can last up to one week. They taste best in the first few days. After that, they may lose some crunch. If you want to keep them longer, you can freeze them. Just place them in a freezer-safe bag or container. If your crackers lose their crunch, you can reheat them. Preheat your oven to 300°F (150°C). Spread the crackers on a baking sheet in a single layer. Heat them for about 5-7 minutes. Check often to avoid burning. Let them cool before enjoying again. For the full recipe, refer to the earlier section. Pickle Ranch Snack Crackers are tasty, crunchy treats. They mix the flavors of dill pickles and ranch dressing. These snacks are perfect for parties or game nights. They are easy to make at home with simple ingredients. To make Pickle Ranch Snack Crackers at home, follow these steps: 1. Preheat your oven to 350°F (175°C). 2. Line a baking sheet with parchment paper. 3. Mix flour, cornmeal, baking powder, baking soda, salt, and ranch seasoning in a bowl. 4. Add dill pickle juice and cooled melted butter. Stir to form a dough. 5. Fold in cheddar cheese and chopped pickles. 6. Roll the dough into small balls. Flatten each ball on the baking sheet. 7. Bake for 12-15 minutes until golden. 8. Let them cool on a wire rack. For the full recipe, check the details provided above. Pickle Ranch Snack Crackers can be a fun snack. They contain some healthy ingredients like cheese and pickles. However, they also have butter and flour, which add calories. Enjoy them in moderation as part of a balanced diet. You can find Pickle Ranch Snack Crackers at many grocery stores. Look in the snack aisle or near the crackers. Some stores may also sell them online. Check popular websites for easy shopping options. These crackers pair well with many dips and spreads. Serve them with ranch dressing, creamy dip, or hummus. You can also enjoy them with cheese or fresh veggies. They make a great snack for any gathering. This blog post covers everything about Pickle Ranch Snack Crackers. We discussed the key ingredients, including substitutions, and shared helpful nutritional data. You learned precise steps for preparation and baking, along with cooling tips for best results. I shared easy tricks to get the perfect texture and flavor. You now know various tasty variations to try and how to store them properly. Finally, you have answers to common questions about these delicious snacks. Enjoy making and sharing your own Pickle Ranch Snack Crackers!](https://joymealplan.com/wp-content/uploads/2025/07/696f27ca-dd07-4295-82fd-de9c637e8141-768x768.webp)

