Grilled Vegetable Skewers Flavorful and Fun Recipe

Looking for a fun and tasty way to enjoy veggies? Grilled vegetable skewers are the perfect answer! They’re colorful, full of flavor, and great for gatherings. I’ll show you how to make and grill these skewers step-by-step. Whether you want to keep them simple or add proteins and spices, this recipe works for everyone. Let’s fire up the grill and dive into this delicious adventure!
Ingredients
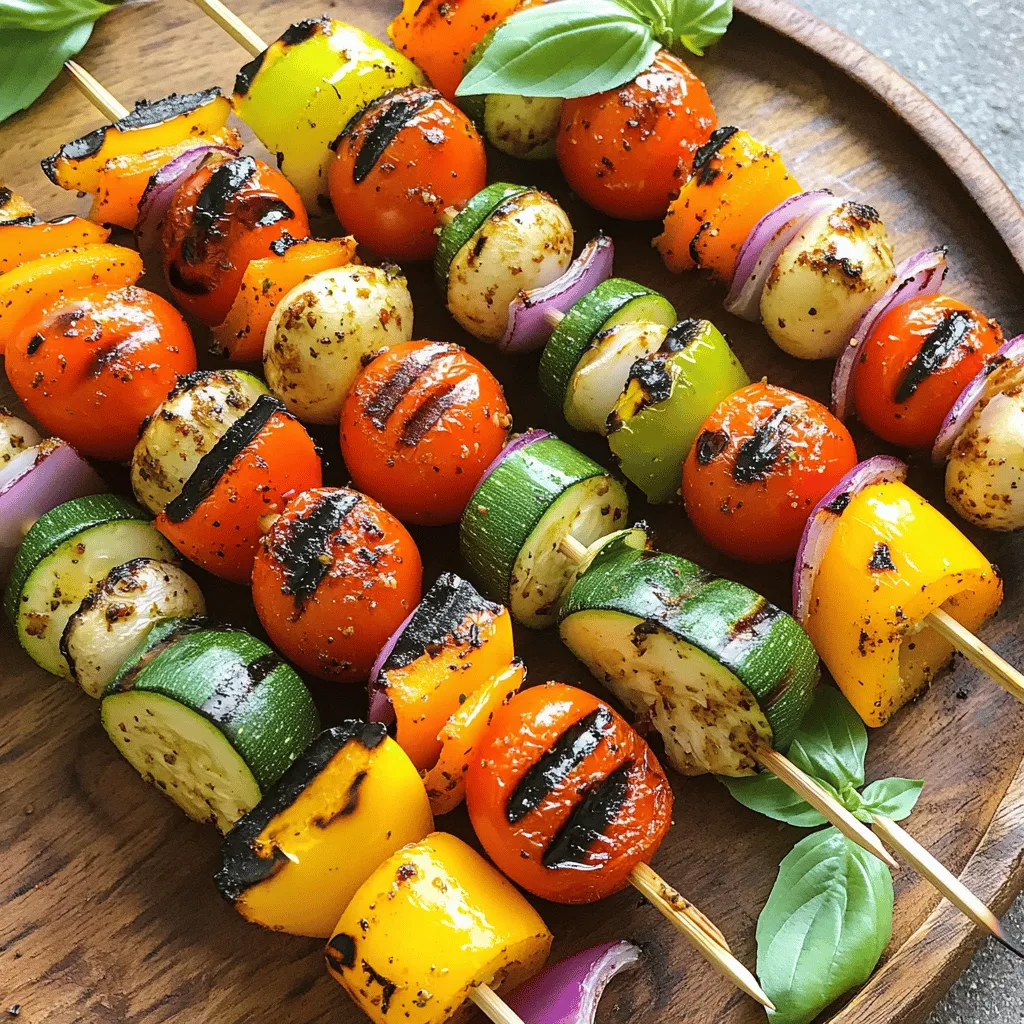
List of Required Vegetables
For tasty grilled vegetable skewers, you will need:
– 1 bell pepper (red, yellow, or green), cut into 1-inch chunks
– 1 medium zucchini, sliced into thick rounds (about ½ inch)
– 1 large red onion, cut into wedges (quarters)
– 8 cherry tomatoes, whole
– 8 button mushrooms, cleaned and stems removed
These vegetables bring color and flavor to your skewers. Each one adds its unique taste, making your dish exciting.
Seasonings and Oils Needed
To enhance the flavors of your skewers, gather these seasonings and oil:
– 2 tablespoons extra virgin olive oil
– 1 teaspoon garlic powder
– 1 teaspoon dried oregano
– 1 teaspoon smoked paprika
– Sea salt and freshly ground black pepper, to taste
These ingredients will give your vegetables a lovely, savory taste. The olive oil helps to keep them moist while grilling.
Optional Garnishes
To make your skewers pop, consider these optional garnishes:
– Fresh basil leaves
Basil adds a fresh touch and brightens up your dish. Just sprinkle it on top before serving for an extra burst of flavor.
Step-by-Step Instructions
Prepping the Grill
To start, you need a hot grill. Preheat your grill to medium-high heat, around 400°F (200°C). If you use wooden skewers, soak them in water for at least 30 minutes. This helps stop them from burning while cooking.
Preparing the Vegetables
Next, it’s time to prepare your vegetables. Take a large mixing bowl and add your chopped bell pepper, zucchini slices, onion wedges, whole cherry tomatoes, and mushrooms. Drizzle with two tablespoons of extra virgin olive oil. Then, add the garlic powder, dried oregano, smoked paprika, sea salt, and black pepper. Mix gently until all the vegetables are coated well. The oil and spices will give them great flavor.
Assembling the Skewers
Now comes the fun part: assembling your skewers! Carefully thread your marinated vegetables onto the skewers. Alternate the colors and shapes for a pretty look. Aim for a good mix of veggies on each skewer. This not only looks nice but also ensures a variety of flavors in each bite.
Grilling Technique and Timing
Place your assembled skewers on the hot grill. Grill them for about 10 to 12 minutes. Turn them every few minutes. This helps them cook evenly and gives them a nice char. You’ll know they’re ready when they’re tender and have some grill marks. After grilling, let them cool for a couple of minutes. For a fresh finish, add basil leaves before serving. Enjoy your tasty and colorful skewers!
Tips & Tricks
Avoiding Sticking and Burning
To keep your skewers from sticking, oil the grill grates. Use a paper towel dipped in oil, and rub it on the grates. Soaking wooden skewers helps, too. If you don’t soak them, they can burn. Use metal skewers for easy grilling since they don’t catch fire.
Best Vegetables for Skewers
Choose colorful vegetables for great taste and looks. Some of my favorites are:
– Bell peppers (red, yellow, or green)
– Zucchini
– Red onion
– Cherry tomatoes
– Button mushrooms
These veggies cook well and add nice flavors. Feel free to mix in others like asparagus or eggplant. Each adds its own unique twist.
Achieving Optimal Grill Marks
Good grill marks show your skill and add flavor. To get these, preheat your grill well. Once hot, place the skewers on it. Don’t move them too much. Let them cook for a few minutes before turning. This gives you those nice marks. Aim for a char without burning.

Variations
Adding Proteins to Your Skewers
You can boost your skewers by adding proteins. Chicken, shrimp, or tofu work great. For chicken, cut it into 1-inch pieces. Shrimp should be peeled and deveined. Tofu can be cut into cubes. Marinate your proteins the same way as your veggies. This adds flavor and makes your dish heartier.
Vegetarian vs Vegan Options
Vegetarians can enjoy cheese on skewers. Cube some halloumi or feta for a tasty twist. Vegans can skip cheese or use plant-based options. Check your seasonings too; some contain animal products. Always read labels to ensure your meal fits your diet.
Global Flavor Profiles
Explore flavors from around the world! Try a Mediterranean twist with lemon juice and fresh herbs. For an Asian flair, use soy sauce, ginger, and sesame oil. You can also create a spicy kick with chili powder or sriracha. Mixing these flavors adds excitement to your skewers. The possibilities are endless!
Storage Info
Storing Leftover Skewers
You can store leftover skewers in the fridge. Place them in an airtight container. They will stay fresh for about three days. Make sure to let them cool first. This keeps them from steaming and getting soggy.
Reheating Instructions
To reheat your skewers, use a grill or an oven. If you use a grill, preheat it to medium heat. Grill the skewers for about 5 minutes. Turn them to heat evenly. If you prefer the oven, set it to 350°F (175°C). Place the skewers on a baking sheet and heat for 10 minutes. They should be warm and tasty again!
Freezing Tips for Skewers
You can freeze skewers for later meals. Wrap each skewer in plastic wrap. Then, place them in a freezer bag. They will keep well for up to two months. When you’re ready to eat, let them thaw in the fridge overnight. After thawing, reheat them as mentioned above. Enjoy your grilled vegetable skewers anytime!
FAQs
How long do I grill vegetable skewers?
Grill vegetable skewers for about 10 to 12 minutes. Turn them every few minutes. This helps them cook evenly. The goal is to get them tender and slightly charred.
Can I use frozen vegetables for skewers?
You can use frozen vegetables, but they may not grill as well. Frozen veggies often release water when cooking. This can make them soggy. Fresh vegetables usually give better flavor and texture.
What other seasonings can I use?
Feel free to mix up the seasonings! You can try:
– Italian seasoning
– Chili powder
– Cumin
– Lemon zest
– Fresh herbs
These add fun flavors and can change the whole dish.
How do I know when the vegetables are done?
Check for tenderness and slight charring. You can pierce them with a fork. If the fork goes in easily, they are done. The colors should also look bright and vibrant.
We covered everything you need to know about making delicious vegetable skewers. You learned the key ingredients, the grilling steps, and helpful tips to get the best results. We also explored ways to add proteins and different flavors for fun variations. Finally, we shared storage tips to keep your skewers fresh. Remember, grilling is an art, and with practice, you’ll create amazing meals. Enjoy tasty skewers with family and friends, and make every grilling session fun and easy.


![- Tortilla chips - Black beans - Corn kernels - Cherry tomatoes - Avocado - Cheddar cheese (or dairy-free alternative) - Pickled jalapeños - Red onion - Fresh cilantro - Olive oil - Ground cumin - Smoked paprika - Salt and pepper - Optional toppings: Sour cream or Greek yogurt, lime wedges To make loaded veggie nachos, gather fresh and flavorful ingredients. I love using crispy tortilla chips as the base. They hold all the toppings without getting soggy. Black beans add protein and texture. Rinsing and draining them keeps the flavors bright. Corn kernels bring sweetness and crunch. I often use fresh corn when it’s in season, but canned works well too. Next, halved cherry tomatoes burst with flavor. Diced avocado brings creaminess. I prefer ripe avocados for the best taste. Cheddar cheese is a must for gooey goodness. You can use a dairy-free version if needed. Pickled jalapeños give a nice kick, so add as many as you like. Red onion adds a sharp taste and crunch. Fresh cilantro brings brightness. I love the fresh herb flavor it adds. For the dressing, use olive oil, ground cumin, and smoked paprika. They bring warmth and depth. Lastly, don’t forget salt and pepper to enhance all the flavors. You can serve these nachos with optional toppings like sour cream or Greek yogurt. Lime wedges add a zesty finish. For the full recipe, check out the Ultimate Loaded Veggie Nachos. Start by preheating your oven to 350°F (175°C). This temperature helps the cheese melt just right. While the oven warms up, grab a mixing bowl for the veggies. Combine 1 cup of black beans, 1 cup of corn, 1 cup of halved cherry tomatoes, 1 ripe diced avocado, and 1/4 cup of chopped red onion. Drizzle 1 tablespoon of olive oil over this mix. Sprinkle in 1 teaspoon of ground cumin, 1 teaspoon of smoked paprika, and add salt and pepper to taste. Gently toss to blend the flavors. Now take a large baking sheet. Spread an even layer of tortilla chips across it. Make sure they are not crowded. This helps the chips stay crisp. Next, generously spoon the veggie mixture over the chips. Try to cover as many chips as you can. This way, each bite is packed with flavor. Sprinkle 1 cup of shredded cheddar cheese evenly over the veggie-covered chips. If you like spice, add pickled jalapeños on top. Place the baking sheet in your preheated oven. Bake for about 10 to 15 minutes. Watch closely until the cheese is melted and bubbly, but not burnt. Once baked, carefully take the nachos out of the oven. Garnish with 1/4 cup of freshly chopped cilantro. Serve them with lime wedges on the side. For a creamy touch, add sour cream or Greek yogurt. These extra touches make every bite a treat. Serve them on a large platter or in bowls. Enjoy this savory delight with friends or family! For the full recipe, check the detailed instructions above. Choose the right cheese for your nachos. I love using cheddar, but you can try Monterey Jack or a dairy-free alternative. These cheeses melt well and add rich flavor. For the best texture, shred your cheese fresh from the block. Pre-shredded cheese often has anti-clumping agents that can affect melting. When baking, keep an eye on the nachos. You want the cheese to bubble and slightly brown, which usually takes 10 to 15 minutes at 350°F. To kick up the flavor, think about adding spices. A pinch of chili powder or a dash of hot sauce can do wonders. If you enjoy tang, drizzle some lime juice over the nachos before serving. Fresh herbs like cilantro or green onions can also brighten the dish. Chopped jalapeños, fresh or pickled, add heat and flavor. Experiment with different combinations to find your favorite mix. I often serve nachos on a large platter, letting everyone dig in. For individual servings, use small bowls. This makes for a fun, personal touch. Pair your nachos with drinks like soda, beer, or a margarita for a complete experience. Dips like guacamole or salsa work great on the side too. They add extra flavor and keep the meal exciting. Remember to keep lime wedges handy for a fresh burst of flavor. For the complete recipe, check out the [Full Recipe]. {{image_4}} You can easily make loaded veggie nachos vegan. First, swap the cheddar cheese for a dairy-free cheese. Look for brands made from nuts or soy. These options melt well and taste great. For extra vegan toppings, try using cashew cream instead of sour cream. You can also add sliced black olives, diced bell peppers, or fresh spinach. These ingredients boost flavor and nutrients. To make gluten-free nachos, choose tortilla chips marked gluten-free. Many brands offer this option. Always check the label to ensure safety. You can also use other bases like baked sweet potatoes or zucchini slices. These alternatives add a unique twist and keep things healthy. Get creative with your toppings! You can add other veggies like mushrooms, bell peppers, or even roasted zucchini. For proteins, consider topping with lentils, chickpeas, or tofu. Specialty toppings can add unique flavors. Try fresh herbs like basil or mint, or drizzle with hot sauce for a kick. You can also scatter some pomegranate seeds for a sweet touch. After enjoying your loaded veggie nachos, store any leftovers properly. This helps maintain their taste and texture. Start by letting the nachos cool down. Place them in an airtight container. If you have extra toppings, like sour cream or avocado, store those separately. Use a small bowl or a bag to keep them fresh. Refrigerate the container within two hours. The nachos will stay good for about three days. To reheat your nachos, use the oven for best results. Preheat it to 350°F (175°C). Spread the nachos on a baking sheet in a single layer. Heat them for about 10 minutes. This helps revive their crunch. If you’re in a hurry, the microwave works too. Use a microwave-safe plate and heat for 30 seconds at a time. Keep an eye on them to avoid sogginess. Enjoy your nachos as if they were just made! Making homemade tortilla chips is easy and fun! Start with corn tortillas. Cut each tortilla into six triangles. Heat oil in a pan over medium heat. When the oil is hot, add a few triangles. Fry them until they turn golden brown. Remove them and place them on paper towels to drain excess oil. Sprinkle with salt while they are hot. Enjoy your fresh chips with loaded veggie nachos! Yes, you can prepare some parts in advance. You can chop the veggies and mix them a few hours before cooking. Store the veggie mixture in the fridge. However, I recommend adding the chips and cheese just before baking. This keeps the chips crispy and delicious! You can get creative with toppings! Try adding: - Sliced black olives - Diced bell peppers - Sliced radishes - Fresh spinach - Grilled chicken or beef - Different types of cheese like pepper jack or feta These options add fun flavors and textures to your nachos. Freezing nachos is tricky. I do not recommend freezing fully assembled nachos. The chips become soggy when thawed. However, you can freeze the veggie mixture and cheese separately. When you’re ready to eat, simply bake fresh chips and top them with the thawed mixture. It’s a great way to enjoy nachos anytime! For the full recipe, check out the Ultimate Loaded Veggie Nachos. In this blog post, I covered how to make delicious nachos, highlighting key ingredients and simple steps. You learned about assembling layers and baking for the best results. I shared tips for perfect cheese melting, flavor boosts, and customizable options to fit your needs. Don't forget storage advice and reheating methods to enjoy leftovers. Nachos are easy to make and adapt, so get creative and enjoy! Your nacho journey starts here, and I hope you relish every bite.](https://joymealplan.com/wp-content/uploads/2025/06/0185d0b5-b46a-4930-af15-477191a5be30-768x768.webp)

![- 2 lbs chicken wings - 1/4 cup honey - 1/4 cup soy sauce - 4 cloves garlic, finely minced - 2 tablespoons sriracha - 1 teaspoon fresh ginger, grated - 1 tablespoon rice vinegar - 1 teaspoon sesame oil - Salt and freshly ground black pepper to taste These ingredients create the perfect balance of sweet and spicy. The honey gives a nice glaze. The soy sauce adds depth. Garlic and ginger give a punch of flavor. Sriracha brings the heat. You can adjust the sriracha to your spice liking. - Lime juice for a tangy kick - Fresh herbs like cilantro or parsley - Hot sauce for extra spice - Other spices like paprika or cayenne Adding lime juice can brighten the wings. Fresh herbs add a burst of color and flavor. Hot sauce can amplify the heat if you like it fiery. Mixing in other spices can deepen the taste profile. - Large mixing bowl for marinating - Whisk for mixing ingredients - Baking sheet lined with aluminum foil - Wire rack to elevate the wings - Basting brush for the glaze Using a whisk helps blend the marinade smoothly. The wire rack ensures even cooking and crispness. A basting brush is perfect for applying that last layer of flavor. Each tool makes the process easier and more enjoyable. For the full details on how to make these wings, check out the [Full Recipe]. To start, gather your ingredients. In a big bowl, mix the honey, soy sauce, minced garlic, sriracha, ginger, rice vinegar, and sesame oil. Add a pinch of salt and black pepper. Use a whisk to blend until smooth. This marinade gives your wings a sweet, spicy flavor. Next, add the chicken wings to the marinade. Make sure each wing gets coated well. Cover the bowl with plastic wrap or a lid. Place it in the fridge for at least one hour. For a better taste, marinate overnight. This step helps the wings soak up all those tasty flavors. Now, preheat your oven to 400°F (200°C). Line a baking sheet with aluminum foil for easy cleanup. Put a wire rack on top. This helps the wings cook evenly. After marinating, take out the wings and let excess marinade drip off. Place them in a single layer on the rack. Bake for about 40-45 minutes, flipping halfway through. This helps them brown evenly. In the last five minutes, brush on some reserved marinade to enhance the flavor. When done, let the wings rest for a few minutes. Garnish with sesame seeds and chopped green onions for a fresh look. Enjoy these Spicy Honey Garlic Wings! To get crispy wings, start by drying them well. Pat the chicken wings with paper towels. This step is key. Moisture leads to soggy skin. Next, use a wire rack when baking. This allows hot air to circulate around the wings. Bake them at 400°F (200°C). Flip the wings halfway through cooking. This helps them brown evenly. Spice and sweetness should work together. The honey adds sweetness. Sriracha brings the heat. Start with 2 tablespoons of sriracha. Taste the marinade before marinating the wings. If you want more heat, add more sriracha. This way, you control the spice level. Remember, balance is key to great flavor. One common mistake is overcrowding the baking tray. Wings need space to crisp up. If you place too many on one tray, they will steam instead of bake. Another mistake is skipping the marinating step. Marinating adds depth of flavor. Don't rush it! Lastly, avoid opening the oven too often. This lets heat escape and slows cooking. Follow these tips for the best wings ever! {{image_4}} You can make spicy honey garlic wings in two main ways: the oven or the air fryer. Both methods yield tasty wings, but they differ in texture and cooking time. - Oven: Baking wings in the oven gives them a crispy skin. It takes about 40-45 minutes at 400°F (200°C). You should flip them halfway for even cooking. - Air Fryer: This method cooks wings faster. In about 25-30 minutes, you can have crispy wings. The air fryer circulates hot air around the wings, making them crispy without much oil. Try both methods to see which you like best! You can adjust the heat of your wings easily. If you want them spicier, add more sriracha to the marinade. For a milder flavor, reduce the sriracha or use sweet chili sauce. Here are some ideas: - Mild: Cut sriracha to 1 tablespoon or use sweet chili sauce. - Medium: Stick with the original recipe, using 2 tablespoons of sriracha. - Spicy: Add chili flakes or use a hot sauce like habanero for a kick. Experiment with different heat levels to find what you love! You can swap some ingredients to fit different diets. Here are some easy swaps: - Gluten-Free: Use tamari instead of soy sauce. - Vegan: Replace chicken wings with cauliflower florets and use maple syrup instead of honey. - Low-Sodium: Look for low-sodium soy sauce or reduce the amount used. These substitutions keep the flavors while catering to your dietary needs. Enjoy your cooking! To store leftover wings, let them cool first. Place the wings in an airtight container. Seal it tightly to keep them fresh. Store the container in the fridge. They last for about three to four days. Make sure to label it with the date. For the best results when reheating, use an oven. Preheat your oven to 350°F (175°C). Place the wings on a baking sheet. Cover them with foil to keep moisture. Heat for about 10-15 minutes. This method keeps them crispy and juicy. You can also use a microwave, but they may not be as crispy. You can freeze wings if you want to save them for later. Place the cooled wings in a freezer-safe bag. Remove as much air as you can before sealing. These wings can stay frozen for up to three months. When you’re ready to eat, thaw them in the fridge overnight. Reheat as mentioned above for the best taste. To make the sauce spicier, add more sriracha. You can also mix in crushed red pepper flakes. A dash of cayenne pepper works well too. Start with a small amount, then taste and adjust. Remember, a little goes a long way! Yes, you can use other chicken cuts. Thighs, drumsticks, or even chicken breasts work well. Just keep in mind that cooking times may change. Thighs and drumsticks might need a bit longer. Always check for doneness with a meat thermometer. Spicy honey garlic wings go great with several sides. Here are some ideas: - Celery sticks - Carrot sticks - Blue cheese or ranch dressing - French fries - Coleslaw - Garlic bread These sides balance the heat and add a nice crunch. You can find the full recipe for spicy honey garlic wings in the earlier sections of this article. It includes all the ingredients and steps to make these tasty wings. Enjoy the cooking! You learned how to make spicy honey garlic wings using simple steps. We covered key ingredients, tools, and how to marinate and bake the wings. Tips helped you get crispy results, balance flavors, and avoid common mistakes. You also discovered cooking methods and storage tips for leftovers. Now, you can enjoy these tasty wings anytime. Experiment with flavors and cooking styles to suit your taste. Dive into this fun recipe, and share it with friends and family!](https://joymealplan.com/wp-content/uploads/2025/07/77ff3bfc-c319-4305-bcf9-ef7b204d8239-768x768.webp)