Ground Beef Philly Cheesesteak Skillet Flavor Boost

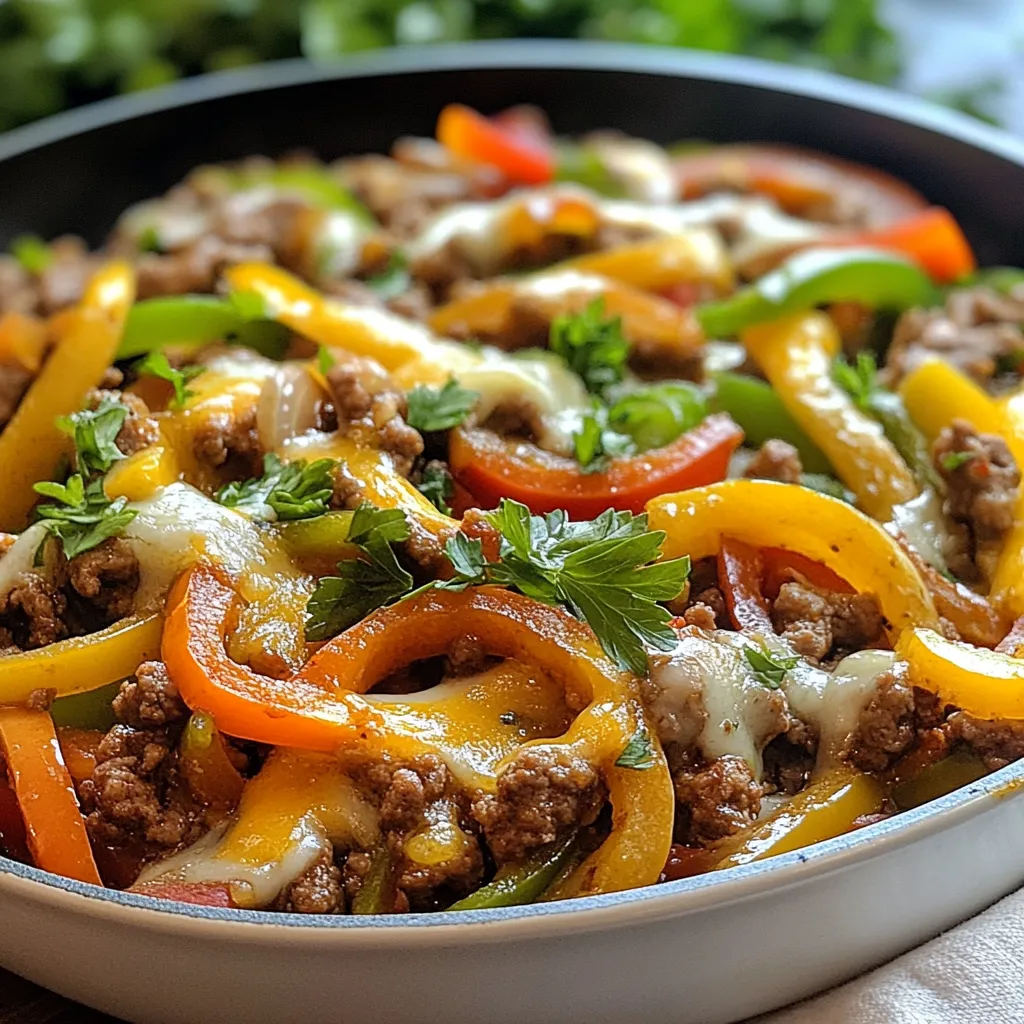
Are you craving a quick and tasty dinner? Let me show you how to make a Ground Beef Philly Cheesesteak Skillet that bursts with flavor. This skillet dish is simple, fun, and perfect for busy nights. With juicy beef, fresh veggies, and melty cheese, you’ll enjoy every bite. Join me as we dive into the ingredients, cooking steps, and helpful tips to elevate your meal. Let’s get cooking!
Why I Love This Recipe
- Quick and Easy: This recipe comes together in just 25 minutes, making it perfect for busy weeknights.
- Flavor Packed: The combination of ground beef, peppers, and melted provolone cheese creates a deliciously savory dish.
- Versatile Serving Options: Serve it straight from the skillet or in toasted hoagie rolls for a fun twist!
- Customizable Ingredients: Feel free to swap out the vegetables or cheese to suit your taste preferences!
Ingredients
Main Ingredients for Ground Beef Philly Cheesesteak Skillet
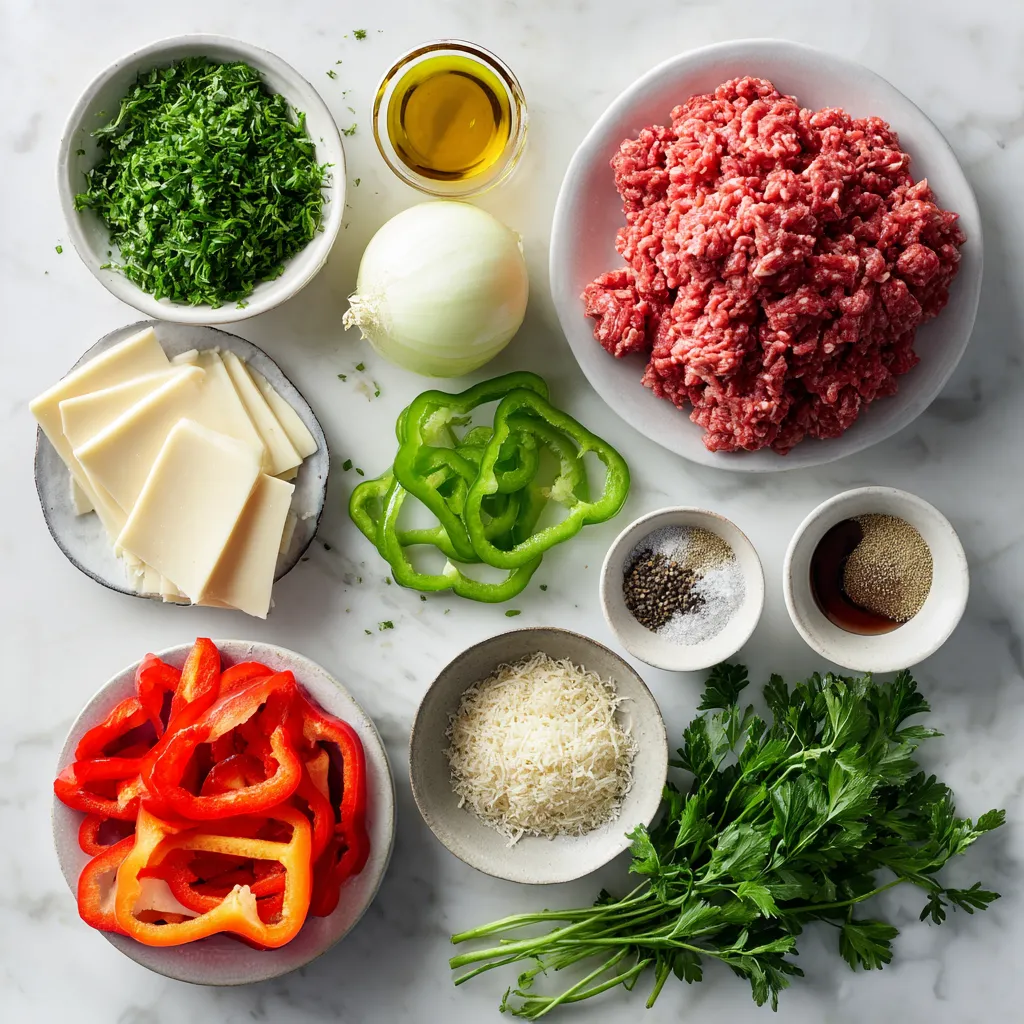
This dish uses simple, tasty ingredients. Here’s what you need:
– 1 lb ground beef
– 1 tablespoon olive oil
– 1 medium onion, thinly sliced
– 1 green bell pepper, thinly sliced
– 1 red bell pepper, thinly sliced
– 2 cloves garlic, minced
– 1 teaspoon Worcestershire sauce
– 1 teaspoon onion powder
– 1 teaspoon garlic powder
– Salt and pepper to taste
– 4 slices provolone cheese (or your favorite cheese)
– Fresh parsley, chopped (for garnish)
Each item adds flavor and texture. The ground beef gives protein and heartiness. The peppers and onion add crunch and sweetness. Garlic adds a punch of flavor that makes this dish shine.
Recommended Cheese Options
Cheese is key to a great cheesesteak. Provolone is classic and melts well. You could also use:
– Cheddar for a sharp taste
– Mozzarella for a milder flavor
– American for that gooey texture
Feel free to mix cheeses for a unique taste. Each choice changes the flavor, so experiment to find your favorite.
Additional Garnishes
Garnishes make the dish look fresh and inviting. I love to add:
– Fresh parsley, chopped
– Crushed red pepper for heat
– Pickles for crunch
Garnishes not only add color, but they also enhance the taste. They make your skillet look great and add a final touch of flavor. Plus, they are easy to find and prepare.

Step-by-Step Instructions
Preparing the Beef and Vegetables
Start by heating the olive oil in your skillet. Use medium heat until the oil shimmers. Then, add the ground beef. Break it apart with a spatula as it cooks. Brown it for about 5 to 7 minutes. If there is extra fat, drain it out. Next, slice your onion, green bell pepper, and red bell pepper thinly. Mince two cloves of garlic. Once the beef is done, toss in the sliced veggies and minced garlic. Stir everything together. Cook for about 5 minutes until the veggies soften and the onions turn clear.
Cooking and Combining Ingredients
After the veggies soften, pour in the Worcestershire sauce. This adds a rich flavor to the mix. Then, sprinkle the onion powder and garlic powder over everything. Add salt and pepper to taste. Stir well to combine all the ingredients. This step ensures that every bite is full of flavor. Keep the heat at a gentle simmer while you prepare for the next step.
Melting the Cheese and Final Touches
Now, it’s time for the cheese! Lay the provolone cheese slices evenly over the beef and veggies. Cover the skillet with a lid. Let it sit for about 2 to 3 minutes. This helps the cheese melt into a gooey delight. Once the cheese is melted, take the skillet off the heat. For a pop of color, sprinkle freshly chopped parsley on top. Serve hot and enjoy your flavorful Ground Beef Philly Cheesesteak Skillet!
Tips & Tricks
How to Ensure Perfectly Cooked Beef
Start with a hot skillet. Heat the olive oil until it shimmers. Add the ground beef and break it up with a spatula. Cook it until it turns brown, about 5 to 7 minutes. Make sure it cooks evenly. If you see extra fat, drain it before adding veggies. This keeps the dish from being greasy.
Enhancing Flavor with Seasonings
Add Worcestershire sauce for depth. It gives a rich umami flavor. Sprinkle onion powder and garlic powder next. These spices boost the taste without extra work. Don’t forget salt and pepper! They help round out the flavors. Mix everything well to ensure even seasoning.
Achieving the Right Cheese Melt
Layer provolone cheese on top of the beef mixture. Cover the skillet with a lid. This traps heat and helps the cheese melt perfectly. Let it sit for 2 to 3 minutes. The cheese should be gooey and delicious. For extra flavor, try different cheeses. Cheddar or mozzarella can also work well!
Pro Tips
- Choose Your Cheese: While provolone is traditional, feel free to experiment with other cheeses like cheddar or mozzarella for a unique twist on flavor.
- Veggie Variations: Add mushrooms or jalapeños for extra flavor and texture; they complement the beef beautifully.
- Make It Spicy: If you enjoy a bit of heat, consider adding a pinch of red pepper flakes or a dash of hot sauce when mixing in the Worcestershire sauce.
- Perfectly Toasted Buns: For the best experience, toast your hoagie rolls lightly in the oven or on a skillet before filling them with the cheesesteak mixture.

Variations
Alternative Proteins to Use
You can switch out the ground beef for other meats. Ground turkey works well. It has a lighter taste but can still hold flavor. Ground chicken is another option. If you want something different, try diced steak. You can also use plant-based ground meat for a vegan dish. Each protein brings its own flavor, so feel free to experiment.
Different Vegetable Combinations
While onions and bell peppers are classic, you can mix it up. Try adding mushrooms for a rich taste. Spinach or kale can add a nice green touch. Carrots bring sweetness, while jalapeños add heat. Experiment with what you have at home. Each veggie changes the dish and adds new flavors.
Unique Cheese Choices
Provolone is great, but you can choose other cheeses too. Cheddar gives a sharp flavor. Monterey Jack melts well and adds creaminess. For a kick, try pepper jack cheese. If you want a gourmet touch, use gouda or fontina. Each cheese will change the dish’s character, so have fun with it.
Storage Info
Proper Storage Techniques
To keep your Ground Beef Philly Cheesesteak Skillet fresh, store it in an airtight container. Let the dish cool for about 30 minutes before sealing it. This helps prevent moisture from building up inside the container. Place it in the fridge if you plan to eat it within three days. For longer storage, consider freezing it.
Reheating Instructions
Reheat your skillet dish in a pan over medium heat. Add a splash of water or broth to keep it moist. Stir often to heat it evenly. You can also use the microwave. Place it in a microwave-safe dish and cover it with a damp paper towel. Heat in short bursts, stirring in between, until hot.
Recommended Freezing Tips
If you want to freeze the skillet, portion it out first. Use freezer-safe bags or containers. Remove as much air as possible to prevent freezer burn. Label the bags with the date. This dish can last up to three months in the freezer. Thaw it overnight in the fridge before reheating.
FAQs
Can I use ground turkey instead of beef?
Yes, you can use ground turkey in place of ground beef. Turkey offers a leaner option. It has a milder flavor but works well with all the spices. Just follow the same cooking steps. You may want to add a bit of olive oil for moisture.
What sides pair well with Ground Beef Philly Cheesesteak Skillet?
Many sides go great with this skillet dish. Here are a few ideas:
– Crispy French fries
– Potato chips
– A fresh garden salad
– Steamed broccoli
– Pickles for a crunchy bite
Each of these sides will add a nice touch to your meal.
How do I make this dish ahead of time?
Making this dish ahead is easy and smart! Cook the beef and veggies as usual. Let them cool, then store in the fridge. When ready to serve, reheat in a skillet. Add cheese and melt as you warm it up. This keeps it tasty and fresh.
You can create a delicious Ground Beef Philly Cheesesteak Skillet with simple steps. We covered main ingredients, tasty cheese options, and ways to enhance flavor. Proper cooking ensures great texture, and unique variations help keep it fresh. Don’t forget about storage and reheating tips for leftovers.
This dish is easy to make and fun to share. Enjoying this meal together makes it even better. Try it, and make it your ow

Ground Beef Philly Cheesesteak Skillet
Ingredients
- 1 lb ground beef
- 1 tablespoon olive oil
- 1 medium onion, thinly sliced
- 1 medium green bell pepper, thinly sliced
- 1 medium red bell pepper, thinly sliced
- 2 cloves garlic, minced
- 1 teaspoon Worcestershire sauce
- 1 teaspoon onion powder
- 1 teaspoon garlic powder
- to taste salt and pepper
- 4 slices provolone cheese
- for garnish fresh parsley, chopped
Instructions
- In a large skillet, heat the olive oil over medium heat until shimmering.
- Carefully add the ground beef to the skillet, using a spatula to break it into smaller pieces as it cooks. Sauté the beef until it is thoroughly browned, about 5 to 7 minutes. If there is any excess fat, drain it off before proceeding.
- Introduce the sliced onion, green bell pepper, and red bell pepper to the skillet, along with the minced garlic. Stir the mixture and cook for about 5 minutes, or until the vegetables have softened and the onions are translucent.
- Pour in the Worcestershire sauce, then sprinkle the onion powder, garlic powder, salt, and pepper over the mixture. Stir well to ensure all ingredients are evenly combined.
- Lower the heat to a gentle simmer and layer the provolone cheese slices over the entire meat and vegetable mixture. Cover the skillet with a lid and let it sit for about 2 to 3 minutes, or until the cheese is melted and gooey.
- Remove the skillet from heat and garnish generously with freshly chopped parsley to add a pop of color.
- Serve the cheesesteak hot, straight from the skillet for a casual vibe, or for a more traditional experience, scoop the mixture into toasted hoagie rolls.


. To get the best flavor in your ratatouille with quinoa, start with fresh veggies. Fresh vegetables bring out the natural taste. Use ripe tomatoes for a juicy base. Add herbs like thyme and basil early in the cook. This helps release their oils and flavors. Sautéing the onions and garlic first adds depth to your dish. A common mistake is overcooking the vegetables. You want them soft but not mushy. Another mistake is not seasoning enough. Taste as you cook and adjust. Don't skip the olive oil; it adds richness. Lastly, avoid using pre-cooked quinoa. Cooking it fresh makes a big difference in texture. Serve your quinoa ratatouille warm in shallow bowls. Drizzle with extra virgin olive oil for a touch of luxury. Fresh basil leaves make a great garnish. They add color and flavor. You can also sprinkle some crushed red pepper for heat. Pair it with crusty bread or a simple salad for a full meal. For more details, check the Full Recipe. {{image_4}} Ratatouille with quinoa is naturally vegan and gluten-free. You can enjoy this dish without any animal products. Quinoa itself is a great choice. It is a whole grain that is safe for those avoiding gluten. You can feel good about serving this meal to friends and family with dietary needs. If you want to boost the protein in your dish, consider adding beans or tofu. Black beans or chickpeas mix well with ratatouille. They add texture and protein. Tofu is another option. Just cube it and sauté it with the veggies. It soaks up all the flavors of the dish. Ratatouille is flexible when it comes to vegetables. You can switch out the veggies based on what you have. Try adding carrots, mushrooms, or even spinach. Each vegetable brings its own taste and texture. You can make the dish more colorful and exciting. Experiment with what you love. Each combination can lead to a new favorite dish! To store leftovers, let the quinoa ratatouille cool down. Place it in an airtight container. This keeps the dish fresh and tasty. You can keep it in the fridge for up to three days. Make sure to label the container with the date. When you are ready to eat, you can reheat the dish. You can use the microwave or a stovetop. To microwave, place it in a bowl and cover it. Heat on high for about 2-3 minutes. Stir halfway through to heat evenly. If you prefer the stovetop, warm it in a skillet over medium heat. Stir and cook for about 5 minutes until hot. If you want to freeze the dish, use a freezer-safe container. Portion out servings to make it easy to reheat later. Freeze for up to three months. To thaw, move it to the fridge overnight. Reheat as mentioned above before serving. Enjoy your tasty meal even when you are busy! Yes, you can make Ratatouille with Quinoa ahead of time. I often prepare it a day before. This allows the flavors to mix well. Just store it in an airtight container in the fridge. When you are ready to eat, just reheat it on the stove or in the microwave. Ratatouille with Quinoa is a complete meal. You can serve it with crusty bread for dipping. A simple green salad also pairs well. If you want to add protein, try grilled chicken or fish. This makes a balanced meal that everyone will enjoy. Adjusting the spice level is easy. If you like it mild, stick to the recipe. For more heat, add red pepper flakes. You can also use spicy bell peppers or a dash of hot sauce. Always taste as you go to find the right balance for you. This blog post covered the key steps to make Ratatouille with Quinoa. We reviewed the ingredients and their benefits, plus substitutions for dietary needs. The step-by-step instructions simplify preparation and cooking. Tips and tricks help you avoid common mistakes and enhance flavor. We also explored variations to suit different diets and preferences. Ratatouille with Quinoa is versatile and easy to store. You can enjoy it fresh or as leftovers. Embrace your creativity with this dish, and feel confident in your cooking skills. Enjoy making this healthy meal!](https://joymealplan.com/wp-content/uploads/2025/06/988dfaac-430c-4a57-a4f4-203d0c398d72-768x768.webp)

![To create a delicious Lemon Herb Grilled Salmon, you need fresh and simple ingredients. Here’s what you will gather: - 4 salmon fillets (approximately 6 ounces each) - 1/4 cup extra virgin olive oil - Zest from 1 large lemon - Juice of 2 fresh lemons - 3 cloves garlic, finely minced - 2 tablespoons fresh parsley, finely chopped - 2 tablespoons fresh dill, finely chopped - 1 tablespoon fresh thyme, finely chopped - Salt and freshly ground black pepper to taste - Lemon wedges, for garnishing These ingredients work together to bring out the bright and zesty flavor of the salmon. The fresh herbs add depth, while the lemon provides a refreshing kick. When you combine these elements, you create a dish that looks and tastes amazing. If you want to explore the complete process, check out the Full Recipe. To start, grab a medium bowl. Mix together: - 1/4 cup extra virgin olive oil - Zest from 1 large lemon - Juice from 2 fresh lemons - 3 cloves garlic, finely minced - 2 tablespoons fresh parsley, chopped - 2 tablespoons fresh dill, chopped - 1 tablespoon fresh thyme, chopped - Salt and pepper to taste Whisk all these ingredients together until they blend well. This mix will be your flavorful marinade. Now, take your salmon fillets. Place them in a resealable bag or shallow dish. Pour the marinade over the salmon. Make sure each piece is well coated. Seal the bag or cover the dish. Let it chill in the fridge for 30 minutes up to 2 hours. The longer it sits, the stronger the flavor will be. Preheat your grill to medium-high heat. If using a grill pan, set it to medium heat. Lightly coat the surface with olive oil to stop the fish from sticking. After marinating, remove the salmon from the bag. Let any extra marinade drip off. Discard the leftover marinade. Place the salmon skin-side down on the hot grill. Cook for about 5-6 minutes without touching it. Then, flip the salmon gently with a spatula. Grill for another 4-5 minutes. The fish should be opaque and flake easily with a fork. Once it’s done, let the salmon rest for a few minutes. This helps improve the flavor and texture. Serve the grilled salmon with fresh lemon wedges. Add a pop of citrus to enhance your dish. Enjoy your meal! For the complete recipe, check the [Full Recipe]. To grill salmon just right, aim for medium-high heat. This usually means around 375°F to 400°F. The salmon needs about 5-6 minutes on the first side. Flip it gently and grill for another 4-5 minutes. To check for doneness, use a fork. The fish should easily flake apart and look opaque. If it’s still shiny, it needs more time. For more flavors, try adding a pinch of smoked paprika or a dash of cayenne pepper. These spices can add a nice kick. Pair the salmon with sides like roasted veggies, quinoa, or a fresh salad. These dishes complement the salmon well and balance its rich taste. When plating the salmon, add a bright touch with fresh herbs. A sprinkle of parsley or dill makes it pop. Serve with lemon wedges for an extra zing. For drinks, a crisp white wine, like Sauvignon Blanc, pairs well. It enhances the meal and makes it feel special. For a non-alcoholic option, try sparkling water with lemon. It refreshes the palate and adds a lovely touch to your dinner. For the full recipe, check out the detailed steps above. {{image_4}} You can switch up the marinade to keep things fresh. Try using lime or orange juice instead of lemon. These fruits add a different twist to your salmon. You can also add spices like cayenne pepper for some heat. A touch of heat makes the dish more exciting. Grilling is great, but you have other choices too. Baking or broiling the salmon works well and keeps it moist. If it’s raining or too cold outside, use a stovetop grill pan. Just make sure it’s hot before adding the salmon for even cooking. You can make this dish fit your diet needs. For a gluten-free version, check that your spices are gluten-free. You can also skip dairy by using olive oil instead of butter. If you want to lower calories, use less oil in the marinade. These small changes keep the meal healthy while still tasting great. Try these variations to make lemon herb grilled salmon fit your taste and lifestyle. For the full recipe, check out the earlier sections! To keep your grilled salmon fresh, store it in the fridge. Place the salmon in an airtight container. This helps keep it from drying out. It should last for up to three days in the fridge. If you want to save it longer, freezing is a good option. Wrap the salmon tightly in plastic wrap, then put it in a freezer bag. You can freeze it for up to three months. Label the bag with the date so you know when to use it. When you reheat grilled salmon, you want to keep it moist. The best way is to use the oven. Preheat the oven to 275°F (135°C). Place the salmon on a baking sheet, cover it with foil, and heat for about 15 minutes. This method helps avoid drying out the fish. You can also use a microwave, but be careful. Heat it in short bursts of 30 seconds on low power. Check often to keep the flavor and texture. A splash of lemon juice can help refresh the taste. Grilling time depends on the thickness of the salmon. For fillets about 1 inch thick, grill for 5-6 minutes on one side. Flip and grill for another 4-5 minutes. Thicker fillets may need more time, so check for doneness. When the salmon is opaque and flakes easily, it's ready to eat. Yes, you can use frozen salmon. To cook it, thaw the salmon first. Place it in the fridge overnight or submerge it in cold water for about an hour. Once thawed, pat it dry and marinate as in the Full Recipe. This will help keep it moist while grilling. Lemon herb grilled salmon pairs well with fresh salads and veggies. Try serving it with: - Mixed green salad with a light vinaigrette - Steamed asparagus or green beans - Roasted potatoes seasoned with herbs - Quinoa or rice pilaf for a hearty side These dishes complement the fresh flavors of the salmon and make a complete meal. Grilling lemon herb salmon is simple and rewarding. You start with fresh salmon and a tasty marinade of olive oil, lemon, garlic, and herbs. Marinate for a short time to boost flavor. Grill it right and serve with sides for a complete meal. Experiment with different flavors and cooking methods to find your favorite. Always store leftovers properly to enjoy them later. With these tips, you’ll impress everyone at the table. Now, get ready to grill and enjoy this delicious dish!](https://joymealplan.com/wp-content/uploads/2025/06/94675a3f-7fd4-4f6d-bbd0-da6b916d26a4-768x768.webp)

![To make oven-baked chicken fajitas, you will need: - 1 lb boneless, skinless chicken breasts, sliced into thin strips - 1 red bell pepper, sliced into thin strips - 1 yellow bell pepper, sliced into thin strips - 1 medium onion, sliced into thin wedges - 3 tablespoons extra virgin olive oil - 2 teaspoons chili powder - 1 teaspoon ground cumin - 1 teaspoon smoked paprika - 1 teaspoon garlic powder - 1 teaspoon onion powder - Salt and freshly ground black pepper to taste - 8 small flour or corn tortillas These ingredients come together to create a burst of flavors. The chicken brings protein, while the peppers and onion add color and crunch. Seasonings like chili powder and cumin enhance the taste, making every bite exciting. You can elevate your fajitas with these optional toppings: - Sour cream - Guacamole - Freshly chopped cilantro - Lime wedges These toppings add creaminess, freshness, and zest. Feel free to mix and match based on your preference. Here are the tools you need to prepare your fajitas: - Large baking sheet - Parchment paper - Mixing bowl - Spatula or your hands for mixing - Knife and cutting board Using these tools makes the cooking process smooth. The baking sheet helps in even cooking, while the mixing bowl keeps things clean. If you follow the [Full Recipe], you will have a delicious meal ready in no time! To start, gather your ingredients. You will need: - 1 lb boneless, skinless chicken breasts, sliced into thin strips - 1 red bell pepper, sliced into thin strips - 1 yellow bell pepper, sliced into thin strips - 1 medium onion, sliced into thin wedges - 3 tablespoons extra virgin olive oil - 2 teaspoons chili powder - 1 teaspoon ground cumin - 1 teaspoon smoked paprika - 1 teaspoon garlic powder - 1 teaspoon onion powder - Salt and freshly ground black pepper to taste - 8 small flour or corn tortillas - Optional toppings: sour cream, guacamole, freshly chopped cilantro, lime wedges Begin by preheating your oven to 400°F (200°C). Line a large baking sheet with parchment paper. This helps with easy cleanup. In a big mixing bowl, combine all the sliced chicken and veggies. Drizzle the olive oil over them. Add the spices: chili powder, cumin, smoked paprika, garlic powder, onion powder, salt, and pepper. Now, mix everything well. Use your hands or a spatula to toss the chicken and veggies. Make sure every piece gets coated in oil and spices. This step is key for flavor. Spread the chicken and veggies evenly on the prepared baking sheet. Ensure there’s space between pieces for even cooking. Bake in the oven for 25 to 30 minutes. Halfway through, stir the mixture. Check that the chicken reaches an internal temperature of 165°F (75°C). The veggies should be tender and slightly caramelized. After baking, let the mixture rest for a few minutes. While it rests, warm your tortillas. You can microwave them wrapped in a damp paper towel or heat them in a skillet. To serve, place a generous scoop of the chicken and veggie mix in each tortilla. Add sour cream, guacamole, and cilantro. A squeeze of lime juice adds a nice touch! Enjoy this easy yet delicious meal. For the complete process, refer to the Full Recipe. To get juicy chicken, use thin strips. Thin pieces cook faster and stay tender. Always check the internal temperature. It should reach 165°F (75°C) for safety. If you have time, marinate the chicken in spices and olive oil for a few hours. This adds flavor and keeps it moist. Cut the vegetables into uniform sizes. This helps them cook evenly. Use a large baking sheet. Spread the veggies out to avoid steaming. Stir them halfway through baking. This promotes even browning and caramelization. Aim for a tender texture with some charred edges for extra flavor. Warm the tortillas before serving. You can use a microwave or a skillet. For the microwave, wrap them in a damp paper towel. Heat them in short bursts for a soft finish. If using a skillet, heat on medium until they become pliable. This makes them easier to fold and fill. For the full recipe, check the section earlier in the article. {{image_4}} You can switch chicken for shrimp or tofu. Shrimp cooks fast and adds a sweet taste. Just adjust the cooking time to around 15-20 minutes. Tofu is great for a plant-based meal. Use firm tofu for the best texture. Press it to remove excess water. Then, cut it into strips and season like chicken. Feel free to mix in other veggies. You can add zucchini, mushrooms, or even corn. Each veggie brings its own flavor and texture. Try using fresh jalapeños for a spicy kick. You can also use frozen veggies if fresh ones aren’t available. Just ensure they are thawed and well-drained before mixing. Get creative with your spices! You can try taco seasoning for a different taste. Or, mix in some lime zest for brightness. If you like heat, add cayenne pepper or chipotle powder. Experimenting with these flavors makes each meal unique. Don't be afraid to try unusual combinations. This is your chance to explore new tastes. Check out the Full Recipe for more ways to spice things up! After enjoying your oven-baked chicken fajitas, you may have some leftovers. To store them well, let the fajitas cool down to room temperature. Then, place them in an airtight container. This keeps the flavors fresh and prevents sogginess. You can store them in the fridge for up to three days. If you want to keep them longer, consider freezing. When you are ready to eat your leftovers, reheating them properly is key. For the best results, use an oven. Preheat your oven to 350°F (175°C). Spread the fajitas on a baking sheet and cover them with foil. Heat for about 10 to 15 minutes, or until warmed through. This method keeps the chicken juicy and the veggies crisp. You can also use a microwave, but this may make the tortillas soft. If you want to save your fajitas for later, freezing is easy. First, make sure they are completely cool. Then, place your fajitas in a freezer-safe bag or container. Remove as much air as possible before sealing. Label the bag with the date. You can freeze them for up to three months. When ready to enjoy, thaw the fajitas in the fridge overnight before reheating. This way, they taste just as good as when you first made them. For the full recipe, check out the earlier sections. To make your oven-baked chicken fajitas healthier, you can swap some ingredients. Use skinless chicken thighs instead of breast for more flavor. Add more veggies like zucchini or mushrooms for extra fiber. You can also replace olive oil with cooking spray to cut calories. Use whole grain tortillas rather than white flour ones. This change boosts fiber and nutrients. Finally, skip the sour cream or use a low-fat version. Yes, you can prepare fajitas ahead of time. Just season the chicken and veggies the night before. Store them in the fridge in a sealed container. This helps the flavors blend nicely. Bake them when you are ready to eat. If you want to save time, you can also cook the fajitas fully. Store the cooked fajitas in the fridge for up to three days. Reheat them in the oven for best results. The best tortillas for fajitas depend on your taste. Flour tortillas are soft and easy to fold. They are a classic choice. Corn tortillas have a nice flavor and are gluten-free. They can be a bit more fragile but pair well with fajitas. You can also try whole wheat tortillas for a healthier option. Choose the type you enjoy most, and your fajitas will shine. Check out the full recipe for more tips! In this article, we explored how to make delicious oven-baked chicken fajitas. We covered the main ingredients, cooking steps, and helpful tips for perfect results. You also learned about fun variations to customize your dish and smart ways to store leftovers. Now, you can enjoy tasty fajitas at home. Get creative with your toppings and enjoy sharing this meal with friends and family. The key is to have fun and make it your own. Happy cooking!](https://joymealplan.com/wp-content/uploads/2025/06/95795fac-5c59-44b7-b221-1c1b2c95851f-768x768.webp)
