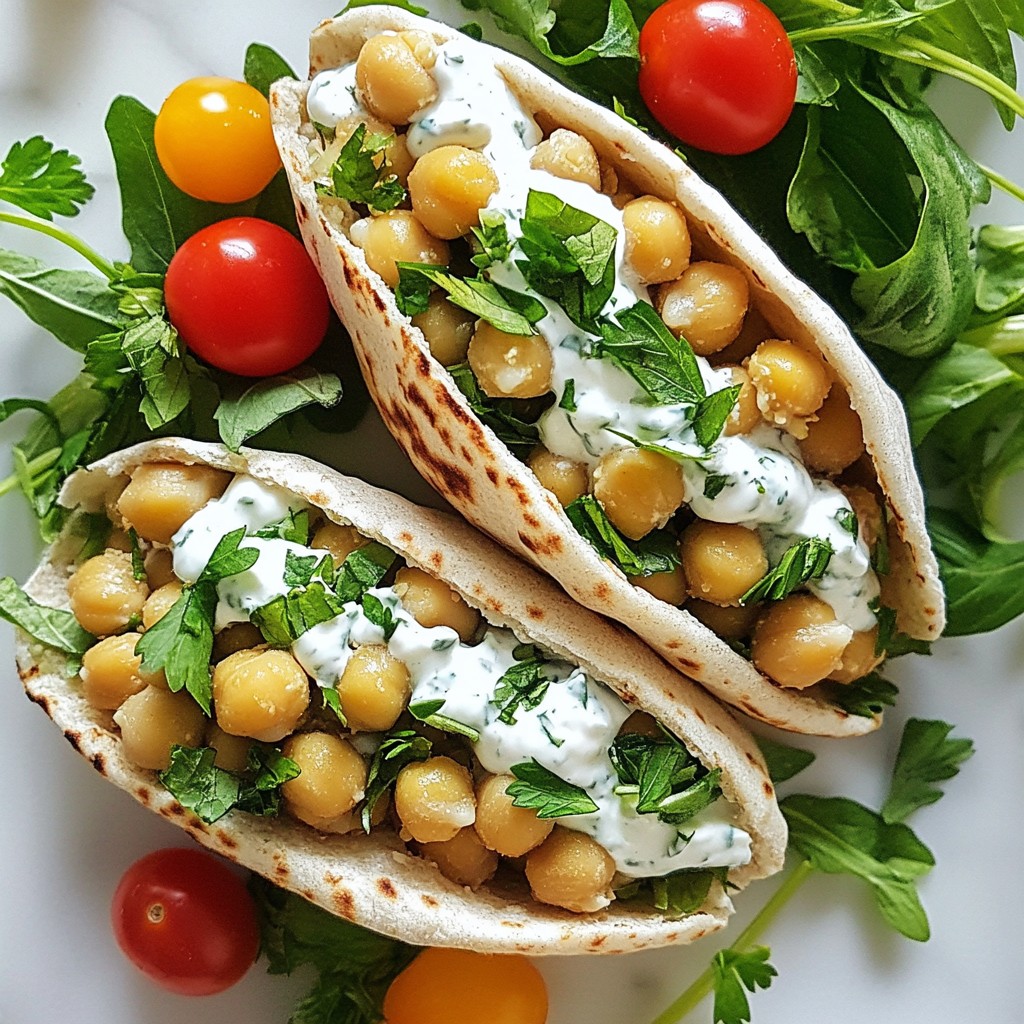
Are you craving a quick, healthy meal that packs a flavorful punch? Look no further! My recipe for Herby Chickpea Pita Pockets is here to save your day. With simple ingredients and easy steps, you can whip up a delicious dish in no time. Perfect for lunch or a light dinner, these pockets are tasty and fun to make. Let’s dive into the delightful world of chickpeas and fresh herbs!
Why I Love This Recipe
- Quick and Easy: This recipe can be prepared in just 10 minutes, making it perfect for busy weeknights or last-minute meals.
- Nutritious Ingredients: Packed with protein and fiber from chickpeas, this dish is healthy and satisfying, providing essential nutrients in every bite.
- Herbaceous Flavor: The fresh parsley and mint elevate the taste, creating a vibrant and refreshing filling that's bursting with flavor.
- Customizable: Feel free to add your favorite vegetables or adjust the spices to suit your taste, making it a versatile meal option.
Ingredients
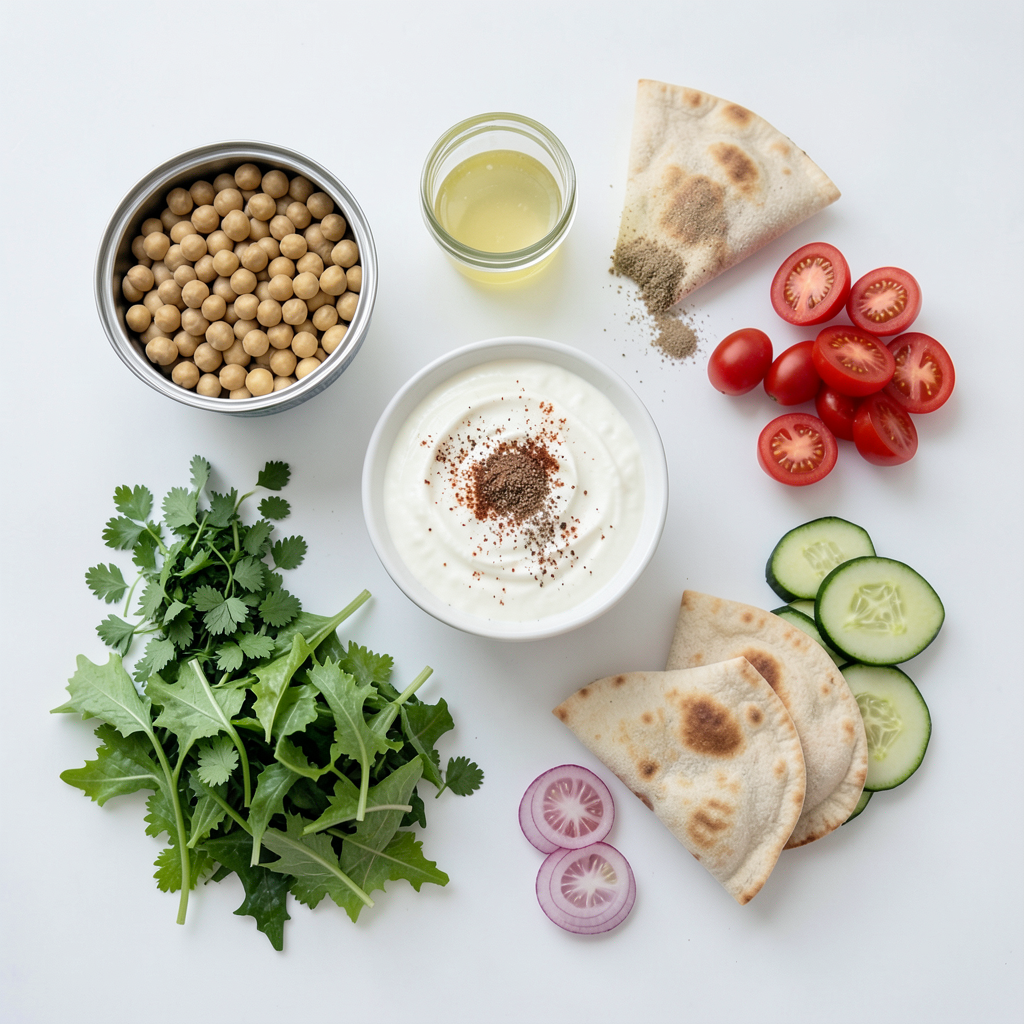
List of Ingredients Needed
- 1 can (15 oz) chickpeas, drained and rinsed
- 1/4 cup plain Greek yogurt (or dairy-free yogurt)
- 1 tablespoon tahini
- 1 tablespoon freshly squeezed lemon juice
- 1 teaspoon garlic powder
- 1 teaspoon ground cumin
- 1/2 teaspoon smoked paprika
- Salt and freshly ground black pepper, to taste
- 1/4 cup fresh parsley, finely chopped
- 1/4 cup fresh mint, finely chopped
- 4 whole wheat pita pockets
- 1 cup mixed greens (such as spinach, arugula, or baby kale)
- 1 cup cherry tomatoes, halved
- Optional: Sliced cucumber and red onion for garnish
Gather these ingredients for a bright and tasty meal. Chickpeas are the star here. They are easy to use and full of protein. Greek yogurt adds creaminess and a bit of tang. Tahini brings in a nutty flavor that balances the dish well. Fresh herbs like parsley and mint make the mix lively and fresh.
Make sure your pita pockets are whole wheat for extra fiber. You can use any greens and tomatoes you love. If you want more crunch, add cucumber and red onion on top. Each ingredient plays a role in making this dish a delight!
Step-by-Step Instructions
Preparing the Chickpea Mixture
1. Mashing the chickpeas
Start by opening the can of chickpeas. Drain and rinse them well. Then, place them in a medium bowl. Use a fork to mash the chickpeas. Aim for a slightly chunky texture. This gives your filling a nice bite.
2. Mixing in yogurt and spices
Next, add your Greek yogurt to the bowl. Then, add tahini, lemon juice, garlic powder, cumin, smoked paprika, and a pinch of salt and pepper. Mix everything together until it becomes creamy and well combined. This step brings in rich flavors.
3. Incorporating herbs
Now, fold in the fresh parsley and mint. Make sure the herbs are evenly spread throughout the chickpea mixture. The herbs add freshness and a vibrant taste.
Preparing Pita Pockets
1. Warming the pita
To make the pita soft, warm them up. You can use a toaster or microwave. Heat them for about 10 to 15 seconds. This makes it easier to fill them.
2. Creating pouches for filling
Carefully open each warmed pita pocket. This creates a small pouch for your filling. Be gentle to avoid tearing the pita.
Assembling the Pita Pockets
1. Filling the pockets with chickpea mixture
Take the chickpea mixture and fill each pita pocket generously. Make sure each one gets a good amount of the mixture.
2. Adding greens and tomatoes
Add a handful of mixed greens to each pocket. Then, layer in the halved cherry tomatoes. This adds color and sweetness to your meal.
3. Optional garnishes
If you like, you can add sliced cucumber and red onion. These toppings provide extra crunch and freshness. They enhance the taste and look of your pockets.
Serve your Herby Chickpea Pita Pockets right away for the best flavor and texture. Enjoy this simple and tasty meal!
Tips & Tricks
Making the Recipe Efficiently
To save time, you can batch prepare this chickpea mixture. Make a big batch and store it in the fridge. It lasts well for about three days. This way, you can easily whip up tasty pita pockets when hunger strikes.
For the best pita experience, warm them before filling. You can use a toaster or microwave. Just warm them for 10-15 seconds. This makes them soft and easy to fill.
Flavor Enhancements
To boost the flavor, try adding more spices. A pinch of cayenne can add heat. You can also mix in some fresh dill or cilantro for a twist.
When serving, think about pairing. These pita pockets go well with a light salad. You can also serve them with hummus or a yogurt dip on the side. This adds creaminess and extra flavor to your meal.
Pro Tips
- Texture Matters: For a delightful crunch, make sure to leave some chickpeas slightly chunky when mashing.
- Herb Freshness: Use fresh herbs for the best flavor; dried herbs won't provide the same vibrant taste and aroma.
- Warming Pitas: Warming the pita pockets not only makes them easier to fill but also enhances their flavor and texture.
- Garnish Creatively: Don't hesitate to add your favorite toppings like feta cheese or olives for a personal twist on this recipe.
Variations
Ingredient Substitutions
You can switch out chickpeas for other legumes. Black beans or lentils work well. Both options give a different taste but keep the dish healthy. If you want a more colorful meal, try red kidney beans. They add a nice look and flavor.
If you want to change the Greek yogurt, you have options. Use dairy-free yogurt if you prefer. Coconut yogurt is a great choice. It adds creaminess and a hint of sweetness. Silken tofu blended can also be a good substitute. It keeps the dish smooth and rich.
Serving Suggestions
Mix up your greens for added flavor. Spinach, arugula, or baby kale all taste great. You can even use shredded cabbage for a crunchier texture. Try adding toppings like shredded carrots or radishes for a colorful twist.
For sauces or dressings, consider your options. Tzatziki sauce gives a cool, fresh taste. A drizzle of balsamic glaze adds sweetness and tang. You can also use a simple lemon vinaigrette. It brightens the dish and enhances the flavors.
Storage Info
Best Ways to Store Leftovers
To keep filled pita pockets fresh, store them in the fridge. Wrap each pocket in plastic wrap or foil. This helps keep them from drying out. Eat refrigerated pockets within three days for the best taste.
If you have extra chickpea mixture, freeze it for later use. Place it in an airtight container. It can stay in the freezer for up to a month. When you are ready to eat, just thaw it in the fridge overnight.
Reheating Instructions
To maintain freshness when reheating, use a microwave or oven. If using a microwave, heat on medium for 30 seconds. Check and heat longer if needed.
For the oven, preheat to 350°F (175°C). Wrap the pita in foil to keep it soft. Heat for about 10-15 minutes. This method keeps the pita warm and the filling nice and moist. Enjoy your meal!
FAQs
Common Questions About Chickpea Pita Pockets
Can I use canned chickpeas, or should I cook my own? Yes, you can use canned chickpeas! They save time and taste great. Just drain and rinse them before mashing. If you want to cook your own, soak dried chickpeas overnight. Then, boil them until tender. Both options work well for this recipe.
What are the health benefits of chickpeas? Chickpeas are very healthy! They are high in protein and fiber. This helps keep you full longer. Chickpeas also contain many vitamins and minerals. They can support heart health and help with digestion, too.
How can I make this dish vegan-friendly? To make this dish vegan, simply swap the Greek yogurt for a dairy-free yogurt. Look for options made from almond or coconut. This keeps the recipe creamy while keeping it plant-based. Enjoy your herby chickpea pita pockets without any animal products!
In this post, we covered how to make delicious chickpea pita pockets. We discussed ingredients like chickpeas, yogurt, fresh herbs, and pita. I shared step-by-step instructions for preparing the chickpea mix and warming the pita. You learned tips to save time and enhance flavors, along with tasty variations to try.
Now you're ready to create your own mouth-watering chickpea pita pockets. Enjoy this healthy dish for a quick meal or snack.