High Protein Cheeseburger Bowls Tasty and Simple Meal

Looking for a tasty way to pack in protein? These High Protein Cheeseburger Bowls are both simple and satisfying! With lean ground beef or turkey, quinoa, and fresh toppings, you can create a filling meal in minutes. Perfect for meal prep or a quick dinner, this recipe caters to different tastes. Ready to dive into a delicious, nutritious bowl that’s really easy to make? Let’s get cooking!
Why I Love This Recipe
- Protein-Packed Goodness: This recipe is loaded with protein from the lean ground beef or turkey, making it a satisfying meal that fuels your day.
- Versatile Base: Using quinoa or brown rice allows you to customize the dish according to your dietary preferences while adding nutritious grains to your bowl.
- Colorful and Crunchy: The fresh veggies and toppings bring vibrant colors and textures, enhancing both the visual appeal and the taste of your meal.
- Meal Prep Friendly: These cheeseburger bowls are perfect for meal prepping, allowing you to enjoy a delicious homemade meal throughout the week effortlessly.
Ingredients
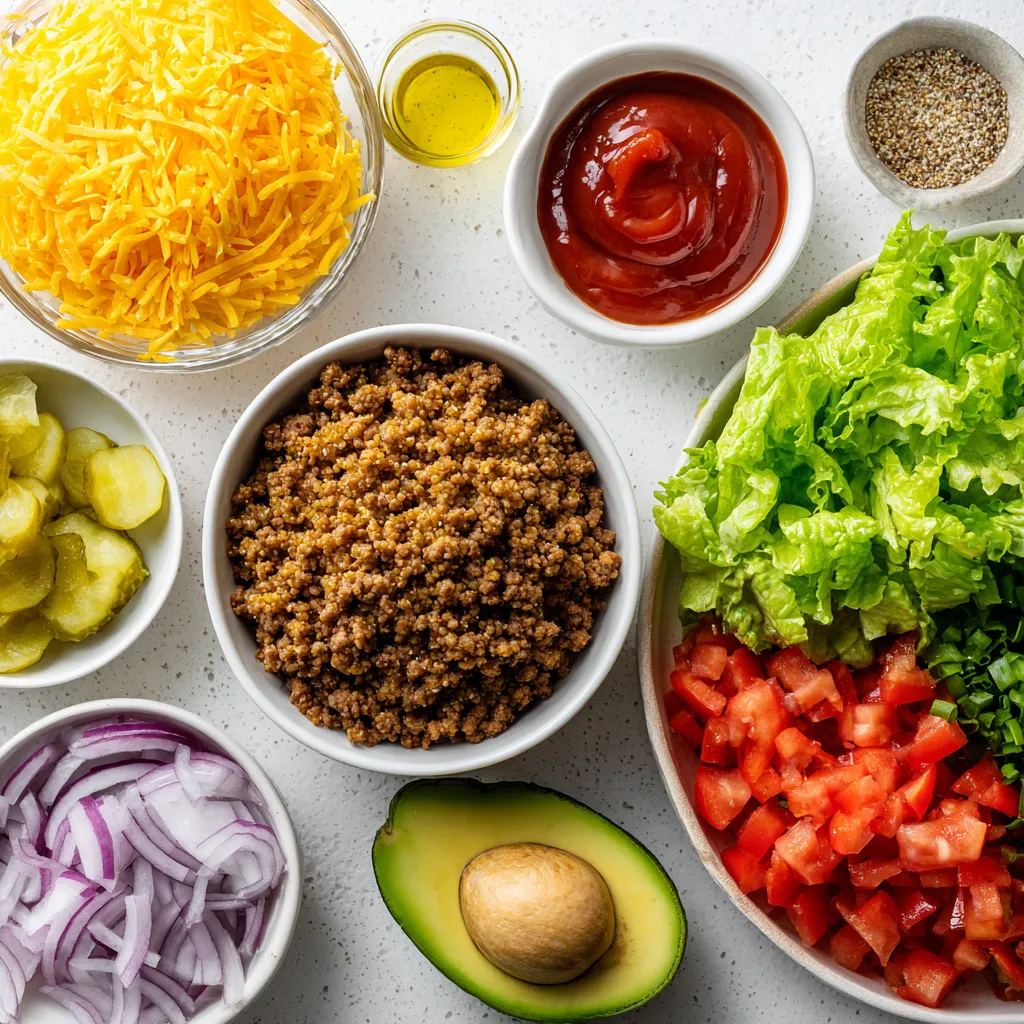
The high protein cheeseburger bowl is easy and fun to make. Here are the ingredients you will need:
– 1 lb lean ground beef or turkey
– 1 cup cooked quinoa or brown rice
– 1 cup chopped romaine lettuce
– 1 medium tomato, diced
– ½ cup shredded sharp cheddar cheese
– ¼ cup diced dill pickles
– 2 tablespoons ketchup
– 2 tablespoons yellow mustard
– 1 tablespoon olive oil
– Salt and pepper to taste
– Optional toppings: sliced avocado, red onion, hot sauce
This list gives you all the flavors of a classic cheeseburger but in a healthy bowl. You can mix and match the toppings to make it your own. Want it creamier? Add some avocado. Want a crunch? Toss in red onion. Each bite is a tasty, protein-packed treat!

Step-by-Step Instructions
Cooking the Protein
1. Heat a skillet over medium heat. Add 1 tablespoon of olive oil.
2. When the oil is hot, crumble 1 lb of lean ground beef or turkey into the skillet.
3. Season the meat with salt and pepper. Stir often, cooking until browned. This takes about 7-10 minutes.
Preparing the Base
1. While the meat cooks, prepare 1 cup of quinoa or brown rice. Follow the package instructions.
2. Once cooked, fluff the grain with a fork. Set it aside to cool slightly.
3. In a large bowl, spread the cooked quinoa or rice evenly as the base layer.
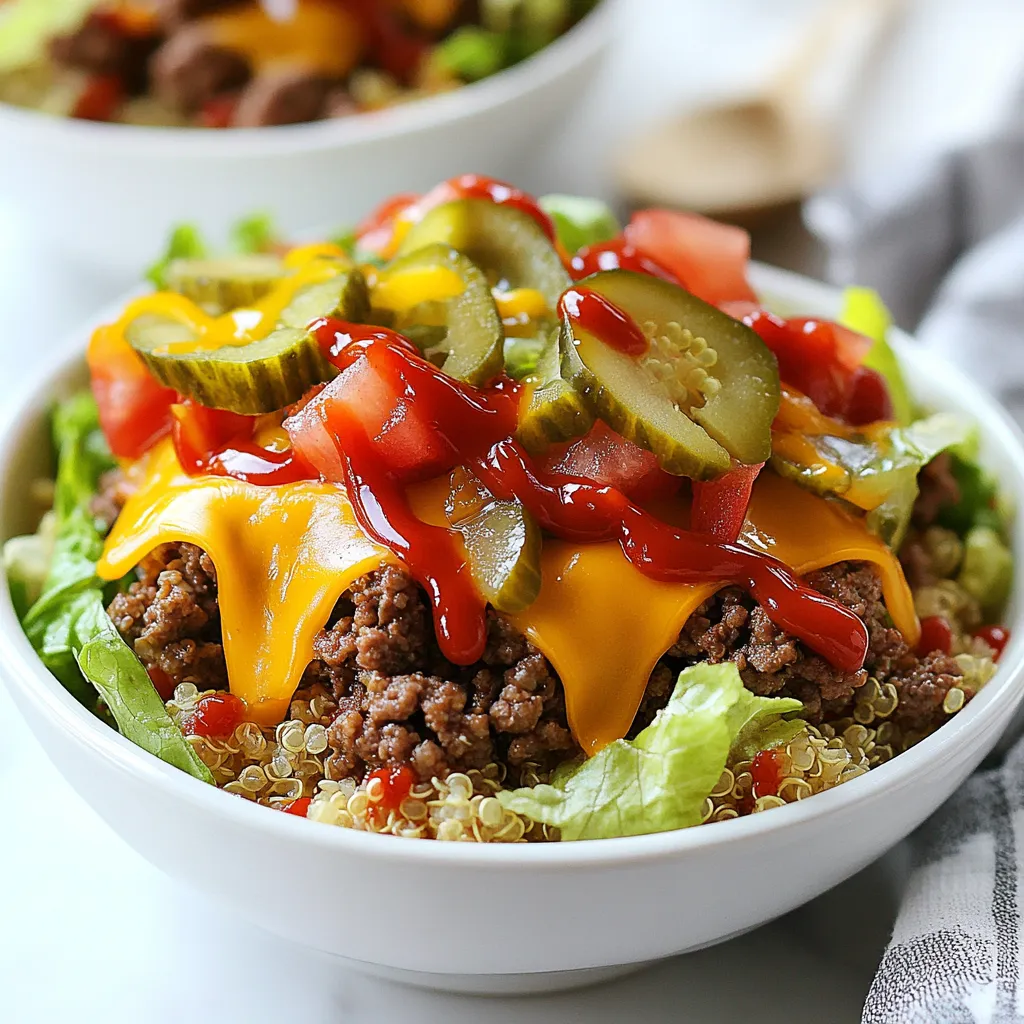
Assembling the Bowls
1. Spoon the cooked ground meat on top of the quinoa or rice. Spread it evenly.
2. Add layers of chopped romaine lettuce, diced tomatoes, shredded cheddar cheese, and diced dill pickles.
3. Drizzle 2 tablespoons of ketchup and 2 tablespoons of yellow mustard over the top.
4. For extra taste, add sliced avocado and thinly sliced red onion.
5. Serve warm or pack in meal prep containers for later.
Tips & Tricks
Cooking Tips
– Ensure the meat is thoroughly cooked. Use a meat thermometer; it should reach 160°F for beef and 165°F for turkey. This keeps the dish safe and tasty. Stir the meat often while cooking. This helps it brown evenly.
– Fluff and cool the grain base. After cooking quinoa or brown rice, let it sit. Fluff with a fork to separate the grains. This makes the base light and fluffy, perfect for layering.
Presentation Tips
– Use deep decorative bowls. These bowls hold all the layers well. They also make the meal look more inviting. Choose bright colors to add fun.
– Garnish with fresh herbs. Chopped parsley or cilantro adds color and flavor. A sprinkle on top makes the dish pop.
Customizing the Recipe
– Adjust toppings based on dietary preferences. If you want it lighter, skip the cheese or use less. You can also add more veggies like bell peppers or cucumbers.
– Substitute proteins for variety. Try ground chicken or a plant-based option like lentils. This keeps the recipe fresh and exciting each time.
Pro Tips
- Choose the Right Meat: For a leaner option, ground turkey is great, but if you want more flavor, lean ground beef is the way to go.
- Cook Quinoa Perfectly: Rinse quinoa before cooking to remove bitterness, and use a 2:1 water to quinoa ratio for fluffy results.
- Layer for Texture: Layering the ingredients not only makes for a beautiful presentation but also enhances the eating experience with varied textures.
- Meal Prep Friendly: These bowls store well in the fridge for up to 4 days, making them perfect for quick lunches or dinners throughout the week.

Variations
Low-Carb Option
If you want to cut carbs, try cauliflower rice. Cauliflower rice is a great swap for quinoa or brown rice. It gives you that bowl base without the extra carbs. To make it, simply pulse cauliflower florets in a food processor. Then, sauté it on medium heat for about five minutes. You’ll get a light and fluffy base that pairs perfectly with the toppings.
Vegetarian Version
For a tasty vegetarian bowl, use lentils or plant-based meat alternatives. Cooked lentils work well as a protein-rich base. They add texture while soaking up flavors. If you prefer plant-based meat, choose brands like Beyond Meat or Impossible Burger. These options give you that meaty taste without the meat. Just cook according to package instructions, and layer it in the bowl.
Flavor Enhancements
To jazz up your cheeseburger bowl, add spices like garlic powder or smoked paprika. Garlic powder gives a savory touch that enhances the meat. Smoked paprika adds a warm and smoky flavor. You can sprinkle these spices while cooking your meat. For extra zest, try a splash of Worcestershire sauce too. These small additions make a big difference in flavor.
Storage Info
Meal Prep
To keep your High Protein Cheeseburger Bowls fresh, follow some easy tips. First, let the bowls cool to room temperature. This helps avoid condensation in the containers. Then, portion the bowls into airtight containers. You can make four servings at once. Store them in the fridge for quick meals. If you want to add toppings later, keep them separate. This keeps the lettuce crunchy and the avocado fresh.
Reheating Instructions
When you’re ready to eat, reheating is simple. The best way is to use a microwave. Place the bowl in the microwave and cover it loosely. Heat for 1-2 minutes, checking it often. Stir halfway through to ensure even heating. If you prefer, you can reheat on the stove. Use a skillet over low heat. Add a bit of olive oil to keep it moist. Stir until warmed through.
Shelf Life
These bowls last about 3-4 days in the fridge. After that, the quality may drop. If you want to keep them longer, consider freezing. They can last up to 3 months in the freezer. Just remember to thaw them overnight in the fridge before reheating. This helps maintain the flavors and textures. Enjoy your bowls fresh for longer!
FAQs
How can I make these bowls spicier?
To add heat, you can use hot sauce. Just drizzle it on top. You can also add sliced jalapeños for a fresh kick. Both options give a nice boost to the flavor. If you want more spice, try using spicy mustard instead of yellow mustard. This will add a new layer of heat to your cheeseburger bowl.
Is this recipe gluten-free?
Yes, this recipe can be gluten-free. Just use gluten-free ketchup and mustard. You can also swap out quinoa with brown rice, as both are naturally gluten-free. If you want more options, try using cauliflower rice for a lighter base. This keeps the meal delicious without gluten.
Can I use a different protein?
Absolutely! You can use ground chicken or plant-based meat for a tasty twist. If you want a vegetarian option, try lentils or black beans. Both options are high in protein and will fit right into your bowl. You can also use tofu for a unique texture and flavor. This way, you can enjoy the bowl no matter your diet.
You can make quick and tasty bowls with lean protein, grains, and fresh veggies. Start by cooking your meat and grains. Then layer your bowls with toppings. Remember: customize based on your tastes. You can create a low-carb or vegetarian option, too. Store leftovers well for later meals. This recipe fits many diets and occasions. Try it today for a simple yet satisfying meal. Your new favorite dish await


![To make a tasty tomato basil soup, gather these ingredients: - 2 tablespoons extra virgin olive oil - 1 medium yellow onion, finely diced - 3 cloves garlic, minced - 2 cans (14 oz each) diced tomatoes in juice - 2 cups low-sodium vegetable broth - 1 teaspoon granulated sugar - 1 teaspoon dried oregano - Salt and freshly ground black pepper, to taste - 1 cup fresh basil leaves, roughly chopped - 1/2 cup heavy cream (optional for added creaminess) - Crusty bread or homemade croutons, for serving You can change up the flavor of your soup by adding: - A pinch of red pepper flakes for heat - Fresh lemon juice for brightness - A sprinkle of Parmesan cheese for richness - Other herbs like thyme or parsley Fresh basil and tomatoes make a big difference. Here’s how to choose the best: - Basil: Look for bright green leaves. They should be firm, not wilted. Smell the leaves; they should have a strong, sweet aroma. - Tomatoes: Choose ripe tomatoes with no bruises. They should feel heavy and firm. The color should be bright and even, depending on the type. Using high-quality ingredients will enhance the soup's flavor. Enjoy the vibrant taste of fresh basil and tomatoes in your cooking! For the full recipe, check out the [Full Recipe]. First, gather all your ingredients. You will need olive oil, onion, garlic, diced tomatoes, vegetable broth, and spices. Also, have fresh basil and cream ready if you want a richer soup. Start by chopping the onion and mincing the garlic. Dice them small for even cooking. This helps build the soup's flavor from the start. Measure out your diced tomatoes and vegetable broth, so you have them ready. In a large saucepan, heat the olive oil on medium heat. Once hot, add the diced onion. Cook it for about five minutes until it turns soft and clear. Then, add the minced garlic. Stir it for one minute. Be careful not to let it burn. Next, pour in the diced tomatoes and vegetable broth. Stir well to mix everything. Add the sugar, oregano, salt, and pepper. Let the soup come to a gentle boil. Then, reduce the heat to low. Let it simmer for 20 minutes. This helps the flavors mix together nicely. After simmering, take the saucepan off the heat. Let it cool for a few minutes. For a smooth soup, use an immersion blender to blend the soup until it's silky. If you don’t have one, transfer it in batches to a blender. Blend until smooth. Once blended, return the soup to the saucepan. Stir in the chopped basil and cream if you want it creamy. Heat it gently on low for about five minutes. This will let the basil's flavor shine through. Taste your soup before serving. Adjust the salt, pepper, or sugar to your liking. Serve it warm with bread or croutons for a tasty meal. Enjoy your delicious tomato basil soup! For a complete recipe, check the Full Recipe. To make your tomato basil soup extra tasty, focus on fresh herbs. Fresh basil adds a bright touch. You can also use other herbs, like thyme or parsley, for a twist. Seasoning is key! Start with salt and pepper to bring out the flavors. A dash of sugar balances the acidity of the tomatoes. Don’t forget to taste as you go. One common mistake is overcooking the garlic. If it burns, it can turn bitter. Add it just before the tomatoes for the best flavor. Another mistake is skipping the simmering step. This helps the flavors blend well. A quick boil won't do the trick. Lastly, don’t forget to blend the soup well. A chunky texture can be nice, but a smooth soup feels luxurious. Keep your heat at medium for sautéing the onions. This allows them to soften without burning. When it’s time to simmer, lower the heat. A gentle simmer for 20 minutes works best. If you want a silky texture, blend the soup until smooth. A few minutes of gentle heating after blending helps the basil infuse nicely. For the full recipe, check the complete guide above. Enjoy your cooking! {{image_4}} To make a creamy version of tomato basil soup, add heavy cream. This gives the soup a rich and smooth texture. Follow the original recipe and simply stir in 1/2 cup of heavy cream after blending the soup. Heat it gently over low heat for a few minutes. The cream balances the acidity from the tomatoes and adds depth. You can also use coconut cream for a dairy-free option. If you like a chunkier soup, add fresh veggies. Dice up some zucchini, bell peppers, or carrots. Sauté these with the onion at the start. This adds more color and nutrients to your dish. Keep the diced tomatoes, but don’t blend the soup completely. Just stir in the chopped fresh basil at the end for extra flavor. This version is hearty and satisfying. To make a vegan version, skip the heavy cream and use coconut milk instead. It gives a creamy texture and a hint of sweetness. Use vegetable broth and fresh basil as usual. This version keeps the dish plant-based and delicious. You’ll still enjoy all the flavors without animal products. For a kick, add crushed red pepper flakes when cooking. These variations show just how versatile tomato basil soup can be. Each version brings its own twist while keeping that classic flavor. For the full recipe, check out the complete guide. To store your tomato basil soup, let it cool first. Pour it into an airtight container. You can keep it in the fridge for 3 to 4 days. Make sure the lid seals tightly to keep it fresh. If you want to save it longer, freezing is a great option. For freezing, use freezer-safe containers. Leave some space at the top, as the soup will expand when it freezes. You can store it in the freezer for up to 3 months. Label the container with the date, so you know when you made it. It helps to freeze it in portion sizes for easy use later. When you're ready to eat, thaw the soup in the fridge overnight. To reheat, pour it into a pot over low heat. Stir often to prevent sticking. If you want a creamier texture, add a splash of cream while heating. You can also use a microwave, but stir halfway through to heat evenly. Enjoy your delicious soup! You can serve many tasty sides with Tomato Basil Soup. Here are some great options: - Crusty bread - Grilled cheese sandwiches - Homemade croutons - A fresh salad These choices add texture and flavor. For a fun twist, try a cheesy garlic bread. It pairs well with the soup's warmth. Tomato Basil Soup lasts about 3 to 5 days in the fridge. Store it in an airtight container to keep it fresh. To enjoy it longer, you can freeze it. Yes, you can make Tomato Basil Soup in advance. It tastes even better the next day! Just cook the soup, let it cool, and store it in the fridge. You can also freeze it for later use. When ready to serve, simply reheat it on the stove or in the microwave. For a full recipe, check out the Hearty Tomato Basil Delight. Making Tomato Basil Soup is simple and rewarding. We covered the key ingredients, preparation steps, and cooking tips. You can choose fresh basil and ripe tomatoes for the best taste. Variations like creamy or vegan options add more fun. Remember to store leftovers properly to keep them fresh. By avoiding common mistakes, you can create a perfect soup each time. I hope these insights inspire you to enjoy this classic dish all year round.](https://joymealplan.com/wp-content/uploads/2025/06/73c8b43a-025c-4169-ae99-725afa6fdd07-768x768.webp)


![To make Easy Chicken Tikka Masala, gather these essential ingredients: - 500g chicken breast, diced into bite-sized pieces - 1 cup plain yogurt - 2 tablespoons garam masala - 1 tablespoon ground cumin - 1 tablespoon ground coriander - 1 teaspoon turmeric - 1 teaspoon chili powder (adjust for spice level) - 4 cloves of garlic, finely minced - 1 inch fresh ginger, grated - 2 tablespoons olive oil - 1 medium onion, finely chopped - 1 can (400g) diced tomatoes, with juices - 1 cup coconut milk - Salt, to taste - Fresh cilantro (coriander), chopped, for garnish To boost the taste, you can add these optional items: - 1 tablespoon lemon juice for a tangy twist - 1-2 green chili peppers, chopped, for extra heat - 1 teaspoon sugar to balance flavors - Additional spices like cinnamon or cardamom for depth You will need these items to make cooking easier: - A large mixing bowl for marinating chicken - A sharp knife and cutting board for prep - A skillet or frying pan for cooking - A spoon or spatula for stirring - Measuring spoons for accurate ingredient amounts - A serving dish for presentation Gathering these ingredients and utensils sets you up for a flavorful cooking experience. Enjoy the process of making this delightful dish! To start, take a mixing bowl. In it, add 1 cup of plain yogurt. Then, mix in 2 tablespoons of garam masala, 1 tablespoon of ground cumin, and 1 tablespoon of ground coriander. Next, add 1 teaspoon of turmeric and 1 teaspoon of chili powder. You can adjust the chili powder to suit your taste. Finally, add half of the minced garlic and the grated ginger. Stir everything together until it forms a smooth marinade. This mix is key to a flavorful dish. Now, take 500g of diced chicken breast. Add it to the marinade you just made. Make sure every piece is well-coated. This is where the magic happens! Cover the bowl with plastic wrap or a lid. Place it in the refrigerator for at least 1 hour. For the best flavor, let it sit overnight. This allows the spices to soak into the chicken. Heat 2 tablespoons of olive oil in a large skillet over medium heat. Once the oil is hot, add 1 finely chopped onion. Sauté it for about 5 minutes until it turns soft and clear. Next, add the remaining minced garlic and grated ginger. Cook for 1-2 more minutes. This step fills your kitchen with a lovely aroma. Now, add the marinated chicken to the skillet. Reserve any leftover marinade. Cook the chicken for about 7-10 minutes until it browns. Then, pour in the can of diced tomatoes with their juices and the reserved marinade. Stir everything together and bring it to a simmer. Let it cook for 10 more minutes. Lower the heat, and stir in 1 cup of coconut milk. Mix it well. Let it simmer gently for another 10 minutes. You can add water if you want a thinner sauce. Season with salt to taste. When it’s ready, turn off the heat and let it sit for a few minutes. This resting time helps the flavors blend well. For the full recipe, refer to the earlier section. To get the best flavor, marinate your chicken well. Use plain yogurt as your base. Yogurt helps to tenderize the meat and adds a tangy taste. Mix yogurt with spices like garam masala, cumin, and turmeric. This mixture will coat every piece of chicken. Make sure to let it marinate for at least one hour. For the best results, marinate overnight. This gives the spices more time to soak in. Cooking techniques matter a lot. Start by sautéing onions in olive oil. This adds sweetness and depth to your dish. After the onions are soft, add garlic and ginger for more flavor. These ingredients should cook just until fragrant. This step enhances the taste of the whole dish. When adding the marinated chicken, let it brown well. Browning adds a nice texture. Finally, add diced tomatoes and coconut milk, stirring thoroughly to combine. To make your meal complete, serve Chicken Tikka Masala with basmati rice or naan. The rice soaks up the sauce, making every bite delicious. Naan is perfect for scooping up the sauce. For a fresh touch, garnish with chopped cilantro. You can also add lime wedges for extra zing. This adds a bright flavor that balances the spices. For more fun, consider serving a side salad or yogurt raita to cool things down. {{image_4}} You can easily swap chicken for vegetables or tofu. For a vegetarian version, use firm tofu. Cut it into cubes and marinate just like the chicken. You can also use mixed vegetables like bell peppers, zucchini, and cauliflower. These options soak up the spices nicely. Cook them until they're tender. The flavors will still shine through. Not everyone enjoys the same level of heat. If you want less spice, reduce the chili powder. Start with a half teaspoon and taste as you go. For more heat, add extra chili powder or even fresh chopped chilies. Remember, you can always add more, but it’s hard to take it away. If you have dietary needs, you can make changes easily. For a dairy-free version, use almond yogurt instead of plain yogurt. If you're gluten-free, check that all spices and canned goods are gluten-free. Coconut milk is a great dairy substitute, but you can also use vegetable broth for a lighter sauce. You can find the full recipe [here]. To store leftover chicken tikka masala, let it cool down first. Then, place it in an airtight container. This helps keep it fresh. Store it in the fridge for up to four days. If you want to keep it longer, consider freezing it. When reheating chicken tikka masala, use the stove for the best taste. Place it in a pan over low heat. Stir occasionally to warm it evenly. You can add a splash of water or coconut milk if it seems too thick. You can also use a microwave, but be careful not to overheat. To freeze chicken tikka masala, ensure it is fully cooled. Place it in freezer-safe bags or containers. Remove as much air as possible to prevent freezer burn. It can last up to three months in the freezer. When ready to eat, thaw it in the fridge overnight before reheating. Yes, you can make Easy Chicken Tikka Masala ahead of time. Prepare the dish, then cool it down. Store it in a sealed container in the fridge for up to three days. When ready to eat, just reheat on the stove until hot. This helps the flavors meld even more! If you want to swap out coconut milk, try using heavy cream or Greek yogurt. These options add creaminess without losing flavor. You can also use almond milk, but it may change the taste a bit. Just remember to adjust the seasoning to keep it tasty. Easy Chicken Tikka Masala can be made spicy or mild. The chili powder is the main spice. Start with a small amount if you prefer less heat. You can always add more later, but you can’t take it out once it’s in! Adjust it to your taste for the best experience. We explored how to make easy Chicken Tikka Masala, focusing on ingredients, instructions, and tips. You learned about required and optional ingredients that elevate flavor. Understanding marinating and cooking steps ensures juicy chicken. Plus, I shared ways to adapt recipes for different diets and spice levels. In closing, enjoy your meal and feel free to experiment. Happy cooking!](https://joymealplan.com/wp-content/uploads/2025/07/7203decf-58c7-4016-ac99-38120703d330-768x768.webp)
