Homemade Apple Crisp Delightful and Easy Recipe

Welcome to my delightful journey into the world of Homemade Apple Crisp! This easy recipe will leave your taste buds dancing with joy. Using fresh Granny Smith or Honeycrisp apples, lemon juice, and warm spices, we’ll create a sweet treat that fills your kitchen with a cozy aroma. With simple steps and tips, you’ll impress everyone at the table. Ready to dive into this scrumptious dessert? Let’s get started!
Ingredients
Fresh Ingredients
– Apples: Use 6 medium-sized apples. I prefer Granny Smith or Honeycrisp. They give a great balance of tartness and sweetness.
– Lemon juice: Add 1 tablespoon. It keeps apples from browning and brightens the flavor.
– Spices: Incorporate 1 teaspoon of cinnamon and ½ teaspoon of nutmeg. They add warmth and depth to the dish.
Topping Components
– Rolled oats: Use 1 cup. They create a chewy texture that complements the soft apples.
– Flour: Add ½ cup of all-purpose flour. This helps bind the topping together.
– Sweeteners: Use ⅓ cup of light brown sugar and ⅓ cup of granulated sugar. They add sweetness and depth to the topping.
Additional Ingredients
– Butter: Melt ½ cup of unsalted butter. It creates that golden crispiness we all love.
– Sea salt: Add ½ teaspoon. It enhances all the flavors in the dish.
– Optional ingredients: You can add ½ cup of chopped nuts, like walnuts or pecans, for a delightful crunch.
Step-by-Step Instructions
Prepping the Oven
Start by preheating your oven to 350°F (175°C). This heat is perfect for crisping the topping and softening the apples. Make sure to give your oven enough time to reach this temperature. A hot oven helps create that golden, crunchy layer we love.
Preparing the Apple Filling
In a large mixing bowl, slice and peel your apples. I like using Granny Smith or Honeycrisp for their sweet-tart balance. Add 1 tablespoon of fresh lemon juice to keep the apples bright. Next, sprinkle in 1 teaspoon of ground cinnamon, ½ teaspoon of ground nutmeg, and ⅓ cup of packed light brown sugar. Toss everything together gently. This step allows the flavors to blend well and makes the apples taste amazing.
Making the Crisp Topping
For the topping, grab another bowl. Combine 1 cup of rolled oats, ½ cup of all-purpose flour, and ⅓ cup of granulated sugar. Add ½ cup of melted unsalted butter and ½ teaspoon of sea salt. If you want some crunch, toss in ½ cup of chopped nuts too. Mix until it looks like coarse crumbs. This texture is key for a delightful topping.
Baking Process
Now it’s time to bake! Pour the apple mixture into a greased 9×13 inch baking dish. Spread the oat mixture over the apples, covering them completely. Place it in your preheated oven. Bake for 35-40 minutes. Look for tender apples and a golden-brown topping. Keep an eye on it to avoid burning. Once it’s done, let it cool slightly before serving. Enjoy the wonderful smells in your kitchen!
Tips & Tricks
Achieving the Perfect Crisp
To get the best topping, start with cold butter. Cut it into small pieces before mixing. This helps create a crunchy texture. Use a fork or your fingers to mix the topping. You want it to look like coarse crumbs. Don’t over-mix; it should still have some lumps. A sprinkle of sea salt can enhance the flavor.
Apple Selection Tips
Choosing the right apples is key. I recommend using Granny Smith or Honeycrisp apples. They give a nice balance of sweet and tart. Make sure they are firm. Soft apples turn mushy during baking. You can also mix varieties for added depth. A combination can create a more complex taste.
Serving Suggestions
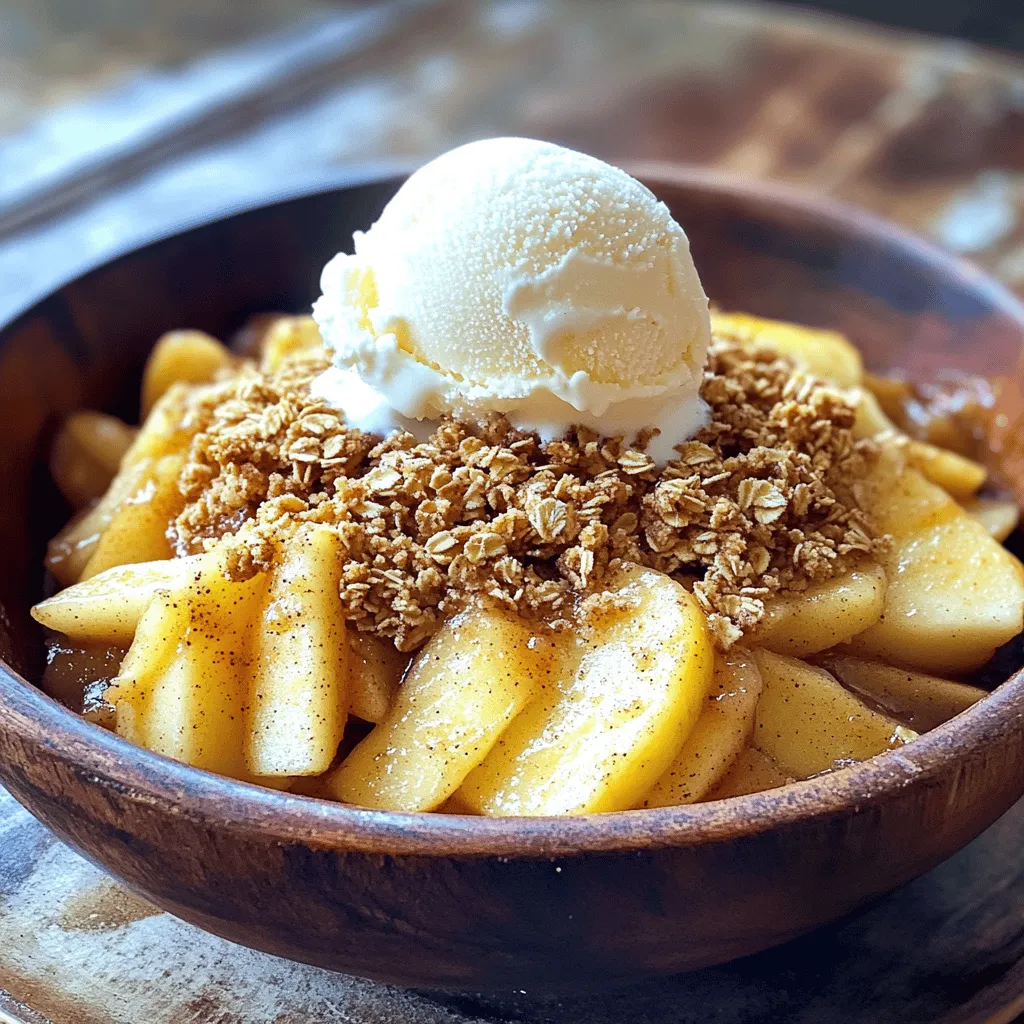
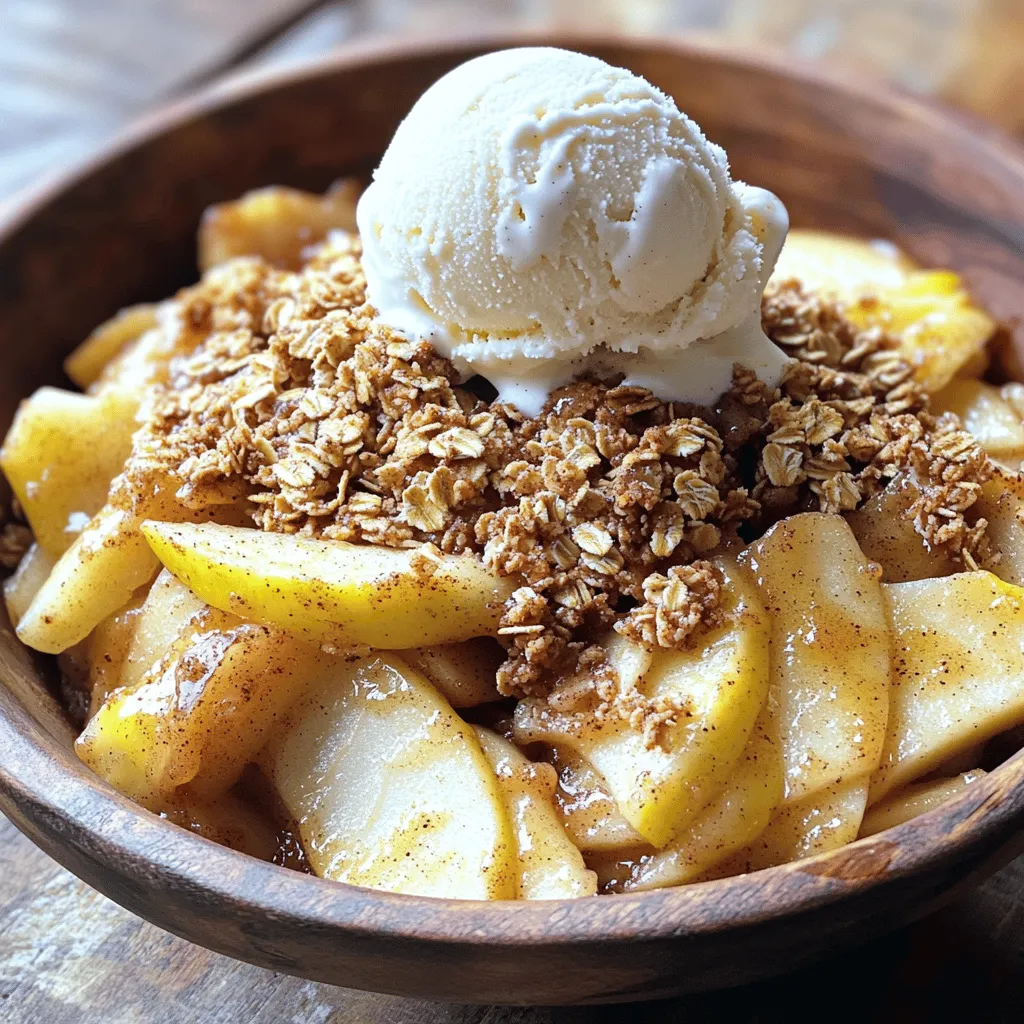
Serve your crisp warm for the best experience. I love pairing it with vanilla ice cream. The cold ice cream melts into the warm crisp. It creates a wonderful contrast. Whipped cream also works great as a topping. A sprinkle of cinnamon on top adds a nice touch. Enjoy each bite!

Variations
Fruit Additions
You can mix in other fruits for a fun twist. Try adding berries, like blueberries or raspberries. Pears also work well! They add sweetness and a nice texture. Just remember, if you use juicier fruits, you may need to adjust the sugar or cook time. This keeps the crisp from getting too wet.
Flavor Enhancements
Adding spices can take your apple crisp to the next level. Ginger and cloves bring warmth and depth. You can mix in a teaspoon of ground ginger or half a teaspoon of ground cloves. These spices create a cozy flavor that pairs perfectly with apples. Feel free to experiment with nutmeg too, which adds a nice kick.
Healthier Substitutions
If you want a healthier option, you can swap out some ingredients. Use coconut oil instead of butter for a dairy-free treat. You can also use gluten-free flour if you need it. It works well to keep the crisp texture. Lastly, try reducing the sugar or using a natural sweetener like maple syrup for a lighter taste.
Storage Info
Short Term Storage
To keep your apple crisp fresh in the fridge, let it cool completely. Once cool, cover it tightly with plastic wrap or aluminum foil. Store it in the fridge for up to three days. This method helps keep the apples tender. The topping may lose some crunch, but the flavors will still shine.
Long Term Storage
For long-term storage, you can freeze your apple crisp. First, let it cool completely. Then, wrap it tightly in plastic wrap and place it in a freezer-safe container. It can last in the freezer for up to three months. When you want to enjoy it, thaw it in the fridge overnight.
Reheating Instructions
To reheat and restore crispiness, preheat your oven to 350°F (175°C). Place the apple crisp in an oven-safe dish. Cover it loosely with foil to prevent burning. Heat for about 20-25 minutes until warm. Remove the foil for the last 5 minutes to crisp up the topping. This method ensures you enjoy that delightful crunch again!
FAQs
Can I make apple crisp ahead of time?
Yes, you can make apple crisp ahead of time. To do this, prepare the apple mixture and topping separately. Store the apples in the fridge after mixing them with lemon juice and spices. Keep the topping in an airtight container at room temperature. When you’re ready to bake, combine them in a dish and bake as instructed. This method saves time and keeps the crisp fresh.
What types of apples are best for apple crisp?
The best apples for apple crisp are Granny Smith and Honeycrisp. Granny Smith apples are tart and hold their shape well when cooked. Honeycrisp apples provide a nice balance of sweetness and tartness. Using a mix of these apples gives you a deep flavor and great texture in your crisp.
Can I make this recipe vegan?
Yes, you can make this recipe vegan! Substitute the unsalted butter with coconut oil or vegan butter. For the sweeteners, you can use maple syrup or agave nectar instead of brown sugar. These swaps keep the dish delicious while making it plant-based. Enjoy your vegan apple crisp!
Making apple crisp involves fresh apples, spices, and a perfect topping. We explored the best ingredients, like Granny Smith apples and rolled oats for texture. Step-by-step, I guided you from prepping the oven to baking and achieving that golden crust. Remember to try different fruits and spices to keep it exciting. Store leftovers carefully in the fridge or freeze them for later. With these tips, you can enjoy a warm, tasty treat anytime. Now, it’s time to gather your ingredients and start baking your own delicious apple crisp!


![- 2 cups all-purpose flour - 1/4 cup granulated sugar - 1 tablespoon baking powder - 1/2 teaspoon salt - 1/2 cup unsalted butter, cold and cut into small cubes - Zest of 1 large lemon - 1/2 cup fresh blueberries (or frozen blueberries, thawed and drained) - 1/2 cup heavy cream - 1 large egg, at room temperature - 1 teaspoon pure vanilla extract - 1 tablespoon freshly squeezed lemon juice The ingredients are simple but full of flavor. I love using fresh blueberries for their burst of sweetness. If you can't find fresh ones, frozen work well too. Just make sure to thaw and drain them first. The zest of lemon adds a bright touch that pairs perfectly with the blueberries. It’s key to use cold butter. This helps create flaky layers in the scones. The heavy cream gives richness, while the egg adds structure. - You can use whole milk or buttermilk instead of heavy cream. - For a different sweetness, try brown sugar or honey. - Feel free to swap blueberries for other fruits like raspberries or cranberries. These variations let you play with flavors. It’s fun to experiment and find your favorite twist! If you want a vegan option, replace the egg with a flaxseed mixture. Just combine one tablespoon of flaxseed meal with three tablespoons of water, and let it sit for a few minutes until it thickens. You can find the full recipe for these delightful scones in the section above. 1. Preheat your oven to 400°F (200°C). Line a baking sheet with parchment paper. 2. In a large bowl, mix 2 cups of all-purpose flour, 1/4 cup of granulated sugar, 1 tablespoon of baking powder, and 1/2 teaspoon of salt. Stir well with a whisk. 3. Add 1/2 cup of cold, cubed unsalted butter to the flour mix. Use your fingers or a pastry cutter. Work it until it looks like coarse crumbs, with some larger pieces remaining. 1. Gently fold in the zest of 1 large lemon and 1/2 cup of fresh blueberries. Be careful not to crush them. 2. In a separate bowl, whisk together 1/2 cup of heavy cream, 1 large egg, 1 teaspoon of pure vanilla extract, and 1 tablespoon of freshly squeezed lemon juice. Mix until smooth. 3. Pour the wet mix into the dry mix. Stir with a spatula until just combined. The dough should be slightly sticky. 1. Transfer the dough to a floured surface. Knead it lightly about 3 to 4 times until it comes together. Form it into a circle about 1-inch thick. 2. Cut the dough into 8 wedges, like slicing a pizza. Place them on the lined baking sheet, leaving space between each scone. 3. Bake for 15-20 minutes. Check for a golden brown top and use a toothpick to see if it comes out clean. 4. Let the scones cool on the baking sheet for 5 minutes. Then, move them to a wire rack to cool completely. For the complete recipe, check the Full Recipe section. To make great scones, start with cold butter. Cold butter helps create flaky layers. Cut it into small cubes before mixing. This keeps the butter pieces intact. When you mix, use a gentle touch. Overmixing can lead to tough scones. Mix just until combined; it’s okay if the dough is slightly sticky. To make your scones stand out, add spices or herbs. A pinch of cinnamon can bring warmth. Fresh basil or thyme can add a unique twist. For a glaze, mix powdered sugar with lemon juice. This adds a sweet and tangy finish. Serve your scones warm for the best taste. Serve your scones on a beautiful plate. Add a dusting of powdered sugar for flair. Pair them with clotted cream or butter for a rich experience. You can even add fresh berries on the side for color. A simple yet elegant display makes your scones shine. To get the full recipe, check out the Lemon Blueberry Dream Scones. {{image_4}} You can change the flavor of your scones easily. Try using other fruits like raspberries or cranberries. These fruits add a new twist to the classic recipe. You can also switch to citrus fruits. Instead of lemon, use orange or lime zest for a fresh taste. Each fruit brings its own unique flavor. Don't be afraid to experiment! If you need gluten-free scones, simply swap the all-purpose flour for a gluten-free blend. Many brands make great options that work well in baking. For a vegan version, replace the butter with coconut oil or a vegan butter. Use a plant-based milk instead of heavy cream. You can also use a flax egg to replace the regular egg. These changes can still yield tasty scones. Make your scones fun for special occasions! Add festive spices like cinnamon or nutmeg for fall events. For holidays, try adding a cranberry glaze. You can shape your scones into hearts for Valentine's Day or stars for the Fourth of July. These special touches make your treats stand out. You can find the full recipe to try these variations at home! To keep your scones fresh, store them in an airtight container. You can place parchment paper between layers to avoid sticking. This helps maintain their texture. If you have a lot, use a resealable bag. Make sure to squeeze out excess air. Your Lemon Blueberry Scones will stay tasty for up to three days at room temperature. When reheating scones, the goal is to keep them soft. You can use an oven or a microwave. For the oven, preheat it to 350°F (175°C). Wrap each scone in foil to keep them moist. Heat for about 10 minutes. If using the microwave, place a scone on a plate. Cover it with a damp paper towel. Microwave it for about 15-20 seconds. For longer storage, freezing is a great option. Wrap each scone tightly in plastic wrap. Then, place them in a freezer-safe bag. They can last up to three months. When you are ready to eat them, thaw in the fridge overnight. Then, reheat as mentioned above. Enjoy the fresh taste again! For the complete recipe, check out the [Full Recipe]. Can I make these Lemon Blueberry Scones ahead of time? Yes, you can prepare the dough and chill it. Wrap it in plastic wrap and store in the fridge overnight. Bake when you are ready. What is the best way to freeze scones? To freeze scones, bake them first. Let them cool, then place in an airtight bag. They stay fresh for about three months. How do I know when my scones are done baking? Scones are done when they turn golden brown. You can also insert a toothpick into the center. If it comes out clean, they are ready. Can I use frozen blueberries? Yes, frozen blueberries work well. Just make sure to thaw and drain them first. This helps avoid extra moisture in your scone dough. What should I do if my dough is too sticky? If your dough is sticky, add a bit more flour. Sprinkle a little at a time while mixing gently. You want it to be a soft dough, not too wet. Can I add more lemon zest for a stronger flavor? Absolutely! Adding more lemon zest gives a bright and fresh taste. Just be mindful not to overpower the blueberries. What other flavors pair well with lemon and blueberry? Lemon and blueberry go well with herbs like thyme or basil. You can also try adding a hint of almond extract for a unique twist. In this post, we explored how to make perfect Lemon Blueberry Scones. We covered ingredients, step-by-step instructions, essential tips, variations, and storage methods. With simple techniques, you can create delicious scones that impress everyone. Remember, using cold butter is key for the right texture. Experiment with flavors and enjoy your tasty treats. Now, go bake some scones and share them with friends and family!](https://joymealplan.com/wp-content/uploads/2025/07/84e54135-a0a0-42e2-a72a-4461fccf9179-768x768.webp)


