Honey Balsamic Roasted Vegetables Flavorful Side Dish

Looking for a tasty side dish that will wow your family and friends? Honey balsamic roasted vegetables are here to save the day! This easy recipe brings together sweet and savory flavors that will enhance any meal. You can use a range of fresh veggies and simple pantry staples. Get ready to fill your kitchen with delightful aromas as I guide you through making these flavorful roasted veggies!Enjoy creating this tasty side dish!
Step-by-Step Instructions
Preheat the Oven
Start by preheating your oven to 425°F (220°C). This high heat helps the veggies caramelize. Preheating is key for even cooking.
Preparing the Vegetables
In a large bowl, add:
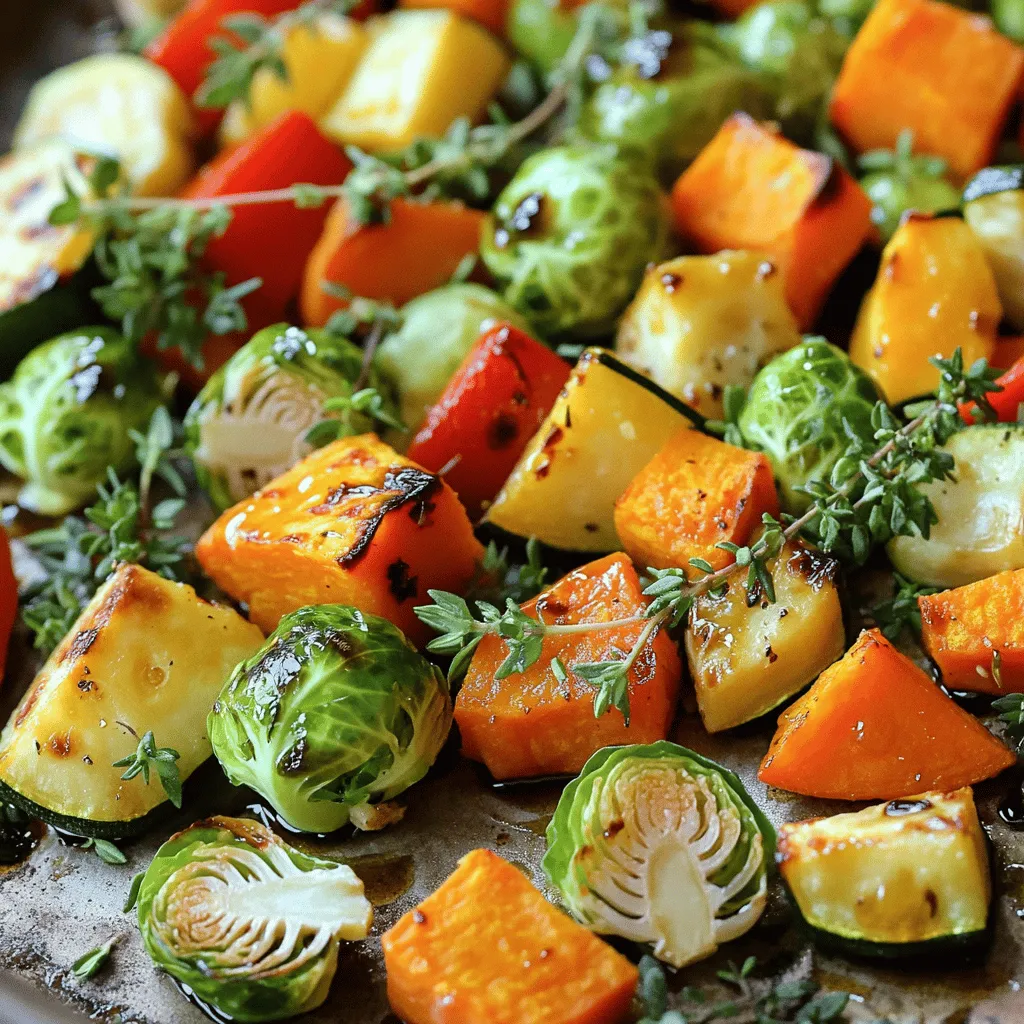
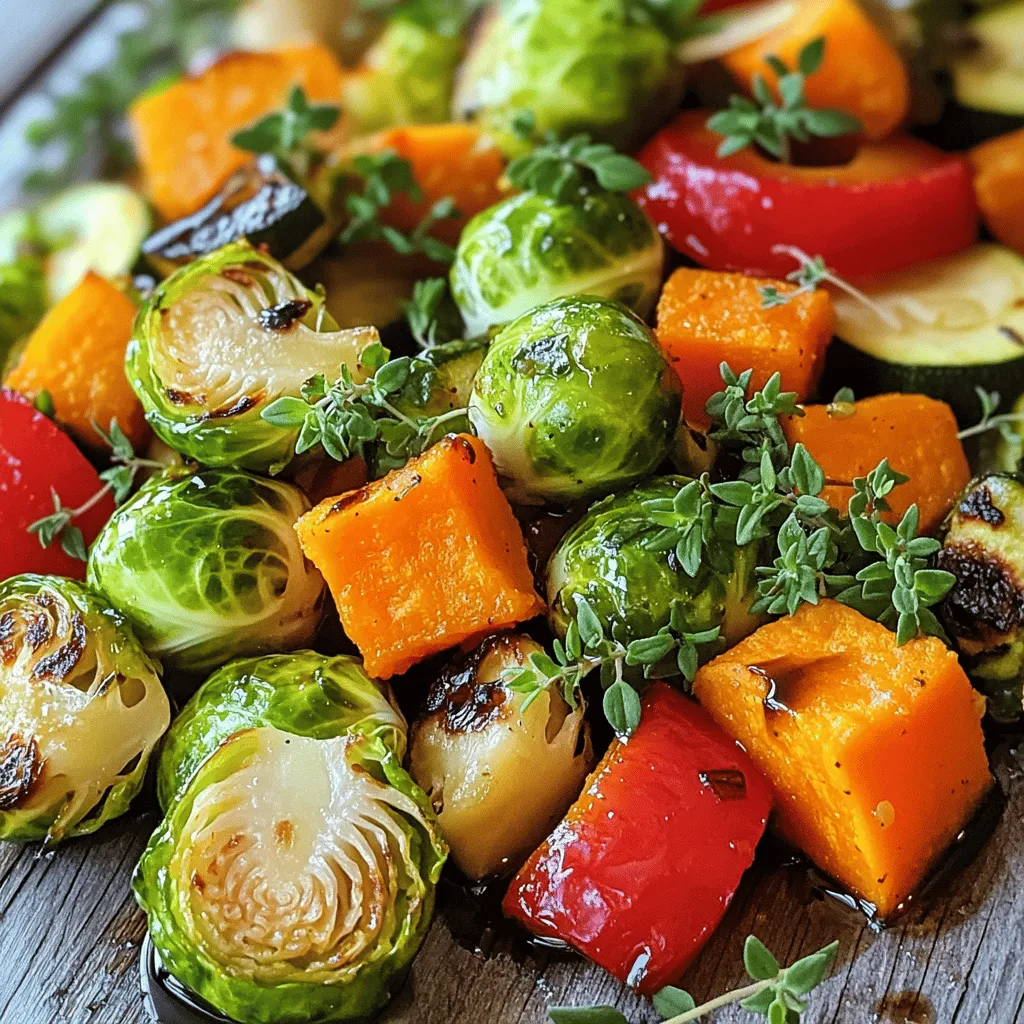
– 2 cups Brussels sprouts, halved
– 1 medium sweet potato, peeled and diced into 1-inch cubes
– 1 red bell pepper, chopped into bite-sized pieces
– 1 zucchini, sliced into ½-inch rounds
– 1 red onion, cut into wedges
Gently toss the vegetables together. This step mixes the flavors well and ensures even roasting.
Making the Honey Balsamic Dressing
In a small bowl, whisk together:
– 3 tablespoons extra virgin olive oil
– 3 tablespoons balsamic vinegar
– 2 tablespoons honey
– 1 teaspoon garlic powder
– Salt and freshly ground black pepper, to taste
Whisk until smooth. This dressing gives the vegetables a sweet and tangy flavor.
Arranging and Roasting the Vegetables
Pour the dressing over the mixed vegetables. Toss them well to coat. Spread the vegetables on a baking sheet lined with parchment paper. Make sure they are in a single layer. This helps them roast evenly.
Place the baking sheet in your preheated oven. Roast for 25-30 minutes. Halfway through, toss the veggies gently to ensure even cooking.
When they are tender and caramelized, take them out and let them cool slightly. Serve them warm, garnished with fresh thyme or parsley.
Tips & Tricks
Achieving Perfectly Roasted Vegetables
To get the best roasted vegetables, you need the right temperature. I recommend using 425°F (220°C). This heat helps caramelize the veggies, giving them a sweet flavor. Cut your vegetables into similar sizes. This helps them cook evenly. Spread them out in a single layer on your baking tray. Crowding the pan will steam the veggies instead of roasting them.
Recommended Cooking Times for Different Veggies
Different vegetables need different times to roast. Here are some tips:
– Brussels sprouts: Roast for 25-30 minutes.
– Sweet potato: Roast for 30-35 minutes.
– Bell pepper: Roast for 20-25 minutes.
– Zucchini: Roast for 15-20 minutes.
– Red onion: Roast for 20-25 minutes.
Check on them halfway through and give them a good toss for even cooking.
Ways to Enhance Flavor
You can boost the flavor of your honey balsamic roasted vegetables in many ways. Here are some ideas:
– Add spices: Try chili powder or smoked paprika for a kick.
– Use fresh herbs: Toss in rosemary or oregano for a fragrant touch.
– Add nuts: Sprinkle some walnuts or almonds for crunch.
– Drizzle more honey: A touch of extra honey before serving will enhance sweetness.
These tips will make your vegetables pop with flavor.Enjoy the deliciousness!

Variations
Alternative Vegetable Combinations
You can mix and match vegetables to suit your taste. Try carrots, butternut squash, or cauliflower. Each choice adds a unique flavor. For a twist, use root veggies like parsnips or turnips. They roast well and add sweetness. If you want color, add yellow bell peppers or purple eggplant. Keep in mind, different veggies may need varying cooking times.
Ingredient Substitutions for Dietary Preferences
If you follow a special diet, there are easy swaps. For a vegan option, replace honey with maple syrup or agave nectar. This keeps the sweetness without animal products. If you need gluten-free, all ingredients are already safe. You can also use coconut oil instead of olive oil for a different taste.
Different Ways to Serve Honey Balsamic Roasted Vegetables
These roasted vegetables shine in many meals. Serve them as a side dish with grilled chicken or fish. They also work great in salads or grain bowls. For a hearty meal, toss them with quinoa or farro and a drizzle of more balsamic glaze. You can even add nuts like walnuts or almonds for crunch.
Storage Info
How to Store Leftovers
After enjoying your honey balsamic roasted vegetables, let them cool. Place the leftovers in an airtight container. Store them in the fridge. They will stay fresh for about three to five days. Make sure to keep them sealed tight to prevent drying out.
Reheating Tips for Best Texture
To reheat, use the oven for the best texture. Preheat your oven to 350°F (175°C). Spread the vegetables on a baking sheet. Heat them for about 10 to 15 minutes. This helps to keep them crispy and flavorful. You can also use a microwave if you’re short on time. Just be aware that they may lose some crispness.
Freezing Guidelines and Tips
You can freeze honey balsamic roasted vegetables for later use. First, let them cool completely. Then, spread them on a baking sheet in a single layer. Freeze for about an hour until they are firm. After that, transfer them to a freezer-safe bag or container. They will last for up to three months in the freezer. When ready to use, thaw them overnight in the fridge before reheating. This method keeps the flavors intact.
FAQs
How can I make this recipe vegan?
You can make honey balsamic roasted vegetables vegan by replacing honey with maple syrup or agave. These sweeteners work well and maintain the dish’s flavor. Simply swap the honey in the recipe for an equal amount of your chosen sweetener.
Can I use different types of vegetables?
Yes, you can use different vegetables! Feel free to swap in your favorites. Carrots, cauliflower, or even asparagus can work great. Just make sure to cut them into similar sizes for even roasting. Adjust the cooking time based on the vegetables you choose.
What are the nutritional benefits of honey balsamic roasted vegetables?
Honey balsamic roasted vegetables are packed with nutrients. They provide vitamins, minerals, and fiber. The variety of colorful veggies boosts antioxidants too. The olive oil adds healthy fats, while honey offers natural sweetness without refined sugars. This dish supports a balanced diet.
How long do roasted vegetables last in the fridge?
Roasted vegetables can last in the fridge for about 3 to 5 days. Store them in an airtight container to keep them fresh. When reheating, use the oven or a skillet to maintain their texture. Enjoy your tasty leftovers!
This blog post covered the key steps to make delicious honey balsamic roasted vegetables. We discussed the essential ingredients, simple instructions, and helpful tips for perfect results. You can mix and match vegetables and make it your own. Remember, leftovers can be stored well and enjoyed later. Roasted vegetables are easy and tasty for meals. Try this recipe for a healthy side dish or snack today. Keep experimenting and enjoy your cooking journey!


![- 1 block firm tofu - 1/4 cup cornstarch - 2 tablespoons vegetable oil - 1 cup cooked brown rice - 1 cup broccoli florets - 1 cup snap peas - 1 medium carrot, julienned - 1 red bell pepper, sliced into thin strips - 1/4 cup teriyaki sauce - 1 tablespoon sesame seeds - 2 green onions, sliced thinly - Optional: lime wedges for serving This recipe for crispy teriyaki tofu bowls highlights delicious flavors and fresh veggies. You start with firm tofu because it holds its shape well when cooked. Make sure to press and drain it thoroughly before cooking. This step removes extra moisture and helps achieve that perfect crunch. Next, you coat the tofu cubes in cornstarch. This coating is key for creating a crispy exterior. The cornstarch absorbs moisture and forms a crunchy crust when you sauté the tofu. For the veggies, I love using broccoli, snap peas, carrots, and red bell pepper. These not only add color but also provide a mix of textures and flavors. They pair wonderfully with the savory teriyaki sauce. Speaking of the sauce, you can use store-bought teriyaki sauce for ease or make your own at home. Either way, the sauce adds a sweet and salty kick to the dish. Adding sesame seeds and sliced green onions on top gives the bowls a nice finish. If you want a bit of zing, serve lime wedges on the side. For the full recipe, refer to the earlier section. Enjoy making these tasty crispy teriyaki tofu bowls! Start by pressing the tofu. This step removes extra moisture. Slice the tofu into bite-sized cubes. I like to use a sharp knife for clean cuts. Next, coat the tofu. Sprinkle cornstarch over the cubes in a bowl. Toss the tofu gently until each piece is coated. This coating helps achieve a crispy texture when cooking. Heat vegetable oil in a large non-stick skillet. Use medium-high heat for the perfect crisp. Once hot, add the tofu. Cook for about 8-10 minutes. Turn the cubes to cook evenly. Watch for a golden-brown color on all sides. This is how you get that crunch that everyone loves. While the tofu cooks, steam the broccoli and snap peas. Use a steamer basket over boiling water. Steam for about 3-4 minutes. You want the veggies to be bright and tender-crisp. This keeps their color and nutrients intact. For added crunch, prepare other vegetables like carrots and bell peppers as you go. Once the tofu is crispy, lower the heat. Pour teriyaki sauce over the tofu. Stir gently to coat each piece. Allow it to cook for 1-2 more minutes. This gives the sauce time to thicken and stick to the tofu. The flavor will be rich and delicious. In each serving bowl, start with a layer of brown rice. Top it with the crispy teriyaki tofu. Add the steamed broccoli, snap peas, julienned carrots, and red bell pepper slices. The colors will make your dish pop. Finally, garnish with sesame seeds and sliced green onions. This adds a nice touch and extra flavor. For an optional zest, serve lime wedges on the side. For the full recipe, check out [Full Recipe]. To make your tofu crispy, drying is key. After pressing the tofu, pat it dry well. This helps remove extra moisture. Less moisture means a better fry and a crispier texture. The oil temperature matters too. Heat your vegetable oil over medium-high heat. If the oil is too cool, the tofu will soak up oil instead of becoming crispy. A good test is to drop a small piece of tofu in the oil. If it sizzles, you're ready to fry. To make your teriyaki tofu even tastier, consider adding spices or marinades. You can sprinkle garlic powder or ginger for extra flavor. Marinating the tofu for at least 15 minutes can also deepen its taste. Choosing the right teriyaki sauce is crucial. You can buy sauce or make your own for a fresher taste. A sauce with a balance of sweet and salty works best. Look for options with natural ingredients for a healthier dish. When serving your teriyaki tofu, pair it with sides that complement the dish. Steamed rice works great, but you can also try quinoa for a nutty flavor. Adding a side salad can enhance the meal's freshness. You can customize your bowl to fit your tastes. Try swapping out vegetables based on what you like. Add more crunch with sliced radishes or extra color with yellow bell peppers. Enjoy the freedom to make it your own! For the full recipe, refer to the section above. {{image_4}} If you want to switch up the protein, tofu isn’t your only choice. You can use chicken or tempeh instead. Both options add great flavor and texture. For chicken, choose boneless, skinless thighs for juiciness. Cut them into bite-sized pieces and cook them like the tofu. Tempeh, made from fermented soybeans, offers a nutty taste. Simply slice it and coat it in cornstarch, just like the tofu. You can make your bowls even better with seasonal veggies. In spring, try asparagus or green beans. In summer, add zucchini or bell peppers. Fall offers butternut squash or Brussels sprouts. You can also mix in leafy greens like spinach or kale. They add nutrients and a vibrant color. Mushrooms are another great choice. They bring umami and a meaty bite. While store-bought teriyaki sauce is tasty, making your own is fun and easy. Combine soy sauce, honey, garlic, and ginger for a fresh taste. Simmer it until it thickens. Other sauces can work too. Try a spicy chili sauce for heat or a peanut sauce for creaminess. Each option brings its own unique flavor to your crispy tofu bowls. For the full recipe, check out the Crispy Teriyaki Tofu Bowls. To store your leftover crispy teriyaki tofu bowls, place them in an airtight container. Make sure the bowl cools down to room temperature before sealing it. This helps keep the tofu crispy and the veggies fresh. You can store these bowls in the fridge for up to three days. If you plan to enjoy them later, it's best to keep the sauce separate until you're ready to eat. For the best texture when reheating, use an oven or a skillet. Preheat your oven to 350°F (175°C) and place the tofu bowls on a baking sheet. Heat for about 10 to 15 minutes until warmed through. If using a skillet, add a splash of water to prevent sticking and cover it. This method helps retain the crispiness of the tofu and keeps the veggies tender. You can freeze these tofu bowls for later use. To do this, let the bowls cool completely. Place the tofu and veggies in a freezer-safe container. Avoid freezing the rice, as it can become mushy. These bowls can last up to three months in the freezer. When you're ready to enjoy them, thaw in the fridge overnight and reheat using the methods above. To make tofu crispy, follow these key steps: - Press the tofu: Remove as much water as you can. - Cube the tofu: Cut it into even, bite-sized pieces. - Dry the tofu: Pat each piece with a paper towel. - Coat with cornstarch: Sprinkle cornstarch evenly over the tofu. - Heat the oil: Use a hot skillet with vegetable oil. - Cook until golden: Sauté the tofu for about 8-10 minutes, turning it often. These steps help create a crispy texture that you will love. Yes, you can easily make this dish vegan. Here are some simple swaps: - Use plant-based teriyaki sauce: Check labels for non-vegan ingredients. - Add more vegetables: Use any fresh veggies you enjoy. - Try different grains: Substitute brown rice with quinoa or farro. These changes keep the dish tasty and vegan-friendly. Store your leftover teriyaki tofu bowls with these tips: - Use airtight containers: Keep air out to maintain freshness. - Refrigerate: Store in the fridge for up to 3 days. - Separate the sauce: Keep the sauce separate to avoid sogginess. These steps help retain taste and texture. Serve your teriyaki bowls in an eye-catching way. Here are some ideas: - Layer the ingredients: Start with a base of rice, then tofu, and veggies on top. - Garnish well: Add sesame seeds and green onions for flair. - Use lime wedges: Serve with lime on the side for a zesty kick. These tips make your dish look appealing and delicious. You can find the full recipe [here](#). This guide covered making teriyaki tofu bowls from start to finish. You learned about key ingredients and how to prepare everything for a tasty meal. We shared tips for crispy tofu and ideas for variations. Remember, adjust the dish to fit your taste and enjoy it fresh or stored for later. This meal is healthy, fun, and easy to customize. Dive in and have fun cooking!](https://joymealplan.com/wp-content/uploads/2025/06/6f569fa0-62f8-4b7a-b8f1-a73cdf9881a3-768x768.webp)

![- Feta cheese - Cherry tomatoes - Olive oil - Garlic - Dried oregano - Red pepper flakes - Salt and pepper - Pasta options (penne or fusilli) - Fresh basil leaves - Optional garnishes (lemon zest) For this dish, you need fresh and high-quality ingredients. The feta cheese brings creaminess, while the cherry tomatoes add sweetness. Olive oil enhances the flavor and helps with cooking. Garlic gives a lovely aroma and taste. Dried oregano adds a hint of earthiness, and red pepper flakes can bring a nice kick. Salt and pepper are essential for seasoning. You can pick either penne or fusilli pasta for this recipe. Both hold the creamy sauce well. Fresh basil leaves add brightness and color to your dish. If you want a zesty touch, lemon zest is a perfect addition. When you gather these ingredients, you set the stage for a simple yet delightful meal. Each component plays a role in making your baked feta pasta a creamy delight. Be sure to look at the full recipe for all the details! First, set your oven temperature to 400°F (200°C). This temperature works well for baking the feta and tomatoes. Next, choose a baking dish that fits all your ingredients. A medium-sized dish works best, allowing enough space for everything. Now it’s time to create your dish. Place the block of feta cheese in the center of the baking dish. Surround it with the halved cherry tomatoes. This colorful mix makes the dish look inviting. Drizzle olive oil over the feta and tomatoes. Then, add minced garlic, dried oregano, red pepper flakes, salt, and pepper. This step adds a burst of flavor to the dish. Place the dish in your preheated oven. Bake for about 30 minutes. Look for the tomatoes to blister and the feta to soften. When it’s ready, the feta should turn a lovely golden color. While that bakes, boil salted water in a pot for the pasta. Cook the pasta according to the package instructions until it is al dente. After cooking, drain the pasta and set it aside. After 30 minutes, carefully take the baking dish out of the oven. Use a fork to mash the softened feta and blistered tomatoes. This creates a creamy sauce. Now, gently fold the cooked pasta into your baking dish. Toss everything together to coat the pasta well. Finally, taste your dish and adjust the seasoning. You can add more salt, pepper, or red pepper flakes for extra flavor. Serve the dish right away, garnished with fresh basil leaves. If you like, add a sprinkle of grated lemon zest for a refreshing twist. Enjoy your simple and creamy delight! For more details, check the Full Recipe. To get the best baked feta pasta, know your oven. Every oven heats a little differently. If yours runs hot, lower the temp by 25°F. Check on the dish after 25 minutes. Look for blistered tomatoes and soft feta. If the feta is golden and creamy, it’s ready! Cook your pasta to al dente. This means it should still have a slight bite. Follow the package directions, but check it a minute early. Save some starchy pasta water when draining. This water helps the sauce stick to the pasta. Want to boost flavor? Try adding a pinch of lemon zest or a dash of balsamic vinegar. Fresh herbs like parsley or thyme can brighten the dish too. If you like heat, toss in more red pepper flakes. You can mix and match spices to fit your taste! {{image_4}} You can easily make Baked Feta Pasta gluten-free. Just use gluten-free pasta instead of regular pasta. Many brands offer tasty options that work well. If you want a vegan version, substitute feta cheese with a plant-based alternative. Look for brands that make creamy vegan feta. These options still give that tangy flavor you love. To add some color and nutrition, toss in vegetables. Spinach wilts nicely and adds a fresh taste. Zucchini can also work well; just chop it into small pieces. For protein, you can add cooked chicken or shrimp. Both will make your dish more filling. Cook the protein separately, then mix it in right before serving. While penne and fusilli are great, you can use other pasta types too. Bowtie or rotini can hold the creamy sauce well. For a lighter option, serve the dish over zoodles or spiralized veggies. You’ll get a fresh twist while keeping it healthy. For the full recipe, check out [Full Recipe]. After you enjoy your baked feta pasta, store any leftovers in the fridge. Use a tight container to keep it fresh. Make sure to cool it down before sealing. It will stay good for about three to four days. This dish tastes great the next day, too. You can reheat your pasta in two ways: the microwave or the oven. If you use the microwave, heat in short bursts. Stir it after each burst to keep it creamy. For the oven, preheat to 350°F (175°C). Place the pasta in an oven-safe dish, cover it, and heat for about 15 minutes. This way, you maintain the texture of the sauce. Yes, you can freeze this dish, but it’s best to freeze it before baking. Place the unbaked dish in a freezer-safe container. It will last around two to three months. When ready to eat, thaw it overnight in the fridge and bake as normal. If you freeze it after baking, the texture might change, but it’s still tasty. Just be careful when reheating to avoid drying it out. Baked Feta Pasta started in Finland. It became popular on social media in 2020. The dish caught on for its simple steps and great taste. People enjoyed the creaminess of feta mixed with tomatoes. It became a fun way to cook pasta. Now, it's a favorite in many homes worldwide. Yes, you can prep Baked Feta Pasta ahead of time. You can bake the feta and tomatoes the night before. Store them in the fridge after cooling. When ready to eat, cook the pasta and mix it in. Just be sure to adjust the baking time as needed. Baked Feta Pasta has some healthy aspects. Feta cheese offers protein and calcium. Tomatoes provide vitamins and antioxidants. However, it also has olive oil and pasta, which add calories. Balance is key. You can add veggies for extra nutrients. This dish pairs well with many sides. A fresh salad with greens is great. Garlic bread adds a nice crunch. You can also serve it with roasted vegetables. For a light option, try steamed broccoli or green beans. To add heat, use more red pepper flakes. You can also try adding sliced jalapeños. For a smoky flavor, mix in some smoked paprika. Taste as you go, so it's just right for your spice level. In this blog post, we explored how to create baked feta pasta. We covered the ingredients, step-by-step instructions, and tips for the perfect dish. Remember to select fresh ingredients for the best flavor. You can personalize the recipe with your choice of pasta and optional add-ins. This dish is simple, satisfying, and perfect for any meal. Enjoy experimenting with flavors and variations to make it your own. With these steps, you'll serve a delightful meal that family and friends will love.](https://joymealplan.com/wp-content/uploads/2025/07/e04698b2-b085-49cc-98ed-107e8e7c4045-768x768.webp)


