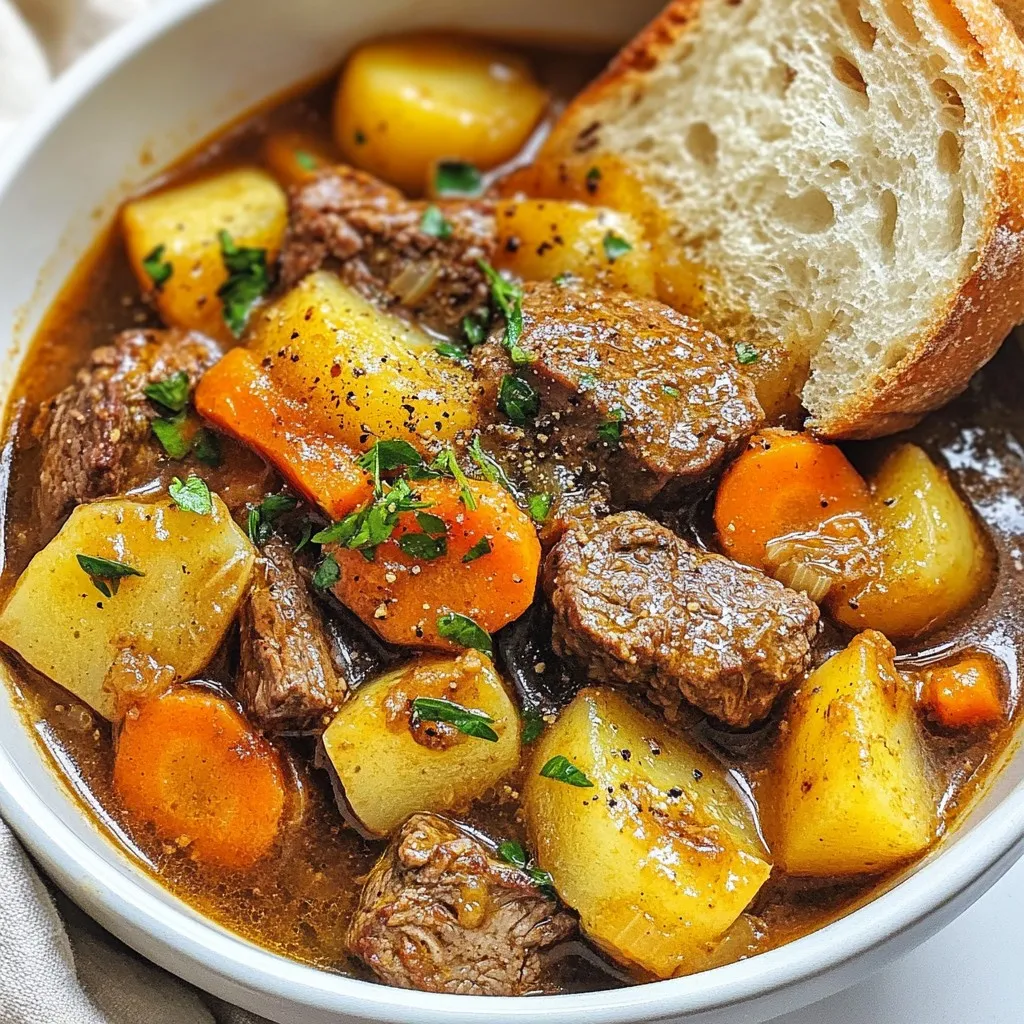
If you’re craving a warm, hearty meal, look no further than my Instant Pot Beef Stew. This dish combines tender beef, fresh vegetables, and a rich broth, making it perfect for any dinner table. With just a few simple steps and ingredients, you can create a flavor-packed stew in no time. Join me as I guide you through this easy recipe that promises to warm your heart and satisfy your appetite!
Why I Love This Recipe
- Comforting Flavor: This beef stew is packed with rich flavors from the tender beef and aromatic herbs, making it the perfect comfort food for chilly evenings.
- Easy Preparation: The Instant Pot simplifies the cooking process, allowing you to create a hearty meal without spending hours in the kitchen.
- Nutrition Packed: With a variety of vegetables like carrots and potatoes, this stew is not only delicious but also loaded with essential nutrients.
- Family Favorite: This recipe is a hit with both kids and adults, making it a reliable choice for family dinners.
Ingredients
Main Ingredients
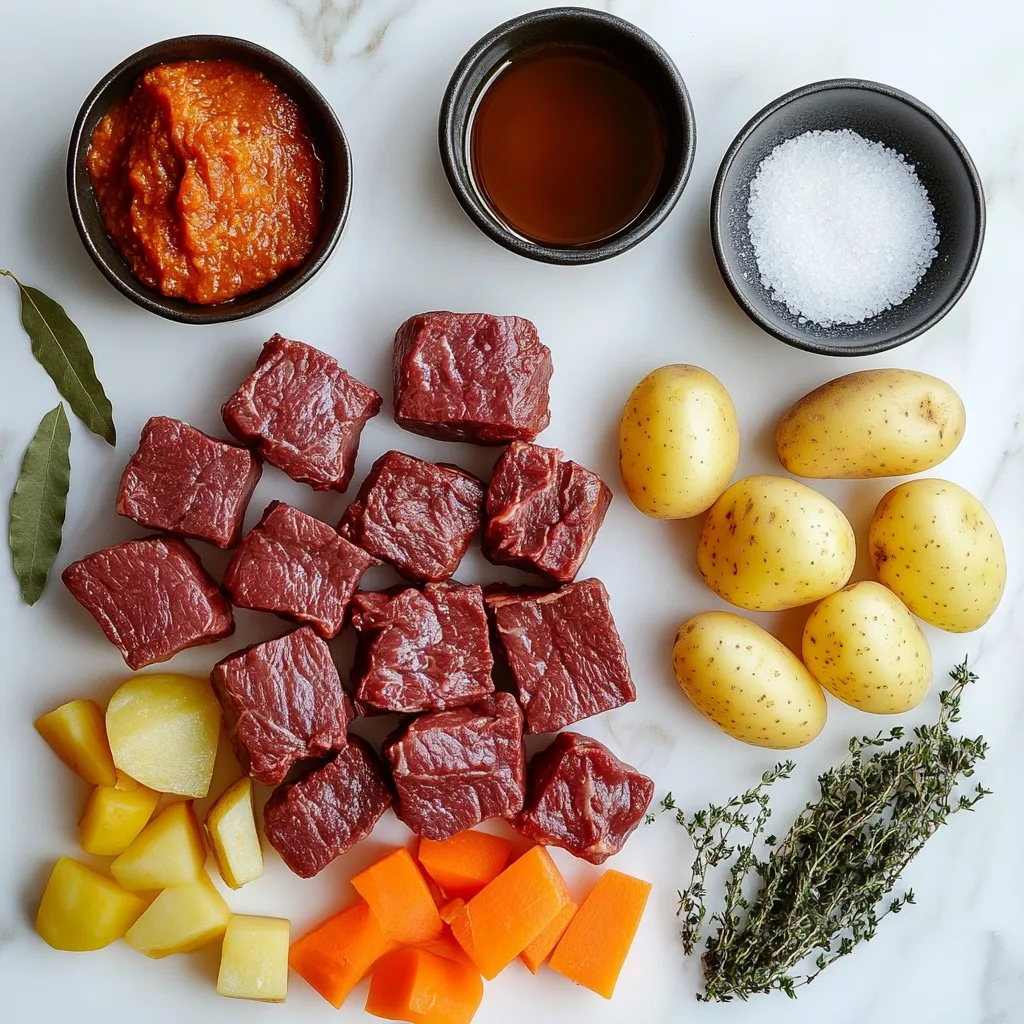
– 2 pounds beef chuck, cut into 1-inch cubes
– 2 tablespoons olive oil
– 1 large onion, chopped
– 3 cloves garlic, minced
– 4 medium carrots, sliced
– 3 medium potatoes, chopped into bite-sized pieces
– 3 cups beef broth
– 1 tablespoon tomato paste
– 1 teaspoon dried thyme
– 1 teaspoon dried rosemary
– 2 bay leaves
– Salt and pepper to taste
To make a great beef stew, you need a mix of tender beef, fresh veggies, and rich broth. The beef chuck gives a nice flavor and stays juicy. The carrots and potatoes add texture and sweetness. Onions and garlic bring warmth and depth to the dish. Seasonings like thyme and rosemary are key for that classic taste.
Optional Ingredients
– 2 tablespoons cornstarch (optional, for thickening)
– 2 tablespoons water (optional, for cornstarch slurry)
If you want a thicker stew, cornstarch is your friend. Mix it with water to create a slurry. This helps to give your stew a nice, hearty feel. Fresh parsley on top adds a pop of color and a hint of freshness. It makes the dish looking and tasting even better!
Step-by-Step Instructions
Preparing the Beef
Start by setting the Instant Pot to Sauté mode. Add 2 tablespoons of olive oil. Let it heat until it shimmers. Carefully add the beef cubes in batches. Do not overcrowd the pot. Sear the beef for about 4-5 minutes until it’s browned on all sides. Use a slotted spoon to remove the beef. Set it aside on a plate.
Cooking the Base
In the same pot, add the chopped onion and minced garlic. Sauté them for about 2-3 minutes. Stir occasionally until the onions turn soft and translucent. This step builds a rich base for your stew.
Combining Ingredients
Now, add the seared beef back into the pot. Mix in the sliced carrots and chopped potatoes. Pour in 3 cups of beef broth to cover everything. Add a tablespoon of tomato paste, dried thyme, dried rosemary, salt, and pepper. Stir all the ingredients until they are well combined. Don’t forget to add 2 bay leaves for extra flavor.
Pressure Cooking
Secure the lid on the Instant Pot. Make sure it is sealed correctly. Set the Instant Pot to Manual or Pressure Cook for 35 minutes. Once the cooking cycle ends, let the pressure release naturally for about 10-15 minutes. After that, carefully turn the valve to release any remaining pressure.
Thickening the Stew
If you like your stew thicker, mix 2 tablespoons of cornstarch with 2 tablespoons of water in a small bowl. This will create a slurry. Stir this mixture into the stew. Switch the Instant Pot back to Sauté mode for 5-10 minutes. This will help thicken the stew to your liking. Before serving, remember to remove the bay leaves.
Tips & Tricks
Best Practices for Searing
To get a good sear, avoid overcrowding the pot. If you add too much beef at once, it stews instead of browns. This makes your meat less tasty. Sear in batches. This way, each piece gets a nice crust. A good crust adds flavor to your stew.
Flavor Enhancements
You can boost the flavor with a few extra spices. Try adding a pinch of smoked paprika for a smoky taste. A splash of Worcestershire sauce can deepen the flavor too. Fresh herbs, like parsley or chives, can add brightness. Experiment to find what you love!
Texture Tips
If you want a thicker stew, use cornstarch. Mix it with water to make a slurry. Stir this into your stew near the end of cooking. Let it cook on Sauté mode for a few minutes. This will help your stew reach the right thickness. Adjust until it feels just right!
Pro Tips
- Choose the Right Cut: Opt for beef chuck as it has the right amount of fat and connective tissue that breaks down during cooking, resulting in a tender and flavorful stew.
- Layering Flavors: Searing the beef first and then sautéing the aromatics enhances the overall flavor profile of the stew, making it rich and delicious.
- Natural Pressure Release: Allowing the pressure to release naturally for a while helps the flavors meld together and keeps the meat tender.
- Thickening Options: If you prefer a thicker stew, use a cornstarch slurry. Mix cornstarch with water and stir it into the stew while sautéing to achieve your desired thickness.
Variations
Vegetable Substitutions
You can switch up the veggies in your stew. Instead of carrots and potatoes, try these options:
– Parsnips: They add a sweet, earthy flavor.
– Sweet potatoes: They give a nice sweetness and color.
– Butternut squash: This adds creaminess when cooked.
– Mushrooms: These bring a meaty texture and umami taste.
Using these vegetables will change the stew but keep it hearty.
Protein Alternatives
If you want to change the meat, consider these options:
– Beef brisket: It is rich and tender.
– Pork shoulder: This gives a different flavor.
– Chicken thighs: They cook quickly and stay moist.
– Tofu: For a plant-based option, it absorbs flavors well.
Each choice will create a unique dish while keeping it comforting.
Dietary Adaptations
Many folks need to follow special diets. Here’s how to adjust the stew:
– Gluten-free: Use gluten-free broth and skip the cornstarch, or use a gluten-free thickener.
– Low-carb: Replace potatoes with cauliflower or turnips for fewer carbs.
These adaptations let everyone enjoy the stew without worry.
Storage Info
Refrigeration Tips
To store leftover stew, let it cool first. Place it in an airtight container. Make sure to cover it well. It can last for 3-4 days in the fridge. When you reheat, stir well to mix flavors.
Freezing Instructions
To freeze beef stew, use freezer-safe bags or containers. Leave some space for expansion. Label your containers with the date. The stew can stay fresh in the freezer for up to 3 months. Thaw it in the fridge overnight before reheating.
Reheating Suggestions
The best way to reheat stew is on the stove. Use low heat and stir often. You can also use the microwave. Heat it in short bursts, stirring in between. Add a splash of broth if it seems too thick. Enjoy your warm and hearty meal!
FAQs
How long does the beef stew last in the fridge?
Beef stew lasts about 3 to 4 days in the fridge. Store it in an airtight container to keep it fresh. To ensure the best taste, eat it within this time. If you notice any off smell or unusual changes, it’s best to discard it.
Can I make beef stew in advance?
Yes, you can make beef stew in advance. It actually tastes better the next day. To do this, let it cool completely before storing. Divide it into portions for easy reheating. This makes meal prep easier and saves time on busy days.
What can I serve with beef stew?
Beef stew pairs well with several side dishes. Here are some great options:
– Crusty bread for dipping
– Mashed potatoes for a creamy touch
– Green salad for freshness
– Steamed vegetables for color and nutrients
These sides complement the rich stew flavors nicely.
You learned how to make a delicious beef stew. We covered key ingredients and preparation steps. I shared tips for flavor and texture. You have ideas for variations and storage. My final thought: enjoy this warm, hearty meal with family or friends. It’s simple, tasty, and perfect for any occasion. Dive in and create your own version of this classic dis


