Italian Chicken Zucchini Bake Simple and Savory Dish

Looking for a simple, tasty dish that’s easy to make? Dive into my Italian Chicken Zucchini Bake! This recipe combines juicy chicken and fresh zucchini for a flavorful meal you’ll love. Perfect for busy nights, this dish offers fresh ingredients and simple steps. Let’s explore how to make this savory delight that your family will ask for again and again. Are you ready to get cooking?
Why I Love This Recipe
- Fresh Ingredients: This bake uses fresh zucchini, cherry tomatoes, and herbs, bringing a vibrant flavor and nutrition to the dish.
- Easy Preparation: With minimal chopping and straightforward layering, this recipe is perfect for busy weeknights.
- Cheesy Goodness: The combination of mozzarella and Parmesan creates a deliciously gooey topping that everyone loves.
- Customizable: You can easily adjust the ingredients, adding your favorite veggies or spices to suit your taste.
Ingredients
Main Ingredients for Italian Chicken Zucchini Bake
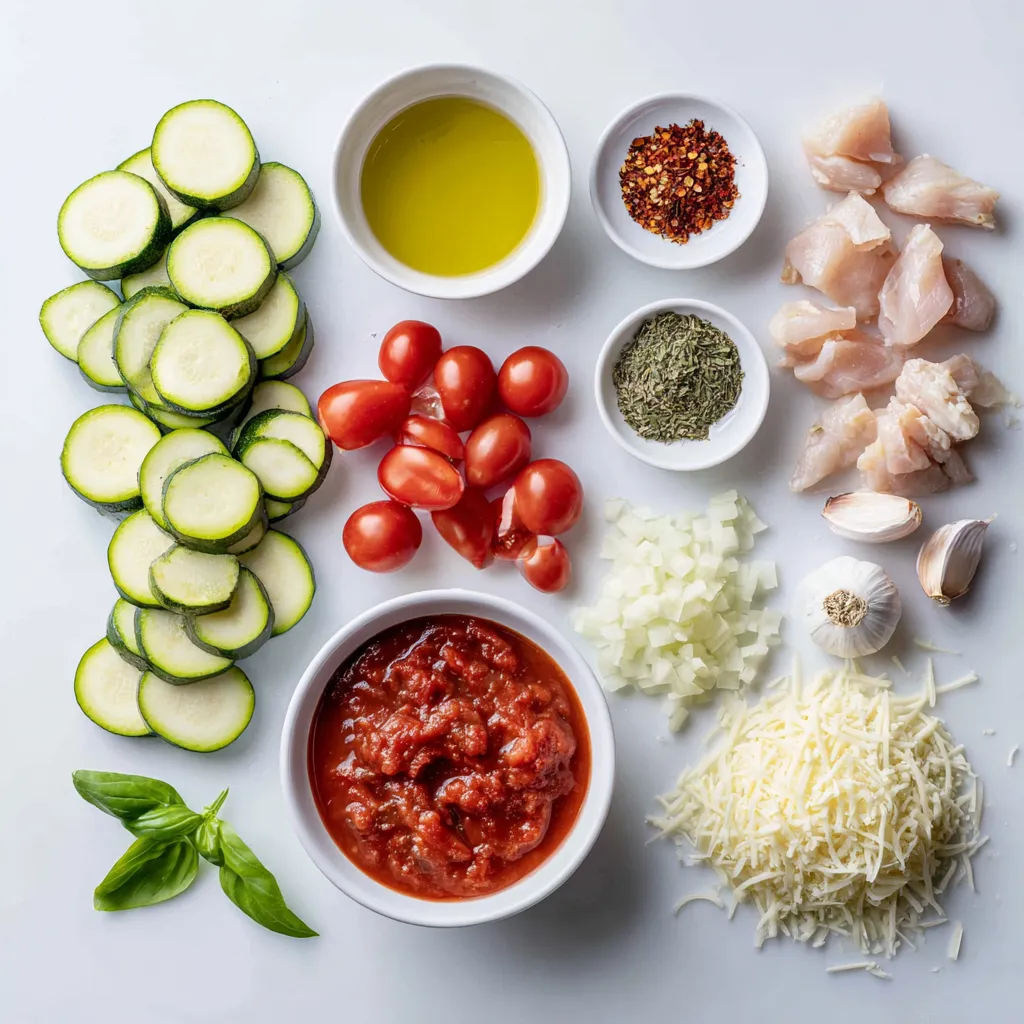
For this dish, you will need:
– 2 large zucchinis, sliced into rounds
– 1 lb (450g) boneless, skinless chicken breasts, cut into bite-sized pieces
– 1 cup cherry tomatoes, halved
– 1 medium onion, diced
– 3 cloves garlic, minced
– 1 cup marinara sauce
– 1 cup shredded mozzarella cheese
– 1/2 cup grated Parmesan cheese
– 2 tablespoons olive oil
– Salt and black pepper, to taste
These ingredients form the base of your bake, providing a mix of flavors. The zucchinis add a nice crunch, while the chicken gives protein. Tomatoes and onions bring sweetness and depth.
Seasonings and Flavor Enhancers
You will also need:
– 1 teaspoon dried oregano
– 1 teaspoon dried basil
– 1 teaspoon red pepper flakes (optional)
These seasonings make your dish pop. Oregano and basil give it that Italian touch. The red pepper flakes add a kick if you like heat. Adjust these to make the flavors suit your taste.
Optional Ingredients for Added Heat
If you enjoy more spice, consider adding:
– Extra red pepper flakes
– Sliced jalapeños
These options can elevate your dish. Just remember to balance the heat with the other flavors, so it all works together. Feel free to experiment until you find your perfect mix!

Step-by-Step Instructions
Preparation of Ingredients
Start by preheating your oven to 400°F (200°C). This step is key for even baking. Next, take two large zucchinis and slice them into rounds. Dice one medium onion and halve one cup of cherry tomatoes. In a large bowl, combine these veggies. Drizzle two tablespoons of olive oil over them. Add salt, black pepper, and half a teaspoon each of dried oregano and dried basil. Toss everything well to coat. In another bowl, cut one pound of boneless, skinless chicken breasts into bite-sized pieces. Season them with salt, black pepper, the rest of the oregano, basil, and red pepper flakes if you want some heat. Mix until the chicken is evenly coated.
Layering the Dish
Grab a 9×13 inch baking dish. Start by layering the zucchini, onion, and tomato mix evenly on the bottom. This veggie base adds flavor and moisture. Next, spread the seasoned chicken pieces on top of the veggies. Make sure to cover the greens well. Pour one cup of marinara sauce over the chicken, ensuring it coats every piece. Finally, sprinkle one cup of shredded mozzarella and half a cup of grated Parmesan cheese on top. This will create a delicious cheesy crust.
Baking Instructions
Cover the baking dish tightly with aluminum foil. This helps keep moisture in the dish while it bakes. Place it in the preheated oven and bake for 25 minutes. After that time, carefully remove the foil—watch out for hot steam! Continue baking for another 15 minutes. The chicken should reach an internal temperature of 165°F (74°C), and the cheese should be bubbly and golden. Once done, let the dish rest for about five minutes before slicing. This resting time helps all the flavors blend beautifully.
Tips & Tricks
Achieving the Perfect Cheese Melt
To get cheese that melts just right, use fresh mozzarella. The moisture makes it creamy. Shred it yourself for better melting. Pack the cheese on top of the dish. This helps it melt evenly. Bake it uncovered for the last 15 minutes. This gives you that golden brown look.
Best Practices for Even Cooking
Cut your chicken into small, even pieces. This helps them cook through at the same time. Layer the veggies first to create a base. They release moisture while baking. This keeps the chicken juicy and tender. Always preheat your oven. It ensures that the dish cooks evenly from the start.
Serving and Presentation Tips
Serve the bake right from the dish for a cozy feel. Garnish it with fresh basil leaves. This adds color and freshness to your dish. Drizzle some extra virgin olive oil over each serving. This enhances flavor and makes the dish shine. Enjoy it with a side salad for a complete meal.
Pro Tips
- Uniform Veggie Slices: Cutting the zucchinis and other vegetables into even rounds ensures they cook uniformly, resulting in the perfect texture throughout the dish.
- Marinara Sauce Choice: Using a high-quality marinara sauce, whether homemade or store-bought, significantly enhances the flavor of the dish, giving it that authentic Italian taste.
- Layering Technique: Layering the vegetables before the chicken allows the flavors to meld as they bake, ensuring that the chicken absorbs the moisture and taste from the veggies.
- Resting Time: Letting the dish rest for a few minutes after baking allows the juices to redistribute, making it easier to slice and serve without falling apart.

Variations
Low-Carb or Keto-Friendly Options
To make this dish low-carb, you can skip the marinara sauce or use a low-carb version. Instead of chicken, try cauliflower for a veggie base. This keeps the bake filling without the carbs. You can add more cheese to maintain flavor and texture.
Vegetarian Adaptations
For a vegetarian twist, swap the chicken for chickpeas or lentils. These add protein and texture. Increase the amount of zucchini, and add bell peppers or mushrooms for more flavor. You can also use a dairy-free cheese if you prefer.
Alternative Proteins
If you want to change up the protein, turkey or firm tofu works well. Turkey gives a lighter flavor while tofu soaks up the sauce nicely. Just make sure to season them well, like you do with chicken. Both options can keep your bake delicious and satisfying.
Storage Info
How to Store Leftovers
To keep your Italian Chicken Zucchini Bake fresh, let it cool first. Then, transfer leftovers to an airtight container. Make sure to store it in the fridge. This dish stays good for about three days. If you want to eat it later, freezing is a great option.
Reheating Instructions
When it’s time to enjoy your leftovers, preheat your oven to 350°F (175°C). Place the dish in a baking tray. Cover it with foil to keep it moist. Heat for about 20 minutes, or until it’s warm throughout. You can also use the microwave. Just heat it in short bursts to avoid overcooking.
Freezing Recommendations
If you want to freeze your bake, do this before cooking it. Assemble the dish but do not bake. Wrap it tightly with plastic wrap, then foil. Label it with a date. It can stay in the freezer for up to three months. When you’re ready, thaw it overnight in the fridge before baking.
FAQs
Can I use different vegetables?
Yes, you can. Feel free to swap in your favorites. Bell peppers, spinach, or mushrooms work well. Just cut them to the same size as the zucchini. This helps them cook evenly. Mixing vegetables adds more color and flavor to your dish.
How do I know if the chicken is cooked?
The chicken is done when it reaches 165°F (74°C). A meat thermometer is helpful here. You can also cut into a piece to check the color. If it’s white and the juices run clear, it’s safe to eat. This ensures you enjoy a juicy and safe meal.
What can I serve with Italian Chicken Zucchini Bake?
This dish pairs nicely with a simple green salad. A crisp Caesar salad is also great. You could serve it with crusty bread to soak up the sauce. For a heartier meal, a side of pasta works well too. Enjoy your meal with whatever you love!
This Italian Chicken Zucchini Bake combines fresh ingredients, layers of flavor, and easy steps. We explored the perfect mix of chicken, zucchini, and spices. I shared tips to melt cheese well and cook evenly. You can also try low-carb options or add your favorite veggies.
Remember, leftovers can be stored or frozen for later use. Keep this recipe handy for a tasty dish any time. Enjoy your cooking adventur

Italian Chicken Zucchini Bake
Ingredients
- 2 large zucchinis, sliced into rounds
- 1 lb boneless, skinless chicken breasts, cut into bite-sized pieces
- 1 cup cherry tomatoes, halved
- 1 medium onion, diced
- 3 cloves garlic, minced
- 1 teaspoon dried oregano
- 1 teaspoon dried basil
- 1 teaspoon red pepper flakes (optional for heat)
- 1 cup marinara sauce
- 1 cup shredded mozzarella cheese
- 1 2 tablespoons olive oil
- to taste salt and black pepper
- 1 2 tablespoons grated Parmesan cheese
Instructions
- Preheat your oven to 400°F (200°C).
- In a large mixing bowl, combine the sliced zucchinis, diced onion, and halved cherry tomatoes. Drizzle with olive oil and season with salt, black pepper, and half of the dried oregano and basil. Toss everything together until the vegetables are thoroughly coated.
- In a separate bowl, place the bite-sized chicken pieces. Season them generously with salt, black pepper, the remaining oregano, basil, and red pepper flakes (if using). Mix until the chicken is evenly seasoned.
- Layer the zucchini, onion, and tomato mixture evenly across the bottom of a 9x13 inch baking dish.
- Spread the seasoned chicken pieces evenly over the vegetable layer.
- Pour the marinara sauce over the chicken, ensuring it coats the chicken entirely.
- Sprinkle the shredded mozzarella and grated Parmesan cheese over the top.
- Cover the baking dish tightly with aluminum foil and bake for 25 minutes.
- After 25 minutes, carefully remove the foil and continue baking for an additional 15 minutes, or until the chicken is cooked through and the cheese is bubbly and lightly golden brown.
- Allow the dish to rest for about 5 minutes before slicing and serving.


![- 4 medium sweet potatoes - 1 lb ground turkey (or beef) - 1 tablespoon olive oil - 1 can (15 oz) black beans, rinsed and drained - 1 cup corn kernels (fresh or frozen) - 1 packet taco seasoning - 1 cup diced tomatoes (fresh or canned) - 1 cup shredded cheddar cheese - 1 avocado, diced - 1/4 cup fresh cilantro, chopped - 1 lime, cut into wedges - Salt and pepper to taste - Sour cream - Jalapeños - Salsa Gathering these ingredients is simple, and it sets the stage for a tasty meal. The sweet potatoes bring a nice sweetness and a lot of nutrients. Ground turkey or beef gives a hearty flavor. The black beans, corn, and tomatoes add texture and nutrition. Taco seasoning brings the classic flavor that everyone loves. The cheese and avocado on top make it all even better. Don't forget the lime for a fresh kick! For a full recipe, check out the [Full Recipe]. - Preheat the oven to 425°F (220°C). - Scrub and poke holes in sweet potatoes. - Bake sweet potatoes for 45-50 minutes. First, I preheat my oven to 425°F (220°C). This step is key to getting those sweet potatoes nice and tender. Next, I scrub each sweet potato under running water. Then, I poke holes in them with a fork. This prevents them from bursting while baking. After that, I place the potatoes on a baking sheet lined with parchment paper. Finally, I bake them for 45-50 minutes until they are soft. - Heat olive oil in a skillet over medium heat. - Cook ground turkey (or beef) until browned. - Stir in taco seasoning, black beans, corn, and tomatoes; simmer for 5-7 minutes. While the potatoes bake, I heat a tablespoon of olive oil in a skillet over medium heat. I add 1 pound of ground turkey or beef. I cook it until it is browned, about 5-7 minutes. Then, I stir in the taco seasoning, a can of rinsed black beans, corn, and diced tomatoes. I let this simmer for another 5-7 minutes. This lets all the flavors mix together nicely. - Slice baked sweet potatoes in half lengthwise. - Scoop filling into each half and top with cheese. - Garnish with avocado and cilantro, serve with lime wedges. Once the sweet potatoes are soft, I carefully take them out of the oven. I slice each potato in half lengthwise, making a boat shape. Then, I scoop the taco filling generously into each half. I sprinkle shredded cheddar cheese on top, letting it melt slightly from the heat. Finally, I garnish with diced avocado and fresh cilantro. I serve them with lime wedges on the side. A squeeze of lime adds a perfect tang to this dish. For the full recipe, check out the details above. - Adjust taco seasoning to taste. You can add more for a bolder flavor. - Incorporate lime juice for extra zing. This brightens the dish and adds freshness. - Use a fork to check for doneness easily. Poke the sweet potatoes to see if they are soft. - Allow cooling before cutting to prevent burns. Sweet potatoes hold heat well, so be careful. - Arrange on a platter for visual appeal. A colorful display makes the meal more inviting. - Drizzle lime juice for an added touch. This adds flavor and makes the dish shine. I love using these tips to make Taco Stuffed Sweet Potatoes even better. If you want to try this recipe, check out the Full Recipe for all the details. {{image_4}} You can switch up the protein in your taco stuffed sweet potatoes. Ground beef or chicken works great. If you want to keep it plant-based, try using lentils or beans. Shredded pork can also give a fun twist to the dish. Each option brings a unique taste and texture. Don't forget to add extra veggies! Diced bell peppers or onions can add flavor and crunch. You can also toss in spinach or kale for more nutrition. Adding these veggies not only boosts the health factor but also brightens the dish's colors. Want to mix things up a bit? Try some Mexican-style toppings like pico de gallo. This fresh salsa adds a burst of flavor. You can also use Greek yogurt instead of sour cream. It gives a creamy texture with less fat, making it a healthier choice. These simple changes can make your meal even more exciting. Store any leftovers in an airtight container. They stay fresh for up to 3 days. To keep the quality high, keep your toppings separate. This will help prevent sogginess and keep flavors bright. For quick reheating, use the microwave. Heat in short bursts to avoid hot spots. If you want a crispy texture, use the oven instead. Preheat it to 350°F and heat for about 10-15 minutes. You can freeze cooked sweet potatoes and the filling separately. This helps maintain their texture. When you're ready to eat, thaw everything in the fridge overnight. Then, reheat as needed for a tasty meal. - Approximately 45-50 minutes at 425°F. Sweet potatoes need time to bake until they are soft. You want them tender, so they are easy to scoop. I usually check them after 45 minutes. If they are not done, I leave them for a few more minutes. You can poke them with a fork to check. - Yes, prepare everything in advance and assemble before serving. Making these stuffed potatoes ahead of time is a great idea. You can bake the sweet potatoes and cook the taco filling. Store them separately in the fridge. When you are ready to eat, just warm them up and stuff the sweet potatoes. It saves time and keeps things simple. - Rich in vitamins A and C, fiber, and antioxidants. Sweet potatoes are a superfood. They are full of vitamins that help your body. Vitamin A is good for your eyes, and vitamin C helps your immune system. The fiber in sweet potatoes also helps with digestion. Plus, they have antioxidants that fight free radicals. - Yes, but sweet potatoes provide a unique flavor and nutrition. You can use regular potatoes if you want. They will work fine. However, sweet potatoes give a nice, sweet taste. They also have more nutrients than regular potatoes. So, I recommend sticking with sweet potatoes for this recipe. - A side salad or additional toppings like guacamole or corn chips. These stuffed potatoes are filling on their own. However, a side salad adds freshness. You can also top them with guacamole for creaminess. Corn chips bring crunch and fun. You can mix and match to create your perfect meal! This blog post shared a tasty recipe for Taco Stuffed Sweet Potatoes. You learned about the key ingredients and easy steps to prepare this dish. I also offered tips to enhance the flavors and variations to keep it exciting. Remember, you can adjust the recipe to suit your taste. Try different proteins or veggies to mix it up. Enjoy this healthy meal any night of the week!](https://joymealplan.com/wp-content/uploads/2025/07/756ff32a-7b8b-490b-a900-7ca350fe3047-768x768.webp)
. To cook shrimp just right, start with fresh shrimp. Look for shrimp that smell like the ocean, not fishy. When you heat your skillet, make sure it’s hot before adding the shrimp. This helps create a nice sear. Cook the shrimp in a single layer. This way, they cook evenly. Flip them when they turn pink, and they will be ready in about 2-3 minutes per side. Overcooking shrimp makes them tough, so watch closely! To make your shrimp scampi burst with flavor, use quality ingredients. Fresh garlic creates a rich taste. You can also add lemon zest for a bright kick. Try adding capers or sun-dried tomatoes for a twist. Herbs like parsley and basil add freshness. If you like heat, adjust red pepper flakes to your taste. You can also finish with a squeeze of fresh lemon juice for a zesty touch. Timing is key for a great shrimp scampi dish. Start by boiling the pasta first. While it cooks, prepare your shrimp and sauce. This keeps everything fresh and hot. Drain the pasta once it’s al dente, and don’t forget to save some pasta water. This water helps the sauce stick to the pasta. Combine everything right away for the best flavor. Serve your dish immediately to enjoy the vibrant tastes. For more ideas, check the Full Recipe. {{image_4}} You can add fresh vegetables to your shrimp scampi. This adds flavor and color. Try using bell peppers, zucchini, or spinach. They cook quickly and blend well with shrimp. Simply sauté them with garlic before adding shrimp. This way, you get a healthy twist on the classic dish. If you want a gluten-free option, you have choices. Look for gluten-free pasta made from rice or quinoa. These options taste great and hold the sauce well. You can also use spiralized vegetables, like zucchini or carrots. They are fun to eat and low in carbs. Both options keep the dish light and flavorful. Do you like heat? You can easily spice up your shrimp scampi. Add more red pepper flakes for extra kick. You could also include diced jalapeños or a dash of hot sauce. Mix in some cayenne pepper for another layer of flavor. Just remember to adjust to your taste. Enjoy the heat while keeping the dish balanced. These variations let you customize your shrimp scampi. They make it fun and unique every time you cook. For the full recipe, check out the details above! Store any leftover shrimp scampi in an airtight container. Place it in the fridge. It stays fresh for 2-3 days. Make sure it cools down before sealing. This keeps the flavors intact. When you reheat shrimp scampi, use low heat. A skillet works best. Add a splash of broth or water to keep it moist. Stir often to heat evenly. You can also use the microwave. Heat in short bursts to avoid overcooking the shrimp. You can freeze shrimp scampi too! Just place it in a freezer-safe container. Use it within three months for best flavor. Thaw it overnight in the fridge before reheating. Avoid freezing it with pasta; they don't hold up well. Instead, cook fresh pasta when you're ready to eat. For the full recipe, check the earlier section. Making Easy Shrimp Scampi takes about 20 minutes. You need 10 minutes to prep and 10 minutes to cook. This fast dish fits well into any busy schedule. You can enjoy a tasty meal in no time. Yes, you can use frozen shrimp. Just remember to thaw them first. Place the shrimp in the fridge overnight or run them under cold water. Using frozen shrimp may add a few extra minutes to your cook time. Shrimp Scampi pairs well with many sides. Here are some great options: - Garlic bread for dipping in the sauce - A fresh green salad for a light touch - Steamed vegetables for extra color and flavor - A glass of white wine to enhance the meal Yes, you can safely reheat shrimp leftovers. Just make sure to heat them gently. Use low heat on the stove or in the microwave. This helps keep the shrimp tender and tasty. Be careful not to overcook them, as they can become tough. This blog post covered easy shrimp scampi from start to finish. We looked at key ingredients, substitutions, and tools. You learned step-by-step cooking instructions and helpful tips to elevate your dish. Variations give you room to tailor it to your taste, while storage tips ensure nothing goes to waste. As you make your shrimp scampi, remember these insights to create a delicious meal every time. Enjoy your cooking adventure!](https://joymealplan.com/wp-content/uploads/2025/06/da480725-ca76-4dc0-87ac-7692f8ecae54-768x768.webp)
