Are you ready to take taco night to the next level? Let me introduce you to my Keto Taco Pizza Casserole—an easy and flavorful dish that packs all your favorite taco flavors into a hearty casserole. Perfect for those following a keto diet, this recipe will satisfy your cravings while keeping carbs in check. Join me as we dive into the ingredients, cooking steps, and tips that make this dish a must-try!
Why I Love This Recipe
- Delicious Flavor Combination: This casserole brings together the savory flavors of taco seasoning, beef, and cheese, creating a satisfying dish that everyone loves.
- Low-Carb Alternative: Using cauliflower rice instead of traditional crust makes this dish keto-friendly, allowing you to enjoy pizza without the carbs.
- Quick and Easy to Prepare: With a total cook time of just 45 minutes, this recipe is perfect for busy weeknights when you need a tasty meal in a hurry.
- Customizable Toppings: You can easily modify this recipe by adding your favorite toppings or adjusting the spice level to suit your taste.
Ingredients
List of Ingredients
To make Keto Taco Pizza Casserole, you will need these items:
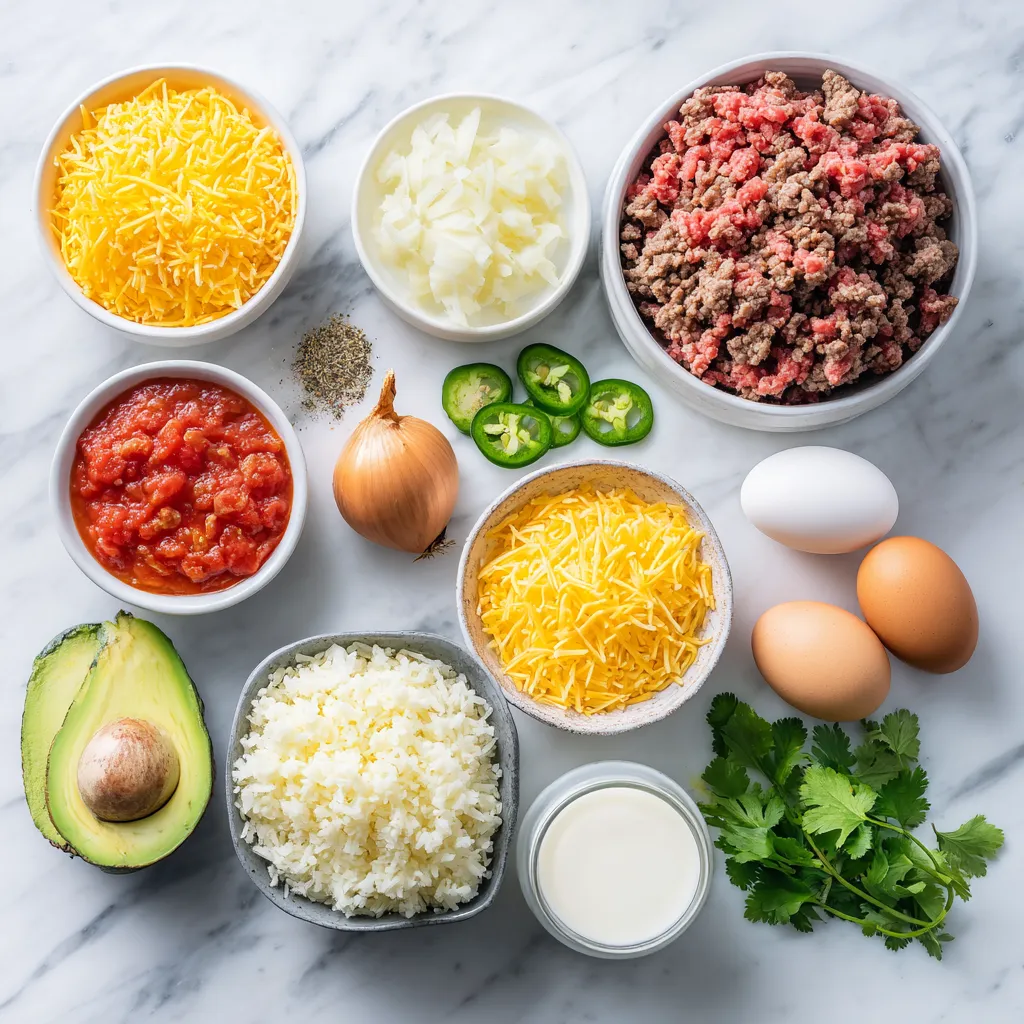
– 1 pound ground beef (or turkey)
– 1 small onion, finely diced
– 2 cloves garlic, minced
– 1 packet taco seasoning (ensure it’s sugar-free)
– 1 (14 oz) can diced tomatoes, well-drained
– 1 cup cauliflower rice (fresh or frozen)
– 1 cup shredded cheddar cheese
– 1 cup shredded mozzarella cheese
– 1 small bell pepper, diced
– 1 jalapeño, thinly sliced (optional for added heat)
– 2 large eggs
– Salt and pepper to taste
– Fresh cilantro, chopped, for garnish
– Sour cream and avocado slices, for garnish (optional)
Suggested Brands for Taco Seasoning
Choosing the right taco seasoning helps boost flavor. I often use these brands:
– Taco Bell Original Seasoning
– McCormick Taco Seasoning Mix
– Simply Organic Taco Seasoning
Make sure to check labels for sugar. Some brands add extra carbs, which can affect your keto diet.
Tips for Choosing Cheese Variants
Cheese plays a big role in this dish. Here’s how to pick the best types:
– Cheddar Cheese: Use sharp cheddar for a stronger taste. It melts well and adds great flavor.
– Mozzarella Cheese: Go for low-moisture mozzarella. It gives a nice stretch and richness.
– Alternative Options: If you’re lactose intolerant, try vegan cheese. Just ensure it melts well.
These tips will help you make a tasty casserole that everyone will love.
Step-by-Step Instructions
Prepping the Oven and Ingredients
Start by preheating your oven to 375°F (190°C). This step is key for cooking the casserole evenly. While the oven heats, gather all your ingredients. Here’s what you need:
– 1 pound ground beef (or turkey)
– 1 small onion, finely diced
– 2 cloves garlic, minced
– 1 packet taco seasoning (ensure it’s sugar-free)
– 1 (14 oz) can diced tomatoes, well-drained
– 1 cup cauliflower rice (fresh or frozen)
– 1 cup shredded cheddar cheese
– 1 cup shredded mozzarella cheese
– 1 small bell pepper, diced
– 1 jalapeño, thinly sliced (optional for added heat)
– 2 large eggs
– Salt and pepper to taste
– Fresh cilantro, chopped, for garnish
– Sour cream and avocado slices, for garnish (optional)
Make sure you have everything ready. This will help you move fast in the kitchen and keep things fun.
Cooking the Meat and Vegetables
In a large skillet, add the ground beef or turkey and the diced onion. Cook this over medium heat. Stir often until the meat is brown and the onions are soft. This should take about 7-10 minutes. If there is extra fat, drain it carefully.
Next, add the minced garlic and taco seasoning to the skillet. Mix it well and let it cook for about one minute. Then, stir in the well-drained diced tomatoes. Let this simmer for about 5 minutes. This makes sure all the flavors blend together nicely.
Assembling the Casserole Layers
In a large mixing bowl, mix the cauliflower rice, half of the shredded cheddar cheese, half of the mozzarella cheese, and the two beaten eggs. Stir until everything blends well. Season this mixture with salt and pepper to taste.
Now, grease a 9×13-inch baking dish lightly. Spread the cauliflower rice mixture evenly across the bottom. This will be the base of your casserole.
Next, layer the seasoned meat mixture on top of the cauliflower layer. Then, sprinkle the diced bell pepper and optional jalapeño slices over the meat. This adds great flavor and texture.
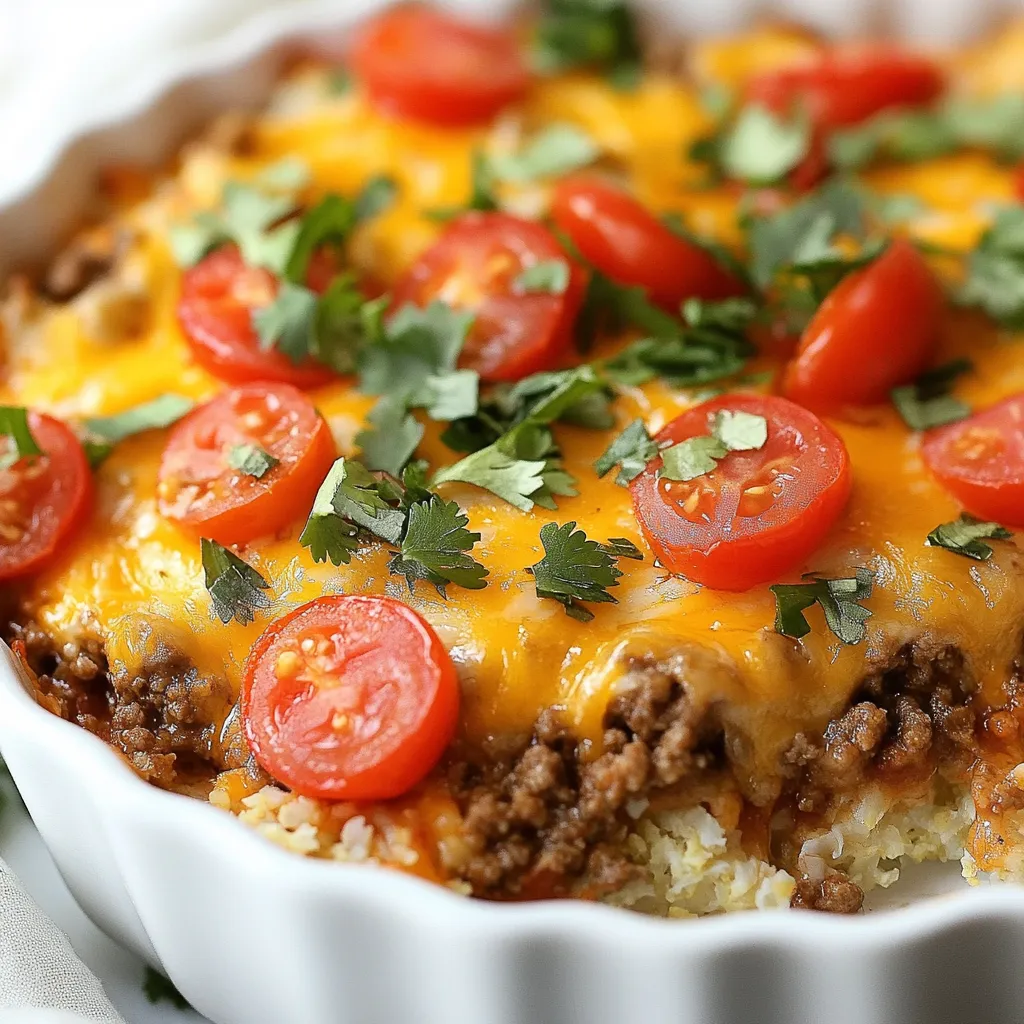
Finally, top everything with the remaining cheddar and mozzarella cheeses. Place the dish in the preheated oven and bake for 25-30 minutes. Look for the cheese to be melted, bubbly, and golden brown on top.
Once it’s done, take it out and let it cool for a few minutes. Slice it into squares for serving. Add fresh cilantro on top and serve with optional sour cream and avocado slices. Enjoy your Keto Taco Pizza Casserole!
Tips & Tricks
How to Make It Extra Cheesy
To boost the cheese factor, use a mix of cheeses. I love mixing cheddar and mozzarella. Try adding cream cheese for richness. You can also sprinkle some Parmesan on top before baking. This gives a nice crust and extra flavor. Don’t be shy with the cheese!
Alternatives for Cauliflower Rice
If you’re not a fan of cauliflower rice, try other options. Riced broccoli or zucchini can work well too. Shredded cabbage is a great low-carb choice. Each of these swaps gives a different texture and taste. Experiment to find your favorite!
Adjusting Spiciness Levels
You can control the heat in this dish easily. Start by adding less jalapeño if you want it mild. If you enjoy spice, add more jalapeños or even some crushed red pepper. You can also serve hot sauce on the side for guests. This way, everyone can enjoy their perfect level of spice.
Pro Tips
- Use Fresh Ingredients: Always opt for fresh vegetables and high-quality meats to enhance the flavor and nutritional value of your casserole.
- Customize the Heat: Adjust the amount of jalapeño or add a pinch of cayenne pepper for extra spice, depending on your heat preference.
- Make it Ahead: Prepare the casserole in advance and refrigerate it. This allows the flavors to meld and can be baked right before serving.
- Rest Before Serving: Allow the casserole to sit for a few minutes after baking. This helps it set and makes it easier to cut into neat squares.
Variations
Vegetarian Option
You can easily make a vegetarian version of this casserole. Instead of ground beef or turkey, use 1 pound of black beans or lentils. Cook them with the onion and garlic just like the meat. You can also add more veggies, like zucchini or mushrooms, for extra taste. This keeps the dish filling and flavorful while staying keto-friendly.
Using Different Proteins
Feel free to switch up proteins for variety. Ground chicken or pork works well in this dish. You can also use shredded rotisserie chicken. Just make sure to adjust the cooking time to avoid drying out the meat. Each protein will bring its unique texture and flavor, making it fun to try different options.
Gluten-Free Modifications
The recipe is naturally gluten-free, but always check your taco seasoning and other ingredients. Some brands add gluten. To ensure your casserole stays gluten-free, use fresh or frozen cauliflower rice, and confirm that your cheese is also gluten-free. This way, everyone can enjoy this tasty dish without worry.
Storage Info
How to Store Leftovers
To keep your Keto Taco Pizza Casserole fresh, let it cool to room temperature. Then, place it in an airtight container. Store it in the fridge for up to three days. If you want to keep it longer, freezing works great too. Just make sure to wrap it well to avoid freezer burn.
Reheating Instructions
When you’re ready to enjoy leftovers, preheat your oven to 350°F (175°C). Remove the casserole from the fridge. Cover it with foil to keep it moist while it reheats. Bake for about 20 minutes or until heated through. You can also microwave individual portions for a quick meal. Just heat for one to two minutes, checking often.
Freezing for Future Meals
Freezing the casserole is a smart choice for meal prep. Cut it into squares for easy serving. Wrap each piece tightly in plastic wrap, then place them in a freezer bag. It will stay good for up to three months. When you’re ready to eat, thaw it overnight in the fridge. Then, follow the reheating instructions above for a tasty meal.
FAQs
Can I make Keto Taco Pizza Casserole ahead of time?
Yes, you can make Keto Taco Pizza Casserole ahead of time. Prepare the dish up to the point of baking. Cover the casserole with foil and refrigerate it for up to 24 hours. When you are ready to eat, just bake it straight from the fridge. You may need to add a few extra minutes to the baking time. This method saves you time on busy days.
What can I substitute for ground beef or turkey?
If you want to switch up the protein, there are many good options. You can use ground chicken, pork, or even plant-based meat. Each option adds a unique flavor. Just ensure that any meat you use is cooked thoroughly. If you prefer a vegetarian dish, consider using black beans or lentils instead. They add great texture and protein while keeping it keto-friendly.
How many carbs are in Keto Taco Pizza Casserole?
The Keto Taco Pizza Casserole is low in carbs. Each serving has about 5-7 grams of net carbs. This count can vary depending on the specific ingredients you use. For the best results, make sure to check the labels on your ingredients, especially the taco seasoning and cheese. Enjoy this dish without worrying about your carb count!
In this article, we explored all you need for a tasty Keto Taco Pizza Casserole. We discussed the key ingredients, brands for taco seasoning, and tips for cheese. You learned step-by-step instructions, from prepping to baking. We shared helpful tips for extra flavor, alternatives, and ways to modify your dish. Don’t forget storage tips for your leftovers or to answer common questions. Now you can enjoy this meal anytime! Keep experimenting and make it your ow


