Korean Ground Beef Bowls Quick and Flavorful Meal

Looking for a quick and tasty meal? Try my Korean Ground Beef Bowls! They are simple to make and loaded with flavor. With just a few fresh ingredients and step-by-step instructions, you can whip up this dish in no time. Whether you’re a busy parent or a student on the go, these bowls will impress everyone at the table. Let’s dive into the delicious details and get cooking!
Why I Love This Recipe
- Quick and Easy: This recipe can be prepared in just 20 minutes, making it perfect for busy weeknights.
- Flavor Packed: The combination of garlic, ginger, and gochujang creates a deliciously savory and spicy sauce that elevates the dish.
- Customizable: You can easily swap out the vegetables or adjust the spice level to suit your taste preferences.
- Healthy Balance: With lean ground beef and plenty of veggies, this dish is both satisfying and nutritious.
Ingredients
When making Korean Ground Beef Bowls, you need simple and tasty ingredients. Here’s what you will need:
– 1 pound ground beef
– 1 tablespoon sesame oil
– 3 cloves garlic, minced
– 1-inch piece of fresh ginger, grated
– 1/4 cup soy sauce
– 2 tablespoons brown sugar
– 1 tablespoon gochujang (Korean red chili paste)
– 1/2 teaspoon freshly ground black pepper
– 2 green onions, finely chopped
– 1 cup cooked rice (white, brown, or jasmine)
– 1/2 cup shredded carrots
– 1/2 cup steamed broccoli florets
– Sesame seeds, for garnish
Each ingredient plays a big role. The ground beef is the star. It gives the bowl its hearty flavor. Sesame oil adds a nutty taste and richness. Garlic and ginger bring warmth and zest. The soy sauce and brown sugar create a sweet and salty balance. Gochujang gives the dish a spicy kick that makes it exciting.
You can mix and match the vegetables. Use your favorites or what you have on hand. Carrots and broccoli give crunch and color. The green onions add freshness and a pop of flavor. Lastly, sesame seeds make a lovely garnish. They add a nice touch and some crunch.
This list of ingredients sets up a quick and flavorful meal. Each part works together to create a delicious experience.

Step-by-Step Instructions
Preparation Steps
1. Heat sesame oil and sauté garlic and ginger: Start by pouring the sesame oil into a large skillet. Heat it over medium heat until it shimmers. Add the minced garlic and grated ginger. Stir and cook for about one minute. You want it fragrant, but not burnt.
2. Brown the ground beef: Increase the heat to medium-high. Add the ground beef to the skillet. Cook until the meat is brown and fully cooked, around five to six minutes. Use a spatula to break the meat into smaller chunks as it cooks.
3. Combine sauces and seasonings: Once the beef is browned, stir in the soy sauce, brown sugar, gochujang, and black pepper. Cook for an extra two to three minutes. This helps the sauce thicken and blend well with the beef.
Assembly Instructions
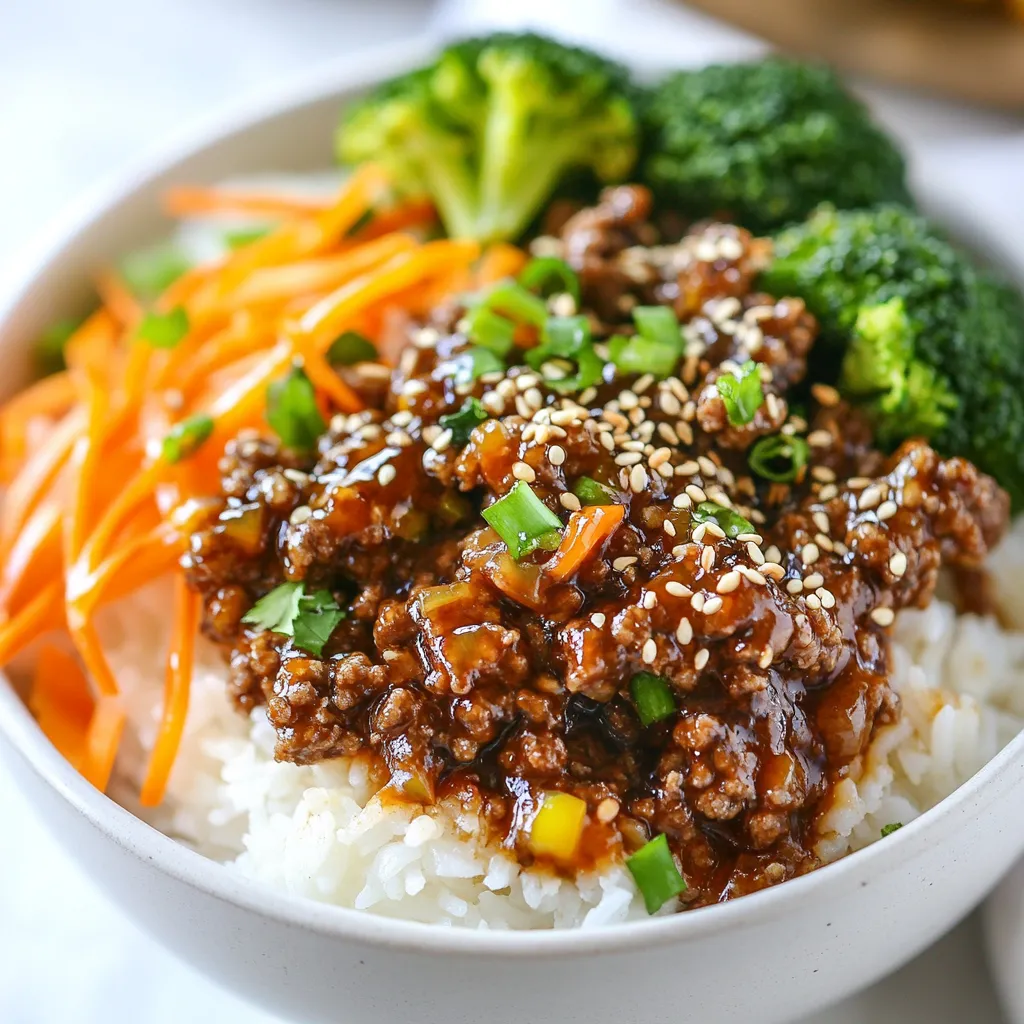
1. Layer rice as a base: For each bowl, start with a scoop of the cooked rice. You can use white, brown, or jasmine rice.
2. Add ground beef mixture: Spoon a generous amount of the savory beef mixture on top of the rice. Make sure it covers the rice well.
3. Top with vegetables and garnishes: Add shredded carrots and steamed broccoli over the beef. This adds color and crunch. Finally, sprinkle sesame seeds and reserved green onions on top. This boosts flavor and looks great!
Tips & Tricks
Cooking Tips
How to achieve the best flavor:
Start with fresh ingredients. Choose high-quality ground beef for the best taste. Use sesame oil for a rich, nutty flavor. Mix the soy sauce, brown sugar, and gochujang well to ensure even flavor.
Proper cooking time for ground beef:
Cook the ground beef for about 5-6 minutes. Stir often to break it into small pieces. Make sure it is no longer pink. This ensures the beef is safe to eat and full of flavor.
Tips for sautéing garlic and ginger without burning:
Always heat the sesame oil on medium heat. Add garlic and ginger only when the oil is hot. Stir quickly for about one minute until fragrant. If they turn brown, lower the heat to avoid burning.
Presentation Tips
Choosing colorful dishware:
Use bright bowls to make your dish pop. Colorful dishware makes the meal more inviting. It also enhances the look of your vibrant ingredients.
Arranging ingredients for visual appeal:
Layer your rice first, then add the beef. Place the shredded carrots and broccoli on top. Create a rainbow effect with your toppings for a fun look.
Suggestions for additional garnishing:
Sprinkle sesame seeds on each bowl for crunch. Add more chopped green onions for freshness. Consider a few slices of radish for extra color and flavor.
Pro Tips
- Use High-Quality Beef: Opt for grass-fed or organic ground beef for a richer flavor and better nutritional profile.
- Customize Your Heat: Adjust the amount of gochujang according to your spice preference; start with less and add more if desired.
- Prep Ahead: Make the beef mixture in advance and store it in the fridge for up to 3 days; reheat and serve over rice for a quick meal.
- Experiment with Toppings: Add other vegetables like bell peppers or snap peas for extra crunch and nutritional benefits.

Variations
Ingredient Substitutions
You can easily change the beef in this dish. Turkey or chicken works well in place of beef. If you want a plant-based option, consider using soy crumbles or lentils. These options still give you great flavor.
If you want a twist on the sauce, swap soy sauce for teriyaki or hoisin sauce. Both add a sweet and savory taste that pairs nicely with the beef. This keeps the dish interesting and allows you to use what you have.
Serving Suggestions
Korean Ground Beef Bowls taste great with sides. Kimchi adds a spicy kick, while pickled veggies bring tanginess. Both sides balance the flavors in your bowl.
You can also try adding different vegetables. Bell peppers, snap peas, or bok choy make lovely additions. They add texture and color to your meal. Feel free to mix and match based on what you enjoy!
Storage Info
How to Store Leftovers
To keep your Korean Ground Beef Bowls fresh, follow these steps:
– Refrigeration guidelines: Place leftovers in the fridge within two hours of cooking. They stay fresh for three to four days.
– Recommended storage containers: Use airtight containers to prevent moisture loss. Glass or BPA-free plastic containers work well.
– Best practices for reheating: Reheat in the microwave or on the stove. Heat until hot. Add a splash of water to keep rice moist.
Freezing Tips
You can freeze components for later meals. Here’s how:
– How to properly freeze assembly components: Freeze the beef mixture in separate containers. Rice and veggies can also freeze well. Make sure to cool everything before freezing.
– Thawing instructions: Thaw overnight in the fridge. For a quicker method, use the microwave. Heat until fully warm before serving.
FAQs
Common Questions About Korean Ground Beef Bowls
Can I make this recipe ahead of time?
Yes, you can make Korean Ground Beef Bowls ahead of time. The beef mixture stores well. Just keep it in the fridge for up to three days. Before serving, reheat it on the stove or in the microwave. Cooked rice also stores well. You can prepare it in advance and reheat it when needed.
What can I serve with Korean Ground Beef Bowls?
You can serve many sides with Korean Ground Beef Bowls. Kimchi is a great choice. It adds a spicy and tangy flavor. Pickled vegetables also pair well. They give a nice crunch. Steamed dumplings or egg rolls are tasty options too. You can add a salad for freshness.
How spicy is the dish with gochujang?
Gochujang gives a mild to medium heat. The spice level depends on how much you use. One tablespoon adds flavor without too much heat. If you want more spice, you can add extra gochujang. Always taste as you go to find your perfect heat.
This blog covered how to make delicious Korean Ground Beef Bowls. We started with simple ingredients and followed step-by-step instructions. I shared tips on cooking and presenting the dish. You can customize it with different meats or sauces. Finally, I offered storage tips to keep leftovers fresh. Enjoy creating your own tasty meals! These bowls are easy, fun, and sure to impress anyone who tries the

Korean Ground Beef Bowls
Ingredients
- 1 pound ground beef
- 1 tablespoon sesame oil
- 3 cloves garlic, minced
- 1 inch fresh ginger, grated
- 0.25 cup soy sauce
- 2 tablespoons brown sugar
- 1 tablespoon gochujang (Korean red chili paste)
- 0.5 teaspoon freshly ground black pepper
- 2 green onions finely chopped
- 1 cup cooked rice (white, brown, or jasmine)
- 0.5 cup shredded carrots
- 0.5 cup steamed broccoli florets
- none sesame seeds, for garnish
Instructions
- In a large skillet, heat the sesame oil over medium heat until it shimmers.
- Add the minced garlic and grated ginger to the skillet, sautéing for approximately 1 minute until fragrant and aromatic.
- Increase the heat to medium-high and add the ground beef to the skillet. Cook until the meat is thoroughly browned and fully cooked, about 5-6 minutes. Use a spatula to break the meat into smaller pieces as it cooks.
- Once the beef is browned, stir in the soy sauce, brown sugar, gochujang, and black pepper. Continue cooking for an additional 2-3 minutes, allowing the sauce to thicken slightly and the flavors to meld beautifully.
- Remove the skillet from heat and fold in the chopped green onions, saving a sprinkle for garnishing later.
- To assemble each bowl, start with a generous scoop of the cooked rice in the bottom. Top it with a hearty portion of the savory Korean ground beef mixture.
- Layer the bowls with shredded carrots and steamed broccoli florets to add a vibrant splash of color and provide a satisfying crunch.
- Finally, garnish each bowl with a sprinkle of sesame seeds and the reserved green onions for an added touch of freshness and flavor.


![- 12 oz pasta (penne, fusilli, or preferred variety) - 2 large red bell peppers - 1 cup raw cashews (soaked in water) - 1 tablespoon olive oil - 3 cloves garlic, minced - 1 cup vegetable broth - 1 tablespoon nutritional yeast - 1 tablespoon freshly squeezed lemon juice - Salt and pepper to taste - Fresh basil leaves for garnish For this vegan creamy roasted red pepper pasta, I love using red bell peppers. They bring sweetness and a lovely color. Start with 12 ounces of your favorite pasta. I prefer penne or fusilli, but any shape you like works. Next, grab two large red bell peppers. These will be roasted to bring out their flavor. Don’t forget the cashews! Use one cup of raw cashews. Soak them in water for at least two hours. This step makes them creamy when blended. Now, let’s talk about the extra ingredients. You’ll need one tablespoon of olive oil for cooking. Garlic adds great taste, so use three cloves, minced. For a nice base, use one cup of vegetable broth. We also need one tablespoon of nutritional yeast for a cheesy flavor. Add one tablespoon of freshly squeezed lemon juice to brighten the sauce. Season with salt and pepper to taste. Finally, fresh basil leaves will make a beautiful garnish. This recipe is easy to follow and packed with flavor. Check out the Full Recipe for more details and instructions! - Preheat your oven to 425°F (220°C). - Slice the red bell peppers in half and remove seeds and stems. - Place them cut side down on a baking sheet. - Roast for 20-25 minutes until the skins blister and char. - Let the peppers cool for a few minutes. - Peel off the skins and chop the peppers into small pieces. - In a large pot, bring salted water to a boil. - Add your pasta and cook until al dente, following package instructions. - Before draining, reserve about 1 cup of the pasta water. - Drain the pasta and set it aside for later. - In a blender, add the roasted peppers, soaked cashews, and garlic. - Pour in the vegetable broth, nutritional yeast, and lemon juice. - Season with a pinch of salt and pepper. - Blend until smooth and creamy, scraping the sides if needed. - Adjust the sauce consistency with reserved pasta water as desired. - Add the cooked pasta back into the pot. - Pour the creamy sauce over the pasta and mix well. - Gently heat the mixture on low for 2-3 minutes. - Taste and adjust seasoning with more salt and pepper if needed. This simple guide helps you create a delightful vegan creamy roasted red pepper pasta that bursts with flavor. For the complete recipe, check the [Full Recipe]. Enjoy cooking! To achieve perfect pasta texture, follow these simple steps. Always cook your pasta in salted water. This enhances flavor and ensures the pasta cooks evenly. Aim for al dente, which means firm to the bite. It should not be mushy. Reserve a cup of pasta water before draining. This water helps to adjust your sauce later. For roasting peppers effectively, preheat your oven to 425°F. Slice the red bell peppers in half and remove the seeds. Place them cut side down on a baking sheet. Roast them for about 20 to 25 minutes. You want the skins to blister and char lightly. This caramelizes their sugars and boosts sweetness. Adjusting seasoning is key for a balanced dish. Start with a pinch of salt and pepper, then taste your sauce. If it needs more flavor, add more salt or lemon juice. For creaminess, you can also add a splash of vegetable broth. Using fresh or dried herbs can elevate your dish. Fresh basil adds brightness. Dried oregano or thyme brings depth. Add these herbs during the blending process for a more integrated flavor. Garnishing can transform your dish. Fresh basil leaves add a pop of color and freshness. Sprinkle some nutritional yeast on top for a cheesy flavor. Crushed red pepper flakes can add a nice kick. For visual appeal, plate your pasta with care. Swirl the noodles for a nice shape. You can also arrange extra basil leaves artfully around the dish. Serve your Vegan Creamy Roasted Red Pepper Pasta hot for the best experience. Enjoy your meal! For the full recipe, check out the details above. {{image_4}} For the sauce base, you can swap the cashews with other nuts. Almonds or macadamia nuts work well. If you want a nut-free option, try using sunflower seeds. They blend into a creamy texture too. If you need gluten-free pasta, use brown rice pasta or chickpea pasta. Both these options taste great and keep the dish healthy. They also add a unique flavor to your pasta. You can make this dish even heartier by adding proteins. Chickpeas or lentils are great choices. They cook quickly and blend well with the sauce. Just stir them in after mixing the pasta with the sauce. If you prefer something meatier, try vegan sausage or tofu. Cook them separately, then mix in with the pasta. This adds a nice texture and extra flavor. This pasta pairs well with side salads or crusty bread. A simple green salad adds freshness and crunch. Garlic bread is a great choice to soak up the creamy sauce. For meal prep, store the pasta in airtight containers. You can make it ahead and reheat it for quick lunches. Just warm it gently on the stove or in the microwave. This dish stays delicious for days! For the full recipe, check out the complete guide. To store leftovers, let the pasta cool down first. Place it in an airtight container. This keeps it fresh for up to four days. When you want to eat it again, take out the amount you need. For reheating, I recommend using the stove. Add a splash of water or vegetable broth. Heat it gently over low heat. Stir often to avoid burning. You can also use the microwave. Just cover it and heat in short bursts. Stir in between to heat evenly. For freezing, I suggest separating the sauce from the pasta. Store the sauce in a freezer-safe container. It will last up to three months in the freezer. You can freeze the pasta too, but it may change texture. If you freeze it, store it in a separate bag. When you're ready to use, thaw the sauce in the fridge overnight. Reheat on the stove, adding a splash of broth if needed. For frozen pasta, boil it for a few minutes until warm. This keeps your vegan creamy roasted red pepper pasta delightful and fresh! For the full recipe, check out the previous sections. Yes, you can use different types of pasta. Here are some suggestions: - Penne: This shape holds sauce well. - Fusilli: The spirals trap sauce nicely. - Spaghetti: Classic choice that works with creamy sauces. - Gluten-free options: Look for rice or chickpea pasta. Feel free to choose your favorite! To add heat, try these tips: - Red pepper flakes: Sprinkle them in the sauce for a kick. - Cayenne pepper: Add a pinch to the blended sauce. - Hot sauce: Mix in your favorite brand to taste. These options let you control the spice level. No, this recipe contains cashews. However, you can make it nut-free. Here are some alternatives: - Sunflower seeds: They blend smoothly and add creaminess. - Pumpkin seeds: A great nut-free option with a slightly different flavor. - Silken tofu: This gives a creamy texture without nuts. These substitutes work well and keep the dish tasty. To make it nut-free, simply substitute the cashews. Here’s how: 1. Choose a nut-free base: Use sunflower seeds or silken tofu. 2. Blend the new ingredient: Just like the cashews, blend them smooth. 3. Adjust seasoning: You may need to tweak the flavors to balance the change. This way, you can enjoy the dish without nuts. For the full recipe, check out the details above. This blog covers a tasty, creamy pasta dish using roasted peppers and cashews. You learned about the ingredients, step-by-step cooking, and tips for best results. Variations give you flexibility with proteins and flavors. Plus, I shared easy storage methods for leftovers. Remember, cooking can be fun and creative! Try different ingredients to make it your own. Enjoy making this flavorful recipe and make it a family favorite. Your kitchen adventures await!](https://joymealplan.com/wp-content/uploads/2025/07/982ba21e-a058-40ff-b3d3-28c410105247-768x768.webp)


