
Looking for a simple yet delicious dish? You’ll love my Lemon Boursin Orzo Bake! This easy recipe blends creamy Boursin cheese with fresh veggies and tender orzo, creating a meal that’s both flavorful and vibrant. Perfect for busy weeknights or gatherings, this bake will impress your family and friends. Ready to dive into this tasty delight? Let’s get cooking!
Why I Love This Recipe
- Easy to Make: This recipe is straightforward and requires minimal prep time, making it perfect for busy weeknights or casual gatherings.
- Flavorful Ingredients: The combination of fresh vegetables, zesty lemon, and creamy Boursin cheese creates a deliciously vibrant dish that excites the palate.
- Versatile Dish: This orzo bake can be customized with your favorite vegetables or proteins, allowing for endless variations to suit your taste.
- Great for Leftovers: It reheats beautifully, making it a fantastic option for meal prep or enjoying as leftovers for lunch the next day.
Ingredients
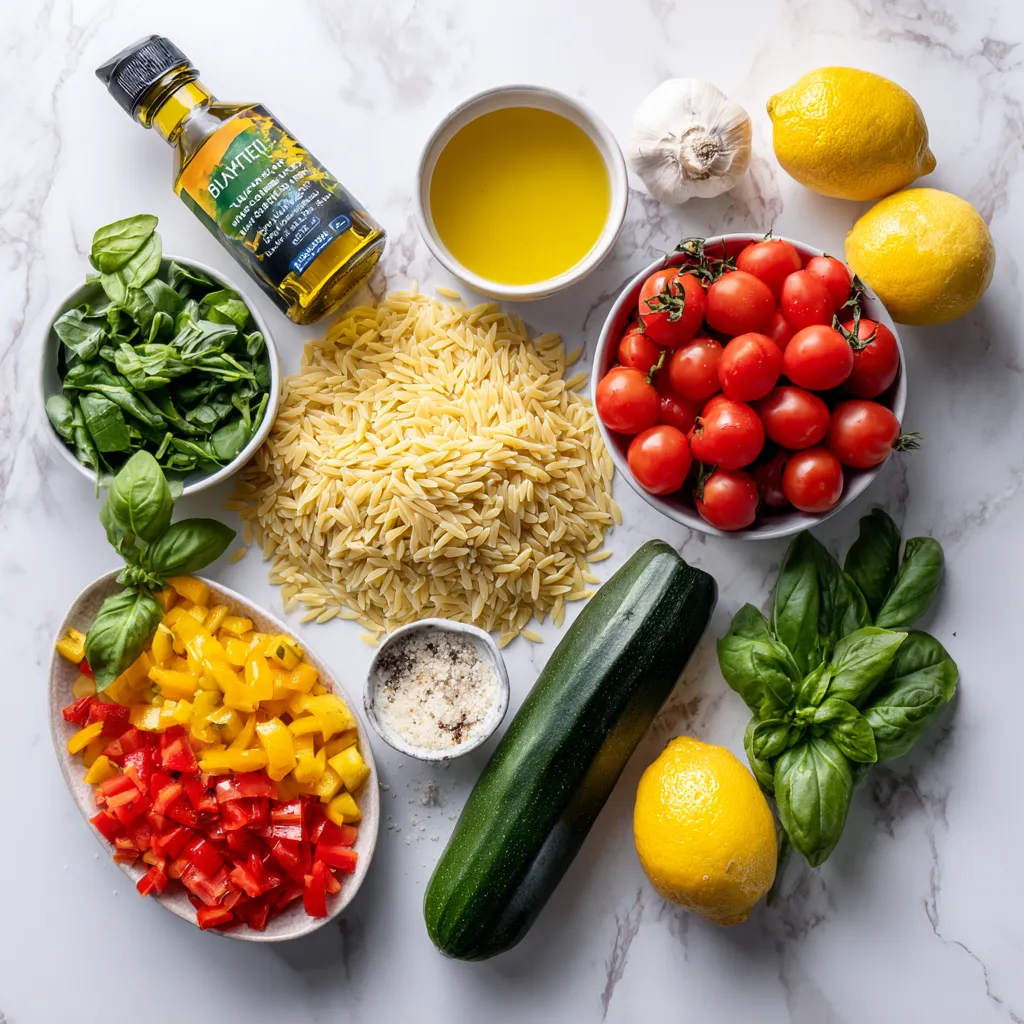
Detailed Ingredients List
– 1 cup orzo pasta
– 2 tablespoons olive oil
– 1 cup cherry tomatoes, halved
– 1 medium zucchini, diced
– 1 bell pepper, diced (choose your favorite color for variety)
– 4 cloves garlic, minced
– 1 cup fresh baby spinach
– 1 package (5.2 oz) Boursin cheese (Garlic & Herb flavor)
– 1 cup vegetable broth
– 1 teaspoon freshly grated lemon zest
– 2 tablespoons freshly squeezed lemon juice
– Salt and pepper to taste
– 1/2 cup grated Parmesan cheese
– Fresh basil or parsley leaves, for garnish
The main ingredients for my Lemon Boursin Orzo Bake come together to create a tasty dish. The orzo pasta serves as a creamy base, soaking up flavors. Olive oil gives a rich taste and helps the veggies cook.
For the veggies, I use bright cherry tomatoes, tender zucchini, and colorful bell peppers. They add texture and taste. I also mince fresh garlic, which brings a wonderful aroma. Spinach adds color and nutrition, wilting down in the mix.
The showstopper is the Boursin cheese. Its creamy texture and garlic-herb flavor make everything taste amazing. I also add vegetable broth to keep it moist. Fresh lemon zest and juice give a bright, zesty kick.
Seasoning is key! I use salt and pepper to enhance the flavors. Lastly, I sprinkle Parmesan on top for a cheesy, golden finish. Fresh basil or parsley garnishes the dish, adding a pop of color and freshness. Enjoy crafting this delightful Lemon Boursin Orzo Bake!
Step-by-Step Instructions
Prepping the Oven and Orzo
First, preheat your oven to 375°F (190°C). This will help the dish cook evenly. Next, fill a large pot with water and add salt. Bring this to a rolling boil. Once boiling, add 1 cup of orzo pasta. Cook it until it’s al dente, which means it should be firm yet tender. This usually takes about 8-10 minutes. After cooking, drain the orzo and set it aside.
Sautéing the Vegetables
In a big skillet, add 2 tablespoons of olive oil. Heat it over medium heat. Once hot, add 1 cup of halved cherry tomatoes, 1 medium diced zucchini, and 1 diced bell pepper. Sauté these veggies for about 5 minutes. You want them to be tender but still colorful. Now, add 4 minced garlic cloves to the skillet and stir for 1 minute. The garlic should smell fragrant but not burnt. Finally, fold in 1 cup of fresh baby spinach. Cook just until it wilts, which takes about a minute.
Combining Ingredients for Baking
In a large bowl, mix together the cooked orzo and the sautéed veggies. Then, crumble in 1 package of Boursin cheese. Pour in 1 cup of vegetable broth, 1 teaspoon of lemon zest, and 2 tablespoons of freshly squeezed lemon juice. Don’t forget to add a sprinkle of salt and pepper. Stir everything until the orzo and veggies are well-coated with the creamy cheese.
Baking the Orzo
Carefully transfer the orzo mixture into a greased 9×13 inch baking dish. Spread it out evenly. Now, sprinkle 1/2 cup of grated Parmesan cheese on top. This will create a cheesy layer that will turn golden when baked. Place the dish in the preheated oven and bake for 25-30 minutes. Keep an eye on it, looking for the cheese to bubble and turn golden brown. Once done, take it out and let it cool for a few minutes.
Tips & Tricks
Perfecting Cooking Techniques
– To achieve al dente orzo, cook it in boiling salted water for 8 to 10 minutes. Stir occasionally to prevent sticking. Check for doneness a minute before the package time ends.
– To avoid burnt garlic, add it after the veggies have softened. Cook for just 1 minute. This brings out the flavor without bitterness.
Enhancing Flavor
– For a flavor boost, try adding a pinch of red pepper flakes. This gives a nice kick without overpowering the dish.
– You can swap Boursin cheese for cream cheese or feta for a different taste. Adding cooked chicken or shrimp also makes it heartier.
Presentation Tips
– Serve the orzo bake straight from the dish for a cozy feel. For a fancier look, scoop portions onto plates.
– Top each serving with fresh basil or parsley. This not only adds color but also brightens the flavor.
Pro Tips
- Use Fresh Ingredients: For the best flavor, opt for fresh vegetables and herbs. They will enhance the overall taste and vibrancy of your orzo bake.
- Adjust the Cheese: If you prefer a stronger cheese flavor, feel free to add more Boursin or mix in other cheeses like feta or mozzarella for added creaminess.
- Make it Ahead: This dish can be prepared in advance. Assemble everything and store it in the refrigerator. Just pop it in the oven when you’re ready to bake!
- Experiment with Additions: Feel free to customize your orzo bake by adding proteins like cooked chicken, shrimp, or chickpeas for a heartier meal.
Variations
Ingredient Substitutions
You can easily swap out veggies in this recipe. Try using asparagus or bell peppers. These choices add color and crunch. If you want a vegan or dairy-free dish, use a plant-based cheese. There are many great options available. Just check the labels to ensure they’re dairy-free.
Flavor Variations
Switching up cheese can change the flavor. You might try feta or goat cheese. Adding different herbs can also elevate the taste. Fresh thyme or dill can add a great twist. If you want more protein, add chicken or shrimp. Just cook them before mixing in with the orzo. This makes the dish heartier and more filling.
Storage Info
Storing Leftovers
To store leftovers, let the dish cool to room temperature. Transfer it to an airtight container. This helps keep the flavors fresh and prevents drying out. You can store it in the fridge for up to 3 days. If you want it to last longer, consider freezing it. Just remember to use a freezer-safe container. It can last up to 2 months in the freezer.
Reheating Techniques
When reheating, you have two great options: the microwave or the oven. For the microwave, place a serving in a bowl. Cover it with a damp paper towel to keep moisture in. Heat it for 1-2 minutes, stirring halfway through.
If you prefer the oven, preheat it to 350°F (175°C). Place the orzo bake in a baking dish. Cover it with foil to keep it moist. Heat for about 15-20 minutes. This method helps the cheese stay creamy and the dish warm throughout.
FAQs
What can I substitute for Boursin cheese?
You can swap Boursin cheese with other creamy cheeses. Cream cheese, goat cheese, or ricotta work well. Add herbs and garlic to mimic the flavor. This keeps the dish rich and tasty.
Can I make Lemon Boursin Orzo Bake ahead of time?
Yes, you can prepare it ahead. Just follow the recipe and let it cool. Cover it tightly and store it in the fridge. Bake it later when you’re ready to enjoy.
What to serve with Lemon Boursin Orzo Bake?
This orzo bake pairs well with a fresh salad. A simple green salad with lemon vinaigrette is perfect. You can also serve it with grilled chicken or fish for a complete meal.
How long does the dish last in the fridge?
Lemon Boursin Orzo Bake lasts about 3 to 5 days in the fridge. Make sure to store it in an airtight container. Reheat it until warm before serving for the best taste.
This blog covers how to make a tasty Lemon Boursin Orzo Bake. We explored ingredients, cooking steps, and handy tips. You learned how to pick veggies, cook orzo, and maximize flavors. I shared ideas for making it your own and storage tips for leftovers. Remember, experimenting with flavors can make this dish uniquely yours. Enjoy this easy recipe and happy cookin


