Lemon Chicken Pasta Simple and Flavorful Dinner Dish

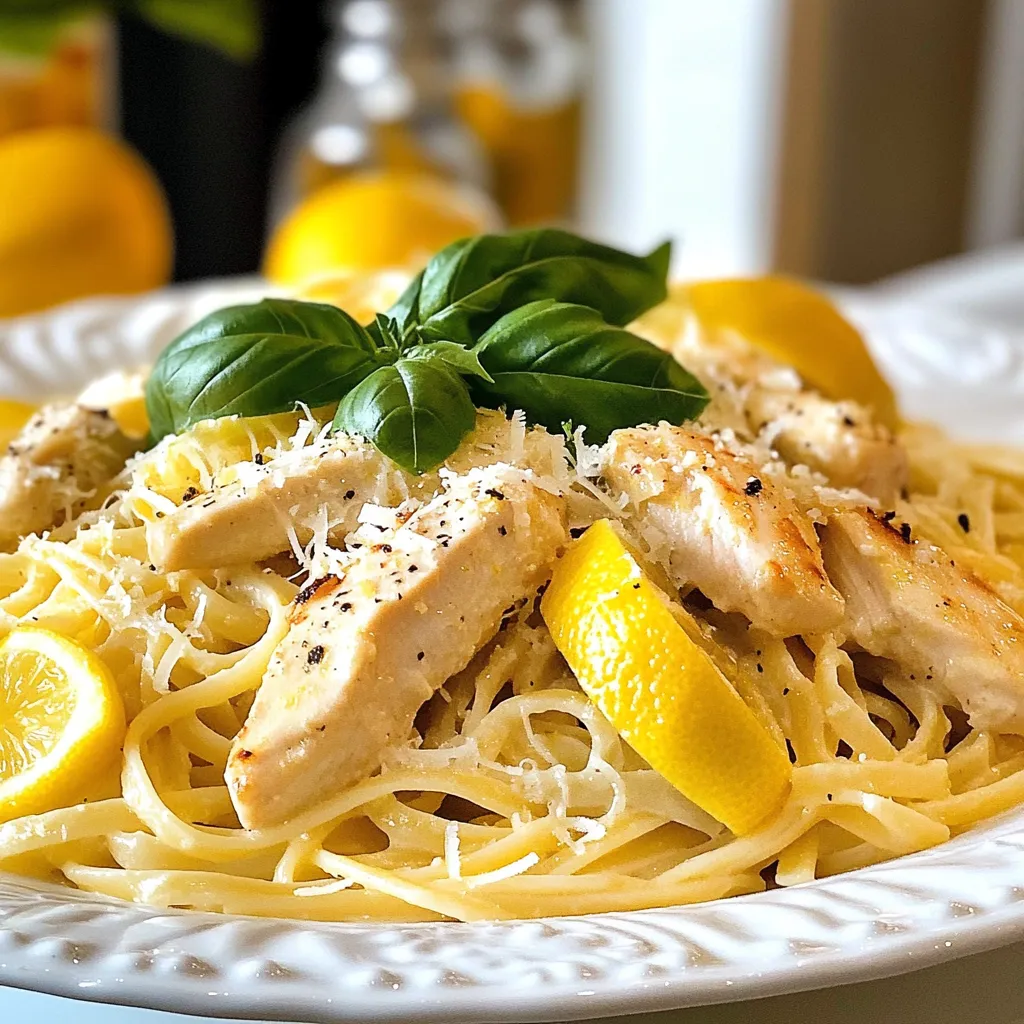
Ready to spice up your dinner routine? This Lemon Chicken Pasta is not just simple—it’s bursting with flavor. I’ll guide you through quick steps to create a creamy sauce, tender chicken, and perfectly cooked pasta. With easy tips and tempting variations, you can impress your family or friends in no time. Let’s make your next meal a deliciously memorable one!
Why I Love This Recipe
- Bright and Zesty Flavor: This dish combines the freshness of lemon with savory chicken, creating a vibrant flavor profile that is both refreshing and satisfying.
- Quick and Easy: With a prep time of just 10 minutes and a total time of 30 minutes, this recipe is perfect for a weeknight dinner when you’re short on time.
- Comfort Food with a Twist: The creamy sauce elevates the pasta to a comforting yet elegant dish, making it suitable for any occasion from casual to special dinners.
- Customizable: You can easily add your favorite vegetables or switch up the protein, making this recipe versatile and adaptable to your taste preferences.
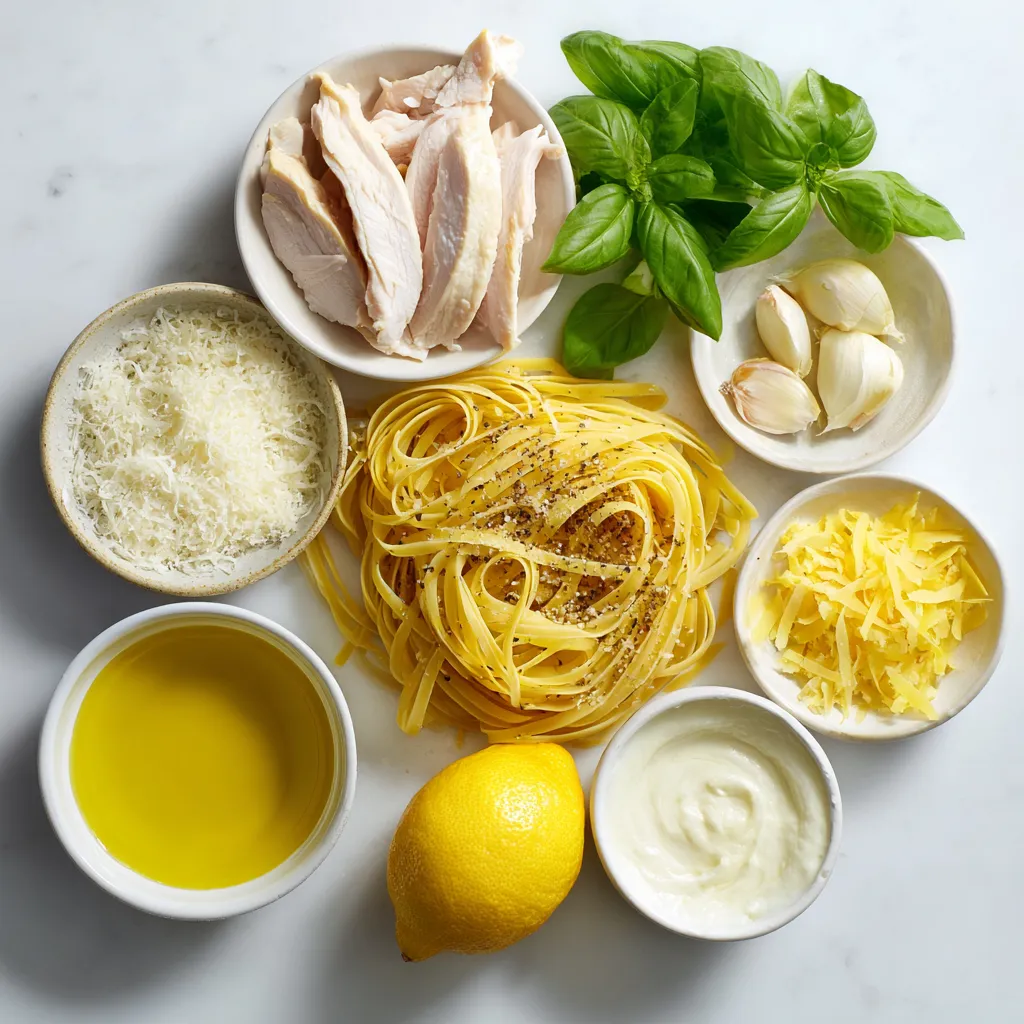
Ingredients
Chicken and Pasta
For the main part of this dish, you will need:
– 2 boneless, skinless chicken breasts, sliced into strips
– 8 oz linguine or spaghetti pasta
The chicken adds protein, while the pasta gives the dish its heartiness.
Aromatics and Flavors
To make the dish pop, gather these ingredients:
– 3 tablespoons extra virgin olive oil, divided
– 3 cloves garlic, minced
– Zest of 1 large lemon
– 1/4 cup freshly squeezed lemon juice (about 1-2 lemons)
These aromatics bring out bright flavors. The garlic adds depth, while lemon zest and juice provide a fresh kick.
Creamy Sauce Components
For a rich and creamy sauce, you will need:
– 1/2 cup heavy cream
– 1/2 cup freshly grated Parmesan cheese
– Salt and freshly cracked black pepper to taste
– A handful of fresh basil leaves, torn or whole, for garnish
Heavy cream and Parmesan make the sauce creamy and rich. Salt and pepper help balance the flavors. Fresh basil adds a lovely touch on top.

Step-by-Step Instructions
Cooking the Pasta
To start, fill a large pot with water. Add a good amount of salt. Bring the water to a rolling boil. Once boiling, add 8 oz of linguine or spaghetti. Cook it according to the package instructions. Aim for al dente, which means tender but still firm. When done, drain the pasta but keep 1/2 cup of the starchy water. Set the pasta aside.
Preparing the Chicken
While the pasta cooks, heat 2 tablespoons of olive oil in a large skillet over medium heat. Take 2 boneless, skinless chicken breasts and slice them into strips. Season the chicken with salt and freshly cracked black pepper. Add the chicken to the skillet. Cook for about 5-7 minutes until golden brown and cooked through. Once it’s done, remove the chicken from the skillet and set it on a plate.
Sautéing the Garlic
In the same skillet, add the last tablespoon of olive oil. Heat it up before adding 3 cloves of minced garlic. Sauté the garlic for about 1 minute. Stir it often until it smells amazing. Be careful not to burn it, as that can make the dish bitter.
Creating the Lemon Sauce
Next, stir in the zest of 1 large lemon and 1/4 cup of freshly squeezed lemon juice. Let this mixture bubble gently for about a minute. This step brings all the flavors together.
Combining the Ingredients
Now, lower the heat to medium-low. Stir in 1/2 cup of heavy cream and 1/2 cup of freshly grated Parmesan cheese. Mix everything well until the cheese melts and the sauce becomes creamy. If it gets too thick, add some of the reserved pasta water. Keep stirring until you reach the right consistency.
Serving Suggestions
Finally, add the cooked chicken and drained pasta to the skillet. Toss everything together so the chicken and pasta are well coated in the lemon sauce. Taste for seasoning, adding more salt and pepper if needed. Plate the pasta warm and garnish with a handful of torn or whole fresh basil leaves. This adds a nice touch and fresh aroma.
Tips & Tricks
Tips for Cooking Pasta
– Use a large pot with lots of water.
– Add salt to the water; it should taste like the sea.
– Stir the pasta often to prevent sticking.
– Cook until al dente, which means firm to the bite.
– Reserve some pasta water; it helps the sauce later.
Cooking pasta well is key to a great dish. The right texture makes every bite enjoyable. Plus, the salty water adds flavor.
Cooking Chicken Perfectly
– Cut chicken into even strips for even cooking.
– Season with salt and black pepper before cooking.
– Use medium heat to avoid burning.
– Cook until golden brown and no longer pink inside.
– Let it rest before slicing, so it stays juicy.
Perfect chicken adds a lot of flavor. It should be tender and cooked through. Avoid overcooking, as it can dry out.
Secrets to a Creamy Sauce
– Start with sautéed garlic for a rich base.
– Use heavy cream for that silky texture.
– Stir in Parmesan cheese slowly until melted.
– Add reserved pasta water to adjust thickness.
– Taste often to get the seasoning just right.
A creamy sauce brings everything together. It coats the pasta and chicken nicely. Adjust the sauce as needed for the best result.
Flavor Enhancements
– Fresh lemon zest brightens the dish.
– Consider adding a pinch of red pepper flakes for heat.
– Fresh herbs like basil or parsley add freshness.
– A squeeze of lemon juice brightens flavors.
– Try different cheeses like feta for a twist.
Enhancing flavors takes your dish to the next level. Small changes can make a big difference. Keep experimenting to find your favorite combination.
Pro Tips
- Marinate the Chicken: For enhanced flavor, consider marinating the chicken strips in lemon juice, olive oil, and garlic for at least 30 minutes before cooking.
- Use Fresh Ingredients: Fresh lemon juice and zest will elevate the dish significantly compared to bottled alternatives. Always opt for fresh where possible.
- Adjust Creaminess: If you prefer a lighter sauce, reduce the amount of heavy cream or substitute with half-and-half for a less rich flavor.
- Perfect Pasta: To prevent the pasta from becoming mushy, cook it just until al dente, and remember to toss it with the sauce immediately after draining.

Variations
Adding Vegetables
You can boost the nutrition of your lemon chicken pasta by adding vegetables. Try adding spinach, cherry tomatoes, or broccoli. These veggies add color and flavor. Simply sauté them after cooking the garlic. Add them to the skillet before mixing in the chicken and pasta. This makes your dish more balanced and tasty.
Gluten-Free Options
If you need a gluten-free meal, swap out the regular pasta. Use gluten-free pasta made from rice or quinoa. You can find these options in most stores. The cooking time may differ, so watch your pasta closely. This way, everyone can enjoy lemon chicken pasta without worry.
Protein Alternatives
Want to change the protein in your lemon chicken pasta? You can use shrimp, salmon, or tofu instead of chicken. Cook shrimp until pink and tender. For salmon, pan-sear it until flaky. If you choose tofu, make sure to press it well and sauté until golden. Each choice brings a new flavor to the dish.
Storage Info
Refrigeration Guidelines
After enjoying your lemon chicken pasta, let it cool to room temperature. Store it in an airtight container. This dish lasts up to three days in the fridge. Make sure to keep it sealed to prevent it from drying out. You can always add a splash of water or cream before reheating to refresh the sauce.
Freezing Instructions
If you want to save some for later, you can freeze it. Place the cooled pasta in a freezer-safe container. It will stay good for up to three months in the freezer. When ready to eat, thaw it overnight in the fridge before reheating. Avoid freezing the dish with fresh basil, as it doesn’t freeze well.
Reheating Tips
To reheat, you can use the stove or microwave. If using the stove, place the pasta in a skillet with a splash of water or cream. Heat it on low, stirring often until warmed through. For the microwave, cover the dish with a damp paper towel and heat in short bursts. This helps keep it moist and prevents drying out. Enjoy your meal again, just as good as the first time!
FAQs
What type of pasta is best for lemon chicken pasta?
I recommend using linguine or spaghetti for this dish. Both types hold the creamy sauce well. They also add a nice texture. You can use any pasta you enjoy, but these work best with the lemon flavor.
Can I use lemon juice from a bottle?
You can use bottled lemon juice, but fresh juice tastes better. Fresh lemons give a bright, zesty flavor. The zest also adds great aroma. If using bottled juice, choose one with no added sugars.
How do I make this recipe spicier?
To add some heat, try adding red pepper flakes. Start with a small amount and taste as you go. You can also use spicy sausage instead of chicken. Another option is to add finely chopped jalapeños.
What can I substitute for heavy cream?
You can use half-and-half for a lighter option. Coconut cream is a great dairy-free choice. For a low-calorie version, try Greek yogurt. Just mix it in slowly to avoid lumps.
How long does lemon chicken pasta last in the fridge?
This dish lasts about 3 to 4 days in the fridge. Store it in an airtight container to keep it fresh. Reheat it gently to maintain the creamy texture.
Can I prepare this dish ahead of time?
Yes, you can prep the chicken and sauce in advance. Cook the pasta right before serving. This way, it stays fresh and al dente. Just toss everything together when ready to enjoy.
This blog post covers everything you need for a great lemon chicken pasta. You learned about each ingredient, from the chicken and pasta to the creamy sauce. The step-by-step instructions made cooking easy. I shared tips for perfect pasta and chicken, plus sauce secrets. You can try fun variations and have storage tips, too.
Cooking is fun and sharing meals brings joy. Enjoy your lemon chicken pasta experienc

Zesty Lemon Chicken Pasta
Ingredients
- 2 pieces boneless, skinless chicken breasts, sliced into strips
- 8 oz linguine or spaghetti pasta
- 3 tablespoons extra virgin olive oil, divided
- 3 cloves garlic, minced
- 1 large lemon zest
- 1 cup freshly squeezed lemon juice (about 1-2 lemons)
- 1 2 heavy cream
- 1 2 freshly grated Parmesan cheese
- to taste Salt and freshly cracked black pepper
- a handful fresh basil leaves, torn or whole, for garnish
Instructions
- Cook the Pasta: Fill a large pot with water, add a generous amount of salt, and bring it to a rolling boil. Add the linguine or spaghetti and cook according to the package instructions until al dente. Once cooked, drain the pasta, reserving 1/2 cup of the starchy pasta water. Keep the pasta aside.
- Prepare the Chicken: While the pasta cooks, heat 2 tablespoons of olive oil in a large skillet over medium heat. Season the chicken strips with salt and freshly cracked black pepper. Add the chicken to the skillet and sauté for about 5-7 minutes, or until cooked through and golden brown on the outside. Once done, remove the chicken from the skillet and set aside on a plate.
- Sauté the Garlic: In the same skillet, add the remaining tablespoon of olive oil. Once heated, toss in the minced garlic and sauté for about 1 minute, stirring frequently until fragrant, taking care not to let it burn.
- Add the Flavor: To the skillet, stir in the lemon zest and freshly squeezed lemon juice, allowing the mixture to bubble gently for about a minute. This helps to meld the flavors beautifully.
- Create the Creamy Sauce: Lower the heat to medium-low and stir in the heavy cream and freshly grated Parmesan cheese. Mix well until the cheese has melted and the sauce becomes creamy. If the sauce seems too thick, gradually add some of the reserved pasta cooking water, stirring until desired consistency is achieved.
- Combine Everything: Add the cooked chicken and the drained pasta to the skillet, tossing everything together to ensure the chicken and pasta are well coated in the luscious lemon sauce. Taste and adjust the seasoning with more salt and pepper as needed.
- Serve and Garnish: Carefully plate the pasta warm, allowing the creamy sauce to cling to each strand. Finish with a generous garnish of fresh basil leaves for an aromatic and vibrant presentation.


![To make garlic butter steak bites, you need a few key ingredients: - 1 pound sirloin steak, cut into bite-sized pieces - 4 tablespoons unsalted butter, divided - 4 cloves garlic, minced - 1 teaspoon smoked paprika - 1 teaspoon salt - 1/2 teaspoon black pepper - 1 tablespoon fresh parsley, finely chopped (for garnish) - Lemon wedges, for serving The sirloin steak is tender and has great flavor. Cut it into small pieces to cook quickly. The unsalted butter adds richness, while garlic gives a wonderful aroma. Smoked paprika adds a nice touch of warmth. Salt and pepper enhance the taste. Fresh parsley brightens the dish, and lemon wedges give a zesty kick. You can add a few optional items to elevate your meal: - Fresh parsley - Lemon wedges - Side dish suggestions Fresh parsley not only looks nice but also adds a fresh taste. Lemon wedges balance the richness of the steak. For sides, consider serving with a salad, rice, or roasted veggies. These add texture and flavor to your plate. You can find the full recipe for garlic butter steak bites to help guide you in creating this dish. First, pat the steak pieces dry with a paper towel. This step helps the steak sear well, giving it a nice crust. Next, cut the steak into bite-sized pieces. Aim for uniform chunks, so they cook evenly. This makes each bite tender and flavorful. Now, let’s melt the butter. In a large skillet, heat 2 tablespoons of unsalted butter over medium-high heat. Wait until it starts to sizzle. This means it's hot enough. Once ready, add the steak bites to the skillet. Spread them in a single layer. Avoid overcrowding; this helps them sear nicely. Next, sprinkle smoked paprika, salt, and black pepper over the steak. These spices add great flavor. Cook the steak bites for about 2-3 minutes on each side. Adjust the time based on how you like your steak. Remove them when they reach your desired doneness. In the same skillet, lower the heat to medium. Add the remaining butter and minced garlic. Sauté for about 30 seconds. Keep stirring until the garlic smells good but doesn't brown. This step creates a rich garlic butter sauce. It’s time to combine the steak and sauce. Return the cooked steak bites to the skillet. Toss them in the garlic butter sauce, coating each piece well. The sauce adds moisture and flavor. To finish, remove the skillet from heat. Garnish the steak bites with finely chopped parsley. This adds color and freshness. Serve them with lemon wedges. The juice from the lemon adds a zesty touch that brightens the dish. Enjoy your delicious garlic butter steak bites! For the detailed recipe, check the Full Recipe section. To get a great sear on your steak bites, space is key. Do not overcrowd the pan. When the pieces are too close, they steam instead of sear. This step makes a big difference in taste. Aim for a single layer in your skillet. For doneness, cook about 2-3 minutes per side for medium-rare. Adjust the time if you like it more or less done. Use a meat thermometer for best results. A medium steak should reach 145°F. If you want to switch things up, try different cuts of steak. Ribeye or tenderloin works well too. Both offer a nice fat content for flavor. You can also use dairy-free butter if you need it. Look for plant-based options that melt well. They give you that creamy taste without dairy. Want to add more flavor? Consider adding a pinch of cayenne pepper or fresh thyme. Both enhance the taste and give an extra kick. For a pretty plate, stack the steak bites neatly. Drizzle some garlic butter sauce over them. Then, add fresh parsley on top. Serve with lemon wedges on the side. The citrus adds a bright burst that pairs nicely with the richness of the steak. This makes your dish both tasty and beautiful. For the full recipe, check out the [Full Recipe]. {{image_4}} You can cook garlic butter steak bites in different ways. Grilling steak bites: Grilling adds a nice smoky flavor. Preheat your grill to medium-high. Thread the steak pieces onto skewers for easy handling. Grill them for about 2-3 minutes on each side. Always check for your desired doneness. The grill marks will make them look great! Air frying steak bites: The air fryer is a quick option. Set it to 400°F. Toss the steak pieces with garlic butter and spices. Place them in the air fryer basket in a single layer. Cook for about 8-10 minutes, shaking halfway. You’ll achieve a crispy outside and tender inside. You can make garlic butter steak bites even better with some fun flavors. Adding herbs and spices: Fresh herbs like thyme or rosemary can bring depth. Add them to the garlic butter while it cooks. A sprinkle of red pepper flakes can add heat if you like spice. Incorporating vegetables: You can add veggies for color and nutrition. Bell peppers or mushrooms work well. Just toss them in the skillet with the steak bites. They soak up that rich garlic butter flavor too. Serving your steak bites can be both fun and creative. Pairing with different sauces: Experiment with sauces like chimichurri or barbecue. A rich steak sauce also complements the bites well. Drizzle the sauce on top or serve it on the side for dipping. Creative side dishes: Think about sides that balance the rich flavor. A fresh salad or roasted veggies can work nicely. For something heartier, serve with mashed potatoes or rice. These will soak up the leftover garlic butter sauce too! For the full recipe, check out the [Full Recipe]. After you make garlic butter steak bites, let them cool to room temperature. Store the leftovers in an airtight container. This helps keep the flavor fresh. You can store them in the fridge for up to three days. To reheat, use a skillet over medium heat. Add a little butter to the pan. This will help bring back the juicy flavor. Heat for about 5 minutes, turning the steak bites occasionally. For meal prep, you can freeze steak bites. First, let them cool completely. Place them in a freezer-safe bag or container. Remove as much air as possible to prevent freezer burn. They can stay fresh in the freezer for about three months. To thaw, move them to the fridge the night before you want to eat them. This keeps them safe and tasty. You can also thaw them in the microwave if you’re in a hurry. Garlic butter steak bites last about three days in the fridge. If you freeze them, they last for about three months. Always check for any off smells or changes in color before eating. This will help ensure you enjoy every bite safely. The best steak for steak bites is sirloin. It has great flavor and is tender. Other good choices include ribeye and tenderloin. Both cuts provide a rich taste. They also remain juicy when cooked. If you can, choose grass-fed steak for better flavor and health. Yes, you can make steak bites without garlic. Try using shallots for a mild onion flavor. You can also use herbs like rosemary or thyme for taste. They add fresh notes to the dish. Consider using lemon zest for brightness in the sauce too. To make garlic butter steak bites low-carb, skip the butter and use olive oil. Focus on fresh herbs and spices for flavor. Serve with low-carb veggies like zucchini or bell peppers. You can also pair it with a salad for a balanced meal. Enjoying this dish without bread or rice keeps it low in carbs. Garlic butter steak bites are simple and delicious. You learned about the best ingredients. I shared tips for cooking and storing them. You can customize with different flavors and sides. These bites shine as a hearty meal or snack. Try various cooking methods to find your favorite. Enjoy making this dish your own!](https://joymealplan.com/wp-content/uploads/2025/06/b02e02a2-a549-4d39-b201-7a4183f1f1f0-768x768.webp)
![- 1 lb boneless, skinless chicken thighs, cut into bite-sized pieces - 2 tablespoons sesame oil - 2 tablespoons fresh ginger, finely grated - 3 cloves garlic, minced - 3 tablespoons low-sodium soy sauce - 2 tablespoons honey - 1 teaspoon rice vinegar - 1 teaspoon cornstarch mixed with 2 tablespoons water (for thickening) - 1 cup cooked brown rice - 1 cup broccoli florets - 1 cup shredded carrots - 1 red bell pepper, sliced into thin strips The chicken thighs give this dish a rich flavor. I love using chicken thighs because they stay juicy and tender. Sesame oil adds a nice nutty taste. Fresh ginger and garlic bring warmth and a hint of spice. Soy sauce gives that classic umami kick. Honey brings sweetness to balance the flavors. Rice vinegar adds a touch of brightness. Cornstarch helps the sauce thicken perfectly. Brown rice serves as a hearty base. The broccoli, carrots, and bell pepper add color and crunch. - Green onions, finely chopped - 2 teaspoons sesame seeds - Lime wedges - Other vegetable options like snap peas or bok choy Garnishes make the dish pop! Green onions and sesame seeds add a lovely texture. Lime wedges are great for a fresh squeeze of citrus. You can swap in other vegetables based on your taste. This way, you can make the dish your own. You can find the full recipe in the article above. 1. Heat 2 tablespoons of sesame oil in a large skillet over medium-high heat. 2. When the oil is hot, add 2 tablespoons of freshly grated ginger and 3 cloves of minced garlic. Sauté for 30 seconds until they smell great. 3. Now, add 1 pound of bite-sized chicken thighs to the skillet. Cook for 6-7 minutes, stirring often. Make sure the chicken is no longer pink inside and is golden-brown. 1. While the chicken cooks, take a small bowl. Whisk together 3 tablespoons of low-sodium soy sauce, 2 tablespoons of honey, and 1 teaspoon of rice vinegar. 2. Pour this delicious sauce over the cooked chicken. Stir well to coat each piece. 1. Reduce the heat to medium. Let the chicken simmer in the sauce for 2-3 minutes. This helps the flavors blend together. 2. Mix 1 teaspoon of cornstarch with 2 tablespoons of water. Stir this into the skillet until it’s well combined. Cook for another minute until the sauce thickens and shines. 3. While the chicken simmers, steam 1 cup of broccoli florets for 3-4 minutes. They should be bright green and tender-crisp. 4. To put your bowls together, start with 1/2 cup of cooked brown rice in each bowl. Top with a scoop of ginger sesame chicken, steamed broccoli, shredded carrots, and sliced red bell pepper. 5. Finally, garnish each bowl with chopped green onions and sesame seeds. This adds flavor and looks nice. For the full recipe, check out the [Full Recipe]. Fresh ingredients make a big difference. Use high-quality chicken and vibrant veggies. This will enhance the taste of your dish. Adjust the sweetness and saltiness to your liking. Add more honey for sweetness or soy sauce for salt. Taste as you go; this helps you find the perfect balance. Cook chicken thighs for about 6-7 minutes. Stir often to ensure even cooking. To check if the chicken is done, cut a piece open. The inside should be white, with no pink. If you see any pink, cook it a bit longer. Make your bowl visually pleasing. Arrange the vegetables in colorful layers. Start with the rice at the bottom, then add the chicken, and top with veggies. For garnish, add green onions and sesame seeds. You can also serve with a lime wedge. A squeeze of lime adds freshness and brightness to each bite. {{image_4}} You can easily swap chicken for other proteins. If you want a vegetarian option, use tofu. Tofu absorbs flavor well and adds a nice texture. Just cube it and sauté it like chicken. For seafood lovers, shrimp works great too. Cook it until pink and tender. You can also use beef. Thinly slice it and cook it until it’s just right. Each protein offers a unique taste and texture. Feel free to change up the veggies in your bowl. Seasonal vegetables can add freshness. Think of zucchini in summer or sweet potatoes in fall. Quick-cooking vegetables are also great. Snap peas and baby corn cook fast and add crunch. Just steam or sauté them briefly. This way, you keep the nutrients and color bright. If you need gluten-free options, try tamari instead of soy sauce. It has a similar taste and works well in this dish. For those watching carbs, use cauliflower rice instead of brown rice. It’s light and absorbs flavors well. You can still enjoy the same taste without the extra carbs. Just sauté it briefly, and you’re good to go. After a tasty meal, you may want to save some for later. Store your Sesame Ginger Chicken Bowls in airtight containers. This keeps the flavors fresh and tasty. Make sure to let the dish cool before sealing it up. You can keep leftovers in the fridge for about 3 to 4 days. If you want to save it longer, freezing is a great option. Place the chicken and veggies in freezer-safe bags or containers. Remove as much air as possible to prevent freezer burn. You can freeze the bowls for up to 3 months. When you're ready to eat, thaw them overnight in the fridge. To reheat, warm them on the stove or in the microwave until hot. Meal prepping helps save time during busy weeks. You can chop and store all your veggies in advance. Cook the chicken and make the sauce separately. This way, you can mix and match throughout the week. Prepare multiple servings at once to enjoy these bowls several times. Each time, just reheat the rice and combine everything for a quick meal. You can add chili flakes or hot sauce to the dish. Start with a small amount and taste it. You can always add more to reach your preferred spice level. This kick can enhance the flavor and make it even more exciting. Yes, you can skip the cornstarch if you prefer. You can use arrowroot powder or flour as a thickening alternative. These options work well in sauces, but you may need to adjust the amount. Just be careful not to add too much, or it may change the taste. I recommend serving your bowls with steamed vegetables or a light salad. A refreshing cucumber salad pairs well. You can also enjoy the bowls with a cold drink, like iced green tea, for a balanced meal. These Sesame Ginger Chicken Bowls are easy to make and packed with flavor. You now have a full guide, covering ingredients, step-by-step cooking, tips, variations, and storage. Fresh ingredients give the best taste, while swapping proteins and veggies keeps it fun. Don't forget to use garnishes for that special touch. Enjoy these bowls any day of the week, and feel free to get creative with your own twists! They make for great leftovers, too. Cook well, and enjoy your tasty meal!](https://joymealplan.com/wp-content/uploads/2025/07/ee8b11ee-19fa-4955-830a-ea8ab42ba55e-768x768.webp)
![To make the Spicy Sriracha Noodles, gather these ingredients: - 8 oz rice noodles - 2 tablespoons Sriracha sauce - 1 tablespoon soy sauce - 1 tablespoon sesame oil - 1 red bell pepper, thinly sliced - 1 cup snap peas, trimmed - 3 green onions, finely chopped - 2 cloves garlic, minced - 1 tablespoon fresh ginger, grated - ½ cup fresh cilantro, roughly chopped - Juice of 1 lime - Salt to taste - Sesame seeds for garnish This recipe serves about 2 to 3 people. Each serving contains: - Calories: Approximately 350 - Protein: 10g - Carbohydrates: 55g - Fats: 12g - Fiber: 5g These noodles are a great choice for a quick, flavorful meal. They balance carbs and protein while being low in calories. You can customize this recipe easily. Here are some swaps: - Rice noodles: Use whole grain or egg noodles if you prefer. - Sriracha sauce: Try chili paste or hot sauce for a different heat. - Soy sauce: Use tamari for a gluten-free option. - Sesame oil: Olive oil or coconut oil can work too. - Red bell pepper: Any bell pepper or even carrots will add crunch. - Snap peas: You can swap these for green beans or broccoli. These substitutions keep your dish exciting while still delivering great flavor. For the full recipe, check out the complete guide. Start by boiling water in a large pot. Add the rice noodles and cook them for about 4-6 minutes, or until they are soft but still firm. Drain the noodles and rinse them with cold water. This stops the cooking process and keeps them from getting sticky. Set them aside to cool. Grab a large skillet or wok and pour in the sesame oil. Heat it on medium until it shimmers. Add minced garlic and grated ginger, stirring for about 30 seconds. The smell should make your mouth water! This step adds a tasty base to your noodles. Now, toss in the sliced red bell pepper and snap peas. Stir-fry these veggies for about 3-4 minutes. They should be bright and slightly tender. In a small bowl, mix Sriracha, soy sauce, and lime juice. Pour this sauce over the veggies, stirring well. Then, gently fold in the cooked noodles, making sure everything is coated evenly. Season with salt to taste. Stir-fry for another 1-2 minutes. Finally, add chopped green onions and cilantro for a fresh kick. Serve your spicy Sriracha noodles hot, garnished with sesame seeds from the recipe provided! To get the best texture for your noodles, cook them until they are al dente. This means they should be firm to the bite. Follow the package instructions closely. After cooking, drain and rinse them with cold water. This stops the cooking process and keeps them from getting too soft. Want to adjust the spice? You can! Add more Sriracha for a hotter dish. If you prefer it milder, use less Sriracha or mix in a little soy sauce. You can also add sugar to balance the heat. Taste as you go to find your perfect level of spice. Garnishing makes your dish pop! Use fresh cilantro and green onions for color. A sprinkle of sesame seeds adds a nice crunch too. You can also add lime wedges on the side. This gives a fresh touch and looks great on the plate. Serve your noodles hot to enjoy all the flavors! {{image_4}} You can add proteins to your spicy Sriracha noodles for extra flavor and nutrition. Tofu is a great choice for a vegetarian option. Cut firm tofu into small cubes, then sauté it until golden. Add it to the noodles at the end for a satisfying bite. If you like chicken, use thinly sliced breast. Cook it in the skillet before the veggies. Shrimp is another tasty option. Toss it in after the veggies cook. Shrimp only takes a few minutes to cook. This way, you get a quick and hearty meal. Feel free to swap in different vegetables for variety. Zucchini adds a nice crunch. Slice it into thin rounds and add it to the skillet with the bell pepper. Broccoli is another great option. Cut it into small florets and steam it slightly before adding to your dish. This keeps it bright and tender. You can mix and match any veggies you have. Spinach, carrots, or bell peppers work well too. The more colors, the better your dish looks and tastes. Making this dish vegetarian or vegan is easy. Just use vegetable broth instead of chicken broth. You can also swap out the honey or sugar for maple syrup. Many store-bought Sriracha sauces are vegan, but check the label. You want to keep the flavors bold and spicy while ensuring it fits your diet. Try adding more herbs or spices, like basil or cilantro, for extra depth. The main goal is to keep it fresh and flavorful. This dish can fit any diet with simple swaps. For the full recipe, check above. After enjoying your spicy Sriracha noodles, store any leftovers in an airtight container. Make sure to let them cool first. This helps keep the noodles fresh and tasty. Refrigerate them right away. They will stay good for up to three days. If you want to enjoy them later, it’s best to eat them within this time frame. When you’re ready to eat your leftovers, there are a few ways to reheat them. You can use a microwave or a skillet. For the microwave, place the noodles in a bowl. Add a splash of water to keep them moist. Heat them for about 1-2 minutes, stirring halfway through. If you choose the skillet, warm it over medium heat. Add a little oil and toss the noodles until they are hot. This method helps keep the texture nice. You can freeze these noodles if you want to save them for later. First, let them cool completely. Then pack them in a freezer-safe container or bag. Make sure to remove as much air as possible. The noodles can last up to two months in the freezer. When you’re ready to eat, thaw them in the fridge overnight. Reheat as mentioned above. This way, you can enjoy your spicy Sriracha noodles even after some time. For the full recipe, check out the previous section. You can easily make Spicy Sriracha Noodles vegetarian. Just skip any meat or seafood. Use vegetables like bell peppers, snap peas, and carrots. You can also add tofu for extra protein. Tofu soaks up the sauce well and adds a nice texture. Make sure to use soy sauce that is vegetarian to keep it meat-free. These noodles pair well with many sides. You could serve a light salad, like a cucumber salad, for a refreshing crunch. Spring rolls or dumplings also make great sides. You can also try some grilled veggies for a hearty touch. If you want something warm, a bowl of miso soup works wonderfully too. Yes, you can use different types of noodles. Rice noodles are great, but you can try egg noodles or udon noodles too. Each type will bring its own flavor and texture. Just cook them according to the package instructions. For the best results, pick a noodle that absorbs the sauce well. Check the [Full Recipe] for cooking tips. In this blog post, we explored key steps to make delicious spicy Sriracha noodles. We discussed ingredients, including nutritional info and possible swaps. You learned how to cook the noodles and sauté the aromatics for great flavor. Tips helped you achieve the perfect texture and customize spice levels. You can even add proteins or veggies for extra variety. Now, you can enjoy a tasty meal that fits your taste and needs. Happy cooking!](https://joymealplan.com/wp-content/uploads/2025/06/8df2442a-c8e4-418c-8d77-15c525c42243-768x768.webp)


