Lemon Garlic Chicken Orzo Skillet Simple and Tasty

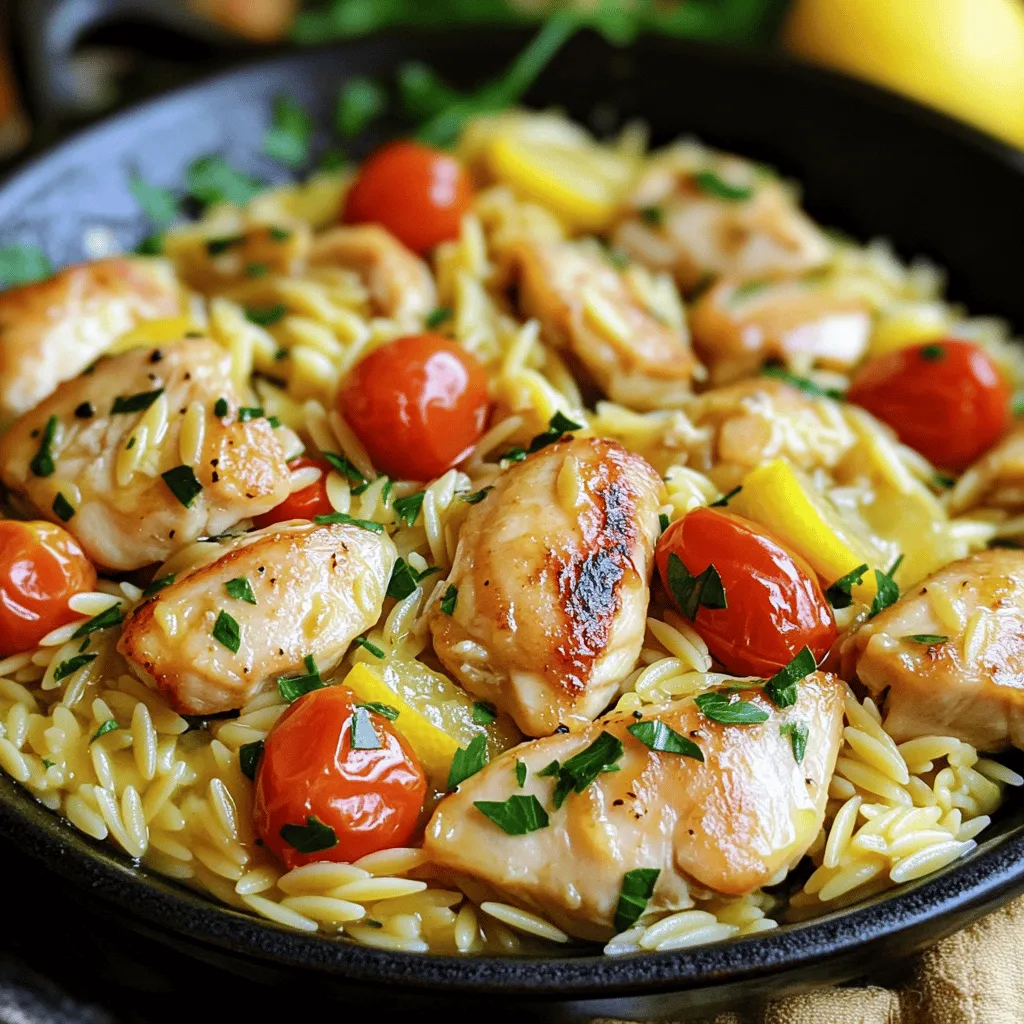
Looking for a quick, delicious meal? The Lemon Garlic Chicken Orzo Skillet is your answer! This one-pan dish is packed with flavor and easy to make. With tender chicken and zesty lemon, it’s sure to impress. Plus, you’ll learn tips to customize and store leftovers efficiently. Let’s dive into this simple and tasty recipe that will make dinner a breeze!
Ingredients
Main Ingredients
– 1 pound boneless, skinless chicken breasts, cut into bite-sized pieces
– 1 cup orzo pasta
– 1 medium onion, finely chopped
– 1 cup cherry tomatoes, halved
Chicken serves as the star of this dish. I recommend using boneless, skinless chicken breasts. They cook quickly and stay juicy. The orzo pasta adds a fun texture. It absorbs flavors well, making it a great choice. The onion adds sweetness, while the cherry tomatoes bring freshness.
Seasonings and Oils
– 3 tablespoons olive oil, divided
– 4 cloves garlic, minced
– 1 teaspoon dried oregano
– 1 teaspoon salt
– ½ teaspoon black pepper
Olive oil is my go-to for cooking. It adds rich flavor and helps brown the chicken. Garlic gives a lovely aroma and a punch of taste. Dried oregano enhances the dish with an earthy note. Salt and pepper are key to bringing out the flavors in all the ingredients.
Garnishes
– Zest and juice of 1 lemon
– Fresh parsley, chopped, for garnish
Lemon brightens the dish with its zest and juice. It adds acidity, balancing the rich flavors. Fresh parsley adds color and freshness. It also provides a nice contrast to the warm meal. Together, these garnishes elevate the dish’s look and taste.
Step-by-Step Instructions
Cooking the Chicken
– Heat 2 tablespoons of olive oil in a large skillet over medium-high heat.
– Add 1 pound of chicken pieces and season with 1 teaspoon salt and ½ teaspoon black pepper.
– Sauté the chicken for 5-7 minutes. It should be golden brown and fully cooked.
– Once done, remove the chicken from the skillet and set it aside.
Preparing the Base
– Lower the heat slightly. In the same skillet, add 1 tablespoon of olive oil.
– Add 1 medium onion, finely chopped, and sauté for 3-4 minutes. Stir until the onion is soft and translucent.
– Add 4 cloves of minced garlic to the skillet. Sauté for another 30 seconds until fragrant.
– Mix in 1 cup of halved cherry tomatoes and 1 teaspoon of dried oregano. Cook for 2-3 minutes until the tomatoes soften.
Combining Ingredients
– Stir in 1 cup of orzo pasta. Ensure the orzo is well coated in the oil and mixture for about 1 minute.
– Pour in 4 cups of chicken broth, along with the juice and zest of 1 lemon. Stir everything together.
– Increase the heat to bring the mixture to a boil.
Final Cooking Steps
– Once boiling, reduce the heat to a simmer. Cover the skillet and cook for about 10 minutes.
– Stir occasionally to prevent the orzo from sticking. The orzo should be tender, and most of the liquid should be absorbed.
– Return the cooked chicken to the skillet. Stir gently to combine and heat through.
– Taste the dish and adjust the seasoning with more salt or pepper, if necessary.
– Before serving, sprinkle fresh parsley over the dish for a vibrant finish.
Tips & Tricks
Cooking Tips
To avoid sticking orzo, stir it often while cooking. This keeps the pasta loose and helps it absorb flavors. Use a large skillet; this gives orzo room to move.
Make sure the chicken is thoroughly cooked. Cook it until it reaches 165°F inside. This ensures your meal is safe and tasty. You can check with a meat thermometer for the best results.
Flavor Enhancements
For more citrus, add extra lemon juice or zest. It brightens the dish and adds freshness. You can even use lime for a twist!
Incorporating herbs like thyme or basil can add depth. Fresh herbs give a burst of flavor. Add them just before serving for the best taste.
Presentation Tips
Use wide, shallow bowls for serving. This shows off the colorful ingredients well. It makes the dish look inviting and fun.
Garnish with an extra sprinkle of parsley. A lemon wedge on the side adds a pop of color. This not only looks great but also hints at the fresh flavors inside.

Variations
Protein Substitutions
You can switch the chicken for shrimp. Shrimp cooks quickly and adds a nice flavor. Just sauté the shrimp until pink, about 3-4 minutes. This gives a fresh twist to the dish.
For a vegetarian option, try chickpeas or tofu. Both add protein and texture. Use the same method and cook until heated through. You can enjoy a tasty meal while keeping it meat-free.
Pasta Variants
Orzo is great, but you can use other pasta shapes. Try penne, fusilli, or even spaghetti. Just adjust the cooking time according to the pasta you choose.
If you need a gluten-free option, use rice or gluten-free pasta. Both work well and stay delicious. Follow the same steps to keep the flavors balanced.
Flavor Modifications
Adding spices can make the dish more exciting. Try red pepper flakes or smoked paprika for a kick. Fresh herbs like basil or thyme can change the taste too.
Incorporating seasonal vegetables brightens the dish. Think zucchini, spinach, or bell peppers. Add them with the tomatoes for a colorful and healthy meal.
Storage Info
Refrigeration Guidelines
After enjoying your Lemon Garlic Chicken Orzo Skillet, store any leftovers in an airtight container. This helps keep it fresh. You can keep it in the fridge for up to three days. If it lasts that long, you’re doing better than I usually do!
Freezing Instructions
You can freeze this dish for up to three months. Just place it in a freezer-safe container. To reheat, thaw it overnight in the fridge. This dish may lose some texture when frozen but will still taste great.
Reheating Recommendations
To reheat, use the stove or microwave. If using the stove, add a splash of chicken broth to prevent dryness. Heat on low, stirring often. In the microwave, cover it with a damp paper towel. This keeps the moisture in and makes it warm without drying out. Enjoy every bite!
FAQs
How long does it take to cook Lemon Garlic Chicken Orzo Skillet?
This dish takes about 30 minutes to cook. The prep time is only 10 minutes. So, you can have a warm meal on the table fast!
Can I make this dish ahead of time?
Yes, you can make this dish ahead of time. Cook the chicken and orzo as instructed. Store them in the fridge for up to three days. You can heat it up later. Just add a splash of broth to keep it moist.
What can I serve with Lemon Garlic Chicken Orzo Skillet?
You can pair this dish with a simple green salad. A side of steamed veggies works well too. Garlic bread is a tasty option to soak up the flavors!
Is this recipe healthy?
Yes, this recipe is quite healthy. It includes lean chicken, fresh veggies, and whole grains. The lemon adds vitamin C, while garlic has many health benefits. Overall, it’s a balanced dish for any meal!
This Lemon Garlic Chicken Orzo Skillet offers a tasty meal filled with flavor. You learned about key ingredients like chicken, orzo, and spices, plus how to cook them. I shared tips for making it better and variations for different diets. Remember, you can store, freeze, or reheat leftovers with ease. With simple steps and fresh flavors, this dish is sure to please everyone. Enjoy your cooking adventure and make this dish your own!


![- 4 medium zucchinis - 1 pound ground turkey (or beef) - 1 small onion, finely diced - 2 cloves garlic, minced - 1 tablespoon taco seasoning - 1 can (14 oz) diced tomatoes, drained - 1 cup canned black beans, rinsed and drained - 1 cup corn kernels (fresh or frozen) - 1 cup shredded cheese (cheddar or Mexican blend) - 2 tablespoons olive oil - Fresh cilantro, chopped (for garnish) - Sour cream (optional) - Salt and pepper to taste When picking zucchinis, look for ones that are firm and bright. They should feel heavy for their size. Avoid any that are soft or have blemishes. For measuring, use a scale for the ground meat and a measuring cup for the beans and corn. When chopping onions and garlic, a sharp knife helps avoid tears. This ensures even cooking and great flavor in your dish. This taco stuffed zucchini boats recipe is full of fun and taste. You can find the full recipe above. Enjoy every bite! - Preheat your oven to 375°F (190°C). - Take 4 medium zucchinis and cut them in half lengthwise. Scoop out the seeds carefully. Leave enough flesh for support. - Brush the insides of the zucchini halves with 2 tablespoons of olive oil. Arrange them cut-side up on a baking sheet. - In a large skillet, heat 1 tablespoon of olive oil over medium heat. - Add 1 small onion, finely diced, and sauté until it is soft, about 3-4 minutes. - Next, add 2 minced cloves of garlic. Sauté for another minute until fragrant. - Add 1 pound of ground turkey (or beef) to the skillet. Break the meat apart with a spatula. Cook until it is browned, about 5-7 minutes. - Season with 1 tablespoon taco seasoning, salt, and pepper to taste. - Stir in 1 can of drained diced tomatoes, 1 cup of rinsed black beans, and 1 cup of corn kernels. Cook for another 2-3 minutes until everything is hot. - Remove from heat and fold in half of the 1 cup of shredded cheese until it melts slightly. - Carefully fill each zucchini boat with the taco mixture. Press down gently to pack it in. - Sprinkle the remaining cheese over the top of each stuffed zucchini. - Place the baking sheet in the oven and bake for 20-25 minutes. Check for tenderness and ensure the cheese is melted and golden. - Once cooked, remove from the oven and garnish each zucchini with chopped cilantro. - Serve warm with a dollop of sour cream, if desired. For the full recipe, check the Full Recipe section above. To make your zucchinis tender yet not mushy, follow these tips: - Choose medium zucchinis: They cook evenly and hold their shape well. - Scoop carefully: Leave enough flesh for support, but remove the seeds. - Preheat your oven: A hot oven helps the zucchinis cook just right. For sautéing your filling, use these methods: - Heat your skillet well: This helps to cook onions and garlic faster. - Add oil before ingredients: Olive oil prevents sticking and enhances flavor. - Stir often: This keeps your mixture from burning and ensures even cooking. Garnishing your taco stuffed zucchini boats adds a fresh touch. Here are some ideas: - Chop fresh cilantro: Sprinkle it on top for a pop of color and flavor. - Add a dollop of sour cream: It adds creaminess and balances the spice. Pair your zucchini boats with sides or salads. Some great options include: - Rice or quinoa: These grains add texture and heartiness. - A fresh garden salad: Crisp greens complement the warm, savory boats. For the full recipe, check out the [Full Recipe]. {{image_4}} You can change the meat in this dish easily. Ground chicken works great in place of turkey or beef. It gives a lighter flavor while still being filling. If you want a plant-based option, try using lentils or crumbled tofu. Both can soak up the tasty taco seasoning. You can also swap out the black beans. Try pinto beans or kidney beans for a new twist. They add different textures and flavors that make the dish fun. Adding spices can really change the taste. Try cumin or smoked paprika for an extra kick. You could also mix in some chili powder if you like it hot. Each spice brings its own personality to your zucchini boats. Cheese is another place to get creative. Instead of cheddar, use pepper jack for a spicy twist. Or, try a mix of different cheeses for depth. Condiments can also change the game. Consider adding salsa or guacamole on top. These add fresh flavors and make every bite exciting. You can find the full recipe for Taco Stuffed Zucchini Boats to explore all these variations! Store leftover zucchini boats in an airtight container. Use parchment paper to separate layers if stacking. This keeps them fresh for up to three days. Make sure to cool them down before sealing to avoid moisture buildup. To maximize freshness, place them in the fridge as soon as they cool. Reheat zucchini boats in the oven for the best results. Set your oven to 350°F (175°C) and bake for about 10-15 minutes. This method warms them evenly and keeps the texture nice. If you want a quicker option, use the microwave. Heat them for 1-2 minutes, but watch for sogginess. To avoid this, place a paper towel under the zucchini boats while reheating. This helps absorb extra moisture. For detailed cooking steps, check the Full Recipe. Enjoy your tasty leftovers! To make taco stuffed zucchini boats healthier, use low-fat ground turkey instead of beef. You can also choose low-fat cheese or skip it entirely for a lighter option. Adding more veggies boosts the nutrition. Consider mixing in diced bell peppers, spinach, or mushrooms. You can also serve them with a side salad for extra greens. This way, you enjoy a tasty dish while keeping it nutritious! Yes, you can freeze taco stuffed zucchini boats! Start by letting them cool completely. Wrap each boat in plastic wrap or foil. Place them in a freezer bag to save space. They can stay in the freezer for up to three months. When you’re ready to eat, let them thaw overnight in the fridge. Then, heat them in the oven until warm. Taco stuffed zucchini boats pair well with rice or quinoa. You can also serve them with tortilla chips and salsa for a fun crunch. For gatherings, consider adding some guacamole as a dip. Fresh fruit like watermelon or mango is a great side too. These options make your meal more exciting and flavorful! Taco stuffed zucchini boats offer a fun and tasty twist on dinner. You learned how to prepare fresh ingredients, cook a hearty filling, and assemble a dish that's sure to please. Remember, you can mix and match proteins and spices to fit your taste. Storing and reheating tips will help you enjoy leftovers without losing flavor. Dive into this dish for a healthy meal that’s easy to make and customize. Enjoy experimenting and sharing your tasty creations!](https://joymealplan.com/wp-content/uploads/2025/07/a6f85fbf-686b-42b4-a399-5784f990ec67-768x768.webp)


![- 8 corn tortillas - 1 cup black beans, drained and rinsed - 1 cup corn kernels (fresh or frozen) - 1 red bell pepper, diced - 1 small zucchini, diced - 1 cup fresh spinach, chopped - 1 teaspoon ground cumin - 1 teaspoon chili powder - 1/2 teaspoon garlic powder - 1 1/2 cups enchilada sauce - 1 cup shredded cheese - 1 tablespoon olive oil - Salt and pepper to taste - Fresh cilantro for garnish You can swap black beans for pinto or kidney beans. You might also try non-dairy cheese if you want a vegan option. If you need gluten-free, use gluten-free tortillas. These swaps keep the recipe flexible and fun! Each serving has about 300 calories. You get protein from beans and fiber from veggies. Black beans boost heart health, while spinach adds iron. Corn gives you energy, making these enchiladas not just tasty but also good for you. - Preheat the oven to 375°F (190°C). - In a large skillet, heat 1 tablespoon of olive oil over medium heat. - Add 1 diced red bell pepper and 1 small diced zucchini. - Sauté for about 5 minutes until they soften. Stir often to avoid sticking. - Next, stir in 1 cup of drained black beans, 1 cup of corn, and 1 cup of chopped spinach. - Cook for 3-4 minutes until the spinach wilts. - Season the mix with 1 teaspoon of ground cumin, 1 teaspoon of chili powder, and 1/2 teaspoon of garlic powder. - Add salt and pepper to taste. Mix well and cook for another 2 minutes. - Pour 1/2 cup of enchilada sauce into a baking dish. Spread it evenly across the bottom. - Warm 8 corn tortillas in the microwave for 20 seconds, or heat them in a skillet. - Take one tortilla and spoon a portion of the filling into the center. - Sprinkle some shredded cheese on top, then roll it up tightly. Place the rolled tortilla seam-side down in the baking dish. - Repeat this for all the tortillas until the filling is used up. - Pour the remaining enchilada sauce over the assembled enchiladas. - Sprinkle the remaining shredded cheese on top of the sauce. - Place the dish in the oven and bake for 20-25 minutes. Look for melted and bubbly cheese. - Allow the enchiladas to cool for a few minutes before serving. Enjoy with fresh cilantro if you like! For the full recipe, check the details above. - Add smokiness with chipotle peppers: Chipotle peppers add a rich, smoky taste. You can use them in the filling or mix them into the sauce. Just chop a few and add them to your veggies while cooking. This will elevate the flavor profile. - Use fresh herbs for garnish: Fresh herbs brighten up your dish. I love adding cilantro or parsley on top before serving. It adds color and freshness, making the enchiladas look even more appealing. - Importance of softening tortillas: Softening the tortillas is key. If they are too hard, they will crack when you roll them. Heat them in the microwave for 20 seconds or warm them on a skillet. This makes them easy to roll and fill without breaking. - Tips for perfectly melted cheese: To get that perfect melt, use a cheese blend with good melting properties. Cheddar and Monterey Jack work great. Add a little extra cheese on top when baking for a delicious, bubbly finish. - Pair with side dishes: Serve your enchiladas with rice or beans on the side. These help balance the meal and add more protein. You can also serve them with a simple salad for extra crunch. - Ideas for toppings: Top your enchiladas with sour cream or guacamole. These creamy toppings add richness and flavor. You can also sprinkle some diced onions or jalapeños for extra spice. These tips will help you make your vegetarian enchiladas even more delicious. For the full recipe, check out the [Full Recipe]. {{image_4}} You can make your enchiladas even better by changing the filling. - Adding roasted vegetables: Roasting veggies like carrots, eggplant, or butternut squash adds depth. The sweet, caramelized flavor makes the filling more exciting. - Using different kinds of cheese: Try mixing cheeses like queso fresco or pepper jack. Each cheese brings its unique taste. This change can keep your enchiladas fresh and fun. The sauce can change the whole dish. - Homemade enchilada sauce recipe: Making your own sauce is simple and rewarding. Blend tomatoes, chili powder, and spices for a rich flavor. This way, you control the heat and taste. - Alternatives like verde sauce: If you like a fresh twist, try verde sauce made with tomatillos. It adds a nice tangy kick that contrasts well with the cheese and veggies. You can adjust the recipe to fit various diets. - Vegan version of enchiladas: Swap cheese for a nut-based cheese or leave it out. Use more beans and veggies to fill the tortillas. You still get a hearty meal without animal products. - Low-carb or keto adaptations: Use lettuce wraps instead of tortillas. This swap keeps the taste while reducing carbs. You can still enjoy the flavors of enchiladas without the extra carbs. For a complete guide on making these delicious meals, check out the Full Recipe. To store leftovers, first, let the enchiladas cool down. Place them in an airtight container. This keeps them fresh and tasty. Glass or plastic containers work well. I prefer glass for easy reheating. If you want to freeze enchiladas, wrap them tightly in plastic wrap. Then, place them in a freezer-safe bag or container. Label the bag with the date. To reheat frozen enchiladas, remove them from the freezer. Let them thaw in the fridge overnight. Bake in a preheated oven at 350°F (175°C) until hot. In the fridge, these enchiladas last about 3 to 5 days. Always check for signs of spoilage. Look for off smells, mold, or changes in color. If you see any of these, it’s best to throw them out. Enjoy your tasty vegetarian enchiladas with confidence! For the full recipe, check the earlier sections. To prevent soggy enchiladas, apply the sauce wisely. Use a thin layer on the bottom of your dish. Do not drown the rolled enchiladas in sauce. Pour the rest of the sauce on top after filling them. Bake them just right. Overcooking can cause sogginess. Bake at 375°F for 20-25 minutes. This keeps them firm and tasty. Yes, you can use flour tortillas. They are softer and easier to roll. However, corn tortillas add a nice flavor. They are also gluten-free. Flour tortillas can get too soft and break. Each type has its charm. Choose based on your taste and needs. Many sides pair well with vegetarian enchiladas. Try Mexican rice for a classic touch. Beans add protein and fiber. A fresh salad can balance the meal. Guacamole or sour cream makes a great dip. You can also serve with a refreshing drink. Consider agua fresca or a light beer. These sides enhance the flavor of your enchiladas. Enjoy exploring different pairings! This blog post covered all you need for delicious vegetarian enchiladas. We discussed key ingredients, from black beans to fresh spinach. I shared tips on prepping and cooking, plus variations for your taste. You learned how to store leftovers and reheat them. These enchiladas are tasty, healthy, and easy to make. Enjoy trying different flavors and ingredients. Whether for a quick dinner or a party, these enchiladas will impress everyone. Now, get in the kitchen and start cooking!](https://joymealplan.com/wp-content/uploads/2025/06/0bc30ee8-fb20-468c-811c-2f42a5691433-768x768.webp)
