Lemon Garlic Roasted Broccoli Healthy and Flavorful Dish

Are you looking for a tasty and healthy side dish? Lemon Garlic Roasted Broccoli is just what you need! This dish offers a perfect balance of bright flavors and crispy textures. With fresh broccoli, zesty lemon, and aromatic garlic, you’ll have a delightful addition to any meal. Let’s dive into the simple steps that make this recipe a must-try in your kitchen!
Ingredients
Main Ingredients
– Broccoli florets
– Olive oil
– Garlic and lemon
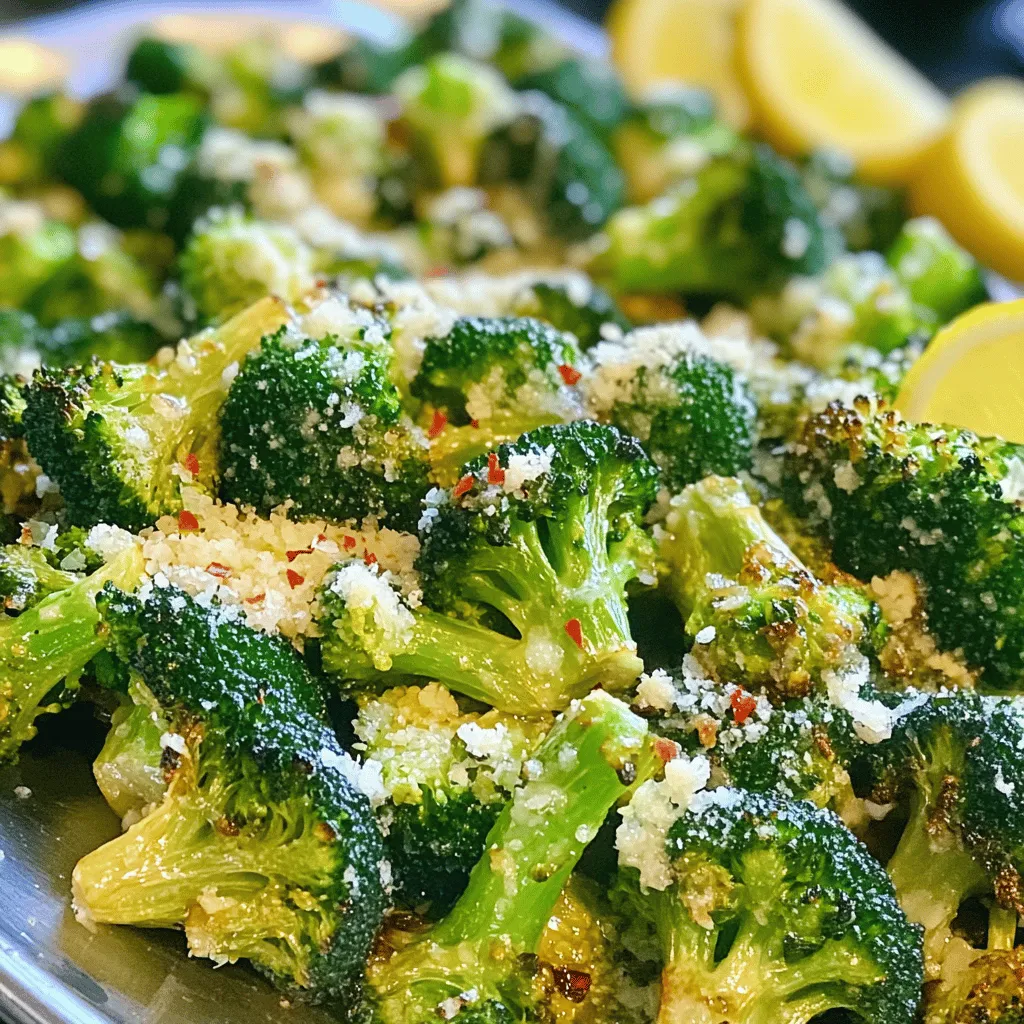
The main stars of this dish are fresh broccoli florets. They are full of vitamins and add a nice crunch. Next, we have extra virgin olive oil, which brings richness and helps the broccoli roast well. Fresh garlic adds a bold flavor, while lemon gives it a bright, zesty kick.
Optional Ingredients
– Red pepper flakes
– Parmesan cheese
– Fresh lemon wedges
If you want some heat, add red pepper flakes. They give a slight spice that pairs well with the lemon. For a cheesy touch, sprinkle some freshly grated Parmesan on top after roasting. Fresh lemon wedges are great for serving. They let you add a burst of flavor right before you eat.
Seasoning
– Salt and black pepper to taste
Don’t forget to season your dish! Use salt and freshly ground black pepper to bring out the flavors. Adjust the amount based on your taste. Always remember, seasoning can make or break your dish.Enjoy creating this healthy and flavorful dish!
Step-by-Step Instructions
Preparation
1. First, preheat your oven to 425°F (220°C). This step helps the broccoli roast evenly and develop a nice crisp.
2. Next, take your large head of broccoli and cut it into bite-sized florets. Aim for uniform pieces. This ensures they cook at the same rate.
Mixing Ingredients
1. In a large mixing bowl, add the broccoli florets.
2. Pour in 3 tablespoons of extra virgin olive oil.
3. Add 4 minced garlic cloves, the zest and juice of one lemon, and 1 teaspoon of red pepper flakes if you like heat.
4. Generously season with salt and freshly ground black pepper.
5. Use your hands or a spoon to toss everything together. Make sure each floret is coated well.
Roasting Process
1. Prepare a baking sheet by spreading the seasoned broccoli in a single layer. This helps them roast evenly.
2. Place the baking sheet in your oven. Roast the broccoli for 20-25 minutes.
3. Toss the florets halfway through the roasting time. This helps them brown nicely. You want them tender yet slightly crispy.
4. After roasting, take the baking sheet out of the oven. If you want, sprinkle 2 tablespoons of freshly grated Parmesan cheese over the hot broccoli.
5. Serve the zesty broccoli warm. Garnish with fresh lemon wedges for an extra citrus burst.
Tips & Tricks
Achieving Perfect Roasting
To get crispy edges on your broccoli, you need to use enough olive oil. Coat each floret well. Spread them out in a single layer on the baking sheet. This gives them room to breathe while roasting. Tossing the broccoli halfway through cooking is key. It helps the florets brown evenly. When you toss, use a spatula to turn them gently.
Flavor Enhancement
You can customize this dish with spices. Try adding smoked paprika or cumin for a twist. If you love cheese, sprinkle on some Parmesan before serving. It melts nicely and adds rich flavor. You might also try a mix of feta and lemon zest for a tangy kick.
Serving Suggestions
For a beautiful presentation, arrange the roasted broccoli on a nice platter. Scatter fresh lemon wedges around the dish. This adds bright color and makes it fun to eat. You can serve this broccoli with grilled chicken or fish for a complete meal. It pairs well with quinoa or rice, too. For a hearty option, add it to pasta dishes or grain bowls.

Variations
Adding Protein
You can boost this dish by adding chicken or shrimp. For chicken, cut it into small pieces. Toss it with the broccoli before roasting. The chicken will soak up the lemon and garlic flavor, making it juicy and tasty. If you prefer shrimp, add them in the last ten minutes of roasting. This way, they cook perfectly without becoming chewy.
Vegetarian Additions
For a vegetarian twist, try pairing the roasted broccoli with nuts or seeds. Almonds or pine nuts add a nice crunch. You can sprinkle these on top just before serving. Sunflower seeds also work well and add extra protein. This makes the dish heartier while keeping it healthy.
Different Flavor Profiles
You can change the flavor by using different spices and herbs. For a Mediterranean twist, add oregano or thyme. For something spicy, try cayenne pepper or smoked paprika. Experiment with these flavors to suit your taste. You can also swap lemon for lime for a zesty change. These variations keep the dish exciting, so you never get bored.
Storage Info
Refrigeration
To store leftover lemon garlic roasted broccoli, let it cool first. Place it in an airtight container. This helps keep it fresh. Store in the fridge for up to three days. When ready to eat, just take it out and enjoy.
Reheating Tips
For the best taste and texture, reheat the broccoli in an oven. Preheat your oven to 350°F (175°C). Spread the broccoli on a baking sheet. Heat for about 10 minutes or until warm. This keeps the broccoli crispy. Microwaving is quick, but it can make the broccoli soft.
Freezing Options
If you want to freeze roasted broccoli, follow these steps. First, cool the broccoli completely. Next, place it in a freezer-safe bag. Remove as much air as possible. You can freeze it for up to three months. To thaw, place it in the fridge overnight. You can also reheat it straight from the freezer. Just add a few extra minutes to the cooking time.
FAQs
Can I use frozen broccoli?
Yes, you can use frozen broccoli for this recipe. Just remember a few things:
– Thawing: Thaw the frozen broccoli before cooking. This helps it roast evenly.
– Adjust Cooking Time: Frozen broccoli may need a bit more time in the oven. Keep an eye on it as it cooks.
– Texture: Frozen broccoli can be softer. It may not be as crispy as fresh.
How can I make this dish vegan?
You can easily make this dish vegan. Here’s how:
– Skip the Cheese: Omit the Parmesan cheese. You won’t lose flavor.
– Use Nutritional Yeast: Add nutritional yeast for a cheesy taste without dairy.
– Choose Plant-Based Oil: Stick with olive oil, which is already vegan.
What else can I serve with Lemon Garlic Roasted Broccoli?
This roasted broccoli pairs well with many dishes. Here are some ideas:
– Grains: Serve it with quinoa or brown rice for added texture.
– Proteins: Pair it with grilled chicken or tofu for a hearty meal.
– Salads: A fresh salad with lemon vinaigrette complements the flavors nicely.
Feel free to explore these options to elevate your meal.This dish will impress everyone at your table!
Lemon Garlic Roasted Broccoli is easy and tasty. We explored the ingredients like fresh broccoli, olive oil, and garlic. Roasting brings out the best flavors. I shared tips for the perfect texture, spices to try, and how to serve. You can even add proteins or customize it.
Remember, storing your leftovers right helps keep them fresh. With these skills, you can enjoy a delicious side dish every time you cook. Happy roasting!


![To make this savory sweet potato black bean chili, gather these main ingredients: - 2 medium sweet potatoes, peeled and cut into 1-inch cubes - 1 can (15 oz) black beans, thoroughly rinsed and drained - 1 can (14.5 oz) diced tomatoes - 1 medium onion, finely chopped - 2 cloves garlic, finely minced - 1 bell pepper, diced - 1 cup vegetable broth - 2 teaspoons ground cumin - 1 teaspoon smoked paprika - 1 teaspoon chili powder - ½ teaspoon dried oregano - Salt and freshly cracked pepper to taste - 2 tablespoons extra virgin olive oil - Fresh cilantro, chopped, for garnish - Lime wedges, for serving If you want to take your chili to the next level, you can add some optional ingredients: - 1-2 jalapeños, diced for heat - 1 cup corn, for sweetness and crunch - 1 teaspoon cayenne pepper, for extra spice - 1 tablespoon apple cider vinegar, to brighten flavors This chili is not just tasty; it’s also packed with nutrition. Here’s a quick breakdown: - Calories: About 250 per serving - Protein: 10 grams - Fat: 7 grams - Carbohydrates: 45 grams - Fiber: 12 grams - Sugars: 5 grams This dish is rich in fiber and protein, making it a filling meal. It also provides a good source of vitamins A and C from the sweet potatoes and peppers. For the full recipe, check out the provided link! Start by gathering your ingredients. You need sweet potatoes, black beans, diced tomatoes, onion, garlic, bell pepper, vegetable broth, spices, olive oil, salt, and pepper. Make sure to peel and cube the sweet potatoes into 1-inch pieces. Rinse the black beans well and drain them. Chop the onion and garlic finely. Dice the bell pepper. This will set you up for success! Heat olive oil in a large pot over medium heat. Add the chopped onion and bell pepper. Sauté them for about 5 minutes until they are soft. Then, add the minced garlic. Stir for 1 minute until you smell its great aroma. Next, add the sweet potatoes, diced tomatoes, and vegetable broth. Sprinkle in cumin, smoked paprika, chili powder, oregano, and season with salt and pepper. Mix everything together. Bring the mix to a gentle boil, then lower the heat. Cover the pot and let it simmer for 25-30 minutes. The sweet potatoes should be tender and easy to fork. Finally, fold in the black beans and let them warm for about 5 minutes. Taste it and adjust the seasoning if you want. Serve the chili hot in vibrant bowls. Top each bowl with fresh cilantro and a lime wedge. The lime adds a nice burst of flavor. For more richness, you can add a dollop of avocado or sour cream. This chili tastes great and looks beautiful on the table. For the full recipe, check out the [Full Recipe] link! To boost flavors in your sweet potato black bean chili, use a few easy tricks. Start by sautéing your onions and peppers in olive oil. This step builds a solid flavor base. Make sure they soften and release their natural sugars. Next, add garlic for aroma, stirring it briefly. This brings out the richness in your chili. Using smoked paprika adds depth. It gives a subtle, smoky taste that lifts the dish. Always taste as you go. Adjusting the seasoning lets you find the perfect balance. Many people rush when cooking chili. Give your sweet potatoes enough time to soften. If they are still hard, your chili will not taste great. Another mistake is ignoring the beans. Be sure to fold them in gently so they don’t break apart. Also, don’t skip the lime! It brightens the flavors. Lastly, avoid overcooking the chili. A gentle simmer is enough to meld the flavors without losing texture. If you like heat, there are simple ways to spice things up. Start with mild chili powder, then add cayenne or hot sauce for more warmth. You can also use diced jalapeños for a fresh kick. For less heat, choose milder peppers and skip the extra spices. Always taste before serving. This way, you can adjust the spice level to suit everyone’s palate. {{image_4}} This chili is already vegetarian and vegan. You can enhance it by adding more veggies. Try using zucchini, corn, or mushrooms. These add texture and flavor. You can also swap the vegetable broth for a homemade version. Just boil water with herbs and spices to boost taste. This chili is gluten-free as is. If you want, you can add gluten-free grains. Quinoa or brown rice make great additions. Cook them separately and mix them in before serving. This will give you a hearty meal without gluten. You can make this chili your own with fun add-ins. Try adding fresh spinach or kale for extra greens. A splash of lime juice brightens the flavors. For a smoky kick, add chipotle peppers in adobo sauce. You can also top it with avocado, cheese, or yogurt. These toppings add creaminess and contrast. Check out the Full Recipe for more ideas! To keep your sweet potato black bean chili fresh, first, let it cool down. Then, pour it into an airtight container. This helps prevent spills and keeps the flavor locked in. You can store it in the fridge for up to three days. Make sure to label the container with the date for easy tracking. If you want to save your chili for later, freezing is a great option. Use freezer-safe bags or containers. Pour the chili into the bags, leaving some space for expansion. Seal them tightly to avoid freezer burn. You can freeze your chili for up to three months. Remember to label the bags with the date so you know when to use them. When you're ready to enjoy your chili again, there are a few ways to reheat it. The best method is to use a pot on the stove. Heat it over medium-low heat, stirring often until it's hot. If you prefer the microwave, pour the chili into a microwave-safe bowl. Cover it loosely and heat for 2-3 minutes, stirring halfway through. Always check that it’s hot all the way through before serving. For added flavor, squeeze some fresh lime juice on top before you dig in! If you do not have sweet potatoes, you can use butternut squash or regular potatoes. Both options will add a nice texture and flavor to the chili. You may also try carrots for a slightly sweeter taste. Adjust the cooking time as needed, since these veggies may take different times to cook. To add heat to your chili, you can use fresh jalapeños or serrano peppers. Chop them up and add them with the onions. You can also increase the chili powder or smoked paprika. Adding a dash of hot sauce or cayenne pepper at the end can give it an extra kick too! Yes, canned black beans work great in this recipe. They save time and still taste delicious. Make sure to rinse and drain them well before adding to the chili. This helps remove excess sodium and keeps the flavor balanced. To serve more people, just double or triple the ingredients. Keep the same cooking steps, but watch the cooking time. You may need a larger pot to accommodate the extra chili. Always taste and adjust seasoning as you increase the amounts. For the full recipe, check out the earlier section. This article covered key ingredients and cooking steps for your dish. You learned about optional ingredients for added flavor and useful tips to improve taste. We explored variations, including vegetarian and gluten-free options. You also picked up on how to store leftovers and common questions. Remember, cooking is fun, and experimenting makes it even better. Enjoy your dish and feel proud of your culinary skills!](https://joymealplan.com/wp-content/uploads/2025/07/8c039768-80c3-4c1c-94c6-06aef8e7156d-768x768.webp)

