Loaded Taco Beef Casserole Tasty Family Favorite

Craving a meal that pleases the whole family? Look no further than my Loaded Taco Beef Casserole! This dish packs bold flavors and simple steps. With savory ground beef, zesty taco seasoning, and gooey cheese, it’s a surefire hit at the dinner table. Plus, I’ll share tips for extra flavor and texture. Ready to transform your weeknight meals? Let’s dive into this tasty favorite!
Why I Love This Recipe
- Quick and Easy: This casserole is simple to make, taking just 15 minutes of prep time, making it perfect for a weeknight dinner.
- Flavor Packed: With the combination of taco seasoning, black beans, and diced tomatoes, every bite is bursting with zesty flavor.
- Crowd-Pleaser: It serves 6-8 people, making it ideal for family gatherings or potlucks where everyone can enjoy a hearty meal.
- Versatile: You can customize it with your favorite toppings and add-ins, catering to everyone’s taste preferences.
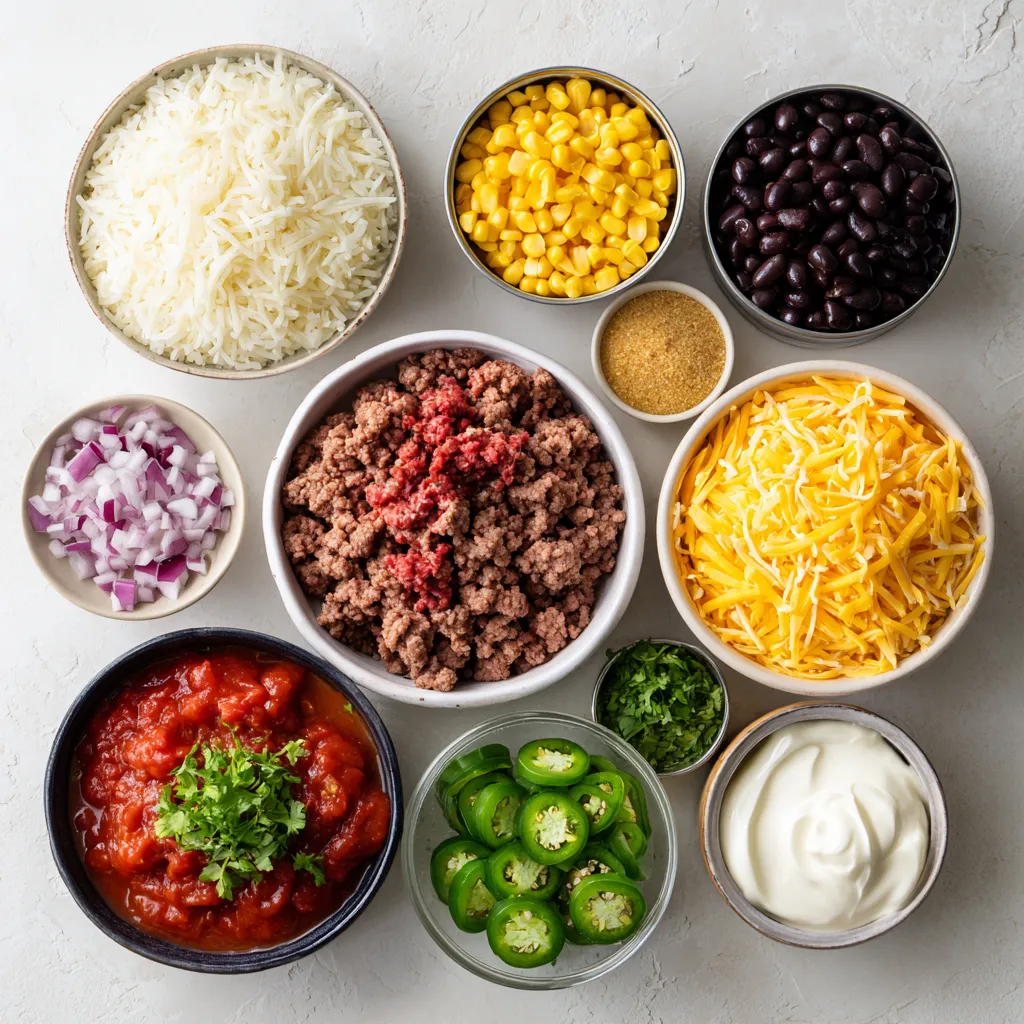
Ingredients
Main Ingredients List
– 1 pound ground beef
– 1 small onion, finely diced
– 2 cloves garlic, minced
– 1 packet (1 oz) taco seasoning mix
– 1 can (15 oz) black beans, rinsed and drained
– 1 can (15 oz) corn, drained
– 1 can (10 oz) diced tomatoes with green chilies
– 1 cup cooked rice (your choice of white or brown)
– 2 cups shredded sharp cheddar cheese
– 1 cup crushed tortilla chips (for added crunch)
– 1 cup sour cream (for creaminess)
Optional Ingredients for Extra Flavor
– 1/4 cup sliced jalapeños (optional, for heat)
– Fresh cilantro, chopped (for garnish)
Recommended Cooking Tools
– Large skillet
– 9×13 inch baking dish
– Spatula and spoon
Using these ingredients, you can create a flavorful and hearty Loaded Taco Beef Casserole. The ground beef serves as a tasty base, while the beans and corn add fiber and texture. The mix of spices in the taco seasoning gives it that classic taco flavor we all love.
You can also customize this dish to fit your taste. Add jalapeños for a spicy kick or sprinkle cilantro on top for some fresh flavor. Don’t forget the tools! A large skillet helps with cooking the beef, while a 9×13 inch baking dish is perfect for layering all the goodness.

Step-by-Step Instructions
Preparing the Meat Mixture
1. Start by cooking the ground beef in a large skillet over medium heat.
2. Brown the beef well, breaking it into small pieces. This step takes about 8 minutes.
3. After the beef is cooked, drain any extra fat from the skillet.
4. Next, add the finely diced onion and minced garlic to the beef.
5. Sauté these for about 3 to 4 minutes until the onion is soft and clear. Stir often to avoid burning.
Combining Ingredients
1. Now, mix in the taco seasoning. This adds great flavor to the beef.
2. Next, add the rinsed black beans, drained corn, and canned diced tomatoes with green chilies.
3. Stir everything together and let it cook for an extra 5 minutes. This helps all the flavors blend well.
4. Remove the skillet from heat and gently mix in the cooked rice. Make sure it’s evenly spread through the mixture.
Assembling the Casserole
1. Lightly grease a 9×13 inch baking dish to prevent sticking.
2. Spread half of the beef mixture over the bottom of the dish.
3. Top it with 1 cup of shredded sharp cheddar cheese. This will melt beautifully.
4. Add the rest of the beef mixture on top of the cheese layer.
5. Next, spoon the sour cream across the surface. Use a spatula to spread it out evenly.
6. Finish with the remaining cheese and sprinkle crushed tortilla chips on top for crunch.
7. If you want some heat, add sliced jalapeños over the top.
Baking
1. Preheat your oven to 350°F (175°C). This ensures even cooking.
2. Place the baking dish in the oven and bake for 25 to 30 minutes.
3. Look for the cheese to be melted and bubbly, with a nice golden color.
4. Once it’s done, take the casserole out and let it cool for a few minutes before serving.
5. Garnish with fresh chopped cilantro for a bright touch.
Tips & Tricks
Enhancing Flavor
To make your Loaded Taco Beef Casserole burst with flavor, consider adding spices. Try cumin, chili powder, or even smoked paprika. These spices give the dish warmth and depth. Fresh ingredients also boost taste. Use fresh garlic instead of minced. Fresh cilantro adds a bright touch as a garnish.
Achieving the Perfect Texture
For cheese that melts perfectly, use sharp cheddar. It gives great flavor and melts well. Layer it between the beef mixture to trap heat. For crunchiness, add crushed tortilla chips on top. Bake until they are golden. This adds a great texture contrast to the soft casserole.
Serving Suggestions
Serve the casserole with a fresh salad for balance. A simple green salad with lime dressing works well. You can also add salsa and extra sour cream on the side. These sides add freshness and creaminess. Enjoy your meal with family and friends!
Pro Tips
- Use Lean Ground Beef: Opt for 90% lean ground beef to reduce excess grease while still maintaining flavor.
- Customize Your Heat: Adjust the amount of taco seasoning and jalapeños based on your heat preference; taste as you go!
- Make Ahead: Prepare the casserole a day in advance, cover, and refrigerate. Just bake it when you’re ready to serve!
- Cheese Variations: Experiment with different cheeses like pepper jack or mozzarella for unique flavors and textures.

Variations
Vegetarian Alternative
If you want a meat-free option, try using plant-based meat. You can use lentils, beans, or soy crumbles. These options give you the same texture and flavor you love. Just cook them like you would ground beef. You can add some extra spices to boost the flavor. This way, everyone can enjoy the casserole.
Low-Carb Version
For a low-carb twist, swap the rice for cauliflower rice. It keeps the dish light and still tasty. You can also use zucchini or bell peppers instead of rice. This change cuts down on carbs while keeping the meal hearty. You won’t miss the rice at all!
Additional Toppings
Feel free to get creative with toppings! Try adding sliced olives, diced avocado, or fresh pico de gallo. You can also sprinkle some green onions on top for a crunchy bite. If you like it spicy, add more jalapeños or a drizzle of hot sauce. These toppings make the casserole even more fun and tasty!
Storage Info
Refrigeration Guidelines
To keep your Loaded Taco Beef Casserole fresh, store leftovers in an airtight container. Make sure the casserole cools down first. It can last in the fridge for about three to four days. If you want to enjoy it later, try not to let it sit out too long.
Freezing Instructions
For freezing, cut the casserole into portions. Wrap each piece tightly in plastic wrap. Then, place the wrapped pieces in a freezer-safe bag or container. This prevents freezer burn. You can freeze the casserole for up to three months. When you are ready to eat, thaw it in the fridge overnight.
Reheating Tips
To reheat, place the casserole in the oven at 350°F (175°C). Heat it for about 20-30 minutes. Cover it with foil to avoid sogginess. If you want it crispier, uncover it for the last few minutes. Enjoy it hot and fresh!
FAQs
What can I substitute for ground beef?
You can use ground turkey or chicken instead of ground beef. These options are leaner and still tasty. If you prefer plant-based proteins, try black beans or lentils. Both give great texture and flavor. You can also use crumbled tofu or tempeh for a vegetarian twist. Each choice offers a unique taste while keeping the spirit of the casserole alive.
Can I make this casserole ahead of time?
Yes, you can make it ahead! Prepare the casserole up to the baking step. Cover it well and store it in the fridge for one to two days. This makes it easy for busy days. When ready to bake, just add a few extra minutes to the cooking time. If you want to freeze it, wrap the dish tightly with foil. It can last up to three months in the freezer. Thaw it overnight in the fridge before baking.
How do I make it spicier?
To add heat, mix in sliced jalapeños with the meat. You can also use spicy taco seasoning instead of mild. Adding some red pepper flakes will kick up the spice too. If you love hot sauce, drizzle it on top just before serving. These options let you control the heat level and make it as spicy as you like!
This casserole combines ground beef, veggies, and cheese for a tasty meal. You learned how to enhance flavors with spices and adjust for dietary needs. Remember to store leftovers properly and reheat with care. Try new toppings or swap ingredients for fun twists. With these tips, you’ll make a dish everyone loves. Enjoy your cooking journey and share your delicious result

Zesty Loaded Taco Beef Casserole
Ingredients
- 1 pound ground beef
- 1 small onion, finely diced
- 2 cloves garlic, minced
- 1 packet (1 oz) taco seasoning mix
- 1 can (15 oz) black beans, rinsed and drained
- 1 can (15 oz) corn, drained
- 1 can (10 oz) diced tomatoes with green chilies
- 1 cup cooked rice (your choice of white or brown)
- 2 cups shredded sharp cheddar cheese
- 1 cup crushed tortilla chips
- 1 cup sour cream
- 1/4 cup sliced jalapeños (optional)
- to taste fresh cilantro, chopped (for garnish)
Instructions
- Start by preheating your oven to 350°F (175°C) to ensure it’s hot and ready for baking.
- In a large skillet set over medium heat, add the ground beef and cook it until it’s browned and fully cooked through, breaking it apart with a spoon. Once cooked, drain any excess fat from the skillet.
- Add the finely diced onion and minced garlic to the beef in the skillet. Sauté for about 3-4 minutes, or until the onion is soft and translucent. Stir occasionally to prevent burning.
- Incorporate the taco seasoning into the skillet, followed by the rinsed black beans, drained corn, and the can of diced tomatoes with green chilies. Stir everything together and let it cook for an additional 5 minutes until all ingredients are well united and heated through.
- Remove the skillet from the heat and carefully mix in the cooked rice, ensuring an even distribution throughout the mixture.
- Lightly grease a 9x13 inch baking dish. Spread half of the beef mixture evenly across the bottom of the dish. Top this with 1 cup of the shredded sharp cheddar cheese.
- Spoon the remaining beef mixture on top of the cheese layer, and then dollop the sour cream across the surface, spreading it lightly with a spatula for even coverage.
- Finish by layering the remaining cheese on top, followed by an even sprinkle of the crushed tortilla chips to add a delightful crunch.
- If you're seeking a touch of spice, scatter sliced jalapeños over the top of the casserole.
- Place the baking dish in the preheated oven and bake for 25-30 minutes, or until the cheese is melted, bubbling, and turning a lovely golden color.
- Once done, remove the casserole from the oven and let it cool for a few minutes. Before serving, garnish the dish with freshly chopped cilantro for a bright flavor and appealing presentation.


![To make a hearty Sweet Potato Black Bean Chili, you will need: - 2 medium sweet potatoes, peeled and cut into ½-inch cubes - 1 can (15 oz) black beans, thoroughly drained and rinsed - 1 large onion, finely diced - 2 cloves garlic, finely minced - 1 red bell pepper, chopped into small pieces - 1 can (14.5 oz) diced tomatoes with their juices - 2 cups vegetable broth (preferably low-sodium) - 1 tablespoon chili powder - 1 teaspoon ground cumin - 1 teaspoon smoked paprika - ½ teaspoon cayenne pepper (adjust according to your spice preference) - Sea salt and freshly cracked black pepper, to taste - 2 tablespoons olive oil Adding toppings can enhance the chili's flavor and look. Here are some tasty options: - Diced avocado for creaminess - Fresh cilantro leaves for a pop of color - Lime wedges for a zesty touch Each ingredient brings unique health benefits: - Sweet potatoes are rich in vitamins A and C. They provide fiber and antioxidants. - Black beans are a great source of protein and fiber. They help keep you full longer. - Onions contain antioxidants and may help reduce inflammation. - Garlic has immune-boosting properties and adds flavor. - Bell peppers are high in vitamin C and help with skin health. This chili is not just filling; it also packs a nutritious punch, making it a well-rounded meal for any day. For the full recipe, check out the recipe section above. Start with a large pot. Heat 2 tablespoons of olive oil over medium heat. Wait until the oil shimmers. Add 1 finely diced onion and 1 chopped red bell pepper. Sauté for about 5 minutes. Stir often until the onion is soft and clear. Next, add 2 minced garlic cloves. Sauté for 1 more minute, just enough to let the garlic smell good. Now, it’s time for the sweet potatoes. Add 2 medium sweet potatoes, cut into ½-inch cubes. Sprinkle in 1 tablespoon chili powder, 1 teaspoon ground cumin, 1 teaspoon smoked paprika, and ½ teaspoon cayenne pepper. Don’t forget salt and pepper to taste! Stir well to coat the sweet potatoes in the spices. Pour in 1 can of diced tomatoes with juices and 2 cups of vegetable broth. Mix everything together and bring it to a boil. Once boiling, lower the heat. Cover the pot and let the chili simmer for 25 to 30 minutes. The sweet potatoes should be soft but not mushy when you poke them with a fork. After the sweet potatoes cook, stir in 1 can of black beans, drained and rinsed. Heat through for another 5 minutes. This gives the beans time to warm up. Taste the chili and add more salt or pepper if you want. - Sauté onion and bell pepper: 5 minutes - Sauté garlic: 1 minute - Simmer chili: 25 to 30 minutes - Heat black beans: 5 minutes - Cut sweet potatoes into even pieces for uniform cooking. - Stir the chili occasionally to prevent sticking. - Adjust the spice levels based on your taste. - Let the chili sit for a few minutes before serving; this helps the flavors blend. For the full recipe, check out [Full Recipe]. Enjoy creating this hearty dish! Many people rush the cooking. Take your time to sauté the onion and pepper. This step builds flavor. If you skip it, your chili may taste flat. Another mistake is adding too much spice at once. Start small, then adjust to your taste. Remember to drain the black beans well. This avoids a watery chili. Use fresh herbs like cilantro or parsley for a burst of freshness. A squeeze of lime juice adds brightness. You can also try adding a splash of soy sauce for depth. If you want more heat, add diced jalapeños or a dash of hot sauce. Lastly, consider a drizzle of olive oil before serving. This adds richness and a nice finish. For this chili, you need a sturdy large pot. A good pot helps with even cooking. A sharp knife and cutting board make prep easy. You also need measuring spoons for spices and a can opener for the beans and tomatoes. A wooden spoon works best for stirring. Having these tools ready will make your cooking smooth and fun. For the full recipe, refer back to the main article. {{image_4}} You can switch up beans in this chili. Try using kidney beans or pinto beans. Both add a different flavor and texture. If you want a creamier chili, use cannellini beans. Mixing beans can make your dish more fun and unique. Feel free to add more veggies. Corn adds sweetness and crunch. Zucchini or carrots can boost nutrition and color. For a protein boost, add cooked quinoa or lentils. You can even throw in some chopped kale or spinach for added greens. These additions can change your chili into a new dish each time. Want more heat? Add extra cayenne pepper or diced jalapeños. For a milder taste, reduce the cayenne or skip it altogether. You can also add a dash of hot sauce when serving for those who like it spicy. If you love smoky flavors, try adding chipotle peppers in adobo sauce. Adjust the spices to fit your taste and make it your own. For the full recipe, check out the Sweet Potato Black Bean Chili section above. To keep your Sweet Potato Black Bean Chili fresh, let it cool first. Once cool, transfer it to an airtight container. It’s best to refrigerate the chili within two hours of cooking. When stored correctly, it lasts in the fridge for about 4 to 5 days. Be sure to label the container with the date. This helps you track how long it has been stored. If you want to keep your chili for a longer time, consider freezing it. First, let the chili cool completely. Then, pour it into freezer-safe bags or containers. Make sure to leave some space for expansion. Seal them tightly to prevent freezer burn. You can freeze the chili for up to 3 months. When you’re ready to enjoy it, just thaw it overnight in the fridge. To reheat your chili, you have a few options. The microwave is quick, but it can heat unevenly. Stir the chili halfway through heating. For the stove, pour the chili into a pot and heat it over medium heat. Stir often until it’s hot. This method helps maintain flavor and texture. If it seems thick, add a splash of vegetable broth or water. Enjoy your chili just like the first time you made it! For the full recipe, check out the details above. You can use pinto beans or kidney beans instead of black beans. They have a similar texture and flavor. If you want a different taste, try chickpeas. They add a nutty flavor and work well in this chili. Just make sure to drain and rinse them, just like you do with black beans. Yes, you can make this chili in a slow cooker! Start by sautéing the onion, garlic, and bell pepper on the stove. Then, add all ingredients to the slow cooker. Cook on low for 6 to 8 hours or on high for 3 to 4 hours. This method lets the flavors blend over time. Leftovers can stay fresh in the fridge for about 4 to 5 days. Make sure to store the chili in an airtight container. This helps keep it flavorful and safe to eat. If you want to keep it longer, you can freeze it! Yes, this chili is perfect for vegans! All ingredients are plant-based and wholesome. You can enjoy it without any worries. It’s full of flavor and nutrients, making it a great choice for everyone. You can find the full recipe [here](#). In this blog post, we explored how to make Sweet Potato Black Bean Chili. We covered the full list of ingredients, cooking steps, and essential tips to avoid common mistakes. Remember to experiment with toppings and variations to make it your own. Proper storage ensures your leftovers stay tasty. This chili is not only delicious but also packed with nutrients. Enjoy this easy recipe that fits many diets, including vegan. Cooking it can be fun and rewarding. Try it out, and discover your new favorite dish!](https://joymealplan.com/wp-content/uploads/2025/07/8ade8b74-c48b-4df7-852e-5be035604d83-768x768.webp)


