Looking for a low-carb meal that’s both delicious and easy to make? Try my Low Carb White Chicken Enchiladas! With simple ingredients like shredded chicken and zucchini tortillas, you can enjoy a flavorful dish without the guilt. Whether you want a quick dinner or a fun way to impress guests, these enchiladas fit the bill. Let’s dive into this tasty recipe that will surely become a favorite in your home!
Why I Love This Recipe
- Healthy Alternative: This recipe uses zucchini as a low-carb substitute for tortillas, making it a healthier option without sacrificing flavor.
- Quick and Easy: With a prep time of just 20 minutes, this dish is perfect for busy weeknights when you want something delicious but don’t have a lot of time.
- Customizable: You can easily modify the filling with your favorite ingredients or add extra spices to suit your taste preferences.
- Family-Friendly: This dish is sure to please everyone at the table, from kids to adults, making it a great option for family dinners.
Ingredients
Main Ingredients
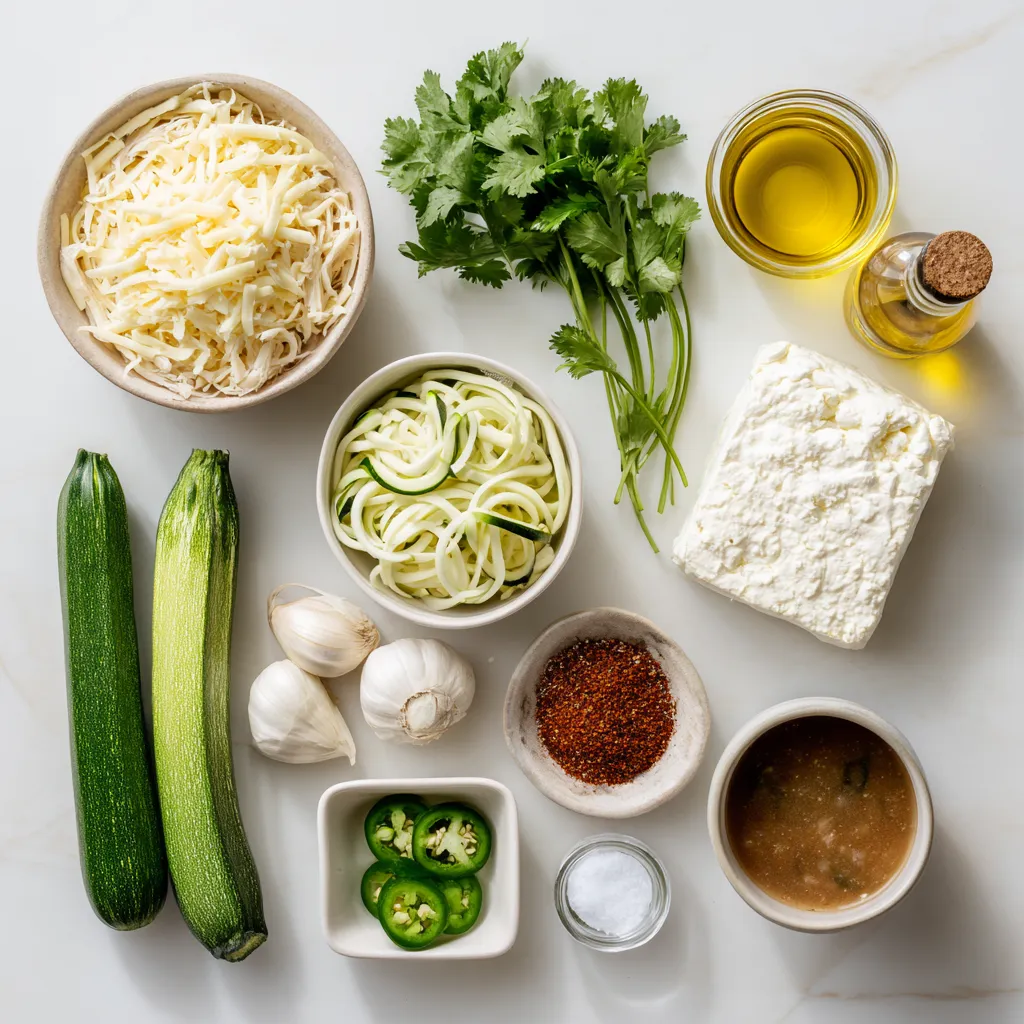
– 2 cups cooked chicken, shredded
– 6 large zucchinis, used as tortillas
– 1 cup cream cheese, softened
– 1 cup Greek yogurt
– 1 cup shredded Monterey Jack cheese, divided
I love using shredded chicken for its flavor and ease. You can use any cooked chicken. Zucchini is my go-to for low-carb tortillas. They create a great texture, and you can enjoy all the fun of enchiladas without the extra carbs. The cream cheese and Greek yogurt add creaminess and tang. I always use Monterey Jack cheese for its meltiness and mild flavor.
Seasonings and Aromatics
– 1 packet low-sodium taco seasoning
– 1 small onion, finely chopped
– 2 cloves garlic, minced
I use low-sodium taco seasoning for a big flavor punch. It brings warmth and spice without being too salty. Onions and garlic add depth to the filling. Sauté them until they are soft and fragrant to make the whole dish shine.
Optional Garnishes
– Fresh cilantro, for garnish
– Sliced jalapeños, optional for serving
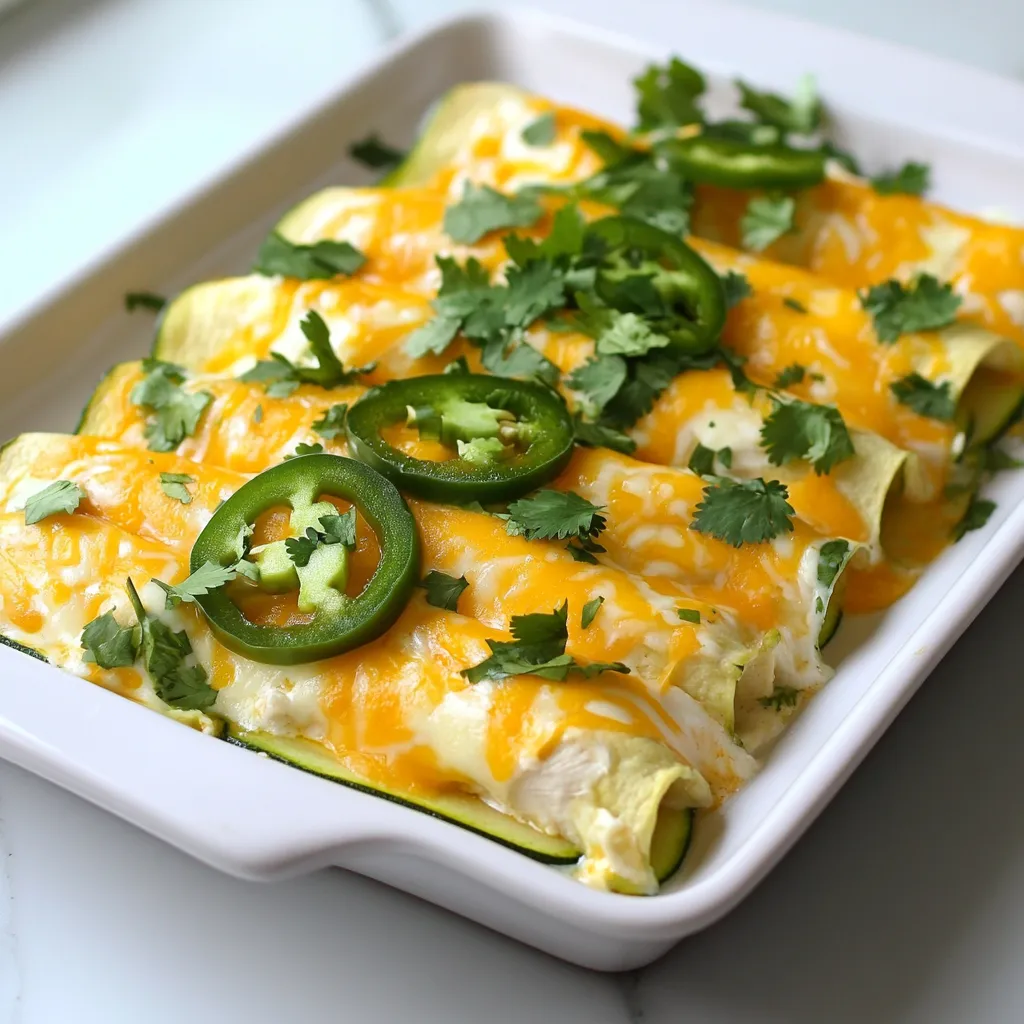
Fresh cilantro adds a burst of freshness. It brightens the dish and makes it look pretty. If you like heat, add sliced jalapeños. They bring a nice kick and enhance the flavors of the enchiladas.
Step-by-Step Instructions
Preparation Steps
– Preheating the Oven
First, preheat your oven to 350°F (175°C). This step helps cook the enchiladas evenly.
– Preparing Zucchini Strips
Use a vegetable peeler to slice the zucchinis. Make long strips, about 1/4 inch thick. These strips will act as your tortillas. Set the strips aside for later.
Cooking the Filling
– Sautéing Onions and Garlic
In a large skillet, heat one tablespoon of olive oil over medium heat. Add one small, finely chopped onion and two minced garlic cloves. Cook them for about 3-4 minutes until the onion turns soft and clear.
– Mixing the Filling Ingredients
In a mixing bowl, combine 2 cups of shredded chicken, 1 cup of softened cream cheese, half of the shredded Monterey Jack cheese, 1 cup of Greek yogurt, and one packet of low-sodium taco seasoning. Add a pinch of salt and pepper. Stir well until everything blends together.
Assembling and Baking
– Rolling Zucchini Enchiladas
Take one zucchini strip and place a spoonful of the chicken filling at one end. Roll the zucchini tightly, making sure the filling stays inside. Repeat this with all the strips until you have a plate full of rolled enchiladas.
– Creating and Adding Cheese Sauce
In a small saucepan, warm 1 cup of chicken broth over low to medium heat. Gradually stir in the remaining Monterey Jack cheese. This will melt and turn into a creamy sauce. Pour this cheese sauce over the rolled enchiladas in a greased baking dish.
– Baking Process
Cover the baking dish with foil and place it in the oven. Bake for 25 minutes. After that, remove the foil and bake for another 10 minutes. The enchiladas should be bubbly and golden when done.
Tips & Tricks
Perfecting the Zucchini Tortillas
How to Slice Zucchini Effectively
To make great zucchini tortillas, use a vegetable peeler. This tool gives you thin, long strips. Aim for about 1/4 inch thick. If you slice them too thick, they may not roll well. Thin strips cook better and hold the filling nicely.
Preventing Excess Moisture
Zucchini has a lot of water. To keep your tortillas from getting soggy, sprinkle salt on the strips. Let them sit for about 10 minutes. This helps draw out moisture. After that, pat them dry with a paper towel. This step keeps your enchiladas firm and tasty.
Flavor Enhancements
Adding Extra Spices
While taco seasoning adds great flavor, you can boost it. Try adding cumin or smoked paprika. A pinch of chili powder can add warmth. Mix these spices into the chicken filling for a deeper taste. Experiment until you find your perfect blend.
Using Fresh Herbs for Garnishing
Fresh herbs make your dish pop. I love using cilantro on top of the enchiladas. It adds a bright flavor. You could also use green onions for a mild kick. Just sprinkle them on right before serving to keep them fresh.
Serving Suggestions
Best Accompaniments
These enchiladas pair well with a fresh salad. A simple side of avocado slices or guacamole adds creaminess. If you like heat, add sliced jalapeños. They give a nice kick and contrast the creamy filling.
Presentation Tips
To serve, place the enchiladas on a large plate. Drizzle the cheese sauce over the top. Garnish with cilantro and jalapeños. For a fun touch, add a dollop of Greek yogurt on the side. This makes your dish look appealing and inviting.
Pro Tips
- Perfect Zucchini Strips: When slicing zucchinis, aim for even thickness to ensure they cook uniformly and maintain their shape while rolling.
- Flavor Boost: For extra flavor, consider adding chopped green chiles or diced bell peppers into the chicken filling mixture.
- Cheese Variation: Experiment with different cheeses like pepper jack or cheddar to add unique flavors to your enchiladas.
- Make Ahead: You can prepare the enchiladas ahead of time and refrigerate them before baking. Just add a few extra minutes to the baking time.
Variations
Customization for Different Diets
You can easily make these enchiladas fit your diet. For gluten-free options, ensure your taco seasoning has no gluten. Zucchini is naturally gluten-free, so you are good to go! If you need a dairy-free version, swap the cream cheese and cheese with dairy-free alternatives. Look for nut-based cream cheese and vegan cheese to keep it creamy.
Ingredient Swaps
Feel free to change the protein. You can use turkey, beef, or even beans for a plant-based option. Each choice will give the dish a unique flavor. Also, consider using other veggies for your “tortillas.” Thinly sliced bell peppers or cabbage can add a fun twist.
Sauce Variants
Want to spice things up? Add some diced jalapeños or hot sauce to your filling. If you love bold flavors, try mixing in chipotle peppers for a smoky taste. For a creamy sauce, stick with the cheese sauce. If you prefer a lighter option, use a simple tomato-based sauce instead. Each sauce brings a new vibe to your enchiladas!
Storage Info
Short-term Storage
For the best taste, store your enchiladas in the fridge. Place them in an airtight container. They will stay fresh for about 3 to 5 days. Make sure to let them cool down before sealing. This helps keep the flavors intact. If you want to keep them longer, consider freezing.
Long-term Storage
To freeze the enchiladas, wrap them tightly in plastic wrap. Then, place them in a freezer bag or container. They can last for up to 3 months in the freezer. When you’re ready to eat, just take them out and let them thaw in the fridge overnight.
Reheating Tips
To reheat your enchiladas, the oven is the best choice. Preheat it to 350°F (175°C). Place the enchiladas in a baking dish, cover with foil, and heat for about 20 minutes. This method keeps them warm and prevents drying out. You can also use the microwave, but keep an eye on them to avoid overcooking. Enjoy your meal again!
FAQs
Can I use other vegetables instead of zucchini?
Yes, you can! If you want to try something different, consider using eggplant or bell peppers. Both can act as great wrappers. Slice them thinly to keep the rolls easy. Just remember to cook them a bit before rolling. This helps soften them for better flavor.
How can I make these enchiladas spicier?
To spice things up, add diced jalapeños to the filling. You can also mix in some cayenne pepper or hot sauce for heat. Another option is to top the enchiladas with a spicy salsa before serving. Adjust to your taste for the perfect kick!
What can I serve with Low Carb White Chicken Enchiladas?
These enchiladas pair well with a fresh salad or some steamed veggies. You can also serve them with a side of guacamole or extra Greek yogurt. If you like crunch, try tortilla chips with salsa. Each option adds a tasty twist to the meal.
How do I reheat leftover enchiladas?
To reheat, use your oven for the best results. Set it to 350°F (175°C). Place the enchiladas in a baking dish and cover with foil. Heat for about 15-20 minutes, or until warmed through. You can also use a microwave, but the oven keeps them crisp.
You can make delicious low-carb white chicken enchiladas with simple ingredients. We covered main ingredients like shredded chicken and zucchini tortillas, along with seasonings for flavor. I shared step-by-step details on preparation, cooking, and baking. Tips like using fresh herbs and customizing for diets are key. Finally, I discussed storage and reheating options. Enjoy these enchiladas as a tasty meal that fits your needs! Your taste buds will appreciate i
<!-- /wp:post-conte


