If you crave a tasty snack that’s also good for you, try my Maple Glazed Sweet Potato Fries! With just a few simple ingredients like sweet potatoes and maple syrup, this dish is easy to make. I’ll guide you through every step, from prep to bake, to ensure your fries come out crispy and full of flavor. Let’s dive in and make this delicious treat!
Ingredients
To make maple glazed sweet potato fries, you will need a few simple items. Here’s what you’ll gather:
– Sweet potatoes
– Olive oil
– Pure maple syrup
– Ground cinnamon
– Garlic powder
– Salt and black pepper
– Fresh parsley
These ingredients come together to create a sweet and savory treat. Sweet potatoes are packed with vitamins and give a great base. Olive oil helps them crisp up in the oven. Pure maple syrup adds a nice sweetness that pairs well with the spices. Ground cinnamon gives these fries a warm flavor. Garlic powder adds depth, while salt and black pepper enhance all the tastes. Finally, fresh parsley brings color and a fresh touch to the dish.
You’ll see how these ingredients work together to create a delicious snack or side dish. Enjoy picking them out!
Step-by-Step Instructions
Preheating the Oven
First, set your oven to 425°F (220°C). This heat makes the fries crisp and tasty. While the oven warms, prepare your baking sheet. Line it with parchment paper. This helps with cleanup and keeps the fries from sticking.
Preparing the Sweet Potatoes
Next, take two large sweet potatoes. Peel them and cut them into thin fry shapes. The thinner the fries, the crispier they get. Place these cut fries into a large mixing bowl.
Coating the Fries
In the bowl with the sweet potatoes, add three tablespoons of extra virgin olive oil. Then, pour in two tablespoons of pure maple syrup. Add one teaspoon of ground cinnamon and one teaspoon of garlic powder. Season with salt and freshly cracked black pepper. Use your hands to toss everything well. Ensure each fry gets a nice coating of the mix.
Baking the Sweet Potato Fries
Spread the fries evenly on the lined baking sheet. Make sure they don’t touch each other. This spacing is key for crispiness. Place the sheet in your preheated oven. Bake for 20-25 minutes. Halfway through, flip the fries with a spatula. This helps them brown evenly. Watch them closely, and take them out when they look golden brown and crispy.
Finishing Touches
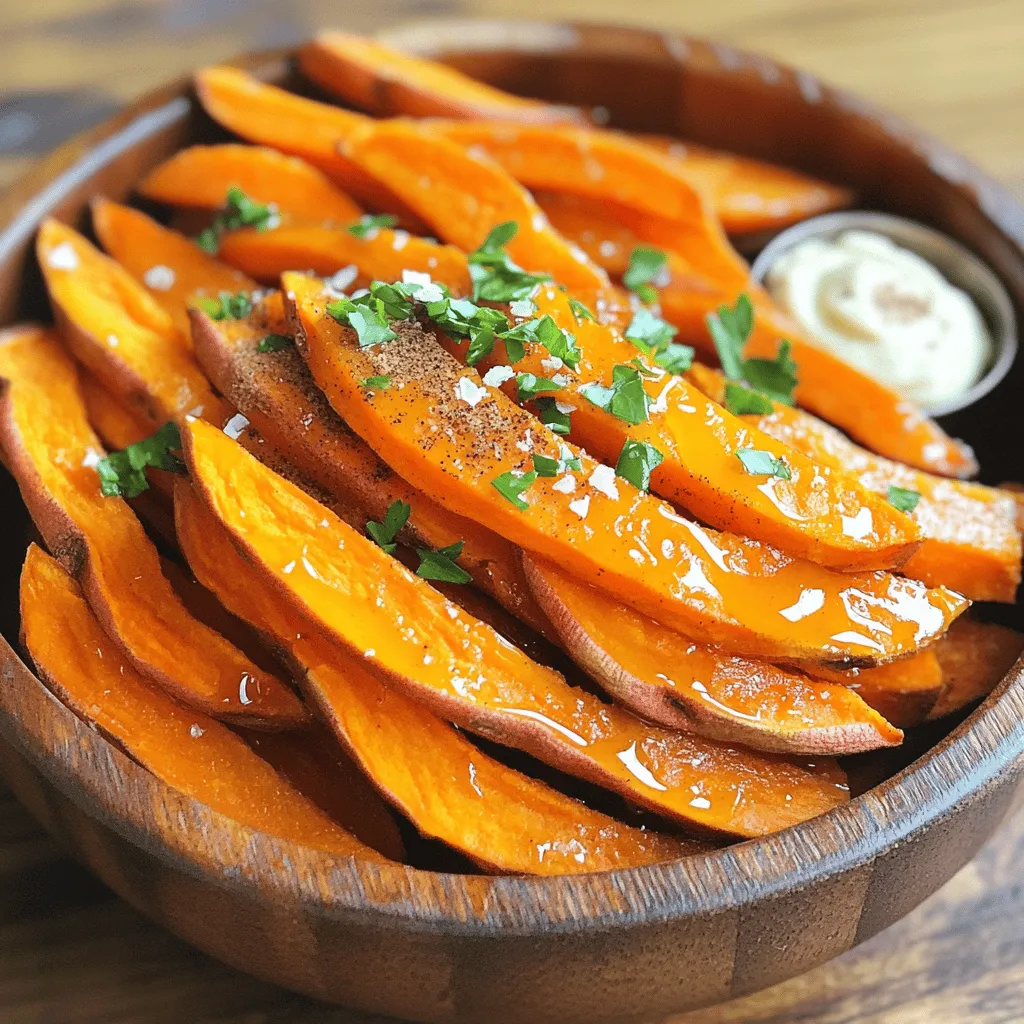
After baking, let the fries cool for a few minutes. Then, drizzle a little more maple syrup over them for extra sweetness. Lastly, sprinkle some finely chopped fresh parsley on top. This adds a nice color and a fresh taste. Enjoy your delicious maple glazed sweet potato fries!
Tips & Tricks
Achieving Maximum Crispiness
To get the crispiest fries, cut sweet potatoes thin. Aim for about 1/4 inch. Thin fries cook faster and turn crispy. Toss them well with oil and maple syrup. The oil helps them crisp up. Spread fries out in a single layer on the baking sheet. Crowding them will cause steaming, not crisping. Flip the fries halfway through baking for even browning.
Flavor Enhancement
Add spices to boost flavor. Ground cinnamon gives a warm touch. Garlic powder adds a savory kick. You can also try smoked paprika for a smoky twist. For extra sweetness, drizzle more maple syrup after baking. Fresh parsley on top adds color and freshness. It makes the dish pop visually and tastefully.
Common Mistakes to Avoid
Don’t skip preheating the oven. A hot oven helps fries crisp up. Avoid cutting fries too thick. Thick fries take longer and may not cook evenly. Make sure to dry sweet potatoes after washing. Moisture can make fries soggy. Lastly, don’t rush the flipping. Wait until halfway through to flip them for best results.

Variations
Maple Glazed Sweet Potatoes with Different Spices
You can change the flavor by using different spices. Try adding smoked paprika for a smoky taste. You can also use cayenne pepper for a spicy kick. Mix in some cumin for a warm, earthy flavor. Each spice gives a unique twist to your fries.
Add-Ins and Pairings
For extra flavor, consider adding chopped nuts. Walnuts or pecans add crunch. You can also mix in some grated cheese. Feta or parmesan works well. Pair your fries with a yogurt dip or spicy aioli for a fun contrast. This makes every bite exciting.
Healthy Substitutions
Want to make it healthier? Swap olive oil for avocado oil. It has a high smoke point and healthy fats. Use less maple syrup or a sugar-free syrup if you want fewer calories. You can also bake the fries without oil for a lighter option. This way, you can enjoy the fries without the guilt.
Storage Info
Best Practices for Storing Leftovers
After you enjoy your maple glazed sweet potato fries, store any leftovers in an airtight container. Let the fries cool down first. This helps keep them crispy when stored. Place them in the fridge, where they can last for up to three days. If you want to keep them longer, freezing is a great option.
Reheating Instructions
To bring back the crispy goodness, reheat the fries in the oven. Preheat your oven to 400°F (200°C). Spread the fries on a baking sheet in a single layer. Heat them for about 10-15 minutes. This method keeps them crispy. You can also use an air fryer if you have one. Just set it to 375°F (190°C) and cook for around 5-7 minutes.
Freezing Maple Glazed Sweet Potato Fries
If you want to freeze your fries, start by cooling them completely. Spread the cooled fries on a baking sheet in a single layer. Place the sheet in the freezer for about 1-2 hours until they are firm. After that, transfer the fries to a freezer bag. Remove as much air as possible, and seal the bag. They can stay in the freezer for up to three months. When ready to eat, cook them straight from the freezer!
FAQs
Can I use other types of potatoes?
Yes, you can use other potatoes. Regular potatoes work well too. Yukon Gold or red potatoes are great options. They will not have the same sweetness, but they will still taste good. You may need to adjust cooking times based on the type you choose.
How can I make these fries spicier?
To add heat, try adding cayenne pepper or chili powder. A little goes a long way, so start small. You can also use a spicy dipping sauce. A sriracha mayo or spicy aioli adds a nice kick.
What can I serve with maple glazed sweet potato fries?
These fries pair well with many dishes. Serve them with grilled chicken, burgers, or fish. They are also great with a fresh salad. For dipping, try ranch dressing or a yogurt dip for a cool contrast.
How do I know when the fries are done baking?
The fries are done when they are crispy and golden brown. Baking takes about 20-25 minutes. Halfway through, flip them for even cooking. Keep an eye on them to prevent burning.
Are sweet potato fries healthier than regular fries?
Yes, sweet potato fries are often healthier. They have more vitamins and fiber than regular fries. They also have a lower glycemic index. This means they can help keep your blood sugar steady.
This blog post covered how to make delicious maple glazed sweet potato fries. We discussed key ingredients, steps for prepping and baking, and tips for the best results. I shared ways to store leftovers and some common questions to help you. Remember, you can adjust flavors to your taste. Enjoy these fries as a healthy side or snack! Get creative with spices and pairings for added flavor. Cooking should be fun and rewarding. Happy frying!


