If you crave a warm, gooey treat, look no further than my Maple Pecan Sticky Buns! These bakery-style delights are simple to make and loaded with flavor. Imagine fluffy dough soaked in maple syrup and topped with crunchy pecans, perfect for breakfast or dessert. I’ll walk you through every step, from choosing the best ingredients to baking tips that guarantee success. Get ready to impress your family and friends with this sweet treat!
Ingredients
List of Ingredients
– 4 cups all-purpose flour
– 1/4 cup granulated sugar
– 1 packet (2 1/4 tsp) active dry yeast
– 1 teaspoon salt
– 1 cup whole milk, warmed to around 110°F (43°C)
– 1/2 cup unsalted butter, melted and slightly cooled
– 2 large eggs, room temperature
– 1 teaspoon vanilla extract
– 1 tablespoon ground cinnamon
– 1 cup brown sugar, packed firmly
– 1/2 cup maple syrup
– 1 cup pecans, roughly chopped
– 1/4 cup cream cheese, softened (for drizzling)
Tips for Selecting Ingredients
Choosing the best flour
Select all-purpose flour for its balance. It gives a nice texture and helps the buns rise well.
Importance of fresh yeast
Always check the date on your yeast. Fresh yeast makes the dough rise better and faster.
Selecting high-quality maple syrup
Use pure maple syrup for the best flavor. Look for a rich color and strong aroma to enhance your sticky buns.
Step-by-Step Instructions
Preparing the Yeast Mixture
To start, warm the milk until it feels like a cozy bath, around 110°F. In a big bowl, mix the warm milk with granulated sugar and active dry yeast. Wait about five minutes. You want the mixture to look frothy. This means the yeast is happy and ready to rise. Next, add melted butter, eggs, and vanilla extract to the frothy mix. Whisk everything together until it’s smooth.
Making the Dough
Now, in a separate bowl, whisk together all-purpose flour and salt. Gradually add this dry mix to your wet ingredients. Use a wooden spoon or dough hook to stir until a soft dough forms. It should feel slightly sticky. Next, transfer the dough to a floured surface. Knead the dough for about 5-10 minutes. You want it to become smooth and elastic. Once it feels right, shape it into a ball. Place it in a greased bowl, cover it, and let it rise in a warm spot for about an hour, or until it doubles in size.
Shaping and Rising
After the dough has risen, gently punch it down to release air. Roll it out on a floured surface into a rectangle about 1/4 inch thick. Evenly sprinkle packed brown sugar, ground cinnamon, and chopped pecans over the dough. Starting from one long side, roll the dough tightly into a log shape. Use a sharp knife or dental floss to cut the log into 12 equal pieces. Arrange the pieces in a greased baking dish with the cut sides facing up.
Baking the Sticky Buns
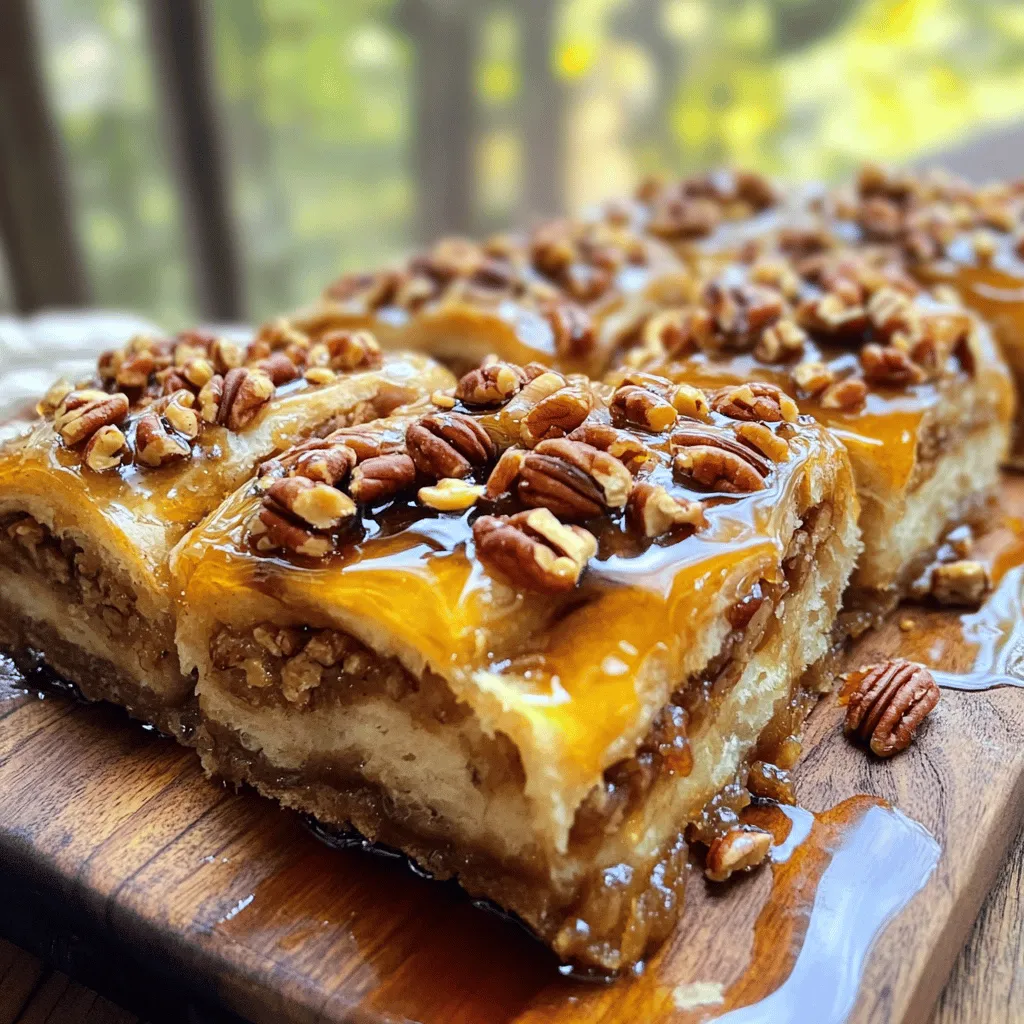
In a small saucepan over low heat, mix the maple syrup and remaining melted butter. Stir gently and simmer for about 2-3 minutes. Pour this warm maple mixture into the bottom of the baking dish. Add more chopped pecans on top. Cover the dish with a towel and let the buns rise for another 30 minutes. Meanwhile, preheat your oven to 350°F. Bake the buns for 25-30 minutes or until they turn golden brown and bubbly. After baking, let them cool in the dish for a few minutes. Then, flip the pan onto a plate to let the sticky topping drizzle down. Finally, drizzle softened cream cheese on top or serve it on the side for dipping.
Tips & Tricks
Perfecting Texture and Flavor
To get fluffy buns, use warm milk. This helps activate the yeast. Knead the dough until it’s smooth and elastic. This step is key for a light texture. You can also add a bit more flour if the dough feels too sticky.
To boost the maple flavor, use high-quality maple syrup. You can also add a pinch of salt. This enhances the sweetness and makes the flavor pop. Try adding a splash of vanilla for extra warmth.
Common Mistakes to Avoid
Don’t over-knead the dough. This makes it tough instead of soft. Keep an eye on your kneading time. Aim for about 5-10 minutes.
Make sure to allow the dough to rise properly. If you rush this step, the buns won’t puff up. Let them rise in a warm spot until they double in size.
Equipment Recommendations
For mixing, use a sturdy stand mixer or a large bowl. A wooden spoon works well too. This ensures that the dough mixes evenly.
Choose a glass or metal baking dish for even heat. A 9×13 inch pan is ideal for these buns. It helps them cook evenly and become perfectly golden.

Variations
Flavor Variations
You can change the flavor of your sticky buns easily. Adding spices like nutmeg or ginger gives a warm taste. These spices pair well with the sweet maple flavor. You can also mix in dried fruits like raisins or cranberries. They add a chewy texture and a burst of sweetness. Try different combinations to find your favorite blend.
Alternative Toppings
Switching up the toppings can make your sticky buns unique. Instead of cream cheese, use other frostings like vanilla or maple glaze. Each frosting brings its own charm. You can also try different nuts, like walnuts or almonds, for added crunch. These small changes can lead to big flavor surprises.
Special Dietary Adaptations
If you need gluten-free options, use a gluten-free flour mix. Many brands work well in baking. For dairy-free alternatives, swap the butter and milk for plant-based options. Coconut milk and vegan butter are great choices. These adaptations allow everyone to enjoy these tasty treats.
Storage Info
How to Store Sticky Buns
To keep your sticky buns fresh, place them in an airtight container. Use a glass or plastic container that seals well. This will help maintain their soft texture and delicious flavor. If you don’t have a container, wrap the buns in plastic wrap. Store them at room temperature for up to two days. For longer storage, you can refrigerate them. Just be aware that refrigeration may dry them out a bit.
Reheating Tips
To bring back the fresh taste of your sticky buns, use a few simple methods. You can reheat them in the oven. Wrap the buns in foil and bake at 350°F (175°C) for about 10-15 minutes. This keeps them warm and soft. If you prefer, you can use the microwave. Place a bun on a plate, cover it with a damp paper towel, and heat for about 15-20 seconds.
Serving them warm adds to the taste. The gooey maple topping will shine when they are hot. However, if you enjoy them at room temperature, that works too! Just be sure to store them well so they maintain their flavor.
FAQs
What is the best way to activate yeast?
To activate yeast, mix it with warm milk and sugar. The milk should be around 110°F (43°C). Let it sit for five minutes. You will see bubbles forming. This means the yeast is active and ready to use.
Can I make the dough in advance?
Yes, you can make the dough ahead of time. After kneading, place it in a bowl and cover it. Store it in the fridge for up to 24 hours. When ready, let it warm up before rolling it out.
How can I tell when the sticky buns are done baking?
The sticky buns are done when they turn golden brown. The edges should bubble with syrup. A toothpick should come out clean when inserted into the center.
What’s the difference between sticky buns and cinnamon rolls?
Sticky buns have a sweet maple topping and pecans. They bake in a syrup, making them gooey. Cinnamon rolls are usually filled with cinnamon sugar and topped with icing.
Can I freeze maple pecan sticky buns?
Yes, you can freeze them. Cool the buns completely, then wrap them tightly. Store in the freezer for up to three months. Thaw overnight in the fridge before reheating.
What can I use instead of cream cheese for drizzling?
You can use Greek yogurt or a simple glaze made of powdered sugar and milk. Both add a nice touch without losing flavor.
In this post, I shared the key ingredients for maple pecan sticky buns and outlined steps to make them. I also offered tips for selecting the best ingredients and avoiding common mistakes. Remember, the right flour and fresh yeast make a big difference. Don’t rush the dough; let it rise properly for the best results. Try variations or dietary swaps for a personal touch. With practice, you’ll create delightful treats that everyone will enjoy. Happy baking!


