Maple Pecan Sticky Buns Irresistible Homemade Treat

Are you ready to delight your taste buds with a sweet, gooey treat? Maple Pecan Sticky Buns are the perfect homemade indulgence for any occasion. With layers of soft dough, a rich maple filling, and crunchy pecans, these buns will have everyone reaching for seconds. Follow my simple guide to create this delicious dessert that makes every morning feel special. Let’s dive into the sweet world of sticky buns!
Why I Love This Recipe
- Deliciously Sweet and Nutty: The combination of maple syrup and chopped pecans creates a rich flavor profile that’s irresistible.
- Perfect for Any Occasion: These sticky buns are ideal for breakfast, brunch, or even dessert, making them a versatile treat.
- Easy to Make: With straightforward steps, even novice bakers can achieve bakery-quality results at home.
- Warm and Comforting: Serving them warm enhances their gooey texture and comforting flavors, perfect for cozy gatherings.
Ingredients
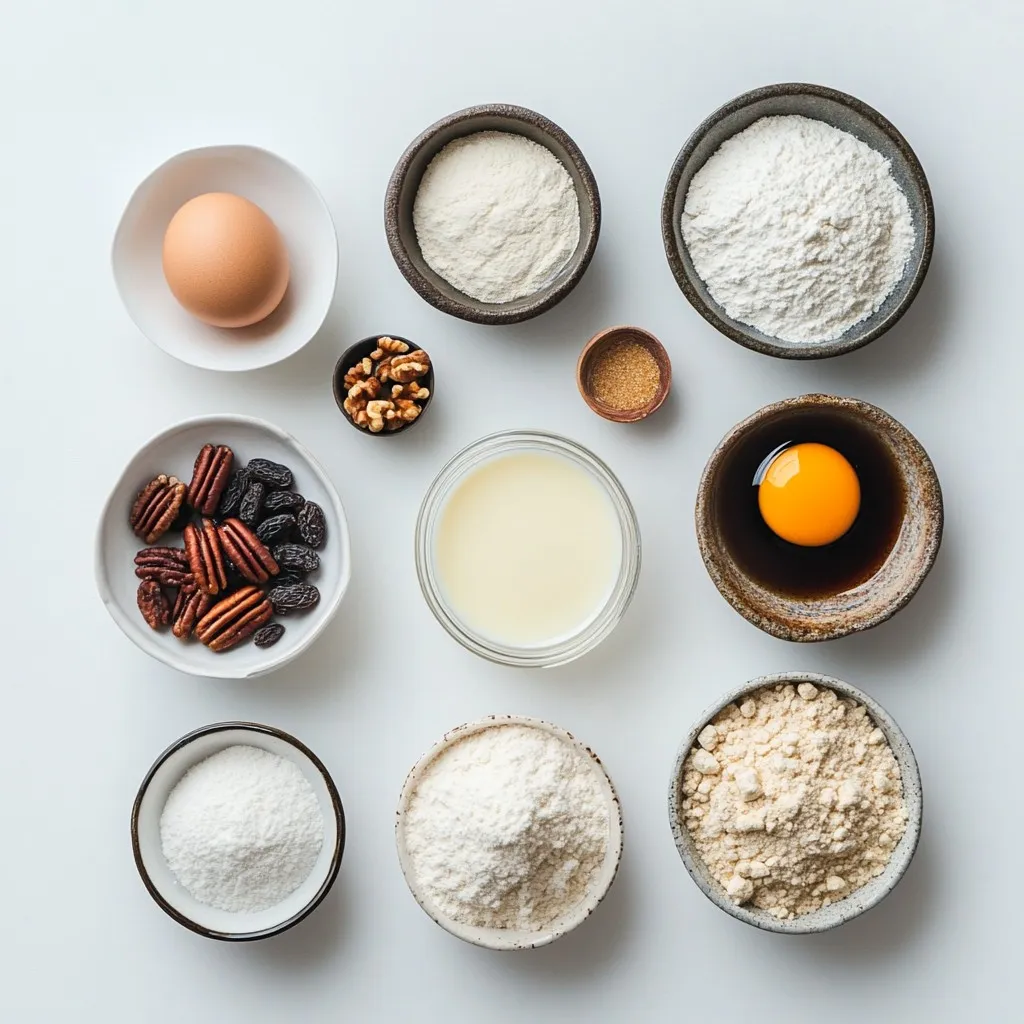
To make delicious Maple Pecan Sticky Buns, you need some key ingredients. Here’s what you will use:
– 2 cups all-purpose flour
– 1/4 cup granulated sugar
– 1/2 teaspoon salt
– 1 packet (2 1/4 tsp) instant yeast
– 1/2 cup warm milk (about 110°F)
– 1/4 cup unsalted butter, melted
– 1 large egg
– 1 teaspoon vanilla extract
– 1/2 cup brown sugar, packed
– 1/2 cup chopped pecans
– 1/4 cup maple syrup
– 1/2 teaspoon ground cinnamon
– 1/4 teaspoon nutmeg
– 1/4 cup raisins (optional for added sweetness)
These ingredients come together to create a sweet and sticky treat. The flour and sugar form the base, while the yeast helps the dough rise. Milk adds moisture, and butter gives it richness. The egg and vanilla enhance the flavor.
The brown sugar and maple syrup provide that lovely sweetness we crave. Pecans add a nice crunch, and spices like cinnamon and nutmeg bring warmth. If you like, toss in some raisins for extra texture.
Make sure you use fresh ingredients. This ensures your sticky buns turn out fluffy and flavorful. Enjoy gathering these items; each one plays an important role in your baking adventure!

Step-by-Step Instructions
Preparing the Dough
– Combine dry ingredients: In a large bowl, mix 2 cups of flour, 1/4 cup of sugar, 1/2 teaspoon of salt, and 1 packet of instant yeast. Make sure to blend them well.
– Mix wet ingredients: In another bowl, whisk together 1/2 cup of warm milk, 1/4 cup of melted unsalted butter, 1 large egg, and 1 teaspoon of vanilla extract. This will create a smooth mixture.
– Knead the dough: Pour the wet mix into the dry ingredients. Stir until they blend. Now, knead the dough on a floured surface for about 5-7 minutes until it is soft and elastic.
Letting the Dough Rise
– Transfer to a greased bowl: Place the kneaded dough into a greased bowl. This helps it not to stick.
– Cover and find a warm spot: Cover the bowl with a clean kitchen towel. Place it in a warm area. Let it rise until it doubles in size, which takes about 1 hour.
Rolling and Filling
– Roll out the dough: Once the dough has risen, punch it down gently. Roll it out on a floured surface into a rectangle about 12×8 inches.
– Prepare the filling mixture: In a small bowl, mix 1/2 cup of brown sugar, 1/2 cup of chopped pecans, 1/2 teaspoon of ground cinnamon, and 1/4 teaspoon of nutmeg. Add raisins if you like extra sweetness.
– Spread filling and roll the dough: Evenly spread the filling over the dough, leaving a small edge. Roll it tightly from the long side to form a log.
Shaping and Second Rise
– Slice the rolled dough: Cut the log into 12 equal pieces. Each piece should be about 1 inch thick.
– Arrange in baking dish: Place the slices cut side up in a greased baking dish. Make sure they are spaced evenly.
Baking the Buns
– Prepare the maple mixture: In a saucepan, heat 1/4 cup of maple syrup and any leftover melted butter. Stir until it thickens slightly.
– Preheat oven and let rise again: Preheat your oven to 350°F (175°C). Let the buns rise for about 30 more minutes while the oven heats.
– Bake and cool: Bake the buns for 25-30 minutes until golden brown. Allow them to cool for a few minutes before flipping them onto a plate. Enjoy the sweet aroma!
Tips & Tricks
Perfecting Texture
To get a soft dough, use warm milk. It helps the yeast wake up. Knead the dough well for 5-7 minutes. This builds the gluten and adds strength. A good dough should feel smooth and elastic. If it sticks to your hands, add a bit more flour.
Flavor Enhancements
You can add extras to boost flavor. Consider adding chocolate chips or dried cranberries. These give a nice twist to the classic taste. You can also adjust the sweetness. If you prefer less sugar, cut back on the brown sugar or maple syrup.
Serving Suggestions
Serve the sticky buns warm for the best taste. You can drizzle extra maple syrup on top for added sweetness. Garnishing with whole pecans makes them look great too. They are perfect for brunch or dessert. Enjoy them with a cup of coffee or tea for a cozy treat!
Pro Tips
- Use Fresh Ingredients: Ensure your yeast is fresh for the best rise. Check the expiration date on the packet to guarantee optimal results.
- Temperature Matters: Make sure the milk is warm but not hot when mixing with the yeast, as excessive heat can kill the yeast and prevent the dough from rising.
- Let Them Rise: Don’t rush the rising time. Allowing the dough to double in size is crucial for achieving that fluffy, airy texture in your sticky buns.
- Perfect Serving: Serve the sticky buns warm for the best flavor and texture. Drizzling additional maple syrup just before serving will enhance their sweetness.

Variations
Different Nuts
You can change the nuts in this recipe. If you don’t have pecans, try walnuts or almonds. Both give a nice crunch. Walnuts add a rich taste, while almonds bring a sweet touch. Just chop them up and use the same amount as pecans. You will still get that lovely nutty flavor.
Flavor Swaps
Add a twist by mixing in chocolate chips or cranberries. Chocolate chips offer a sweet, rich flavor that blends well with the maple. You can use dark or milk chocolate based on your taste. If you prefer a fruity note, cranberries add tanginess. Toss in about half a cup of either for a fun surprise.
Vegan Options
Want a vegan version? It’s easy! Replace the egg with a flax egg. Mix one tablespoon of flaxseed meal with three tablespoons of water. Let it sit until thick. Use almond or oat milk in place of regular milk. Coconut oil can replace butter. These swaps keep the sticky buns delicious and plant-based.
Storage Info
Storing Leftovers
To keep your Maple Pecan Sticky Buns fresh, place them in an airtight container. You can store them in the refrigerator for up to five days. This helps to maintain their softness and flavor.
If you want to freeze them, wrap each bun tightly in plastic wrap. Then, place them in a freezer-safe bag. They can last in the freezer for up to three months. When you’re ready to eat, just thaw them in the fridge overnight.
Reheating Tips
To enjoy your sticky buns warm again, use the oven. Preheat it to 350°F (175°C). Place the buns in a baking dish, cover with foil, and heat for about 10 minutes. This warms them without drying them out.
You can also use the microwave. Place a bun on a microwave-safe plate. Add a damp paper towel on top. Heat for 15-20 seconds. Check if it’s warm enough. If not, heat in short bursts until warm.
FAQs
Can I make the dough the night before?
Yes, you can make the dough the night before. After you knead it, cover it and put it in the fridge. This slows down the yeast. In the morning, take it out and let it rise. It should take about an hour to double in size.
How do I know when the buns are fully baked?
The buns are done when they turn golden brown. You can also check the center with a toothpick. If it comes out clean, they are ready. The tops should feel firm but soft when you touch them.
What can I do if my dough doesn’t rise?
If your dough does not rise, the yeast might be old. Check the expiration date on the packet. You can also try placing the dough in a warm spot. If it still doesn’t rise, you may need to start over with fresh yeast.
Can I use instant yeast instead of active yeast?
Yes, you can use instant yeast instead of active yeast. It works faster and does not need to be dissolved first. Just mix it with your dry ingredients. You can skip the proofing step, saving you some time.
We covered the key ingredients and steps to make delicious sticky buns. You learned how to prepare the dough, shape it, and bake it perfectly. I shared tips for the best texture and flavor, along with variations for personalization. Remember, practice makes perfect when baking. With these methods, you’ll create treats everyone loves. Enjoy baking and sharing your sticky buns with friends and famil

Maple Pecan Sticky Buns
Ingredients
- 2 cups all-purpose flour
- 0.25 cup granulated sugar
- 0.5 teaspoon salt
- 1 packet instant yeast (2 1/4 tsp)
- 0.5 cup warm milk (about 110°F)
- 0.25 cup unsalted butter, melted
- 1 large egg
- 1 teaspoon vanilla extract
- 0.5 cup brown sugar, packed
- 0.5 cup chopped pecans
- 0.25 cup maple syrup
- 0.5 teaspoon ground cinnamon
- 0.25 teaspoon nutmeg
- 0.25 cup raisins (optional for added sweetness)
Instructions
- In a large mixing bowl, combine the all-purpose flour, granulated sugar, salt, and instant yeast. Mix well to ensure the dry ingredients are evenly distributed.
- In a separate bowl, whisk together the warm milk, melted butter, egg, and vanilla extract until you have a smooth mixture.
- Carefully pour the wet ingredients into the bowl with the dry ingredients. Stir until combined, and then knead the dough on a lightly floured surface for about 5-7 minutes until it becomes soft and elastic.
- Transfer the kneaded dough to a greased bowl. Cover with a clean kitchen towel and place it in a warm spot. Let it rise until doubled in size, which should take around 1 hour.
- After the dough has risen, gently punch it down to release the air. Roll it out on a floured surface into a rectangle roughly 12x8 inches in size.
- In a small mixing bowl, combine the brown sugar, ground cinnamon, nutmeg, chopped pecans, and raisins (if using). Stir until mixed well.
- Evenly spread the sugar and pecan mixture over the rolled-out dough, leaving a small border around the edges. Starting from the longer side, tightly roll the dough to form a log.
- Slice the log into 12 equal pieces. Arrange these pieces in a greased baking dish, cut side up.
- In a saucepan over medium heat, combine the maple syrup and any remaining melted butter. Stir until melted and slightly thickened. Pour this mixture evenly over the arranged buns in the baking dish.
- Preheat your oven to 350°F (175°C). While the oven heats, let the buns rise again for about 30 minutes.
- Bake the sticky buns in the preheated oven for 25-30 minutes, or until they are golden brown. Once baked, allow them to cool for a few minutes in the pan before inverting them onto a serving plate.


![To make a tasty Snickerdoodle Apple Cobbler, you need the following ingredients: - 4 medium-sized apples (Granny Smith or Honeycrisp), peeled and thinly sliced - 1 tablespoon fresh lemon juice - 1 cup granulated sugar, divided - 1 teaspoon ground cinnamon, divided - 1 cup all-purpose flour - 2 teaspoons baking powder - 1/2 teaspoon salt - 1/2 cup unsalted butter, melted and slightly cooled - 1 large egg - 1/2 cup milk - 1/2 teaspoon pure vanilla extract - 1 teaspoon ground nutmeg (for a unique twist) These ingredients come together to create a warm, comforting dessert that everyone loves. You can add some optional ingredients to make this dessert even better. Consider these: - Chopped nuts like pecans or walnuts for crunch - A scoop of caramel sauce for extra sweetness - A sprinkle of sea salt to enhance flavors - Dried fruits like raisins or cranberries for added texture These enhancements can take your cobbler to a new level. Sometimes, you may not have every ingredient on hand. Here are some substitutions you can use: - Use other apple varieties, like Fuji or Braeburn, if needed. - Swap granulated sugar with brown sugar for a deeper flavor. - Replace all-purpose flour with whole wheat flour for more fiber. - Use coconut oil or vegetable oil instead of butter for a dairy-free option. These alternatives will keep your cobbler delicious while fitting your needs. For the complete recipe, check out the [Full Recipe]. Start by preheating your oven to 350°F (175°C). This step is vital for even baking. Next, grab a 9x9-inch baking dish and grease it lightly with butter or cooking spray. This helps prevent the cobbler from sticking. In a large mixing bowl, take four medium-sized apples. I love using Granny Smith or Honeycrisp apples. Peel them and slice them thinly. Add one tablespoon of fresh lemon juice to keep the apples bright. Then, mix in 1/2 cup of granulated sugar and 1/2 teaspoon of ground cinnamon. Stir until the apples are well-coated. Pour this delicious mixture into the prepared baking dish, spreading it out evenly. Now, let’s make the batter. In another bowl, mix one cup of all-purpose flour, two teaspoons of baking powder, 1/2 teaspoon of salt, and the remaining 1/2 cup of granulated sugar. Add 1/2 teaspoon of cinnamon for flavor. In a separate bowl, whisk together 1/2 cup of melted unsalted butter, one large egg, 1/2 cup of milk, and 1/2 teaspoon of pure vanilla extract. Gradually pour the wet mixture into the dry ingredients. Stir gently with a spatula until just combined. Be careful not to overmix. This ensures the cobbler stays tender. Now, dollop the batter over the apple mixture in the baking dish. Spread it gently to cover most apples, leaving some peeking through. For a unique twist, combine one teaspoon of ground nutmeg with a pinch of cinnamon and sugar in a small bowl. Sprinkle this mix evenly over the top of the batter. Place the baking dish in the preheated oven. Bake for 35-40 minutes. Your cobbler is done when the top is golden brown. A toothpick inserted into the center should come out clean. Once baked, take the cobbler out of the oven. Let it cool for about 10 minutes before serving. This cooling time helps all the flavors meld together beautifully. Enjoy your Snickerdoodle Apple Cobbler! For the full recipe, check out the earlier sections. To make your snickerdoodle apple cobbler shine, I have some key tips. - Choose the Right Apples: Use tart apples like Granny Smith. They balance the sweetness well. - Don’t Skip the Lemon Juice: This keeps the apples fresh and adds a nice zing. - Mix Carefully: When combining wet and dry ingredients, mix just until combined. Overmixing leads to a tough texture. - Add a Nutmeg Boost: A sprinkle of nutmeg adds warmth and depth to your cobbler. - Keep an Eye on Baking Time: Ovens vary, so check for a golden top and a clean toothpick. Baking can be tricky, and mistakes often happen. Here are some to watch out for: - Using Cold Ingredients: Make sure butter and eggs are at room temperature. This helps the batter mix better. - Not Preheating the Oven: Always preheat your oven. This ensures even baking from the start. - Overcrowding the Dish: Don’t pack the apple filling too tightly. Allow space for the apples to soften. - Ignoring the Cooling Time: Let the cobbler cool for a bit before serving. This helps the flavors blend. Having the right tools makes baking easier. Here’s what I recommend: - 9x9-inch Baking Dish: This is perfect for even baking. - Mixing Bowls: Use at least two medium bowls for mixing ingredients. - Whisk: A good whisk is vital for combining wet and dry ingredients smoothly. - Spatula: A silicone spatula is great for folding and scraping batter. - Measuring Cups and Spoons: Precision matters in baking. Accurate measurements lead to better results. For the full recipe, check out the detailed instructions to guide you through each step. {{image_4}} You can change the flavor of your Snickerdoodle Apple Cobbler easily. Adding nuts gives it a nice crunch. Try using chopped walnuts or pecans. You can also change the spices. Instead of just cinnamon, add a pinch of cardamom. This gives it a warm and unique taste. For a sweeter twist, mix in some chocolate chips. They melt and add a rich flavor to each bite. To make a healthier version, swap all-purpose flour for whole wheat flour. This adds fiber and nutrients. You can also use sugar substitutes, like stevia or coconut sugar. These options lower the calories while keeping the sweetness. If you want to cut down on fat, use applesauce instead of butter. It keeps the cobbler moist while being lighter. Change up the fruit based on the season. In spring, use fresh berries like strawberries or blueberries. In fall, pears can add a different flavor profile. They pair well with apples and spices. You could also top the cobbler with a sprinkle of oats for a crunchy topping. This adds texture and makes a great twist on the classic recipe. For the full recipe, check out the guide we provide. To keep your Snickerdoodle Apple Cobbler fresh, store it in an airtight container. Let it cool for about 10 minutes after baking. Then, cover it tightly and place it in the fridge. This helps keep the flavors intact and prevents it from drying out. Enjoy the cobbler within 3-4 days for the best taste. Reheating is simple. Preheat your oven to 350°F (175°C). Place the cobbler in an oven-safe dish. Cover it loosely with foil. Heat for about 15-20 minutes. Check if it's warm throughout. You can also microwave individual servings for about 20-30 seconds. Add a scoop of ice cream on top for a warm treat. To freeze your cobbler, let it cool completely first. Cut it into portions and wrap each piece in plastic wrap. Then, place the wrapped portions in a freezer-safe bag. Remove air to prevent freezer burn. Your cobbler will stay good for up to 3 months. When you're ready to eat, thaw it in the fridge overnight and reheat as mentioned above. For the full recipe, check the link in the article. You can tell the cobbler is done when the top is golden brown. Also, insert a toothpick into the center. If it comes out clean, your cobbler is ready. Baking usually takes 35 to 40 minutes. Keep an eye on it. If it starts to brown too quickly, cover it lightly with foil. Yes, you can use different types of apples. Granny Smith and Honeycrisp are great choices. They add a nice balance of sweet and tart. Other good options include Fuji or Braeburn. Just make sure to peel and slice them thinly for even cooking. I love serving this cobbler warm with vanilla ice cream. The creamy ice cream melts into the warm cobbler. It creates a delicious mix of flavors and textures. You can also add a light dusting of cinnamon on top. For a fresh touch, add thin apple slices as a garnish. They look great and taste amazing! For the full recipe, please visit [Full Recipe]. In this post, we explored the delightful Snickerdoodle Apple Cobbler. We covered required and optional ingredients, plus substitutions. You learned step-by-step how to prepare the filling and batter. We shared tips to avoid common mistakes and suggested the best tools for success. Variations, including healthier options, added fun. Lastly, we discussed storage and reheating. Now, you're ready to create a comforting dessert. Enjoy baking and experimenting with your own twists!](https://joymealplan.com/wp-content/uploads/2025/07/db3ea963-82dc-410a-a54c-26a74516e24e-768x768.webp)
![- 3 cups unsweetened shredded coconut - 1/2 cup sweetened condensed milk - 2 large egg whites - 1/4 teaspoon vanilla extract - 1/4 teaspoon almond extract - Pinch of salt - 1/2 cup dark chocolate chips (optional) These ingredients create the base for your coconut macaroons. The unsweetened shredded coconut gives it that chewy texture. Sweetened condensed milk adds creaminess and sweetness, making each bite delightful. The egg whites are crucial for lightness and fluffiness. The extracts bring in a lovely depth of flavor. If you want to add a twist, dark chocolate chips can add a rich touch. - Gluten-free options: This recipe is naturally gluten-free, perfect for those with gluten issues. - Nut-free alternatives: You can enjoy these macaroons without nuts, making them safe for nut allergies. - Vegan substitutions: For a vegan version, try using aquafaba instead of egg whites and a plant-based condensed milk. These options help everyone enjoy this treat. Whether you have dietary needs or just want to try something new, there’s a way for you to make these coconut macaroons. You can find the full recipe above to get started! Start by preheating your oven to 325°F (160°C). This step is key to baking your macaroons evenly. While the oven heats, line a baking sheet with parchment paper. This helps prevent sticking and makes cleaning up easier later. In a large mixing bowl, combine 3 cups of unsweetened shredded coconut and 1/2 cup of sweetened condensed milk. Add 1/4 teaspoon of vanilla extract, 1/4 teaspoon of almond extract, and a pinch of salt. Stir well until everything is mixed together nicely. Now, in a separate bowl, take 2 large egg whites and whip them until they form stiff peaks. This is an important step because it gives your macaroons a light and airy texture. Next, gently fold the whipped egg whites into the coconut mixture. Use a spatula and be careful not to stir too hard. You want to keep the air in the egg whites. Fold until the egg whites are just mixed in; some lumps are okay. Using a tablespoon or a small cookie scoop, portion out the mixture onto the prepared baking sheet. Make sure to space each mound about 2 inches apart. This allows them to spread a bit while baking. Now, place the baking sheet in your preheated oven. Bake the macaroons for about 20 to 25 minutes. You want them to turn a lovely golden brown. Once done, take the tray out and let the macaroons cool for about 5 minutes on the sheet. This helps them firm up. After that, transfer them to a wire rack to cool completely. For those who love chocolate, you can melt some dark chocolate chips and dip the bottoms of each macaroon. Let the chocolate set on the parchment paper. Enjoy these delightful treats from the full recipe! To make great coconut macaroons, focus on the egg whites. Whipping them correctly is key. Use a clean bowl and beaters. Beat until stiff peaks form. This step adds lightness to the macaroons. Avoid overmixing when you fold them into the coconut mix. Gently combine the ingredients. Some lumps are okay. A light touch keeps the texture airy and nice. You can boost the flavor of your macaroons in fun ways. Try adding a pinch of cinnamon or nutmeg for warmth. These spices bring depth and richness. Another idea is to add citrus zest. Lemon or lime zest gives a fresh twist. Just a small amount can make a big difference in taste. How you serve your macaroons can impress your guests. Place them on a decorative platter to catch the eye. You can garnish with shredded coconut or fresh fruit. This adds color and flair. Arrange them in clusters for an inviting look. These small touches make your dessert stand out and look professional. For the full recipe, check out the Tropical Coconut Macaroons section. {{image_4}} You can make your macaroons even better by adding chocolate. Start by melting dark chocolate chips. Use a microwave-safe bowl. Heat in 30-second bursts, stirring after each. This helps prevent burning. Alternatively, you can use a double boiler for even heating. Once the chocolate is melted, dip the bottom of each macaroon in it. Make sure to coat it well. Place the dipped macaroons back on the parchment paper. Let the chocolate harden before serving. This adds a rich flavor that complements the coconut. Want to add some nuts? Almonds and pecans work great. Simply chop them finely and mix them in with the coconut. This adds a nice crunch to the soft macaroons. If you have nut allergies, you can skip the nuts. The recipe still tastes great without them. You can also use seeds like sunflower or pumpkin for a similar texture. Always be cautious and adjust based on your needs. There are endless flavor combinations for your macaroons. One tasty option is coconut-lime. Just add lime zest and a bit of lime juice to the coconut mixture. This gives a fresh twist. Another option is vanilla bean macaroons. Instead of vanilla extract, use the seeds from a vanilla bean. This adds a lovely fragrance and flavor. You can also mix in spices like cinnamon for a warm touch. Each variation brings a new taste to your delightful tropical treats. For the complete recipe, refer to the [Full Recipe]. Store your coconut macaroons at room temperature for the best taste. Keep them in a cool, dry place. Use an airtight container to keep them fresh. This helps avoid moisture and keeps them soft. If you live in a warm climate, consider refrigerating them. The cold can help them last longer. However, be aware that refrigeration may change their texture slightly. To freeze macaroons, let them cool completely first. Once cooled, place them in a single layer on a baking sheet. Freeze for about one hour. This step prevents them from sticking together. After they are firm, transfer them to a freezer-safe bag or container. When you want to enjoy a macaroon, take it out of the freezer. Let it thaw in the fridge overnight. For a quick thaw, leave it at room temperature for a few hours. Coconut macaroons can last up to one week at room temperature. If stored in the fridge, they can last for about two weeks. Check for signs of spoilage before eating. Look for changes in texture, color, or a sour smell. If you see any of these, it’s best to toss them out. Yes, you can make coconut macaroons without egg whites. Instead, use ground flaxseed or chia seeds mixed with water. This mixture acts as a binder. For every egg white, mix 1 tablespoon of ground flaxseed or chia seeds with 2.5 tablespoons of water. Let it sit for about 10 minutes to thicken. This will give your macaroons a nice texture while keeping them egg-free. To keep your macaroons from falling apart, mix the ingredients gently. Overmixing can cause them to break. When you fold in the egg whites, do it slowly and carefully. This helps maintain air and keeps the macaroons light. Make sure to space them well on the baking sheet. This allows them to bake evenly. A good tip is to form them tightly with your hands. This will help them hold their shape during baking. Leftover shredded coconut can be used in many ways. You can add it to smoothies for extra texture. It works well in oatmeal or yogurt for a tropical twist. Consider making coconut pancakes or muffins. You can also toast it for a crunchy topping on salads or desserts. If you enjoy baking, use it in granola or energy balls. This way, you won't waste any coconut, and you'll enjoy its rich flavor in other dishes. You now know how to make coconut macaroons from scratch. We covered the essential ingredients, step-by-step instructions, and storage tips. You learned about variations, dietary options, and how to enhance flavors. Give these tasty treats a try! They are fun to make and share. Don’t forget to experiment with flavors or coatings. Enjoy your baking, and let your creativity shine!](https://joymealplan.com/wp-content/uploads/2025/06/e4df15b8-ca64-4a89-a5eb-245e13ac6d80-768x768.webp)


