Are you craving a quick and delicious meal? This Margherita Tortilla Pizza is your answer! With simple ingredients like flour tortillas, marinara sauce, and fresh mozzarella, you can whip up a tasty dish in no time. Whether you’re cooking for a family dinner or a fun snack, this recipe is easy to follow and packed with flavor. Let’s dive into the steps and make pizza magic happen in your kitchen!
Ingredients
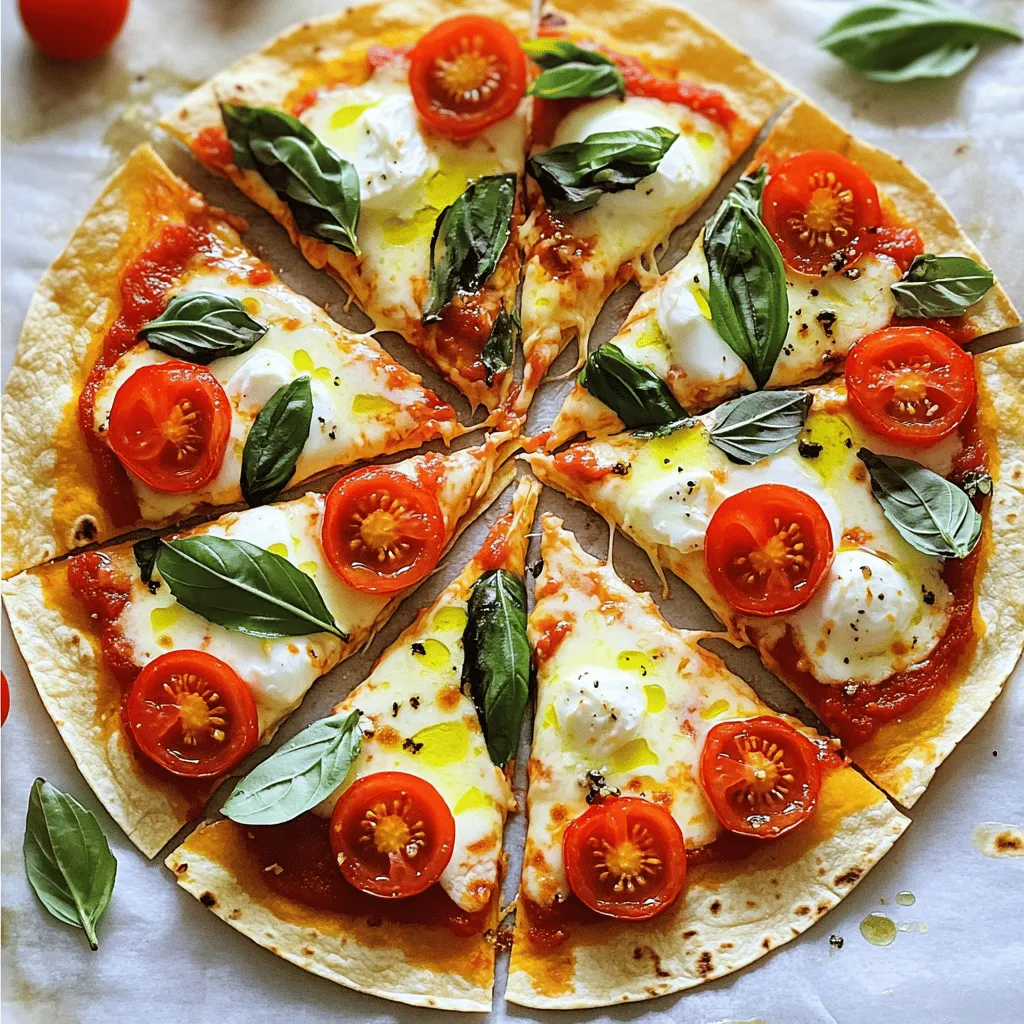
List of Ingredients
– 4 large flour tortillas
– 1 cup marinara sauce
– 1 ½ cups fresh mozzarella cheese, sliced
– 1 cup cherry tomatoes, halved
– 1/4 cup fresh basil leaves, torn
– 2 tablespoons olive oil
– Salt and freshly ground black pepper, to taste
These ingredients create a simple yet tasty Margherita tortilla pizza. Flour tortillas form the base. Marinara sauce gives it a rich flavor. Fresh mozzarella cheese melts beautifully on top. Cherry tomatoes add a sweet touch. Fresh basil leaves bring a burst of freshness. Olive oil enhances the taste and texture. Finally, a sprinkle of salt and pepper balances all the flavors.
Using quality ingredients is key. Fresh mozzarella makes a big difference. Choose ripe cherry tomatoes for the best flavor. Fresh basil should be fragrant. These choices elevate your pizza from simple to gourmet.
Feel free to adjust the ingredients. Want more cheese? Go for it! Prefer fewer tomatoes? You can skip them. This recipe is flexible, so you can make it your own.
Step-by-Step Instructions
Preheat and Prepare
First, preheat your oven to 400°F (200°C). This step makes sure your pizza cooks evenly. While the oven heats, grab a large baking sheet. Lay out your flour tortillas flat on the sheet. Make sure they do not overlap. This will help them crisp up nicely.
Add and Layer Ingredients
Now, let’s add the sauce. Take 1/4 cup of marinara sauce and spoon it onto each tortilla. Use the back of a spoon to spread the sauce evenly over the surface. Next, place the fresh mozzarella slices on top of the sauce. Spread the cheese out evenly, covering each tortilla. After that, scatter the halved cherry tomatoes on top of the cheese. Season them lightly with salt and pepper for extra flavor.
Baking Process
It’s time to bake! Place the baking sheet in your preheated oven. Bake your pizzas for about 10-12 minutes. Watch closely until the cheese is melted, bubbly, and golden. This is your sign that the pizzas are ready.
Finishing Touches
Once your pizzas are done, take them out of the oven. Immediately add torn fresh basil leaves on top. This adds a lovely flavor and freshness. For serving, use a pizza cutter or a sharp knife to slice each tortilla pizza into wedges. Serve the pizzas hot and enjoy your tasty creation! Consider using a stylish wooden board for presentation. You can also add a side of extra marinara sauce for dipping.
Tips & Tricks
Baking Techniques
– Ideal oven settings: Preheat your oven to 400°F (200°C). This heat helps your pizza cook evenly.
– Tips for achieving crispy edges: Place the tortillas flat on the baking sheet and avoid overlapping. The hot air needs to circulate around the edges to make them crispy.
Ingredient Substitutions
– Alternatives for marinara sauce: If you want a change, use pesto or a white sauce. Both can add a fresh twist.
– Cheese variations to consider: Try using goat cheese, provolone, or a mix of cheeses. Each brings a unique flavor to the pizza.
Serving Suggestions
– Pairing ideas for sides and drinks: Serve with a light salad or garlic bread. A chilled white wine or sparkling water complements the pizza well.
– Presentation tips for gathering: Slice the pizza into wedges and arrange them on a wooden board. Add a small bowl of marinara for dipping. Top with whole basil leaves for an eye-catching touch.

Variations
Different Protein Additions
You can easily add protein to your Margherita tortilla pizza. Try adding cooked chicken, pepperoni, or sausage. Just make sure to slice them thinly. Place the protein on top of the cheese and tomatoes. This will give your pizza extra flavor and make it more filling.
Vegetarian Options
If you want a veggie version, you have many choices. Instead of meat, use more veggies. Bell peppers, mushrooms, or spinach can work great. You can also add artichokes or olives for a fun twist. Just remember to keep the balance of flavors. These toppings will keep your pizza tasty and colorful.
Gluten-Free Adaptations
For a gluten-free option, use gluten-free tortillas. There are many brands available. You can also check the marinara sauce label for gluten-free options. This way, everyone can enjoy the pizza without worry. Make sure to bake them at the same temperature and time as the regular version. Enjoy your pizza, no matter your dietary needs!
Storage Info
Refrigeration Guidelines
To store leftover Margherita tortilla pizza, let it cool first. Wrap each pizza slice in plastic wrap. You can also use an airtight container. This keeps the pizza fresh for 3 to 4 days in the fridge. Make sure to keep it away from strong-smelling foods. This helps to maintain its delicious flavor.
Reheating Instructions
To reheat your pizza, use an oven or a skillet. For the oven, preheat it to 350°F (175°C). Place the slices on a baking tray. Heat for about 8 to 10 minutes. This keeps the tortilla crispy and the cheese melty. If you use a skillet, heat it on medium. Place the pizza slice in the skillet. Cover it with a lid and heat for 5 to 7 minutes. This method also keeps it crispy and tasty.
Freezing Suggestions
If you want to freeze your leftover pizza, wrap each slice tightly in plastic wrap. Then, place them in a freezer bag or container. Make sure to squeeze out all the air. This helps prevent freezer burn. You can freeze the pizza for up to 2 months. When you’re ready to eat it, thaw it in the fridge overnight. Then, reheat it using the oven or skillet method. Enjoy your tasty pizza anytime!
FAQs
How long do I bake Margherita Tortilla Pizza?
Bake your Margherita Tortilla Pizza for 10 to 12 minutes at 400°F (200°C). Keep an eye on it. You want the cheese to melt and bubble. The edges of the tortillas should turn golden brown. This quick baking time helps keep the tortillas crispy and the toppings fresh.
Can I use store-bought tortillas?
Yes, you can use store-bought tortillas. They are a great option for saving time. Look for large flour tortillas for this recipe. You can find them in most grocery stores. Whole wheat or corn tortillas work too, but they will change the flavor a bit. Choose what you like best.
What can I serve with Margherita Tortilla Pizza?
You can serve many tasty sides with your pizza. A fresh salad pairs well. Try a simple arugula salad with lemon dressing. You can also serve extra marinara sauce for dipping. Garlic bread or roasted vegetables make great sides too. Choose what you enjoy to complete your meal.
In this article, we explored how to make a delicious Margherita Tortilla Pizza. We covered the key ingredients, step-by-step instructions, baking tips, and serving ideas. You can create varied versions with proteins or vegetarian toppings, too. Storing and reheating your leftovers is easy with these tips. In the end, making this pizza is fun and rewarding. Enjoy your tasty creation and share it with friends or family for a delightful meal!


