No-Bake S’mores Cheesecake Jars Easy and Delicious Treat

To make your No-Bake S'mores Cheesecake Jars, you need some simple ingredients. Here’s the list you will need: - 1 cup graham cracker crumbs - 4 tablespoons unsalted butter, melted - 1 cup cream cheese, softened at room temperature - 1/2 cup powdered sugar, sifted - 1 teaspoon pure vanilla extract - 1 cup heavy whipping cream, cold - 1 cup mini marshmallows - 1/2 cup semi-sweet or milk chocolate chips - Additional mini marshmallows and chocolate shavings for decoration These ingredients work together to create a delicious treat. The graham cracker crumbs form the crust, while the cream cheese and whipped cream make the filling smooth and rich. The mini marshmallows add a fun texture, and the chocolate chips give a sweet touch. Don't forget the decorations! They make your jars look fancy and inviting. Using these ingredients, you'll impress everyone with your dessert skills. To start, grab a medium mixing bowl. Add the graham cracker crumbs and melted butter. Mix them well with a fork. You want the crumbs to feel like wet sand. This is how you know it is ready. Next, take four jars or small cups. Divide the crumb mixture evenly among them. Press the mixture down firmly with the back of a spoon. This forms a solid base for your cheesecake. Now it’s time to make the filling. In a large mixing bowl, beat the softened cream cheese using an electric mixer. Keep mixing until it’s smooth and creamy. There should be no lumps left. Next, gradually add the sifted powdered sugar while mixing. Then, pour in the vanilla extract. Blend until everything is fully combined and smooth. In a separate chilled bowl, whip the heavy cream. Use an electric mixer until stiff peaks form. This means the cream is ready to fold into the cheesecake mixture. Gently fold in the whipped cream with a spatula. Be careful not to over-mix; you want it to stay fluffy. Now, fold in the mini marshmallows evenly. It’s time to assemble the jars! Spoon the cheesecake filling on top of the crust. Fill each jar about three-quarters full. Then, sprinkle chocolate chips on top. Add another spoonful of cheesecake mixture, smoothing it gently. Cover the jars with lids or plastic wrap and chill them in the refrigerator for at least four hours. This helps the cheesecake set properly. Before serving, add a few extra mini marshmallows on top. Use a kitchen torch to toast them lightly for a golden finish. Finish with a sprinkle of chocolate shavings for a stunning look. To get the best texture for your cheesecake, use room temperature cream cheese. Cold cream cheese can cause lumps in your mix. It’s also key to whip your cream correctly. Start with a cold bowl and cold cream. Whip until stiff peaks form. This helps the filling become light and fluffy. When it comes to decorating your jars, think about fun layers. Use extra mini marshmallows on top for a sweet touch. A kitchen torch can toast them for a golden look. You can also sprinkle chocolate shavings for extra flair. Other toppings like crushed graham crackers or nuts can add texture. Explore these options to make your dessert shine! {{image_4}} You can change the taste of your no-bake s'mores cheesecake jars easily. Adding different types of chocolate can make them more fun. Try dark chocolate for a richer taste or white chocolate for a sweeter flavor. You can also mix in flavored extracts. A hint of almond extract can add warmth. If you love mint, peppermint extract will make it fresh and bright. If you need gluten-free options, use gluten-free graham cracker crumbs for the crust. They work just as well and keep the flavor intact. For a dairy-free version, swap cream cheese with a dairy-free cream cheese. Coconut cream can replace heavy cream for a rich texture. These swaps let everyone enjoy this treat, no matter their diet. To store your No-Bake S’mores Cheesecake Jars, place them in the fridge. Cover each jar with a lid or plastic wrap. This keeps them fresh and stops other smells from getting in. The dessert lasts about 3 to 5 days in the fridge. After that, the texture may change. For the best taste, enjoy them fresh! You can freeze these jars if you want to save some for later. First, make sure the jars are tightly sealed. This prevents ice crystals from forming. To freeze, place the jars in the freezer. They can stay frozen for up to 2 months. When ready to serve, move the jars to the fridge overnight to thaw. Serve them cold, or let them sit at room temperature for about 15 minutes before enjoying. The flavors will be just as good as fresh! Yes, you can. I recommend making the jars a day in advance. This helps the flavors blend well. When you prepare ahead, just store them in the fridge. Cover each jar tightly. This keeps them fresh and tasty. The jars last about 3 to 4 days in the fridge. Keep them covered to maintain freshness. After that, the texture may change. The cheesecake may become too soft or watery. Yes, larger jars work fine! Just remember to adjust your portions. You may need to double the filling. This keeps the same great taste while fitting in larger jars. Enjoy your s'mores cheesecake however you like! In this post, I covered how to make delicious no-bake s'mores cheesecake jars. You learned about the simple ingredients, easy steps for preparation, and expert tips to improve texture and presentation. Remember, you can modify flavors and ingredients to fit your needs. Store the jars properly for freshness, or freeze them for later. With these tips, you can impress anyone with your tasty treats. Enjoy creating your cheesecake desserts!

WANT TO SAVE THIS RECIPE?

Craving a sweet, easy dessert? Let me introduce you to No-Bake S’mores Cheesecake Jars! This treat combines rich cream cheese and melted chocolate with a crunchy graham cracker crust. Plus, there’s no baking required! With simple steps and fun layers, you can whip these up in no time. Whether for a summer BBQ or a cozy night at home, this dessert will impress everyone. Ready to make some delicious memories? Let’s get started!

Ingredients

To make your No-Bake S’mores Cheesecake Jars, you need some simple ingredients. Here’s the list you will need:

– 1 cup graham cracker crumbs

– 4 tablespoons unsalted butter, melted

– 1 cup cream cheese, softened at room temperature

– 1/2 cup powdered sugar, sifted

– 1 teaspoon pure vanilla extract

– 1 cup heavy whipping cream, cold

– 1 cup mini marshmallows

– 1/2 cup semi-sweet or milk chocolate chips

– Additional mini marshmallows and chocolate shavings for decoration

These ingredients work together to create a delicious treat. The graham cracker crumbs form the crust, while the cream cheese and whipped cream make the filling smooth and rich. The mini marshmallows add a fun texture, and the chocolate chips give a sweet touch. Don’t forget the decorations! They make your jars look fancy and inviting. Using these ingredients, you’ll impress everyone with your dessert skills.

Step-by-Step Instructions

Preparing the Crust

To start, grab a medium mixing bowl. Add the graham cracker crumbs and melted butter. Mix them well with a fork. You want the crumbs to feel like wet sand. This is how you know it is ready. Next, take four jars or small cups. Divide the crumb mixture evenly among them. Press the mixture down firmly with the back of a spoon. This forms a solid base for your cheesecake.

Making the Cheesecake Filling

Now it’s time to make the filling. In a large mixing bowl, beat the softened cream cheese using an electric mixer. Keep mixing until it’s smooth and creamy. There should be no lumps left. Next, gradually add the sifted powdered sugar while mixing. Then, pour in the vanilla extract. Blend until everything is fully combined and smooth.

Final Assembly and Chilling

In a separate chilled bowl, whip the heavy cream. Use an electric mixer until stiff peaks form. This means the cream is ready to fold into the cheesecake mixture. Gently fold in the whipped cream with a spatula. Be careful not to over-mix; you want it to stay fluffy. Now, fold in the mini marshmallows evenly.

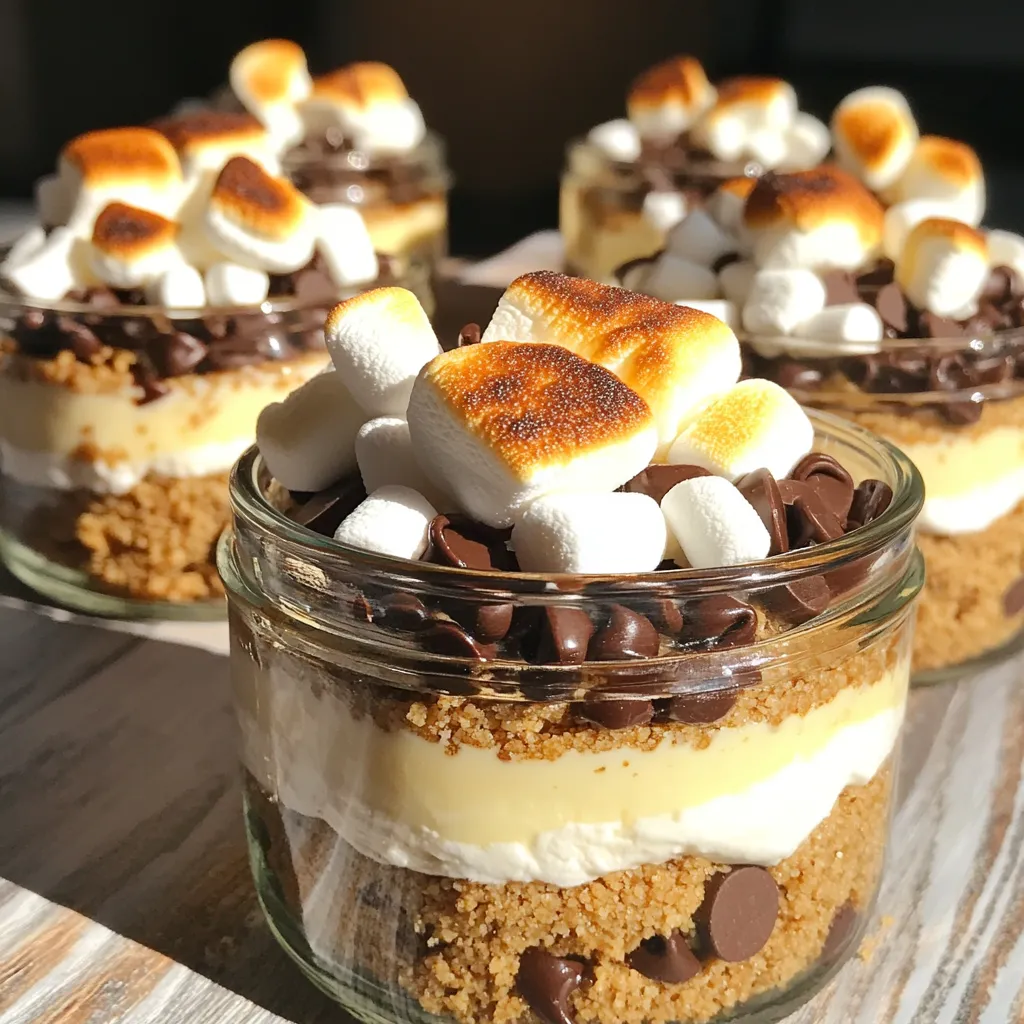
It’s time to assemble the jars! Spoon the cheesecake filling on top of the crust. Fill each jar about three-quarters full. Then, sprinkle chocolate chips on top. Add another spoonful of cheesecake mixture, smoothing it gently. Cover the jars with lids or plastic wrap and chill them in the refrigerator for at least four hours. This helps the cheesecake set properly. Before serving, add a few extra mini marshmallows on top. Use a kitchen torch to toast them lightly for a golden finish. Finish with a sprinkle of chocolate shavings for a stunning look.

Tips & Tricks

Achieving the Perfect Texture

To get the best texture for your cheesecake, use room temperature cream cheese. Cold cream cheese can cause lumps in your mix. It’s also key to whip your cream correctly. Start with a cold bowl and cold cream. Whip until stiff peaks form. This helps the filling become light and fluffy.

Decorating for Presentation

When it comes to decorating your jars, think about fun layers. Use extra mini marshmallows on top for a sweet touch. A kitchen torch can toast them for a golden look. You can also sprinkle chocolate shavings for extra flair. Other toppings like crushed graham crackers or nuts can add texture. Explore these options to make your dessert shine!
Variations

Flavor Adjustments

You can change the taste of your no-bake s’mores cheesecake jars easily. Adding different types of chocolate can make them more fun. Try dark chocolate for a richer taste or white chocolate for a sweeter flavor. You can also mix in flavored extracts. A hint of almond extract can add warmth. If you love mint, peppermint extract will make it fresh and bright.

Ingredient Substitutions

If you need gluten-free options, use gluten-free graham cracker crumbs for the crust. They work just as well and keep the flavor intact. For a dairy-free version, swap cream cheese with a dairy-free cream cheese. Coconut cream can replace heavy cream for a rich texture. These swaps let everyone enjoy this treat, no matter their diet.

Storage Info

Best Practices for Storage

To store your No-Bake S’mores Cheesecake Jars, place them in the fridge. Cover each jar with a lid or plastic wrap. This keeps them fresh and stops other smells from getting in.

The dessert lasts about 3 to 5 days in the fridge. After that, the texture may change. For the best taste, enjoy them fresh!

Freezing Options

You can freeze these jars if you want to save some for later. First, make sure the jars are tightly sealed. This prevents ice crystals from forming.

To freeze, place the jars in the freezer. They can stay frozen for up to 2 months. When ready to serve, move the jars to the fridge overnight to thaw.

Serve them cold, or let them sit at room temperature for about 15 minutes before enjoying. The flavors will be just as good as fresh!

FAQs

Can I make No-Bake S’mores Cheesecake Jars ahead of time?

Yes, you can. I recommend making the jars a day in advance. This helps the flavors blend well. When you prepare ahead, just store them in the fridge. Cover each jar tightly. This keeps them fresh and tasty.

How long do the jars last in the refrigerator?

The jars last about 3 to 4 days in the fridge. Keep them covered to maintain freshness. After that, the texture may change. The cheesecake may become too soft or watery.

Can I use larger jars for this recipe?

Yes, larger jars work fine! Just remember to adjust your portions. You may need to double the filling. This keeps the same great taste while fitting in larger jars. Enjoy your s’mores cheesecake however you like!

In this post, I covered how to make delicious no-bake s’mores cheesecake jars. You learned about the simple ingredients, easy steps for preparation, and expert tips to improve texture and presentation. Remember, you can modify flavors and ingredients to fit your needs. Store the jars properly for freshness, or freeze them for later. With these tips, you can impress anyone with your tasty treats. Enjoy creating your cheesecake desserts!

To make your No-Bake S'mores Cheesecake Jars, you need some simple ingredients. Here’s the list you will need: - 1 cup graham cracker crumbs - 4 tablespoons unsalted butter, melted - 1 cup cream cheese, softened at room temperature - 1/2 cup powdered sugar, sifted - 1 teaspoon pure vanilla extract - 1 cup heavy whipping cream, cold - 1 cup mini marshmallows - 1/2 cup semi-sweet or milk chocolate chips - Additional mini marshmallows and chocolate shavings for decoration These ingredients work together to create a delicious treat. The graham cracker crumbs form the crust, while the cream cheese and whipped cream make the filling smooth and rich. The mini marshmallows add a fun texture, and the chocolate chips give a sweet touch. Don't forget the decorations! They make your jars look fancy and inviting. Using these ingredients, you'll impress everyone with your dessert skills. To start, grab a medium mixing bowl. Add the graham cracker crumbs and melted butter. Mix them well with a fork. You want the crumbs to feel like wet sand. This is how you know it is ready. Next, take four jars or small cups. Divide the crumb mixture evenly among them. Press the mixture down firmly with the back of a spoon. This forms a solid base for your cheesecake. Now it’s time to make the filling. In a large mixing bowl, beat the softened cream cheese using an electric mixer. Keep mixing until it’s smooth and creamy. There should be no lumps left. Next, gradually add the sifted powdered sugar while mixing. Then, pour in the vanilla extract. Blend until everything is fully combined and smooth. In a separate chilled bowl, whip the heavy cream. Use an electric mixer until stiff peaks form. This means the cream is ready to fold into the cheesecake mixture. Gently fold in the whipped cream with a spatula. Be careful not to over-mix; you want it to stay fluffy. Now, fold in the mini marshmallows evenly. It’s time to assemble the jars! Spoon the cheesecake filling on top of the crust. Fill each jar about three-quarters full. Then, sprinkle chocolate chips on top. Add another spoonful of cheesecake mixture, smoothing it gently. Cover the jars with lids or plastic wrap and chill them in the refrigerator for at least four hours. This helps the cheesecake set properly. Before serving, add a few extra mini marshmallows on top. Use a kitchen torch to toast them lightly for a golden finish. Finish with a sprinkle of chocolate shavings for a stunning look. To get the best texture for your cheesecake, use room temperature cream cheese. Cold cream cheese can cause lumps in your mix. It’s also key to whip your cream correctly. Start with a cold bowl and cold cream. Whip until stiff peaks form. This helps the filling become light and fluffy. When it comes to decorating your jars, think about fun layers. Use extra mini marshmallows on top for a sweet touch. A kitchen torch can toast them for a golden look. You can also sprinkle chocolate shavings for extra flair. Other toppings like crushed graham crackers or nuts can add texture. Explore these options to make your dessert shine! {{image_4}} You can change the taste of your no-bake s'mores cheesecake jars easily. Adding different types of chocolate can make them more fun. Try dark chocolate for a richer taste or white chocolate for a sweeter flavor. You can also mix in flavored extracts. A hint of almond extract can add warmth. If you love mint, peppermint extract will make it fresh and bright. If you need gluten-free options, use gluten-free graham cracker crumbs for the crust. They work just as well and keep the flavor intact. For a dairy-free version, swap cream cheese with a dairy-free cream cheese. Coconut cream can replace heavy cream for a rich texture. These swaps let everyone enjoy this treat, no matter their diet. To store your No-Bake S’mores Cheesecake Jars, place them in the fridge. Cover each jar with a lid or plastic wrap. This keeps them fresh and stops other smells from getting in. The dessert lasts about 3 to 5 days in the fridge. After that, the texture may change. For the best taste, enjoy them fresh! You can freeze these jars if you want to save some for later. First, make sure the jars are tightly sealed. This prevents ice crystals from forming. To freeze, place the jars in the freezer. They can stay frozen for up to 2 months. When ready to serve, move the jars to the fridge overnight to thaw. Serve them cold, or let them sit at room temperature for about 15 minutes before enjoying. The flavors will be just as good as fresh! Yes, you can. I recommend making the jars a day in advance. This helps the flavors blend well. When you prepare ahead, just store them in the fridge. Cover each jar tightly. This keeps them fresh and tasty. The jars last about 3 to 4 days in the fridge. Keep them covered to maintain freshness. After that, the texture may change. The cheesecake may become too soft or watery. Yes, larger jars work fine! Just remember to adjust your portions. You may need to double the filling. This keeps the same great taste while fitting in larger jars. Enjoy your s'mores cheesecake however you like! In this post, I covered how to make delicious no-bake s'mores cheesecake jars. You learned about the simple ingredients, easy steps for preparation, and expert tips to improve texture and presentation. Remember, you can modify flavors and ingredients to fit your needs. Store the jars properly for freshness, or freeze them for later. With these tips, you can impress anyone with your tasty treats. Enjoy creating your cheesecake desserts!

No-Bake S’mores Cheesecake Jars

Indulge in the ultimate treat with these no-bake s'mores cheesecake jars! Perfectly layered with a buttery graham cracker crust, creamy cheesecake filling, and gooey mini marshmallows, this recipe is a delightful twist on a classic favorite. It’s easy to prepare and ideal for any occasion. Click through now to explore the full recipe and impress your friends with this delicious dessert that’s sure to please every palate!

Ingredients
  

1 cup graham cracker crumbs

4 tablespoons unsalted butter, melted

1 cup cream cheese, softened at room temperature

1/2 cup powdered sugar, sifted

1 teaspoon pure vanilla extract

1 cup heavy whipping cream, cold

1 cup mini marshmallows

1/2 cup semi-sweet or milk chocolate chips

Additional mini marshmallows and chocolate shavings for decoration

Instructions
 

Prepare the Crust: In a medium mixing bowl, combine the graham cracker crumbs with the melted butter. Use a fork or your fingers to mix until the crumbs are evenly coated and the texture resembles wet sand.

    Layer the Crust: Divide the crumb mixture evenly among the bottom of 4 jars or small cups. Use the back of a spoon to press down firmly, forming a compact base layer for the cheesecake.

      Make the Cheesecake Filling: In a large mixing bowl, use an electric mixer to beat the softened cream cheese until it's creamy and smooth, ensuring no lumps remain.

        Add Sugar and Vanilla: Gradually sift in the powdered sugar while continuing to mix, then add the vanilla extract. Blend until the mixture is smooth and fully combined.

          Whip the Cream: In a separate chilled bowl, whip the heavy cream using an electric mixer until stiff peaks form, indicating that it's ready to be folded into the cheesecake filling.

            Combine Mixtures: Gently fold the whipped cream into the cream cheese mixture using a spatula or wooden spoon. Aim to preserve the light fluffy texture by being careful not to over-mix.

              Add Marshmallows: Carefully fold in the mini marshmallows, ensuring they’re evenly dispersed throughout the cheesecake filling for delightful bites of gooeyness.

                Assemble the Jars: Spoon the cheesecake mixture on top of the prepared graham cracker crusts in each jar, filling them about three-quarters full to allow space for additional layers.

                  Layer with Chocolate: Sprinkle a layer of chocolate chips atop the cheesecake filling in each jar. Follow this with another spoonful of the cheesecake mixture, smoothing it out gently.

                    Chill: Cover the jars with lids or plastic wrap and transfer them to the refrigerator. Allow them to chill for at least 4 hours to ensure the cheesecake sets properly.

                      Serve: Just before serving, top each jar with a few extra mini marshmallows. For an added touch, use a kitchen torch to lightly toast the marshmallows until golden brown. Finish off with a sprinkle of chocolate shavings for a delightful presentation.

                        Prep Time, Total Time, Servings: 20 minutes | 4 hours chill time | 4 servings

                          WANT TO SAVE THIS RECIPE?

                          Related Posts