No-Bake Strawberry Cheesecake Cups are the perfect sweet treat! They combine creamy goodness with fresh strawberries. You don’t need to bake, making them quick and easy. In this blog, I’ll guide you through simple steps to create these delightful cups. Whether for a party or a cozy night in, you’ll impress everyone with this dessert. Let’s dive into the tasty details and start your no-bake journey!
Why I Love This Recipe
- Deliciously Creamy: The combination of cream cheese and whipped cream creates a rich, velvety texture that melts in your mouth.
- Fresh & Fruity: The addition of fresh strawberries adds a burst of sweetness and a refreshing contrast to the creamy layers.
- Easy to Make: With simple ingredients and straightforward steps, this dessert can be whipped up in just 20 minutes!
- Beautiful Presentation: These cups not only taste amazing but also look stunning, making them perfect for any occasion.
Ingredients
List of Ingredients
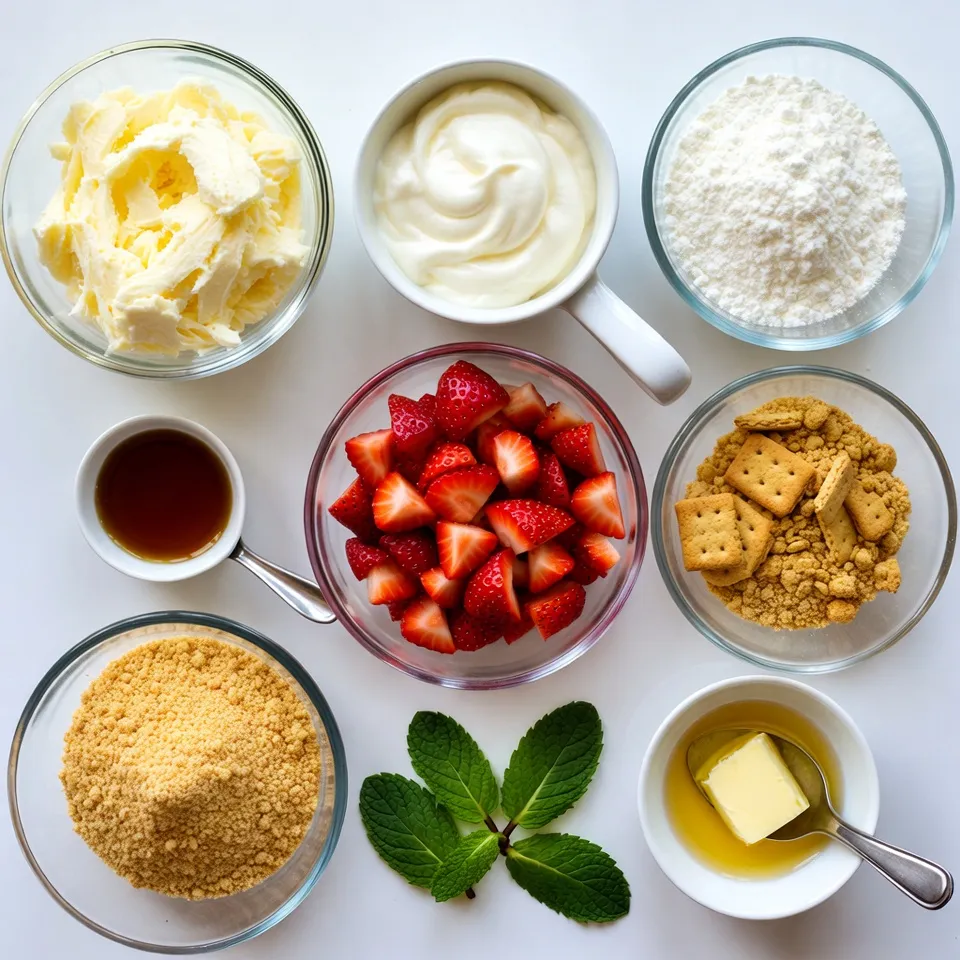
– 1 cup cream cheese, softened to room temperature
– ½ cup powdered sugar
– 1 teaspoon pure vanilla extract
– 1 cup heavy whipping cream
– 1 cup fresh strawberries, diced into small pieces
– ½ cup graham cracker crumbs
– 2 tablespoons unsalted butter, melted
– Fresh mint leaves, for garnish (optional)
To make No-Bake Strawberry Cheesecake Cups, you need simple and fresh ingredients. Start with cream cheese. It gives the cheesecake its rich flavor and creamy texture. Next, add powdered sugar for sweetness. This sweet touch balances the tang of the cream cheese. Don’t forget the vanilla extract! It adds a lovely aroma and taste.
Heavy whipping cream is key for that light, fluffy texture. Whipping it well makes your dessert airy. Fresh strawberries give a burst of flavor and color. Use ripe strawberries for the best taste; they should be sweet and juicy.
Graham cracker crumbs form the base of your cups. Mix them with melted butter to create a nice, crunchy layer. Finally, consider adding fresh mint leaves for garnish. They add a pop of color and a hint of freshness.
Gather these ingredients, and you’re ready to create a delightful treat!
Step-by-Step Instructions
Preparing the Cream Cheese Mixture
– Combining Ingredients
Start by taking a mixing bowl. Add 1 cup of softened cream cheese, ½ cup of powdered sugar, and 1 teaspoon of pure vanilla extract. Mix these ingredients together until they blend well.
– Mixing Technique
Use an electric mixer set to medium speed. Beat the mixture for about 2-3 minutes. You want it to be smooth and creamy, with no lumps. This step is key for a great texture.
Making Whipped Cream
– Whipping Process
In a separate bowl, pour in 1 cup of heavy whipping cream. Using a hand mixer or stand mixer, whip the cream on high speed. This will take about 3-5 minutes.
– Achieving Stiff Peaks
Keep whipping until you see stiff peaks form. The whipped cream should be thick enough to hold its shape. This will add air and fluffiness to your cheesecake cups.
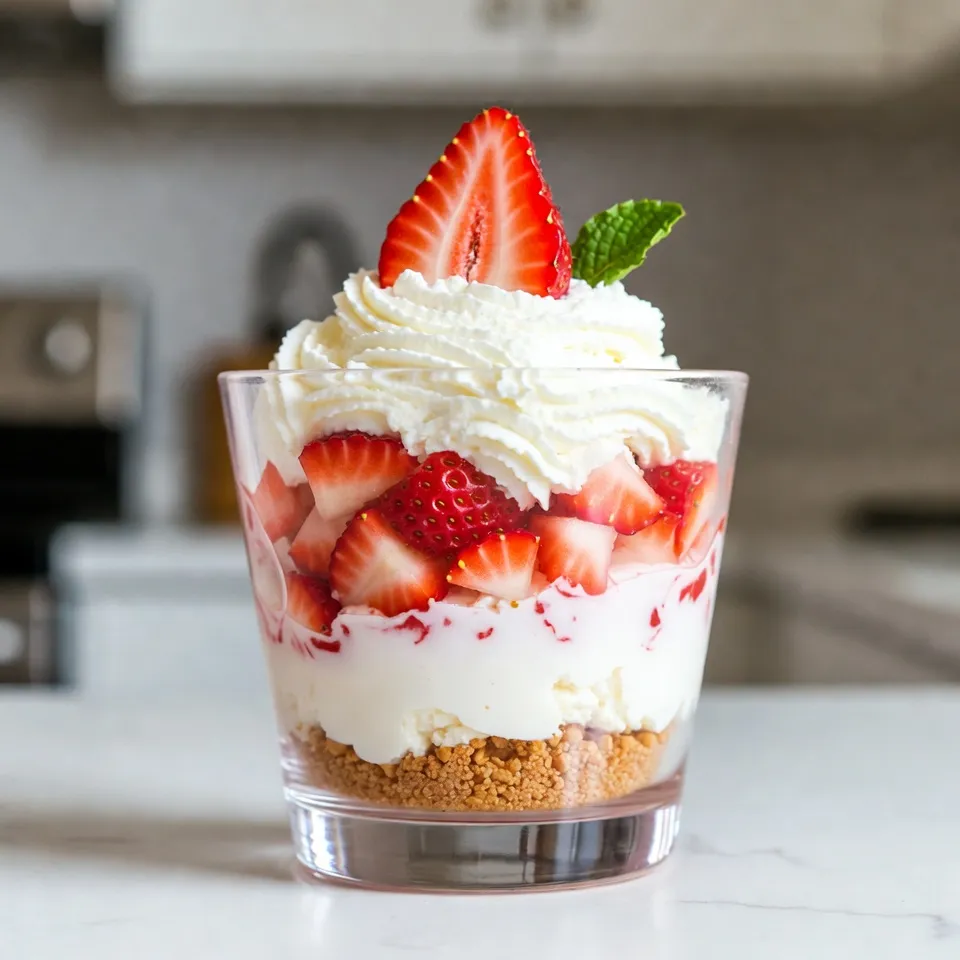
Assembling the Cups
– Layering Instructions
Start with a spoonful of the graham cracker mixture at the bottom of each cup. Press it down gently to form a base. Next, spread a layer of the cream cheese mixture over the crust. Then, add a layer of diced strawberries.
– Firmness of Layers
Repeat the layers: graham cracker crumbs, cream cheese mixture, and strawberries. Keep layering until you use all the ingredients. Make sure the final layer is the cream cheese mixture. This keeps the cups looking nice and neat.
Tips & Tricks
Perfecting the Texture
Avoiding Deflation of Whipped Cream
To keep your whipped cream fluffy, fold gently. Use a spatula to lift and turn the mixture. This method helps maintain air bubbles. If you mix too hard, the cream can deflate. Remember, a light touch is key!
Smoothing the Cream Cheese Layer
For a rich texture, ensure your cream cheese is soft. Let it sit at room temperature before mixing. This makes it easier to blend with sugar and vanilla. Beat the mixture until it is smooth and free of lumps.
Serving Suggestions
Garnishing with Mint
A fresh mint leaf adds color and taste. It makes your dessert look fancy. Place it on top of the last layer. This simple step elevates the dish.
Serving Style Options
Consider using clear glasses for a pretty view of the layers. You can also serve them on a decorative platter. Add extra strawberries around the cups for a colorful display.
Common Mistakes to Avoid
Over-mixing Ingredients
When combining whipped cream with the cream cheese mix, don’t over-mix. This can make your dessert heavy. Aim for a light and airy blend.
Incorrect Layering
Layering is crucial for looks and taste. Always start with graham cracker crumbs. Follow with cream cheese, then strawberries. Make sure the last layer is cream cheese. This keeps everything neat and tasty.
Pro Tips
- Use Room Temperature Ingredients: Allow the cream cheese to soften completely at room temperature for a smoother mixture. This will help prevent lumps when you mix it with the powdered sugar and vanilla.
- Perfect Whipping Cream: Ensure your mixing bowl and beaters are cold before whipping the cream. This will help the cream whip faster and achieve stiff peaks more easily.
- Layering Technique: When layering your cups, press down gently on each layer to create a stable structure. This will keep the cups from collapsing and make for a beautiful presentation.
- Fresh Strawberries: Use fresh, ripe strawberries for the best flavor. If strawberries are out of season, consider using other fruits like blueberries or raspberries for a different twist.
Variations
Flavor Options
You can change the flavors in your no-bake strawberry cheesecake cups. Adding other fresh fruits gives a fun twist. Try blueberries, raspberries, or even chopped peaches. Each fruit adds its own taste and looks great in the cups.
You can also use flavor extracts to switch things up. A bit of almond or lemon extract can make for a tasty surprise. Just add a few drops to the cream cheese mix. This can enhance the flavor without adding extra fruit.
Dietary Substitutions
If you have dietary needs, don’t worry. You can easily make gluten-free options. Use gluten-free graham cracker crumbs for the crust. Many brands now offer great-tasting substitutes that work well.
For dairy-free alternatives, swap cream cheese with a dairy-free version. Look for cashew or almond-based cream cheeses. Use coconut cream instead of heavy cream for a rich texture. You can still enjoy this dessert without dairy.
Serving Size Alternatives
You can adjust the serving sizes for your needs. If you want more servings, double the recipe. This is easy and keeps the same delicious taste. You can also halve the recipe for a smaller treat.
For a fun twist, make miniature versions. Use small cups or shot glasses for a bite-sized dessert. These are perfect for parties or gatherings. Everyone loves a cute dessert they can grab and enjoy!
Storage Info
Proper Storage Techniques
To keep your no-bake strawberry cheesecake cups fresh, store them in the fridge. Place them in a covered container. This limits air exposure and helps maintain flavor.
Use airtight containers. These containers prevent moisture from ruining your delicious treat. If you do not have a lid, wrap each cup with plastic wrap. Make sure it is tight around the edges.
Shelf Life
These cheesecake cups last about 3 to 5 days in the fridge. After that, they may not taste good.
Look for signs of spoilage. If the cups smell sour or have a watery texture, it’s time to toss them. Fresh strawberries on top may also turn mushy or change color. Always check before enjoying!
FAQs
How long can I store No-Bake Strawberry Cheesecake Cups?
You can store No-Bake Strawberry Cheesecake Cups in the fridge for up to three days. Make sure to cover them tightly. This keeps them fresh and tasty. After three days, the texture may change. Always check for freshness before enjoying!
Can I make this recipe ahead of time?
Yes, you can make this recipe ahead of time. I suggest preparing it the day before you plan to serve. This gives the flavors a chance to blend. Just make sure to store them in the fridge until you’re ready to enjoy.
What can I substitute for heavy cream?
If you need a substitute for heavy cream, try using coconut cream. This option works well and gives a nice flavor. You can also use half-and-half, but it may not whip as well as heavy cream.
Is it possible to use frozen strawberries instead of fresh?
Yes, you can use frozen strawberries! Just make sure to thaw them first. Drain any excess liquid to avoid a soggy texture. Frozen strawberries can still taste great and add sweetness to your cheesecake cups.
Can I make this recipe in advance?
Absolutely! You can prepare the cups and layer them ahead of time. Just keep them in the fridge. This makes it easy for parties or family gatherings. It’s a great way to save time and still impress your guests!
You learned how to make no-bake strawberry cheesecake cups. We covered essential ingredients, easy steps, and tips for perfect layers. You can customize flavors and scale the recipe for any gathering. Remember to store your treats properly to keep them fresh.
Enjoy making this delicious dessert and impress your friends and family! Keep experimenting and having fun in the kitchen. Simple variations can lead to delightful surprises. Happy bakin


