One-Pan Creamy Cajun Chicken Pasta Delight

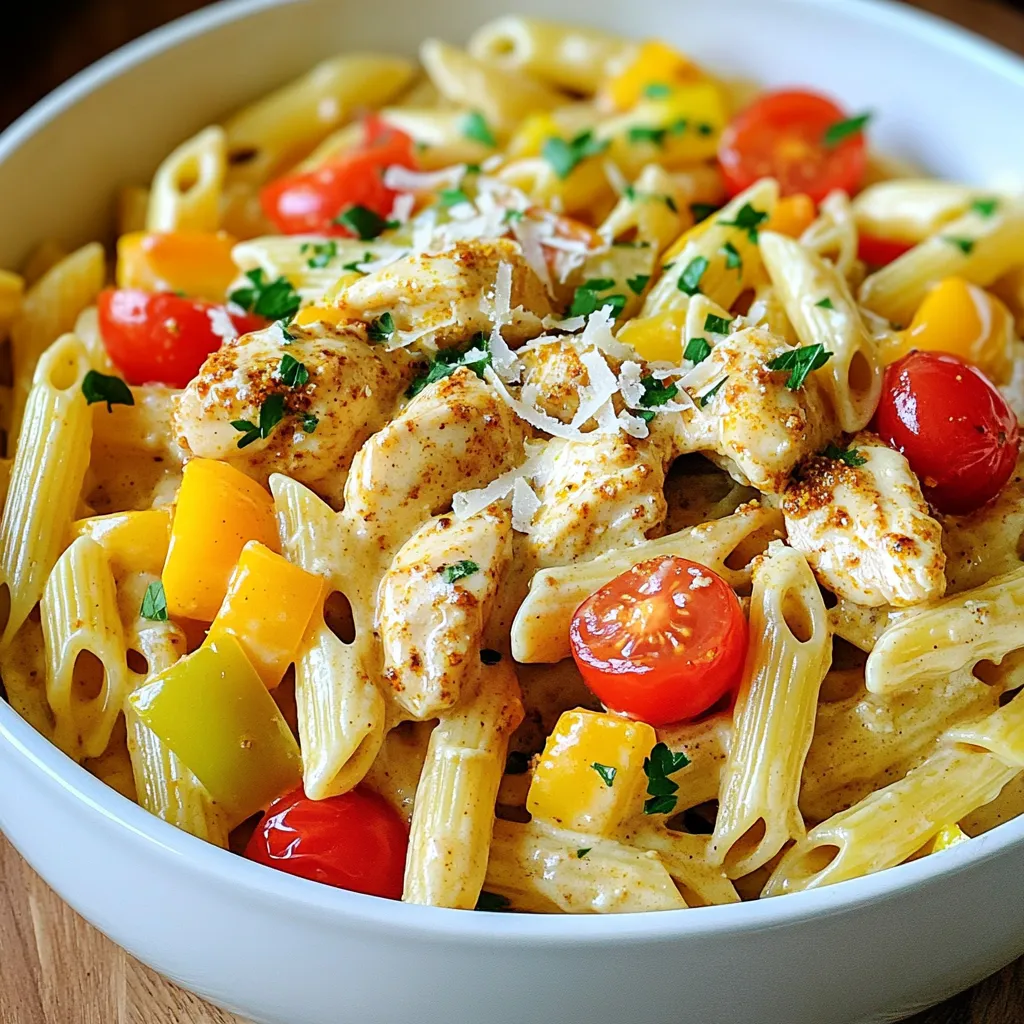
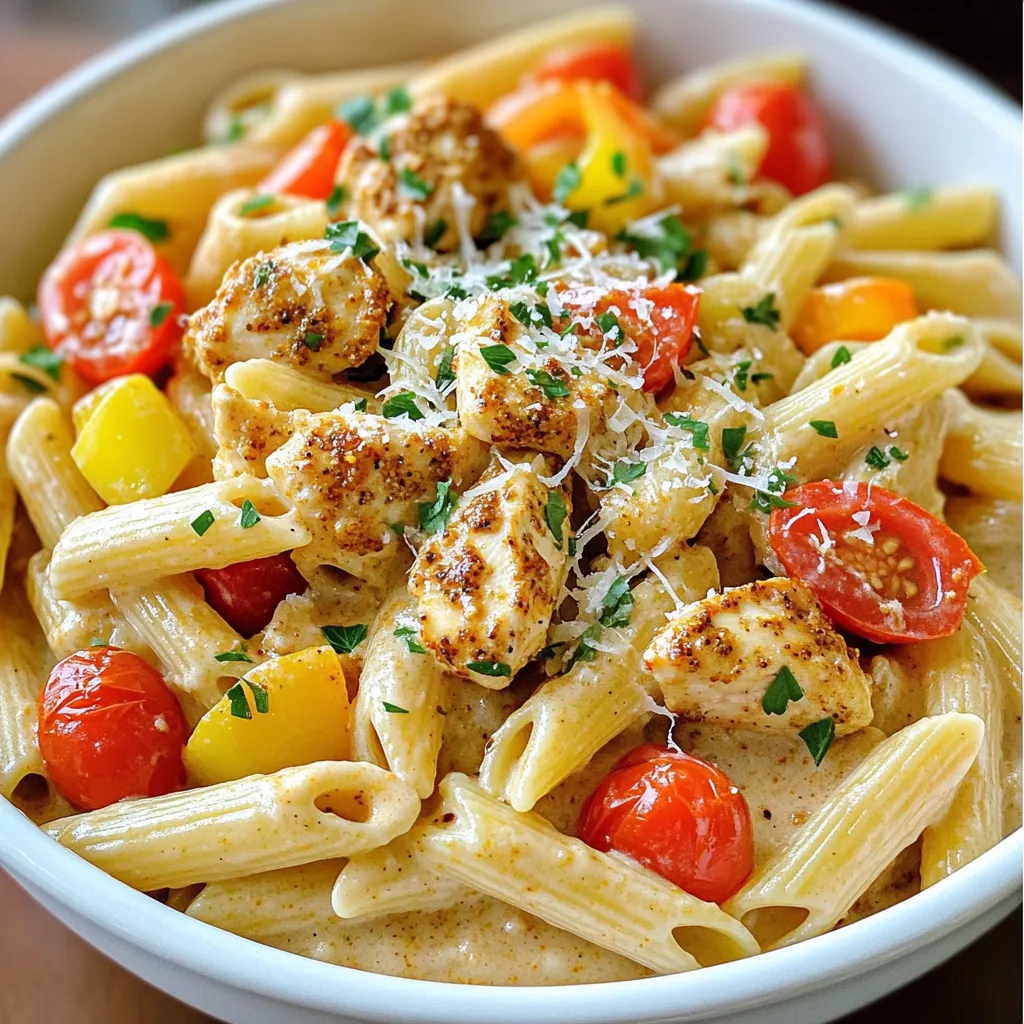
Get ready for a burst of flavor with my One-Pan Creamy Cajun Chicken Pasta Delight! This dish brings together juicy chicken, tender pasta, and fresh veggies in a creamy sauce that’s bursting with Cajun spices. Plus, it’s all made in one pan, making cleanup a breeze. Whether you’re a busy cook or just love good food, you’ll find this recipe quick and easy. Let’s dive into the delicious details!
Ingredients
Main Ingredients
– 2 boneless, skinless chicken breasts, diced into bite-sized pieces
– 8 ounces penne pasta
– 1 cup cherry tomatoes, halved
– 1 cup bell peppers, diced (mix of red, yellow, and green)
– 1 medium onion, chopped
– 3 cloves garlic, minced
Seasonings and Dairy
– 2 tablespoons Cajun seasoning (adjust to your spice preference)
– 1 tablespoon olive oil
– 1 cup heavy cream (or half-and-half for a lighter version)
– 1/2 cup finely grated Parmesan cheese (plus extra for serving)
– Salt and freshly cracked pepper, to taste
Optional Add-ins
– Use smoked paprika or chili powder in place of Cajun seasoning for a different taste.
– Swap penne for fusilli or farfalle for variety.
– Add spinach, zucchini, or shrimp for extra flavor and color.
When I create this dish, I love how the flavors blend. The chicken is tender and juicy, while the pasta soaks up all the creamy sauce. Each bite feels like a warm hug on a plate. You can easily adjust the spice level to suit your taste. If you prefer milder flavors, use less Cajun seasoning.
Feel free to get creative with the vegetables. They add color and nutrition to the dish. I often toss in spinach or zucchini for extra greens. Remember, cooking is all about making it your own! You can even add shrimp for a seafood twist. Enjoy your cooking adventure!
Step-by-Step Instructions
Preparing the Chicken
To start, we need to season the chicken well. In a medium bowl, add diced chicken and sprinkle Cajun seasoning over it. Toss the chicken pieces until they are fully coated in the spices. This step adds a lot of flavor.
Next, let’s cook the chicken. Heat olive oil in a large skillet over medium heat. When the oil shimmers, add the seasoned chicken. Cook for about 5-7 minutes. Stir occasionally to make sure the chicken browns evenly on all sides. Once cooked through, remove it from the skillet and set it aside. This keeps the chicken juicy.
Cooking the Veggies
Now, it’s time for the vegetables! In the same skillet, add chopped onions. Sauté them for about 2-3 minutes. You want the onions to turn translucent and soft. Then, add minced garlic and cook for another minute. Stir it slow to avoid burning the garlic.
After that, toss in the diced bell peppers and halved cherry tomatoes. Stir and cook for another 2 minutes until the veggies start to soften. Watch for bright colors; they mean the veggies are ready for the next step.
Combining Ingredients
Combining the ingredients is key to a creamy pasta. Start by adding the uncooked penne pasta to the skillet. Make sure it mixes well with the vegetables. Then, pour in the chicken broth and heavy cream. Stir gently to combine everything.
Increase the heat to bring the mix to a gentle boil. Once boiling, lower the heat and cover the skillet. Let it simmer for about 12-15 minutes. Stir occasionally. This helps the pasta cook and the sauce to thicken. You want the pasta to be al dente, so check it often.
When the pasta is ready, return the chicken to the skillet. Stir in the grated Parmesan cheese. This step makes the dish creamy and delicious. Taste the dish and add salt and pepper as needed.
Tips & Tricks
Cooking Tips for Perfect Pasta
To cook pasta just right, you want it al dente. This means the pasta is firm but cooked. Overcooked pasta can become mushy and lose its shape. To avoid this, check the pasta a minute before the time on the package.
When cooking pasta, cover the skillet while it simmers. This helps the heat stay in and cook the pasta evenly. If you uncover it, the heat escapes, and cooking can slow down.
Flavor Enhancement Suggestions
To boost flavor, think about adding more spices or herbs. Fresh basil or thyme can add a nice touch. You can also try adding a pinch of cayenne for an extra kick.
For creaminess, consider adding a bit more heavy cream or a splash of cream cheese. Stirring in a bit of sour cream can also make it richer.
Presentation Tips
For serving, choose deep, wide bowls. This lets you show off the colorful dish. It looks great when you sprinkle extra Parmesan cheese on top.
Adding fresh parsley makes the dish pop with color. You can also add a few cherry tomato halves on top for a fresh look.

Variations
Protein Alternatives
You can switch up the chicken for shrimp. Shrimp cooks fast and adds a nice flavor. Just sauté them for about 3-4 minutes until they turn pink. You can also make a vegetarian version. Use mushrooms or firm tofu instead of meat. This keeps the dish hearty and rich.
Spice Level Adjustments
Want more heat? Add more Cajun seasoning. You can also toss in some cayenne pepper. For less spice, use less Cajun seasoning. You could try mixing in herbs like oregano or thyme for different flavors. A dash of smoked paprika can add depth without too much heat.
Ingredient Swaps
To cut calories, use half-and-half instead of heavy cream. It gives a creamy texture without all the fat. For gluten-free options, swap the penne for gluten-free pasta. Just watch the cooking time, as it may differ. You can also use zucchini noodles for a fresh twist.
Storage Info
Refrigeration Guidelines
To store your One-Pan Creamy Cajun Chicken Pasta, place leftovers in an airtight container. Make sure the dish cools down before sealing it. This helps keep the pasta fresh. The pasta can last in the fridge for about three to four days.
Freezing Instructions
You can freeze this dish, but it is best to separate the chicken and pasta. To freeze, let the dish cool completely. Then, place portions in freezer-safe bags. Squeeze out the air before sealing. The chicken and pasta freeze well for about one to two months. When ready to eat, thaw in the fridge overnight.
Reheating Tips
To reheat, use the stovetop or microwave. For the stovetop, add a splash of chicken broth. This keeps the pasta from becoming dry or mushy. Heat it gently, stirring often. If using a microwave, cover the dish loosely. Add a bit of water to keep moisture. You may want to adjust the seasoning when reheating. Taste and add more Cajun seasoning or salt if needed.
FAQs
Can I make this dish ahead of time?
Yes, you can prep this dish in advance. To do this, cook the chicken and the veggies as instructed. Let them cool before storing. Place the cooked chicken and pasta in containers. Keep the creamy sauce separate. When ready to eat, combine them in a pan. Heat gently until warm. This way, the pasta stays fresh, and the sauce stays creamy.
What to serve with One-Pan Creamy Cajun Chicken Pasta?
This dish pairs well with simple sides. A fresh green salad is a great choice. You can add a light vinaigrette for some zing. Garlic bread also enhances the meal. The warm, buttery bread is perfect for scooping up sauce. Roasted vegetables can add color and flavor too. Try zucchini or asparagus for a tasty combo.
Is this dish suitable for meal prep or freezing?
Yes, this dish works well for meal prep. You can make a big batch and divide it into portions. Store them in airtight containers. For freezing, let the pasta cool completely before packing it away. It can stay in the freezer for up to three months. To reheat, thaw in the fridge overnight. Then, warm it on the stove with a splash of broth to bring back creaminess.
In this blog post, we explored a delicious one-pan creamy Cajun chicken pasta. We covered the main ingredients, seasonings, and optional add-ins for your dish. I shared step-by-step instructions for preparing the chicken and cooking the veggies. Tips for perfect pasta and flavor enhancement were also included. You can adjust spice levels and swap ingredients for variations. Follow proper storage and reheating tips to enjoy leftovers. Remember, cooking should be fun, so experiment and make this meal your own!


![- 8 corn tortillas - 1 cup black beans, drained and rinsed - 1 cup corn kernels (fresh or frozen) - 1 red bell pepper, diced - 1 small zucchini, diced - 1 cup fresh spinach, chopped - 1 teaspoon ground cumin - 1 teaspoon chili powder - 1/2 teaspoon garlic powder - 1 1/2 cups enchilada sauce - 1 cup shredded cheese - 1 tablespoon olive oil - Salt and pepper to taste - Fresh cilantro for garnish You can swap black beans for pinto or kidney beans. You might also try non-dairy cheese if you want a vegan option. If you need gluten-free, use gluten-free tortillas. These swaps keep the recipe flexible and fun! Each serving has about 300 calories. You get protein from beans and fiber from veggies. Black beans boost heart health, while spinach adds iron. Corn gives you energy, making these enchiladas not just tasty but also good for you. - Preheat the oven to 375°F (190°C). - In a large skillet, heat 1 tablespoon of olive oil over medium heat. - Add 1 diced red bell pepper and 1 small diced zucchini. - Sauté for about 5 minutes until they soften. Stir often to avoid sticking. - Next, stir in 1 cup of drained black beans, 1 cup of corn, and 1 cup of chopped spinach. - Cook for 3-4 minutes until the spinach wilts. - Season the mix with 1 teaspoon of ground cumin, 1 teaspoon of chili powder, and 1/2 teaspoon of garlic powder. - Add salt and pepper to taste. Mix well and cook for another 2 minutes. - Pour 1/2 cup of enchilada sauce into a baking dish. Spread it evenly across the bottom. - Warm 8 corn tortillas in the microwave for 20 seconds, or heat them in a skillet. - Take one tortilla and spoon a portion of the filling into the center. - Sprinkle some shredded cheese on top, then roll it up tightly. Place the rolled tortilla seam-side down in the baking dish. - Repeat this for all the tortillas until the filling is used up. - Pour the remaining enchilada sauce over the assembled enchiladas. - Sprinkle the remaining shredded cheese on top of the sauce. - Place the dish in the oven and bake for 20-25 minutes. Look for melted and bubbly cheese. - Allow the enchiladas to cool for a few minutes before serving. Enjoy with fresh cilantro if you like! For the full recipe, check the details above. - Add smokiness with chipotle peppers: Chipotle peppers add a rich, smoky taste. You can use them in the filling or mix them into the sauce. Just chop a few and add them to your veggies while cooking. This will elevate the flavor profile. - Use fresh herbs for garnish: Fresh herbs brighten up your dish. I love adding cilantro or parsley on top before serving. It adds color and freshness, making the enchiladas look even more appealing. - Importance of softening tortillas: Softening the tortillas is key. If they are too hard, they will crack when you roll them. Heat them in the microwave for 20 seconds or warm them on a skillet. This makes them easy to roll and fill without breaking. - Tips for perfectly melted cheese: To get that perfect melt, use a cheese blend with good melting properties. Cheddar and Monterey Jack work great. Add a little extra cheese on top when baking for a delicious, bubbly finish. - Pair with side dishes: Serve your enchiladas with rice or beans on the side. These help balance the meal and add more protein. You can also serve them with a simple salad for extra crunch. - Ideas for toppings: Top your enchiladas with sour cream or guacamole. These creamy toppings add richness and flavor. You can also sprinkle some diced onions or jalapeños for extra spice. These tips will help you make your vegetarian enchiladas even more delicious. For the full recipe, check out the [Full Recipe]. {{image_4}} You can make your enchiladas even better by changing the filling. - Adding roasted vegetables: Roasting veggies like carrots, eggplant, or butternut squash adds depth. The sweet, caramelized flavor makes the filling more exciting. - Using different kinds of cheese: Try mixing cheeses like queso fresco or pepper jack. Each cheese brings its unique taste. This change can keep your enchiladas fresh and fun. The sauce can change the whole dish. - Homemade enchilada sauce recipe: Making your own sauce is simple and rewarding. Blend tomatoes, chili powder, and spices for a rich flavor. This way, you control the heat and taste. - Alternatives like verde sauce: If you like a fresh twist, try verde sauce made with tomatillos. It adds a nice tangy kick that contrasts well with the cheese and veggies. You can adjust the recipe to fit various diets. - Vegan version of enchiladas: Swap cheese for a nut-based cheese or leave it out. Use more beans and veggies to fill the tortillas. You still get a hearty meal without animal products. - Low-carb or keto adaptations: Use lettuce wraps instead of tortillas. This swap keeps the taste while reducing carbs. You can still enjoy the flavors of enchiladas without the extra carbs. For a complete guide on making these delicious meals, check out the Full Recipe. To store leftovers, first, let the enchiladas cool down. Place them in an airtight container. This keeps them fresh and tasty. Glass or plastic containers work well. I prefer glass for easy reheating. If you want to freeze enchiladas, wrap them tightly in plastic wrap. Then, place them in a freezer-safe bag or container. Label the bag with the date. To reheat frozen enchiladas, remove them from the freezer. Let them thaw in the fridge overnight. Bake in a preheated oven at 350°F (175°C) until hot. In the fridge, these enchiladas last about 3 to 5 days. Always check for signs of spoilage. Look for off smells, mold, or changes in color. If you see any of these, it’s best to throw them out. Enjoy your tasty vegetarian enchiladas with confidence! For the full recipe, check the earlier sections. To prevent soggy enchiladas, apply the sauce wisely. Use a thin layer on the bottom of your dish. Do not drown the rolled enchiladas in sauce. Pour the rest of the sauce on top after filling them. Bake them just right. Overcooking can cause sogginess. Bake at 375°F for 20-25 minutes. This keeps them firm and tasty. Yes, you can use flour tortillas. They are softer and easier to roll. However, corn tortillas add a nice flavor. They are also gluten-free. Flour tortillas can get too soft and break. Each type has its charm. Choose based on your taste and needs. Many sides pair well with vegetarian enchiladas. Try Mexican rice for a classic touch. Beans add protein and fiber. A fresh salad can balance the meal. Guacamole or sour cream makes a great dip. You can also serve with a refreshing drink. Consider agua fresca or a light beer. These sides enhance the flavor of your enchiladas. Enjoy exploring different pairings! This blog post covered all you need for delicious vegetarian enchiladas. We discussed key ingredients, from black beans to fresh spinach. I shared tips on prepping and cooking, plus variations for your taste. You learned how to store leftovers and reheat them. These enchiladas are tasty, healthy, and easy to make. Enjoy trying different flavors and ingredients. Whether for a quick dinner or a party, these enchiladas will impress everyone. Now, get in the kitchen and start cooking!](https://joymealplan.com/wp-content/uploads/2025/06/0bc30ee8-fb20-468c-811c-2f42a5691433-768x768.webp)
. To get the best flavor in your ratatouille with quinoa, start with fresh veggies. Fresh vegetables bring out the natural taste. Use ripe tomatoes for a juicy base. Add herbs like thyme and basil early in the cook. This helps release their oils and flavors. Sautéing the onions and garlic first adds depth to your dish. A common mistake is overcooking the vegetables. You want them soft but not mushy. Another mistake is not seasoning enough. Taste as you cook and adjust. Don't skip the olive oil; it adds richness. Lastly, avoid using pre-cooked quinoa. Cooking it fresh makes a big difference in texture. Serve your quinoa ratatouille warm in shallow bowls. Drizzle with extra virgin olive oil for a touch of luxury. Fresh basil leaves make a great garnish. They add color and flavor. You can also sprinkle some crushed red pepper for heat. Pair it with crusty bread or a simple salad for a full meal. For more details, check the Full Recipe. {{image_4}} Ratatouille with quinoa is naturally vegan and gluten-free. You can enjoy this dish without any animal products. Quinoa itself is a great choice. It is a whole grain that is safe for those avoiding gluten. You can feel good about serving this meal to friends and family with dietary needs. If you want to boost the protein in your dish, consider adding beans or tofu. Black beans or chickpeas mix well with ratatouille. They add texture and protein. Tofu is another option. Just cube it and sauté it with the veggies. It soaks up all the flavors of the dish. Ratatouille is flexible when it comes to vegetables. You can switch out the veggies based on what you have. Try adding carrots, mushrooms, or even spinach. Each vegetable brings its own taste and texture. You can make the dish more colorful and exciting. Experiment with what you love. Each combination can lead to a new favorite dish! To store leftovers, let the quinoa ratatouille cool down. Place it in an airtight container. This keeps the dish fresh and tasty. You can keep it in the fridge for up to three days. Make sure to label the container with the date. When you are ready to eat, you can reheat the dish. You can use the microwave or a stovetop. To microwave, place it in a bowl and cover it. Heat on high for about 2-3 minutes. Stir halfway through to heat evenly. If you prefer the stovetop, warm it in a skillet over medium heat. Stir and cook for about 5 minutes until hot. If you want to freeze the dish, use a freezer-safe container. Portion out servings to make it easy to reheat later. Freeze for up to three months. To thaw, move it to the fridge overnight. Reheat as mentioned above before serving. Enjoy your tasty meal even when you are busy! Yes, you can make Ratatouille with Quinoa ahead of time. I often prepare it a day before. This allows the flavors to mix well. Just store it in an airtight container in the fridge. When you are ready to eat, just reheat it on the stove or in the microwave. Ratatouille with Quinoa is a complete meal. You can serve it with crusty bread for dipping. A simple green salad also pairs well. If you want to add protein, try grilled chicken or fish. This makes a balanced meal that everyone will enjoy. Adjusting the spice level is easy. If you like it mild, stick to the recipe. For more heat, add red pepper flakes. You can also use spicy bell peppers or a dash of hot sauce. Always taste as you go to find the right balance for you. This blog post covered the key steps to make Ratatouille with Quinoa. We reviewed the ingredients and their benefits, plus substitutions for dietary needs. The step-by-step instructions simplify preparation and cooking. Tips and tricks help you avoid common mistakes and enhance flavor. We also explored variations to suit different diets and preferences. Ratatouille with Quinoa is versatile and easy to store. You can enjoy it fresh or as leftovers. Embrace your creativity with this dish, and feel confident in your cooking skills. Enjoy making this healthy meal!](https://joymealplan.com/wp-content/uploads/2025/06/988dfaac-430c-4a57-a4f4-203d0c398d72-768x768.webp)


. First, fill a large pot with water. Add a good amount of salt. Bring the water to a rolling boil. Once it boils, add the spaghetti. Cook it until it’s al dente, which usually takes about 8 to 10 minutes. Don't forget to check the package for exact times. After cooking, drain the pasta. Make sure to save about half a cup of the starchy water for later. Set the pasta aside. While the pasta cooks, it’s time to make the sauce. Grab a food processor. Add the ripe avocado flesh, minced garlic, lemon juice, basil, and olive oil. Blend everything together until it’s smooth and creamy. If your sauce looks too thick, don’t worry. Just add a bit of the reserved pasta water. Blend again until you reach your desired consistency. Now that the pasta is ready, return it to the pot. Keep the heat low. Pour the creamy avocado sauce over the warm pasta. Gently toss everything together. Make sure every strand of spaghetti gets coated in the sauce. To make your creamy avocado pasta shine, use ripe avocados. Ripe avocados blend smoothly and offer a rich texture. They should feel soft but not mushy. Next, gradually add pasta water when blending your sauce. This step helps to reach your desired creaminess. Start with a little, then add more as needed. Salt and pepper play a key role in flavor. Always taste before serving. If it feels bland, add more salt or pepper. You can also adjust with Parmesan cheese. This cheese adds a savory note and enhances the dish's richness. If you prefer a vegetarian option, skip the cheese and rely on the avocados for flavor. First impressions matter, especially in food. Garnish with cherry tomatoes for a pop of color. Their sweetness pairs well with the creamy sauce. Next, sprinkle some red pepper flakes for heat. This touch not only looks good but adds a nice kick. Remember, we eat with our eyes first, so make it beautiful! {{image_4}} If you want a gluten-free dish, you can swap regular pasta for gluten-free options. Look for pasta made from brown rice, quinoa, or lentils. These types work well and keep the same great taste. Cook them according to the package directions. This way, everyone can enjoy this creamy avocado pasta. To make this dish vegan, skip the Parmesan cheese. Instead, you can add nutritional yeast. It gives a cheesy flavor without the dairy. Just mix in about 1/4 cup of nutritional yeast into the avocado sauce. This keeps your dish creamy and rich while staying plant-based. You can boost protein by adding grilled chicken or shrimp. Cook the proteins separately until done. Then, slice the chicken or toss the shrimp in with the pasta. The added protein makes this dish heartier and more filling. It’s a great way to turn a light meal into a satisfying feast. For the full recipe, check out the Creamy Avocado Pasta Delight. After making creamy avocado pasta, you may want to save some for later. Store any leftovers in airtight containers. This keeps the pasta fresh and avoids any unwanted odors. Place it in the fridge within two hours of cooking. Enjoy the leftovers within three days for the best taste. If you want to freeze the sauce, that's an option too. To do this, pour the creamy avocado sauce into freezer-safe bags or containers. Make sure to remove as much air as possible to prevent freezer burn. The sauce will stay fresh for about three months. When you’re ready to use it, thaw it in the fridge overnight. When it's time to enjoy your leftovers, reheating is key. The best way to reheat creamy avocado pasta is on the stove. Place the pasta in a pan over low heat. Add a splash of water or olive oil to help loosen the sauce. Stir gently until warm. Avoid the microwave if you can, as it can make the sauce grainy. Enjoy your meal! For the full recipe of creamy avocado pasta, check the earlier section. Yes, you can use frozen avocado. Frozen avocado is convenient and often cheaper. It may not have the same taste as fresh, but it still works well. Just thaw the avocado before blending. This way, you get a creamy sauce without waiting for ripe avocados. If you want a dairy-free option, try nutritional yeast. It adds a cheesy flavor without dairy. You can also use a vegan cheese blend. These substitutes keep the dish tasty while catering to different diets. Feel free to experiment with flavors until you find what you love. Creamy avocado pasta stays fresh for about 2 days in the fridge. Store it in an airtight container. To prevent browning, cover the pasta tightly. If you notice any changes in color or smell, it’s best to toss it. Enjoy your leftovers quickly for the best taste! This recipe combines ripe avocados, pasta, and garlic for a creamy dish. You can adjust ingredients to fit your taste. Adding cheese or protein can enhance flavors. Don't forget to store leftovers properly to enjoy later. Cooking can be fun and simple. Now it's your turn to make this delicious pasta! Enjoy every bite.](https://joymealplan.com/wp-content/uploads/2025/06/e38e2670-4076-4ca9-b5ff-23e6aadb6cf7-768x768.webp)