One Pan Maple Dijon Chicken Flavorful and Easy Meal

Looking for a simple yet flavorful meal? Try my One Pan Maple Dijon Chicken! This dish combines juicy chicken thighs, tangy Dijon mustard, and sweet maple syrup for a mouthwatering feast. With just one pan, you can make a delicious dinner that’s packed with veggies and rich flavors. Ready to impress your family? Let’s dive into the ingredients and get cooking!
Why I Love This Recipe
- Easy One-Pan Meal: This recipe simplifies cooking and cleanup by using just one pan, making it perfect for busy weeknights.
- Delicious Flavor Combination: The mix of maple syrup and Dijon mustard creates a sweet and tangy glaze that elevates the chicken.
- Healthy Ingredients: Packed with vegetables like bell peppers and spinach, this dish is nutritious and colorful.
- Customizable: Feel free to swap in your favorite veggies or adjust the seasonings to suit your taste.
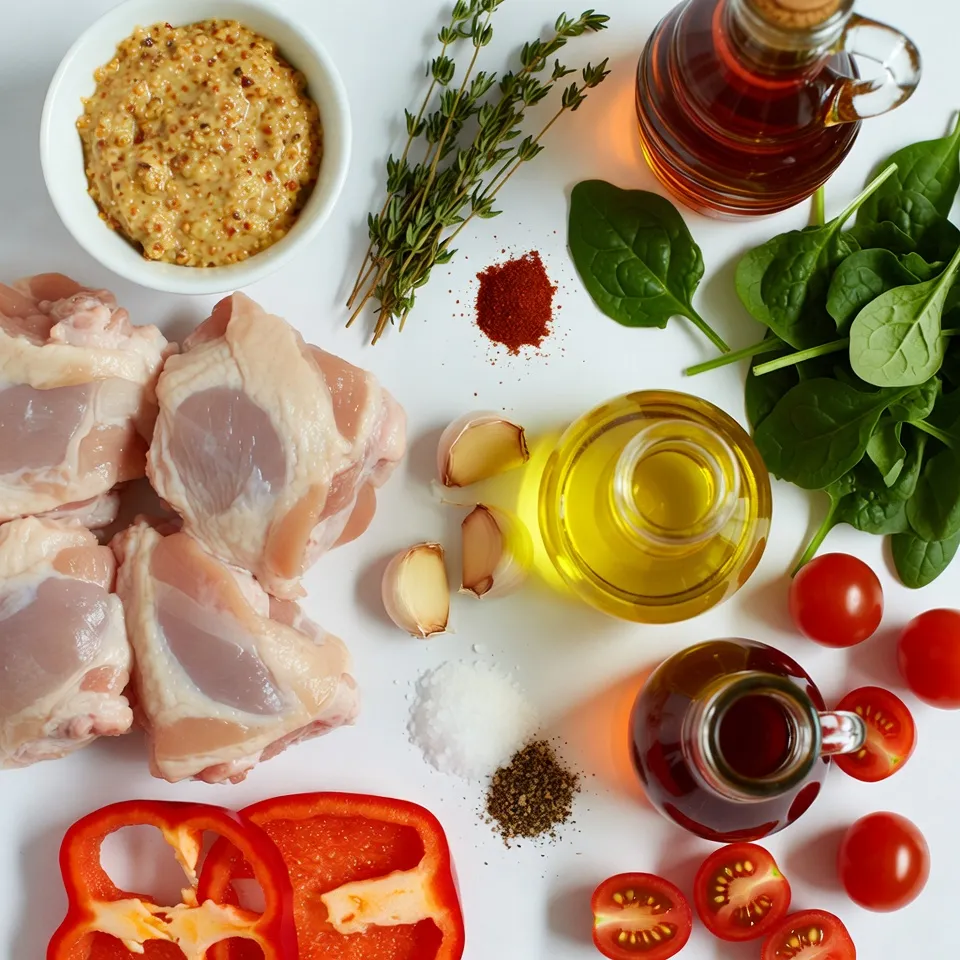
Ingredients
Main Ingredients
– 4 boneless, skinless chicken thighs
– 1/4 cup Dijon mustard
– 1/4 cup pure maple syrup
Additional Ingredients
– 2 tablespoons olive oil, plus extra for searing
– 3 cloves garlic, minced
– 1 tablespoon apple cider vinegar
– 1 teaspoon dried thyme
– 1 teaspoon smoked paprika
– Salt and pepper to taste
Vegetables
– 1 cup baby spinach
– 1 red bell pepper, sliced
– 1 cup cherry tomatoes, halved
The main ingredients in this dish are simple yet flavorful. The chicken thighs provide a juicy base, while Dijon mustard and pure maple syrup create a sweet and tangy glaze.
For the additional ingredients, olive oil adds richness. Garlic gives a nice punch, and apple cider vinegar balances the flavors. Dried thyme and smoked paprika add depth. Salt and pepper round out the taste.
The vegetables in this recipe bring color and nutrition. Baby spinach wilts beautifully, red bell pepper adds crunch, and cherry tomatoes burst with sweetness. This mix not only looks great, but it also tastes amazing together.

Step-by-Step Instructions
Prepare the Marinade
In a medium mixing bowl, combine the following ingredients:
– 1/4 cup Dijon mustard
– 1/4 cup pure maple syrup
– 2 tablespoons olive oil
– 3 cloves garlic, minced
– 1 tablespoon apple cider vinegar
– 1 teaspoon dried thyme
– 1 teaspoon smoked paprika
– Salt and pepper to taste
Whisk them together until smooth. This marinade gives the chicken a sweet and tangy flavor.
Marinate the Chicken
To marinate the chicken, place the chicken thighs in a large zip-lock bag or shallow dish. Pour the marinade over the chicken. Make sure every piece is covered. Seal the bag or cover the dish and refrigerate. I recommend marinating for at least 30 minutes. For the best taste, marinate for up to 4 hours.
Cook the Chicken
Before you cook, preheat your oven to 400°F (200°C). This makes sure it’s hot enough. In a large oven-safe skillet, heat a drizzle of olive oil over medium-high heat. Once the oil shimmers, add the marinated chicken thighs. Sear them for about 3-4 minutes on each side. You want a nice golden-brown crust.
Bake in the Oven
Next, lower the heat to medium. Add sliced red bell pepper, halved cherry tomatoes, and baby spinach around the chicken. Drizzle the reserved marinade over everything. Now carefully transfer the skillet to your preheated oven. Bake for 20-25 minutes. The chicken should reach an internal temperature of 165°F (74°C).
Serve the Dish
Once done baking, remove the skillet from the oven. Let it rest for a few minutes. This helps keep the chicken juicy. For presentation, serve the dish straight from the skillet for a rustic look. You can also plate the chicken and veggies on a large platter. Drizzle any remaining sauce over the top, and garnish with fresh thyme or chopped parsley.
Tips & Tricks
Perfecting the Marinade
To make the best marinade, focus on key flavors. Dijon mustard gives a nice tang. Pure maple syrup adds sweetness. You can swap Dijon for yellow mustard if needed. For a sweeter taste, honey works well too. Just remember to keep the balance of sweet and tangy.
Cooking Techniques
For juicy chicken, sear it well. Heat your skillet to medium-high before adding the chicken. This helps create a golden-brown crust. Cook each side for about 3-4 minutes. Once you add the veggies, lower the heat. This ensures everything cooks evenly without burning.
Serving Suggestions
Pair your chicken with simple sides. Rice or quinoa goes well with this dish. Steamed veggies can add color and nutrition. For garnishing, fresh thyme or chopped parsley makes it pop. Serve it right from the skillet for a cozy feel, or plate it for a more formal look.
Pro Tips
- Marinade Time: For maximum flavor, allow the chicken to marinate for up to 4 hours. This enhances the taste and tenderness of the meat.
- Cooking Temperature: Ensure your oven is preheated to 400°F (200°C) before baking the chicken to achieve a perfectly cooked and golden exterior.
- Vegetable Variations: Feel free to substitute the vegetables with seasonal options like zucchini or asparagus for a fresh twist on this dish.
- Resting Period: Let the chicken rest for a few minutes after baking. This allows the juices to redistribute, ensuring a moist and flavorful bite.

Variations
Protein Alternatives
You can switch out chicken for other proteins. Try using boneless pork chops or turkey thighs. Each option brings a unique taste. Here are some cooking times to consider:
– Pork chops: Cook for 25-30 minutes at 400°F.
– Turkey thighs: Bake for 30-35 minutes at 400°F.
Vegetarian Option
Want a meat-free meal? You can make a vegetarian version. Start by using firm tofu or tempeh. These options absorb the marinade well. You will need:
– 14 ounces of firm tofu, pressed and cubed.
– 1/4 cup Dijon mustard.
– 1/4 cup pure maple syrup.
– 2 tablespoons olive oil.
– 3 cloves garlic, minced.
– 1 tablespoon apple cider vinegar.
– 1 teaspoon dried thyme.
– 1 teaspoon smoked paprika.
– Salt and pepper to taste.
– 1 cup baby spinach.
– 1 red bell pepper, sliced.
– 1 cup cherry tomatoes, halved.
Cook tofu or tempeh for 20-25 minutes in the oven.
Flavor Variations
You can tweak the marinade for new flavors. Add fresh herbs like rosemary or basil. If you enjoy spice, try adding cayenne pepper or chili flakes. You can also mix in different vegetables. Try adding zucchini or asparagus for a fresh twist. These small changes bring new tastes to your meal.
Storage Info
Leftovers
To store leftovers, let the dish cool down first. Place the chicken and veggies in an airtight container. This keeps them fresh. You can store them in the fridge for up to four days. For reheating, simply use the microwave or an oven. Heat until the chicken is warm, around 1-2 minutes in the microwave or 10-15 minutes in the oven at 350°F (175°C).
Freezing the Dish
To freeze the dish, allow it to cool completely. Use a freezer-safe container or bag. Squeeze out as much air as possible to prevent freezer burn. The dish can be frozen for up to three months. When you’re ready to eat, thaw it overnight in the fridge. To reheat, bake it in the oven at 350°F (175°C) for about 25-30 minutes until hot.
Shelf Life
The recommended storage duration for One Pan Maple Dijon Chicken in the fridge is four days. Signs of spoilage include an off smell or change in color. If you see these signs, it’s best to discard the dish. Always trust your senses when it comes to food safety.
FAQs
Can I use chicken breasts instead of thighs?
Yes, you can use chicken breasts. They cook faster than thighs. Chicken breasts can dry out more easily due to less fat. When using breasts, check them at 20 minutes. You want an internal temperature of 165°F (74°C) for safety.
How do I know when the chicken is done?
To check if the chicken is done, use a meat thermometer. Insert it into the thickest part of the chicken. The temperature should read 165°F (74°C). If you don’t have a thermometer, cut into the chicken. The juices should run clear, not pink.
Can I marinate the chicken overnight?
Marinating overnight is great! It allows the flavors to soak in deeply. Just make sure to cover the chicken well. This prevents it from drying out. If you marinate longer than 24 hours, the chicken may become mushy.
What to do if I don’t have maple syrup?
If you don’t have maple syrup, use honey or agave nectar. Both will add sweetness but change the flavor slightly. Honey is richer, while agave is milder. You can also use brown sugar mixed with water for a similar effect.
This recipe takes simple ingredients and turns them into a delicious meal. You learn how to marinate chicken thighs, cook them, and serve them with fresh veggies. Tips for perfecting the dish make it even better. You can also try variations for different proteins or a vegetarian option.
In the end, this meal is versatile and easy. With the right techniques, you can impress anyone at the table. Enjoy making this dish your ow

One Pan Maple Dijon Chicken
Ingredients
- 4 thighs boneless, skinless chicken
- 0.25 cup Dijon mustard
- 0.25 cup pure maple syrup
- 2 tablespoons olive oil
- 3 cloves garlic, minced
- 1 tablespoon apple cider vinegar
- 1 teaspoon dried thyme
- 1 teaspoon smoked paprika
- to taste salt and pepper
- 1 cup baby spinach
- 1 red bell pepper sliced
- 1 cup cherry tomatoes, halved
Instructions
- Prepare the Marinade: In a medium mixing bowl, combine the Dijon mustard, pure maple syrup, 2 tablespoons of olive oil, minced garlic, apple cider vinegar, dried thyme, smoked paprika, salt, and pepper. Whisk thoroughly until the mixture is well combined and smooth.
- Marinate the Chicken: Place the chicken thighs into a large zip-lock bag or a shallow dish. Pour the marinade over the chicken, ensuring each piece is generously coated. Seal the bag or cover the dish and refrigerate for at least 30 minutes to allow the flavors to meld. For best results, marinate for up to 4 hours.
- Preheat the Oven: Shortly before you're ready to cook, preheat your oven to 400°F (200°C) so it's ready for baking.
- Sear the Chicken: In a large oven-safe skillet, heat a drizzle of olive oil over medium-high heat. Once the oil is shimmering, add the marinated chicken thighs (set the remaining marinade aside) to the skillet. Sear the chicken for about 3-4 minutes on each side, or until a beautiful golden-brown crust forms.
- Add Vegetables: Lower the heat to medium, and introduce the sliced red bell pepper, halved cherry tomatoes, and baby spinach to the skillet. Mix the vegetables gently around the chicken, creating a vibrant bed for the meal.
- Bake: Drizzle the reserved marinade evenly over the chicken and the vegetables in the skillet. Carefully transfer the skillet to your preheated oven and bake for 20-25 minutes, or until the chicken is fully cooked and reaches an internal temperature of 165°F (74°C).
- Serve: Once baked, remove the skillet from the oven and let it rest for a few minutes. This will help the juices redistribute within the chicken.


![- 8 corn tortillas - 1 cup black beans, drained and rinsed - 1 cup corn kernels (fresh or frozen) - 1 red bell pepper, diced - 1 small zucchini, diced - 1 cup fresh spinach, chopped - 1 teaspoon ground cumin - 1 teaspoon chili powder - 1/2 teaspoon garlic powder - 1 1/2 cups enchilada sauce - 1 cup shredded cheese - 1 tablespoon olive oil - Salt and pepper to taste - Fresh cilantro for garnish You can swap black beans for pinto or kidney beans. You might also try non-dairy cheese if you want a vegan option. If you need gluten-free, use gluten-free tortillas. These swaps keep the recipe flexible and fun! Each serving has about 300 calories. You get protein from beans and fiber from veggies. Black beans boost heart health, while spinach adds iron. Corn gives you energy, making these enchiladas not just tasty but also good for you. - Preheat the oven to 375°F (190°C). - In a large skillet, heat 1 tablespoon of olive oil over medium heat. - Add 1 diced red bell pepper and 1 small diced zucchini. - Sauté for about 5 minutes until they soften. Stir often to avoid sticking. - Next, stir in 1 cup of drained black beans, 1 cup of corn, and 1 cup of chopped spinach. - Cook for 3-4 minutes until the spinach wilts. - Season the mix with 1 teaspoon of ground cumin, 1 teaspoon of chili powder, and 1/2 teaspoon of garlic powder. - Add salt and pepper to taste. Mix well and cook for another 2 minutes. - Pour 1/2 cup of enchilada sauce into a baking dish. Spread it evenly across the bottom. - Warm 8 corn tortillas in the microwave for 20 seconds, or heat them in a skillet. - Take one tortilla and spoon a portion of the filling into the center. - Sprinkle some shredded cheese on top, then roll it up tightly. Place the rolled tortilla seam-side down in the baking dish. - Repeat this for all the tortillas until the filling is used up. - Pour the remaining enchilada sauce over the assembled enchiladas. - Sprinkle the remaining shredded cheese on top of the sauce. - Place the dish in the oven and bake for 20-25 minutes. Look for melted and bubbly cheese. - Allow the enchiladas to cool for a few minutes before serving. Enjoy with fresh cilantro if you like! For the full recipe, check the details above. - Add smokiness with chipotle peppers: Chipotle peppers add a rich, smoky taste. You can use them in the filling or mix them into the sauce. Just chop a few and add them to your veggies while cooking. This will elevate the flavor profile. - Use fresh herbs for garnish: Fresh herbs brighten up your dish. I love adding cilantro or parsley on top before serving. It adds color and freshness, making the enchiladas look even more appealing. - Importance of softening tortillas: Softening the tortillas is key. If they are too hard, they will crack when you roll them. Heat them in the microwave for 20 seconds or warm them on a skillet. This makes them easy to roll and fill without breaking. - Tips for perfectly melted cheese: To get that perfect melt, use a cheese blend with good melting properties. Cheddar and Monterey Jack work great. Add a little extra cheese on top when baking for a delicious, bubbly finish. - Pair with side dishes: Serve your enchiladas with rice or beans on the side. These help balance the meal and add more protein. You can also serve them with a simple salad for extra crunch. - Ideas for toppings: Top your enchiladas with sour cream or guacamole. These creamy toppings add richness and flavor. You can also sprinkle some diced onions or jalapeños for extra spice. These tips will help you make your vegetarian enchiladas even more delicious. For the full recipe, check out the [Full Recipe]. {{image_4}} You can make your enchiladas even better by changing the filling. - Adding roasted vegetables: Roasting veggies like carrots, eggplant, or butternut squash adds depth. The sweet, caramelized flavor makes the filling more exciting. - Using different kinds of cheese: Try mixing cheeses like queso fresco or pepper jack. Each cheese brings its unique taste. This change can keep your enchiladas fresh and fun. The sauce can change the whole dish. - Homemade enchilada sauce recipe: Making your own sauce is simple and rewarding. Blend tomatoes, chili powder, and spices for a rich flavor. This way, you control the heat and taste. - Alternatives like verde sauce: If you like a fresh twist, try verde sauce made with tomatillos. It adds a nice tangy kick that contrasts well with the cheese and veggies. You can adjust the recipe to fit various diets. - Vegan version of enchiladas: Swap cheese for a nut-based cheese or leave it out. Use more beans and veggies to fill the tortillas. You still get a hearty meal without animal products. - Low-carb or keto adaptations: Use lettuce wraps instead of tortillas. This swap keeps the taste while reducing carbs. You can still enjoy the flavors of enchiladas without the extra carbs. For a complete guide on making these delicious meals, check out the Full Recipe. To store leftovers, first, let the enchiladas cool down. Place them in an airtight container. This keeps them fresh and tasty. Glass or plastic containers work well. I prefer glass for easy reheating. If you want to freeze enchiladas, wrap them tightly in plastic wrap. Then, place them in a freezer-safe bag or container. Label the bag with the date. To reheat frozen enchiladas, remove them from the freezer. Let them thaw in the fridge overnight. Bake in a preheated oven at 350°F (175°C) until hot. In the fridge, these enchiladas last about 3 to 5 days. Always check for signs of spoilage. Look for off smells, mold, or changes in color. If you see any of these, it’s best to throw them out. Enjoy your tasty vegetarian enchiladas with confidence! For the full recipe, check the earlier sections. To prevent soggy enchiladas, apply the sauce wisely. Use a thin layer on the bottom of your dish. Do not drown the rolled enchiladas in sauce. Pour the rest of the sauce on top after filling them. Bake them just right. Overcooking can cause sogginess. Bake at 375°F for 20-25 minutes. This keeps them firm and tasty. Yes, you can use flour tortillas. They are softer and easier to roll. However, corn tortillas add a nice flavor. They are also gluten-free. Flour tortillas can get too soft and break. Each type has its charm. Choose based on your taste and needs. Many sides pair well with vegetarian enchiladas. Try Mexican rice for a classic touch. Beans add protein and fiber. A fresh salad can balance the meal. Guacamole or sour cream makes a great dip. You can also serve with a refreshing drink. Consider agua fresca or a light beer. These sides enhance the flavor of your enchiladas. Enjoy exploring different pairings! This blog post covered all you need for delicious vegetarian enchiladas. We discussed key ingredients, from black beans to fresh spinach. I shared tips on prepping and cooking, plus variations for your taste. You learned how to store leftovers and reheat them. These enchiladas are tasty, healthy, and easy to make. Enjoy trying different flavors and ingredients. Whether for a quick dinner or a party, these enchiladas will impress everyone. Now, get in the kitchen and start cooking!](https://joymealplan.com/wp-content/uploads/2025/06/0bc30ee8-fb20-468c-811c-2f42a5691433-768x768.webp)


![- 1 pound large shrimp, peeled and deveined - 2 cups broccoli florets - 1 cup cherry tomatoes, halved - 1 medium yellow bell pepper, sliced into strips - 3 tablespoons extra virgin olive oil - 4 cloves garlic, finely minced - Zest and juice of 1 large lemon - 1 teaspoon dried oregano - 1 teaspoon dried thyme - Salt and freshly cracked black pepper to taste - Fresh parsley for garnish The main ingredients in this recipe create a bright, fresh dish. The shrimp are the star. Their sweet flavor pairs well with the crunchy broccoli and juicy tomatoes. The yellow bell pepper adds color and sweetness. For the drizzle, I love using olive oil. It adds richness and helps the garlic blend well with the other flavors. The lemon brings a zesty kick. Its zest adds a fragrant aroma, while the juice brightens the dish. Dried oregano and thyme lend an earthy note. They balance the freshness of the lemon and shrimp. Finally, salt and pepper bring out all the flavors. Fresh parsley adds a splash of color and a hint of freshness when you serve. You can find the full recipe here: [Full Recipe]. Enjoy cooking! 1. First, preheat your oven to 400°F (200°C). 2. Line a large baking sheet with parchment paper. This makes cleanup simple. 3. In a big bowl, mix 1 pound of shrimp, 2 cups of broccoli, 1 cup of halved cherry tomatoes, and 1 sliced yellow bell pepper. Toss them gently to combine. 1. In a small bowl, whisk together 3 tablespoons of olive oil, 4 minced garlic cloves, the zest of 1 lemon, and its juice. 2. Then, add 1 teaspoon each of dried oregano and thyme, plus salt and pepper. Mix it well. 1. Pour the lemon herb mix over the shrimp and veggies. Toss everything together to coat well. 2. Spread the mixture evenly on the baking sheet. 3. Place it in the oven and bake for about 12-15 minutes. The shrimp should turn pink, and the veggies should soften. 4. After baking, sprinkle chopped parsley on top for a fresh look and taste. This recipe is quick and makes a colorful dish that bursts with flavor. For the full recipe, check the details above. To know when shrimp are done, look for a bright pink color. They should also be opaque. If you see these signs, they are ready to eat. Cooking time may change with different ovens. Start checking for doneness at around 12 minutes. Your oven may cook faster or slower, so keep an eye on them. Adding more flavors can make this dish even better. You might try a pinch of red pepper flakes for some heat. A dash of smoked paprika adds a nice smoky taste. Fresh herbs are key in this dish. They give a bright and fresh flavor that dried herbs can't match. Always use fresh parsley for a vibrant finish. You can serve the shrimp right from the baking sheet. This gives a fun, casual feel. If you want to impress, transfer them to a nice platter. Drizzle with extra lemon juice for zing. Pair this dish with a light salad or some rice to soak up the juices. These sides complement the shrimp beautifully. For the full recipe, check out the details above. {{image_4}} You can use many vegetables in this dish. Instead of broccoli and bell peppers, try zucchini or asparagus. These options add color and flavor. You can also use seasonal veggies. In summer, fresh corn or green beans work well. In fall, add butternut squash or Brussels sprouts. Mix and match to suit your taste. If you want to change the protein, scallops or chicken are great swaps. Scallops cook fast like shrimp. They need about 8-10 minutes in the oven. Chicken takes longer, around 20-25 minutes. Cut it into small pieces for even cooking. Adjust your bake time based on the protein you choose. This recipe is easy to adapt for different diets. For a gluten-free option, make sure your seasonings are gluten-free. You can also make it dairy-free. Just skip any dairy-based sides. Want a vegan version? Use chickpeas or tofu instead of shrimp. Season them the same way for a delicious meal. Store leftover shrimp and veggies in an airtight container. Keep it in the fridge for up to two days. If you want to save some for later, freezing is a good option. Place shrimp and vegetables in a freezer-safe bag. Remove as much air as you can before sealing. They can last up to three months in the freezer. When reheating, use the oven or stovetop for best results. Preheat your oven to 350°F (175°C) and place the shrimp and veggies on a baking sheet. Heat for about 10 minutes. This keeps everything warm and tasty. You can also use a skillet on low heat. Stir gently to warm the dish without overcooking the shrimp. Avoid the microwave if possible, as it can make shrimp tough. For the full recipe of Sheet Pan Lemon Herb Shrimp, check the earlier section! Shrimp cook quickly. The best time is 12 to 15 minutes at 400°F. They turn pink and opaque when done. Overcooking makes them tough, so watch closely. Each oven is different, so check them a little early. Yes, you can prep this dish in advance. Mix the shrimp and veggies, then store them in the fridge. You can also make the marinade ahead. Just keep the shrimp and marinade separate until you are ready to bake. This keeps the shrimp fresh. This shrimp pairs well with many sides. Here are some great options: - Quinoa salad for a healthy touch - Garlic bread for a filling option - Steamed rice for a classic choice - A fresh garden salad for crunch These sides balance the flavors and make a complete meal. In this post, I shared how to make a delicious sheet pan lemon herb shrimp dish. We covered main ingredients, step-by-step instructions, and tips for perfecting the recipe. I also included variations based on your taste. Cooking should be fun and easy. With quick steps and fresh ingredients, you can create a meal everyone will love. Enjoy experimenting with flavors and make this recipe your own!](https://joymealplan.com/wp-content/uploads/2025/06/8195c318-04ef-4784-9bf9-d5c1a8395797-768x768.webp)