
Weeknights can be hectic, but dinner doesn’t have to be a chore. Let me introduce you to a simple yet delicious dish: One-Pot Creamy Tuscan Chicken. This meal packs flavor and can be ready in no time. With juicy chicken thighs, fresh spinach, and a creamy sauce, it’s perfect for anyone craving comfort food without the cleanup fuss. Let’s dive into the easy steps you can follow to impress your family tonight!
Why I Love This Recipe
- Deliciously Creamy: This dish features a rich and creamy sauce that elevates the chicken to a whole new level of flavor.
- Quick and Easy: With a total cook time of just 30 minutes, this one-pot meal is perfect for busy weeknights.
- Versatile Ingredients: Featuring easily accessible ingredients, this recipe can be modified to suit dietary needs with dairy-free options.
- Beautiful Presentation: Garnished with fresh basil, this dish looks as good as it tastes, making it perfect for dinner parties or special occasions.
Ingredients
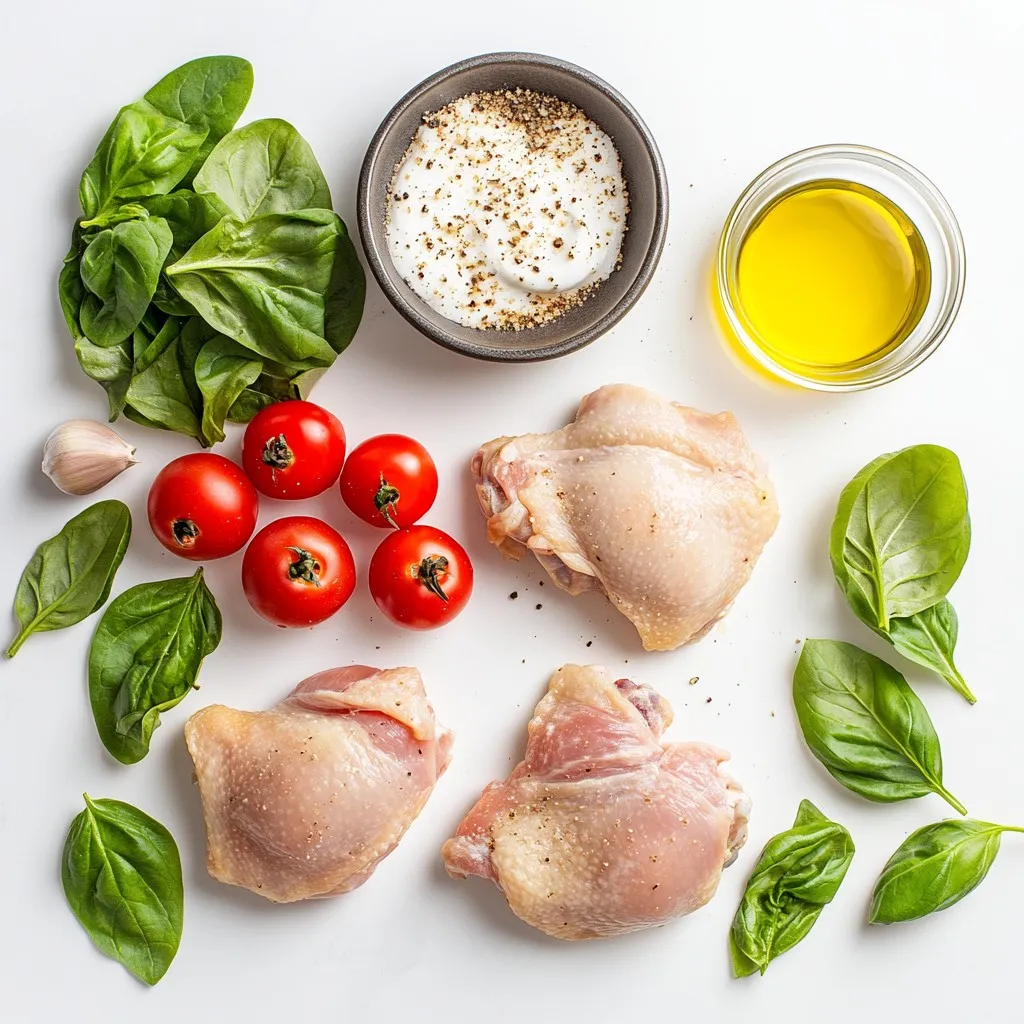
Main Ingredients
– 4 boneless, skinless chicken thighs
– 2 tablespoons olive oil
– Salt and pepper, to taste
– 3 cloves garlic, minced
– 1 cup cherry tomatoes, halved
– 1 cup fresh spinach
– 1 cup heavy cream (or coconut cream for a dairy-free option)
– 1 teaspoon Italian seasoning
– ½ cup grated Parmesan cheese (or nutritional yeast for a dairy-free alternative)
– Fresh basil leaves for garnish
The main ingredients of this dish are simple yet full of flavor. Chicken thighs provide juicy meat that stays tender during cooking. Olive oil coats the chicken and helps it brown nicely. Seasonings like salt and pepper enhance the chicken’s taste. Minced garlic adds a lovely aroma, while cherry tomatoes and fresh spinach bring color and nutrients. The cream creates a rich sauce that makes this dish special.
Optional Ingredients
– Coconut cream for dairy-free version
– Nutritional yeast as a Parmesan substitute
If you want a dairy-free meal, use coconut cream instead of heavy cream. It gives a nice taste and creamy texture. Nutritional yeast is a great swap for Parmesan cheese. It has a cheesy flavor and is packed with nutrients. Both options keep this recipe delicious while meeting dietary needs.
Garnishing Elements
– Fresh basil leaves
Fresh basil leaves are perfect for garnishing. They add a burst of color and a hint of freshness. Just sprinkle them on top before serving. This small touch makes the dish look beautiful and adds a lovely aroma. It truly elevates your one-pot creamy Tuscan chicken!
Step-by-Step Instructions
Preparing the Chicken
First, season the chicken thighs. I like to use salt and pepper. Make sure you cover both sides well. Next, heat the olive oil in a large skillet over medium-high heat. You want the oil to shimmer, showing it’s ready.
Cooking Process
Once the oil is hot, add the chicken thighs. Sear them for about 5 minutes on each side. You want a nice golden-brown crust. After cooking, take the chicken out and set it on a plate.
In the same skillet, lower the heat and add minced garlic. Sauté it for about 30 seconds. Stir constantly until the garlic smells great but does not burn.
Building the Sauce
Now, toss in the halved cherry tomatoes. Cook them for about 3-4 minutes. This helps them soften and release their juices. Next, fold in the fresh spinach. Cook this for another 2 minutes until it wilts down nicely.
Reduce the heat to low. Slowly pour in the heavy cream or coconut cream. Stir gently to mix all the ingredients. Then, sprinkle in the Italian seasoning and add the grated Parmesan cheese. Let the sauce simmer. This thickens as the cheese melts into the cream.
Finally, return the seared chicken thighs to the pot. Nestle them in the creamy sauce. Spoon some sauce over each piece. Let everything simmer together for 5 more minutes. This helps all the flavors blend beautifully.
Tips & Tricks
Perfecting the Sear
To get that golden-brown crust, heat your olive oil until it’s shimmering. This takes just a few minutes. When you add the chicken, don’t crowd the pan. Give each thigh space to cook evenly. Sear them for about five minutes on each side. This will lock in flavor and moisture. If they stick, wait a bit longer before flipping.
Sauce Variations
If you want a dairy-free option, use coconut cream instead of heavy cream. It gives a nice richness. For cheese, nutritional yeast works well. You can also customize the seasonings based on your taste. Add more Italian herbs or even a pinch of red pepper flakes for some heat.
Serving Suggestions
This dish pairs great with garlic bread or over fluffy rice. You can also serve it with pasta to soak up the creamy sauce. For a nice touch, garnish with fresh basil leaves. It adds color and freshness. Serve it on a colorful plate to make the meal more inviting.
Pro Tips
- Perfectly Sear the Chicken: Make sure your skillet is hot enough before adding the chicken. A hot pan helps to achieve a nice golden crust, sealing in the juices.
- Use Fresh Ingredients: Fresh garlic, spinach, and tomatoes will enhance the flavor of the dish significantly. Opt for fresh over dried whenever possible.
- Adjust Creaminess: If you prefer a lighter sauce, add a bit of chicken broth along with the cream to thin it out while maintaining flavor.
- Experiment with Herbs: Don’t be afraid to mix up the herbs! Fresh thyme or oregano can add a delightful twist to the traditional Italian seasoning.
Variations
Protein Swaps
You can easily swap chicken thighs for chicken breasts. Chicken breasts cook faster, so check for doneness at 4-5 minutes per side. You can also use shrimp. Just add them when you add the cream. Shrimp cooks quickly and will absorb the sauce’s flavor. For a plant-based option, try tofu. Press the tofu first, then cut it into cubes. Sauté it until golden before adding the sauce.
Vegetable Additions
Feel free to add more vegetables to boost flavor and nutrition. Bell peppers add sweetness and color. Zucchini or mushrooms work well too. You can also use seasonal veggies like asparagus in spring or butternut squash in fall. Just remember to chop them small for even cooking.
Spicing It Up
If you like heat, add red pepper flakes when you sauté the garlic. This will add a nice kick to the dish. For more depth, throw in fresh herbs like thyme or oregano. You can add them when you stir in the cream for extra flavor. Fresh herbs can really brighten up the dish.
Storage Info
Storing Leftovers
To store your creamy Tuscan chicken, first let it cool. Place it in an airtight container. Keep it in the fridge for up to four days. If you want to save it longer, freeze it. For freezing, use a freezer-safe container. Make sure to leave some space, as the sauce may expand when frozen. You can freeze it for up to three months.
Reheating Tips
When you want to eat your leftovers, reheating is key. You can use the microwave or stovetop. If using the microwave, heat it on medium for a minute or two. Stir it halfway through to heat evenly. On the stovetop, use low heat and stir often. This helps keep the creaminess of the sauce. If it seems too thick, add a splash of broth or water.
Shelf Life
In the fridge, your One-Pot Creamy Tuscan Chicken lasts about four days. If it develops an off smell or changes color, it is best to throw it away. Always trust your senses. If anything seems off, don’t eat it.
FAQs
How do I make One-Pot Creamy Tuscan Chicken dairy-free?
To make this dish dairy-free, you can use coconut cream instead of heavy cream. It gives a similar rich texture without dairy. For cheese, swap Parmesan with nutritional yeast. Nutritional yeast adds a cheesy flavor without any dairy. This way, you keep the taste while avoiding dairy.
Can I use chicken breasts instead of thighs?
Yes, you can use chicken breasts. They cook faster than thighs. Chicken breasts will take about 4-5 minutes per side. They may also be a bit drier than thighs. Adjust your cooking time to keep them juicy.
What can I serve with this dish?
One-Pot Creamy Tuscan Chicken pairs well with garlic bread or fluffy rice. You can also serve it over pasta for a hearty meal. Fresh salad or steamed veggies are great sides too. They add color and balance to your plate.
This blog post covered how to make a delicious One-Pot Creamy Tuscan Chicken. We discussed main and optional ingredients, like chicken thighs and coconut cream. I shared step-by-step cooking instructions, tips for perfecting the sear, and sauce variations. You can even customize the recipe with different proteins and veggies.
For the best results, store leftovers properly and reheat carefully. Enjoy experimenting and making this dish your own! Happy cookin


