Oven Buffalo Chicken Dip Flavorful and Simple Recipe

Looking for a simple and flavorful dish that everyone will love? My Oven Buffalo Chicken Dip is perfect for game days, parties, or cozy nights in. With just a few key ingredients like shredded chicken, buffalo sauce, and cream cheese, you can whip up a creamy, spicy dip in no time. Keep reading to discover how to make this crowd-pleaser and learn fun tips for serving it!
Why I Love This Recipe
- Quick and Easy: This recipe is incredibly simple, taking only 10 minutes of prep time, making it perfect for busy weeknights or last-minute gatherings.
- Flavor Explosion: The combination of buffalo sauce, cream cheese, and cheddar creates a mouthwatering, creamy, and spicy delight that everyone loves.
- Versatile Serving Options: Whether you serve it with tortilla chips, celery sticks, or carrot sticks, this dish is a hit and caters to various preferences.
- Great for Gatherings: This Cheesy Buffalo Chicken Delight is a crowd-pleaser, making it the ideal appetizer for parties, game days, or family gatherings.
Ingredients
Main Ingredients
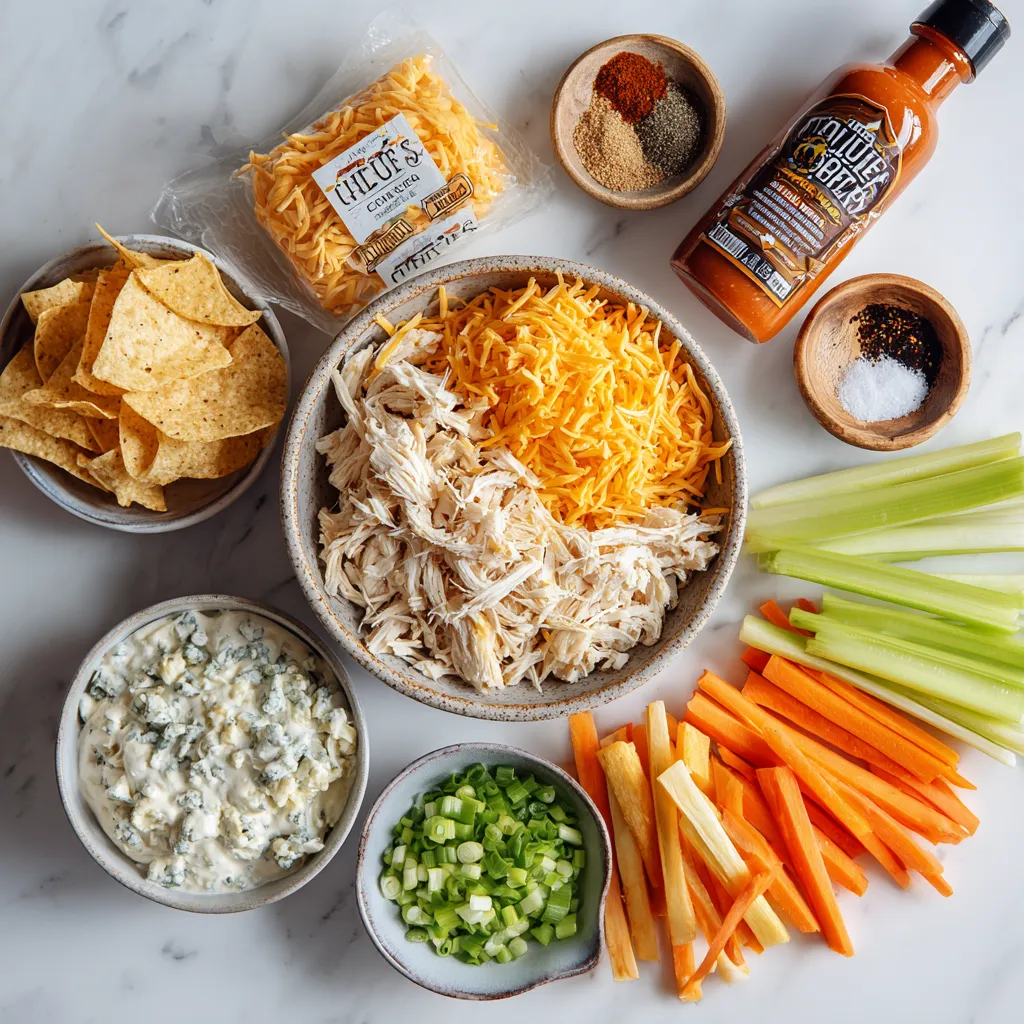
– 2 cups cooked shredded chicken
– 1/2 cup buffalo sauce
– 1 (8 oz) package cream cheese, softened
Additional Ingredients
– 1 cup shredded cheddar cheese
– 1/2 cup blue cheese dressing
– 1/4 cup green onions, finely chopped
Optional Ingredients
– 1/2 teaspoon garlic powder
– Tortilla chips, celery sticks, or carrot sticks for serving
– Salt and black pepper
Every ingredient plays a key role in making this dip tasty. The cooked shredded chicken adds protein and texture. I prefer using rotisserie chicken for ease. Buffalo sauce gives it a spicy kick. You can adjust the heat to your liking. Cream cheese makes the dip creamy and rich. Each bite should feel smooth and delightful.
Shredded cheddar cheese creates a cheesy layer that melts perfectly. Blue cheese dressing adds a tangy flavor, but you can swap it for ranch if you want. Green onions add a fresh crunch and a pop of color.
For optional flavors, garlic powder enhances the savory aspect. Don’t forget the salt and black pepper to balance the taste. Serve it with tortilla chips, celery sticks, or carrot sticks for dipping. Each option adds a fun crunch to your plate.

Step-by-Step Instructions
Preparation Process
1. First, preheat your oven to 350°F (175°C). This step is key for a perfect bake.
2. In a large mixing bowl, combine softened cream cheese, buffalo sauce, and blue cheese dressing. Mix well until smooth.
Combining Ingredients
3. Next, fold in two cups of cooked, shredded chicken and half of the shredded cheddar cheese.
4. Add garlic powder and half of the chopped green onions. Season with salt and black pepper to taste.
Baking Instructions
5. Carefully transfer the mixture to a greased 8×8 inch baking dish. Spread it evenly for even baking.
6. Sprinkle the remaining cheddar cheese on top. This will melt into a delicious, cheesy layer.
7. Place the dish in the oven and bake for 25-30 minutes. Check for a bubbly, golden top.
This step-by-step guide makes it easy to whip up this tasty dip!
Tips & Tricks
Enhancing Flavor
To make your Buffalo chicken dip just right, adjust the buffalo sauce. If you love heat, add more sauce. If you prefer mild, use less. You can also mix in spices. Try some cayenne for extra kick or smoked paprika for depth.
Making it Ahead
You can prep this dip ahead of time. Mix the ingredients and store them in the fridge for up to two days. When you’re ready, just bake it. To store leftovers, place them in an airtight container. This dip stays fresh for about three days.
Serving Suggestions
For dippers, tortilla chips work great. They add crunch and pair well with the dip’s creaminess. Celery sticks and carrot sticks are also excellent choices. You can add toppings like more green onions or a drizzle of buffalo sauce. A small bowl of blue cheese dressing on the side is perfect for extra flavor.
Pro Tips
- Adjust the Heat: Feel free to customize the amount of buffalo sauce based on your heat preference. Start with less if you’re unsure and add more to taste!
- Cheese Variations: Experiment with different types of cheese like pepper jack for a spicy kick or mozzarella for a milder flavor.
- Make Ahead: This dish can be prepared a day in advance. Just mix everything and store it in the fridge until you’re ready to bake.
- Serving Suggestions: Consider serving with a variety of dipping options, like sliced cucumbers or bell peppers, for a fresh contrast to the richness of the dish.

Variations
Ingredient Substitutes
You might want to change things up. Consider using different cheeses. Cream cheese is great, but mozzarella or gouda can add a nice twist. Both have creamy textures that melt well. If you’re not a fan of blue cheese dressing, swap it out for ranch dressing. Ranch gives a milder taste and is very popular.
Healthier Options
Want a lighter dip? Use low-fat cream cheese instead of regular cream cheese. This keeps the dip creamy but cuts down on calories. You can also reduce sodium by choosing low-sodium buffalo sauce and dressing. Your taste buds won’t miss a beat, but your waistline might thank you.
Flavor Variations
For spice lovers, add jalapeños to the mix. They bring a nice kick to the dip. Just chop them finely and fold them in. If you want extra crunch, consider adding veggies. Chopped bell peppers or celery not only add color but also texture. This makes the dip even more fun to eat!
Storage Info
Refrigeration Tips
To keep your buffalo chicken dip fresh, cool it down fast after baking. Place it in a shallow dish to speed up cooling. Cover it tightly with plastic wrap or a lid. This helps keep out air and moisture. You can store it in the fridge for up to three days. Always check for any signs of spoilage before serving.
Freezing Instructions
If you want to save some for later, you can freeze it. First, let the dip cool completely. Then, transfer it to an airtight container or freezer bag. Squeeze out as much air as possible to prevent freezer burn. You can freeze it for up to three months. To defrost, place it in the fridge overnight. Reheat it in the oven at 350°F (175°C) until it’s hot and bubbly.
Shelf Life
To make your dip last longer, store it properly. If it is in the fridge, eat it within three days. If frozen, use it within three months for the best taste. Watch for signs of spoilage, like a sour smell or changes in color. If you see any mold, throw it away immediately. Enjoy your buffalo chicken dip while it’s still fresh and tasty!
FAQs
Common Questions
Can I use raw chicken instead?
No, using raw chicken is not safe. Always use cooked chicken. Rotisserie chicken works great. It saves time and adds flavor.
How do I make it spicier?
To make it spicier, add more buffalo sauce. You can also mix in some hot sauce. Chopped jalapeños are another fun way to enhance the heat.
Serving and Pairing
What can I serve with Buffalo chicken dip?
Buffalo chicken dip pairs well with tortilla chips. You can also use celery sticks or carrot sticks. Crackers and pita chips are tasty options too.
How to store leftovers?
Store leftovers in an airtight container. Keep it in the fridge for up to three days. You can reheat it in the oven or microwave.
Dietary Considerations
Can it be gluten-free?
Yes, the dip can be gluten-free. Just use gluten-free buffalo sauce and dippers. This makes it safe for those with gluten allergies.
Vegetarian alternatives for dip?
To make it vegetarian, swap chicken for cooked lentils or chickpeas. You can also use shredded jackfruit for a meaty texture.
Buffalo chicken dip combines tasty ingredients like shredded chicken, buffalo sauce, and cream cheese. You can enhance it with cheese and toppings, making it special for any gathering. Remember to choose heat level and dippers that fit your taste. Storing and reheating the dip properly ensures it stays fresh. With these tips, you can enjoy a great dish at your next event. Enjoy making this easy and delicious di

Cheesy Buffalo Chicken Delight
Ingredients
- 2 cups cooked shredded chicken
- 0.5 cup buffalo sauce
- 1 package (8 oz) cream cheese, softened
- 1 cup shredded cheddar cheese
- 0.5 cup blue cheese dressing
- 0.25 cup green onions, finely chopped
- 0.5 teaspoon garlic powder
- to taste salt
- to taste black pepper
- as needed tortilla chips, celery sticks, or carrot sticks for serving
Instructions
- Begin by preheating your oven to 350°F (175°C), allowing it to reach the perfect baking temperature.
- In a spacious mixing bowl, combine the softened cream cheese, buffalo sauce, and blue cheese dressing. Stir until the mixture is perfectly smooth and well incorporated.
- Gently fold in the shredded chicken, half of the shredded cheddar cheese, garlic powder, and half of the chopped green onions. Season the mixture with salt and black pepper to taste, ensuring the flavors meld beautifully.
- Carefully transfer the flavorful mixture into a greased baking dish, approximately 8x8 inches in size, spreading evenly.
- Evenly sprinkle the remaining cheddar cheese over the chicken mixture, creating a cheesy topping that will melt and bubble in the oven.
- Place the dish in the preheated oven and bake for 25-30 minutes, or until the dish is hot, bubbly, and the cheese has melted to a lovely golden hue.
- Once baking is complete, remove the dish from the oven and allow it to cool for a few minutes. Garnish the top with the rest of the chopped green onions for a fresh pop of color and flavor.
- Serve the Cheesy Buffalo Chicken Delight with crispy tortilla chips, refreshing celery sticks, or crunchy carrot sticks for dipping and enjoyment.


![To make Pickle Ranch Snack Crackers, you need the following ingredients: - 1 cup all-purpose flour - 1/2 cup cornmeal - 1 teaspoon baking powder - 1/2 teaspoon baking soda - 1/2 teaspoon salt - 1 tablespoon ranch seasoning mix - 1/4 cup dill pickle juice - 1/4 cup melted butter (cooled slightly) - 1/2 cup shredded cheddar cheese - 1/4 cup dill pickle slices (finely chopped) You can swap some ingredients if needed. For the all-purpose flour, try using whole wheat flour for added fiber. If you prefer a gluten-free option, use a gluten-free flour blend. Instead of cornmeal, you can use fine breadcrumbs for a different texture. If you want to skip the ranch seasoning, use herbs like dill, garlic powder, or onion powder to create your own flavor. Each serving, which is about two crackers, provides: - Calories: 120 - Total Fat: 8g - Saturated Fat: 4g - Cholesterol: 20mg - Sodium: 150mg - Carbohydrates: 10g - Fiber: 1g - Sugar: 1g - Protein: 3g These crackers are tasty and balanced, making them a fun snack for any occasion. You can enjoy them without guilt! 1. Preheat your oven to 350°F (175°C). This is key for baking. 2. Line a baking sheet with parchment paper. This helps with easy cleanup. 3. In a large bowl, mix the flour, cornmeal, baking powder, baking soda, salt, and ranch seasoning. Use a whisk to mix well. 4. Slowly add the dill pickle juice and melted butter. Stir until a dough forms. 5. Fold in the cheddar cheese and chopped dill pickles. Make sure they spread evenly in the dough. 6. Roll the dough into small balls, about the size of a quarter. Place them on the sheet, leaving space between them. 1. Flatten each ball gently with a fork or your fingers. Aim for even thickness. 2. Bake the crackers for 12-15 minutes. Watch closely for a light golden brown color. 1. Once baked, let the crackers cool on the sheet for a few minutes. 2. Transfer them to a wire rack to cool completely. This makes them crispier. 3. For a fun serving idea, arrange them on a colorful platter. Add fresh dill sprigs or serve with ranch dip for a tasty snack. Enjoy your Pickle Ranch Snack Crackers! You can find the full recipe above for more details. To get the right texture for your Pickle Ranch Snack Crackers, focus on mixing. Combine the dry ingredients well to avoid lumps. When adding the wet ingredients, mix just until combined. Overmixing can make your crackers tough. Roll the dough into small balls. Keep them uniform in size to ensure even baking. Flatten them gently for a crispier edge. To boost flavor, consider adding more ranch seasoning. You could also try garlic powder or onion powder. A pinch of cayenne can add a nice kick if you like spice. Adding herbs like dill or parsley can enhance the pickle flavor. For extra richness, sprinkle some grated Parmesan cheese on top before baking. One common mistake is using hot melted butter. It can change the dough's texture. Be careful not to skip the cooling step after baking. Allowing them to cool helps the crackers firm up. Also, don’t crowd the baking sheet. If they are too close, they may stick together. Check them often while baking to avoid burning. For a full recipe, refer to the complete instructions. {{image_4}} You can add fun twists to Pickle Ranch Snack Crackers. Want some heat? Try adding cayenne pepper or crushed red pepper flakes. Just a pinch will do! For a cheesy version, swap in pepper jack cheese instead of cheddar. Mixing in some garlic powder can also boost flavor. These tweaks keep your snack game exciting! If you need a gluten-free option, use gluten-free all-purpose flour. It works well in this recipe. You can also try almond flour for a nutty taste. Make sure your ranch seasoning is gluten-free too. This way, everyone can enjoy these tasty crackers without worry. These crackers shine when paired with dips. Creamy ranch dip is a favorite, but you can also serve them with hummus or guacamole. For a fun party snack, arrange them on a platter with fresh veggies. They also taste great with cheese slices or charcuterie. Each bite will surprise your guests! Explore the [Full Recipe] to start making your own delicious Pickle Ranch Snack Crackers today! Store your Pickle Ranch Snack Crackers in an airtight container. This keeps them fresh and crisp. You can use a glass jar or a plastic container. Make sure they are completely cool before sealing. If you live in a humid area, consider adding a small bag of rice to absorb moisture. When stored properly, these crackers can last up to one week. They taste best in the first few days. After that, they may lose some crunch. If you want to keep them longer, you can freeze them. Just place them in a freezer-safe bag or container. If your crackers lose their crunch, you can reheat them. Preheat your oven to 300°F (150°C). Spread the crackers on a baking sheet in a single layer. Heat them for about 5-7 minutes. Check often to avoid burning. Let them cool before enjoying again. For the full recipe, refer to the earlier section. Pickle Ranch Snack Crackers are tasty, crunchy treats. They mix the flavors of dill pickles and ranch dressing. These snacks are perfect for parties or game nights. They are easy to make at home with simple ingredients. To make Pickle Ranch Snack Crackers at home, follow these steps: 1. Preheat your oven to 350°F (175°C). 2. Line a baking sheet with parchment paper. 3. Mix flour, cornmeal, baking powder, baking soda, salt, and ranch seasoning in a bowl. 4. Add dill pickle juice and cooled melted butter. Stir to form a dough. 5. Fold in cheddar cheese and chopped pickles. 6. Roll the dough into small balls. Flatten each ball on the baking sheet. 7. Bake for 12-15 minutes until golden. 8. Let them cool on a wire rack. For the full recipe, check the details provided above. Pickle Ranch Snack Crackers can be a fun snack. They contain some healthy ingredients like cheese and pickles. However, they also have butter and flour, which add calories. Enjoy them in moderation as part of a balanced diet. You can find Pickle Ranch Snack Crackers at many grocery stores. Look in the snack aisle or near the crackers. Some stores may also sell them online. Check popular websites for easy shopping options. These crackers pair well with many dips and spreads. Serve them with ranch dressing, creamy dip, or hummus. You can also enjoy them with cheese or fresh veggies. They make a great snack for any gathering. This blog post covers everything about Pickle Ranch Snack Crackers. We discussed the key ingredients, including substitutions, and shared helpful nutritional data. You learned precise steps for preparation and baking, along with cooling tips for best results. I shared easy tricks to get the perfect texture and flavor. You now know various tasty variations to try and how to store them properly. Finally, you have answers to common questions about these delicious snacks. Enjoy making and sharing your own Pickle Ranch Snack Crackers!](https://joymealplan.com/wp-content/uploads/2025/07/696f27ca-dd07-4295-82fd-de9c637e8141-768x768.webp)
. Spicy Dill Pickle Hummus combines chickpeas, tahini, and pickles for a flavorful dip. You can enhance the taste with garlic, olive oil, and spices like smoked paprika. Remember to adjust flavors to your liking and store it right for freshness. This hummus is versatile; try variations with jalapeños or different herbs. It’s easy to make, nutritious, and perfect for snacks or meals. Enjoy creating this tasty treat and share it with friends!](https://joymealplan.com/wp-content/uploads/2025/07/3a5f2aa9-5489-447e-8fd1-d193bfa563b1-768x768.webp)
