Paleo Crockpot Salsa Chicken Delightful and Easy Dish

Craving a dish that’s easy and full of flavor? Let me introduce you to Paleo Crockpot Salsa Chicken! This delightful recipe combines tender chicken with zesty salsa, black beans, and a mix of spices. Perfect for busy days, you’ll have a satisfying meal ready when you get home. Join me as we uncover the simple steps and tips to make this tasty dish shine on your table!
Why I Love This Recipe
- Easy Preparation: This recipe requires minimal effort, making it perfect for busy weeknights when you want a hearty meal without the fuss.
- Flavorful Ingredients: The combination of zesty salsa, spices, and fresh avocado creates a delightful explosion of flavors that everyone will love.
- Versatile Serving Options: Whether served in bowls or as a filling for lettuce wraps, this dish can be adapted to suit various preferences and dietary needs.
- Healthy and Wholesome: Paleo-friendly and packed with protein and veggies, this dish is not only delicious but also nutritious, making it a guilt-free option.
Ingredients
Main Ingredients
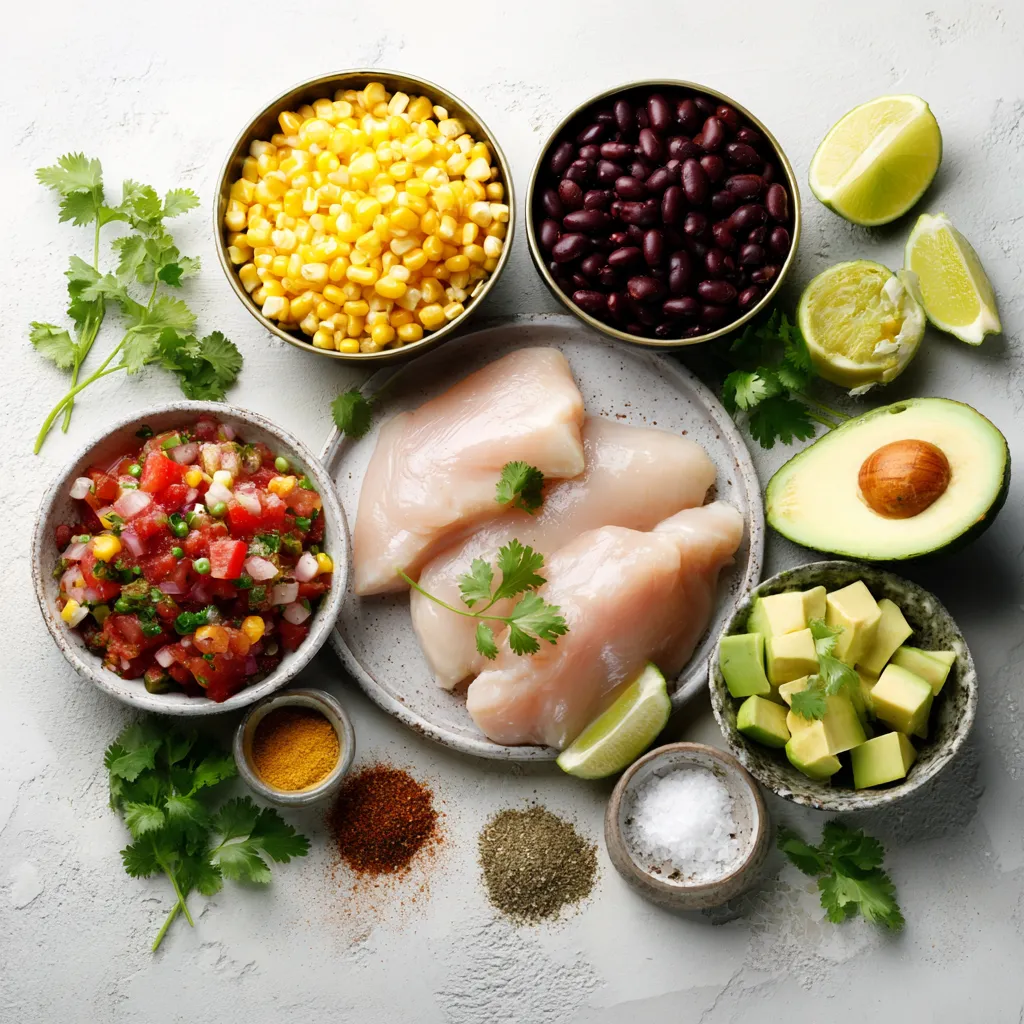
– 4 boneless, skinless chicken breasts
– 2 cups of salsa (homemade or store-bought)
– 1 can (15 oz) black beans, thoroughly rinsed and drained
– 1 cup corn kernels (can use fresh or frozen)
Seasoning and Garnishing
– 1 teaspoon ground cumin
– 1 teaspoon garlic powder
– 1 teaspoon onion powder
– 1 teaspoon smoked paprika
– Salt and black pepper to taste
– Fresh cilantro, roughly chopped, for garnish
– Lime wedges, for serving
This recipe starts with simple yet key ingredients. You need four boneless, skinless chicken breasts for a tender base. Salsa adds a zesty punch. You can use homemade salsa or a store-bought brand that fits Paleo guidelines. I love using fresh ingredients, but a store brand works just fine.
Next, we add black beans and corn. The black beans give protein and fiber, while the corn adds sweetness and color. Rinse the beans well to remove extra sodium.
For seasoning, ground cumin, garlic powder, onion powder, and smoked paprika bring depth. Salt and pepper add a touch of balance. Fresh cilantro brightens the dish, and a squeeze of lime at the end elevates all the flavors.
When you gather these ingredients, you set the stage for a dish that is both easy to make and delicious to eat.

Step-by-Step Instructions
Preparing the Chicken
Start by placing the boneless, skinless chicken breasts in the bottom of your crockpot. Make sure they are in an even layer. This helps them cook evenly. Next, pour the salsa generously over the chicken. Each piece should be well-coated for the best flavor. The salsa not only adds taste but also keeps the chicken juicy.
Assembling the Dish
Now, add the rinsed black beans and corn on top of the salsa-covered chicken. This adds color and texture to your dish. Then, evenly sprinkle ground cumin, garlic powder, onion powder, and smoked paprika over the mixture. Add a pinch of salt and black pepper to taste. This seasoning mix enhances the overall flavor and gives the dish a nice kick.
Cooking Process
Cover the crockpot securely with its lid. Set the temperature to low for 6-8 hours or to high for 3-4 hours. Cooking it low and slow helps the chicken become tender. When the time is up, carefully transfer the chicken to a plate. Use two forks to shred the chicken into bite-sized pieces. After shredding, return it to the pot to soak up the tasty juices. Stir everything well to combine. Let it sit for a few minutes to allow the flavors to meld beautifully.
Tips & Tricks
Cooking Recommendations
For tender chicken, cook on low for 6 to 8 hours. This slow method helps the chicken stay juicy. If you’re short on time, use the high setting. This option cooks the chicken in 3 to 4 hours.
Flavor Enhancement
To adjust seasonings, taste as you go. Start with a pinch of salt and pepper. You can add more if needed. For a bolder flavor, try fresh herbs like cilantro.
If you want to make homemade salsa, blend fresh tomatoes, onion, and lime juice. Add garlic and jalapeños for a kick. This will give your dish a fresh taste. You can also use store-bought salsa. Just make sure it’s paleo-friendly to keep it healthy.
Pro Tips
- Use Homemade Salsa: For the best flavor, opt for homemade salsa. This allows you to control the ingredients and adjust the spice level to your liking.
- Shred Chicken While Hot: Shredding the chicken while it’s still hot makes it easier to pull apart and helps it soak up more of the flavorful juices in the crockpot.
- Customize Your Toppings: Feel free to get creative with toppings! Consider adding lime crema, jalapeños, or even a sprinkle of cheese for added flavor and texture.
- Make It a Meal Prep: This dish is perfect for meal prep. Store leftovers in airtight containers for easy lunches throughout the week!

Variations
Ingredient Swaps
You can change some ingredients for this dish. If you want to avoid black beans, try using kidney beans or chickpeas. They both add great flavor and texture. For corn, you can swap in diced bell peppers or zucchini. These options will keep the dish fresh and tasty.
You can also add different proteins. Instead of chicken, use turkey or even pork. Just adjust the cooking time based on the meat you choose. Try adding more veggies too! Spinach or kale can sneak in some greens and extra nutrition.
Serving Suggestions
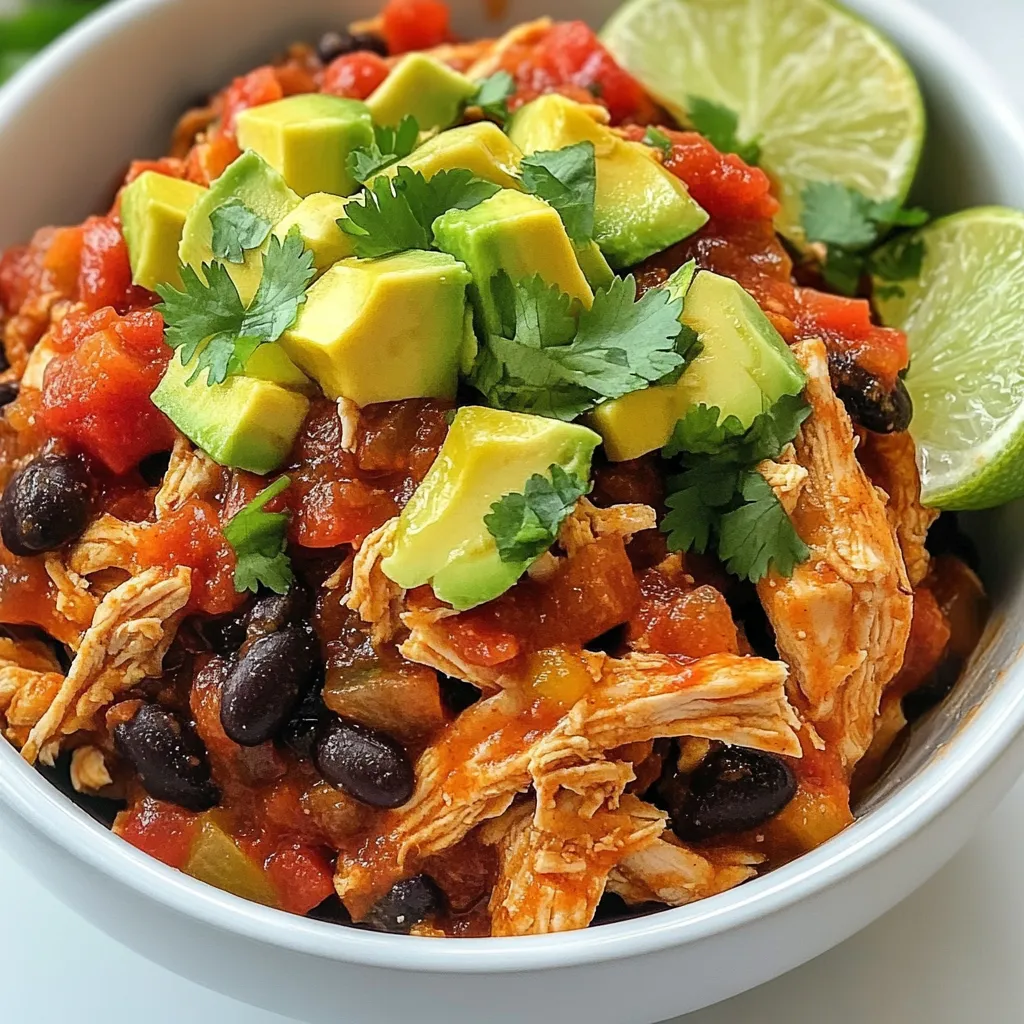
When serving, you have fun options. You can use colorful bowls to present the dish. This makes each serving look inviting. Top each bowl with diced avocado and cilantro for extra flavor.
Another great idea is to use lettuce wraps. This gives a crunchy twist to your meal. Just scoop the chicken mixture into the lettuce leaves and enjoy.
To enhance the meal, serve with lime wedges on the side. A squeeze of lime adds a bright pop of flavor. You can also pair it with a simple salad for a balanced meal.
Storage Info
Refrigeration Guidelines
To store leftovers, cool the dish to room temperature first. Place it in an airtight container. This keeps your chicken fresh for up to three days. I like glass containers for easy reheating and to avoid stains. If you use plastic, choose BPA-free options.
Freezing Tips
For the best freezing results, pack the chicken in freezer-safe bags. Remove as much air as possible to prevent freezer burn. You can freeze it for up to three months. When you’re ready to eat, thaw it in the fridge overnight. Reheat it in a pot on low heat until warm. This keeps the flavors intact and delicious.
FAQs
Is this recipe truly Paleo-friendly?
Yes, this recipe is Paleo-friendly. It uses whole foods that fit the Paleo diet. The main ingredients are boneless chicken breasts, fresh salsa, black beans, and corn. These items are all natural and unprocessed. The spices like cumin, garlic powder, and smoked paprika add flavor without any additives. Just make sure your salsa is made with Paleo-approved ingredients. Avoid brands with added sugars or preservatives.
Can I adjust the spice level?
Yes! You can easily adjust the spice level of this dish. If you want it milder, use a mild salsa. You can also reduce or skip the spices like smoked paprika or garlic powder. For more heat, add some diced jalapeños or a pinch of cayenne pepper. Taste as you go to find your perfect balance.
What can I serve with Paleo Crockpot Salsa Chicken?
You have many options for sides with this dish. Here are some great ideas:
– Cauliflower rice: It’s a fantastic low-carb option.
– Zucchini noodles: They add a fun twist and texture.
– Lettuce wraps: Use crisp lettuce leaves for a crunchy bite.
– Avocado slices: They add creaminess and healthy fats.
– Fresh salsa or guacamole: These can brighten the flavors.
Feel free to mix and match these sides to create a complete meal!
This blog post covered how to make a tasty Paleo Crockpot Salsa Chicken. We explored key ingredients, including chicken, salsa, black beans, and seasonings. I shared step-by-step instructions, tips, and variations to fit your taste. Remember, you can adjust flavors and try different sides to make it your own.
Enjoy creating this dish at home. It’s easy, flavorful, and perfect for any meal. Keep experimenting with ingredients to find your favorite versio

Zesty Paleo Crockpot Salsa Chicken
Ingredients
- 4 pieces boneless, skinless chicken breasts
- 2 cups salsa
- 1 can black beans, thoroughly rinsed and drained
- 1 cup corn kernels
- 1 piece avocado, diced into bite-sized pieces
- 1 teaspoon ground cumin
- 1 teaspoon garlic powder
- 1 teaspoon onion powder
- 1 teaspoon smoked paprika
- to taste salt
- to taste black pepper
- for garnish fresh cilantro, roughly chopped
- for serving lime wedges
Instructions
- Start by placing the boneless chicken breasts in the bottom of your crockpot in an even layer.
- Pour the salsa generously over the chicken, ensuring that each piece is thoroughly coated for maximum flavor.
- Next, add the rinsed black beans and corn on top of the salsa-covered chicken, creating a colorful layer.
- Evenly sprinkle the cumin, garlic powder, onion powder, smoked paprika, along with a pinch of salt and pepper over the mixture.
- Securely cover the crockpot with its lid and cook the dish on low for 6-8 hours or on high for 3-4 hours, until the chicken is perfectly cooked through and easily shredable.
- After cooking, carefully transfer the chicken from the crockpot to a plate. Use two forks to shred the chicken into bite-sized pieces, then return it to the pot, letting it absorb the delicious juices.
- Stir everything together well to combine and allow it to sit for a few minutes, so the flavors meld beautifully.
- When ready to serve, dish out the zesty chicken mixture into bowls, generously topping each serving with fresh diced avocado and cilantro.
- For an added burst of flavor, squeeze fresh lime juice over the dish just before serving.


![- 1 pound sirloin steak, cut into bite-sized cubes - 4 tablespoons unsalted butter - 4 cloves garlic, finely minced - 1 tablespoon fresh rosemary, finely chopped - 1 tablespoon fresh thyme, finely chopped - Salt and freshly ground black pepper, to taste - 1 tablespoon olive oil - ¼ teaspoon red pepper flakes (optional for heat) - Fresh parsley, finely chopped, for garnish The right ingredients make all the difference. For this dish, you want a good cut of meat. Sirloin steak works well because it’s tender and flavorful. Cut it into bite-sized cubes. This size helps them cook quickly and evenly. Butter adds richness. The unsalted kind allows you to control the salt level. Garlic gives a strong, tasty punch. Fresh herbs, like rosemary and thyme, add a nice touch. They bring out the beefy flavor. You can add red pepper flakes for a bit of heat. If you prefer a milder dish, just skip this ingredient. Fresh parsley is perfect for garnishing. It adds color and freshness to the final plate. Every ingredient plays a role. Together, they create joy in every bite. For the complete recipe, check out the Full Recipe section. Start by patting the steak cubes dry with a paper towel. This helps create a nice crust when searing. Moisture can make it hard to get that perfect sear. Next, season each steak cube with salt and freshly ground black pepper. This simple step packs in flavor. Let the seasoned steak sit for a bit. This allows the salt to work its magic. In a large skillet, heat the olive oil over medium-high heat until it shimmers. This means the oil is hot enough for searing. Carefully add the steak cubes. Make sure they are in a single layer. Sear the steak for 2-3 minutes without moving them. This helps form a beautiful crust. After that, flip the cubes and sear for another 2-3 minutes. Adjust the time if you want your steak more done. Once they’re seared to your liking, take the steak bites out and set them aside. In the same skillet, lower the heat to medium. Add the unsalted butter and minced garlic. Then toss in the chopped rosemary, thyme, and red pepper flakes if you want some heat. Stir everything together until the butter melts and the garlic smells great. This should take about a minute. Now, return the cooked steak bites to the skillet. Toss them gently in the garlic butter sauce. Cook for another 1-2 minutes. This lets all the flavors mix well together. Take the skillet off the heat. For the final touch, garnish the steak bites with freshly chopped parsley. Serve them on a colorful platter for a nice look. For fun, you can skewer the bites with toothpicks. This makes them easy to eat. Drizzle some of that garlic butter sauce on top to make them even more tasty! For the full recipe, check out the details provided earlier. Enjoy your cooking! To make the best garlic butter steak bites, start with patting the steak dry. This step is key. Dry steak creates a nice crust when you sear it. Use a paper towel to soak up any moisture. Next, adjust your cooking times based on how you like your steak. For medium-rare, sear the cubes for 2-3 minutes on each side. If you prefer your steak more done, add an extra minute or two. Remember, don’t overcrowd the pan. This helps the steak cook evenly. To boost flavor, consider adding spices and herbs. Fresh rosemary and thyme work wonders. The aroma will fill your kitchen and make the bites irresistible. You can also customize your steak bites with optional add-ins. If you like heat, sprinkle in some red pepper flakes. Want a bit of sweetness? Try adding a splash of balsamic vinegar. Each tweak can create a new taste experience. For the full recipe, click here: [Full Recipe]. {{image_4}} You can swap steak for chicken or shrimp. Chicken thighs work well because they stay juicy. Cut the pieces into bite-sized chunks. Cook for about 5-7 minutes until they are golden brown. Shrimp cooks quickly and adds a sweet taste. Use large shrimp and cook them for 2-3 minutes on each side until they turn pink. Both options absorb the garlic butter flavor nicely. For a gluten-free meal, use gluten-free soy sauce instead of regular soy sauce. Always check the label on your butter and spices. Most of them are naturally gluten-free. This keeps the dish safe for those with gluten sensitivities. Enjoy the same great taste without worry. If you want a vegetarian version, mushrooms are a great substitute. Portobello or cremini mushrooms can mimic the texture of meat. Slice them into bite-sized pieces and cook until golden. You can also use tofu for added protein. Press the tofu to remove moisture, then cut it into cubes. Sauté in the garlic butter for a tasty, plant-based dish. To keep your leftover steak bites fresh, store them in an airtight container. Make sure to cool them first. Place them in the fridge within two hours of cooking. This way, they stay safe to eat. Good storage helps keep the flavor and texture. Leftover steak bites last about three to four days in the fridge. When you're ready to enjoy your steak bites again, reheating is key. Use a skillet for the best results. Heat it over medium-low heat. Add a small amount of butter or oil to help keep them moist. Stir gently for about five minutes. This way, you keep the great taste and tender bite. Avoid using the microwave, as it can make the steak chewy. If you want to save steak bites for later, freezing is a good option. First, let them cool completely. Then, place them in a freezer-safe container. You can also use freezer bags, making sure to remove as much air as possible. They can last up to three months in the freezer. When ready to eat, thaw in the fridge overnight. Reheat them in a skillet for the best flavor. Enjoy your Garlic Butter Steak Bites with these storage tips for later meals! For the full recipe, check out the earlier section. Garlic butter steak bites pair well with many sides. Here are some great options: - Roasted vegetables: Carrots, Brussels sprouts, or asparagus are tasty choices. - Mashed potatoes: Creamy potatoes balance the rich steak flavor. - Rice: Fluffy rice soaks up the garlic butter sauce nicely. - Salad: A fresh green salad adds a crisp bite. - Garlic bread: Perfect for dipping into the garlic butter sauce. Yes, you can prep some parts ahead. Here are my tips: - Season the steak: You can season the steak cubes a few hours before cooking. This helps the flavors soak in. - Make the garlic butter sauce: Prepare the sauce in advance and store it in the fridge. Just warm it up before tossing in the steak. - Cook and store: You can cook the steak bites and store them in the fridge for up to two days. Reheat them gently before serving. If you want more heat, try these ideas: - Add more red pepper flakes: Increase the amount to your taste. - Use hot sauce: Drizzle some hot sauce over the finished dish. - Add jalapeños: Sauté sliced jalapeños with the garlic for extra spice. - Try chili powder: Sprinkle some chili powder on the steak while seasoning. These changes will add a nice kick to your garlic butter steak bites! For the full recipe, check out the [Full Recipe]. In this guide, we explored making garlic butter steak bites. We covered key ingredients, step-by-step cooking instructions, and tips for perfecting your dish. Remember to use fresh herbs for great flavor and adjust cooking times for your preference. You can also try alternatives like chicken or mushrooms. This dish is easy to store and reheat, making it perfect for any meal. Enjoy experimenting with flavors and creating a delicious steak experience!](https://joymealplan.com/wp-content/uploads/2025/06/487cc2c4-861e-43bd-80e8-4492eb920a60-768x768.webp)
![- 4 large bell peppers (any color of your choice) - 1 cup quinoa, thoroughly rinsed - 2 cups vegetable broth - 1 can (15 oz) black beans, drained and rinsed - 1 cup corn kernels - 1 small red onion, finely chopped - 2 cloves garlic, minced - 1 teaspoon ground cumin - 1 teaspoon smoked paprika - 1 teaspoon chili powder - Salt and freshly cracked black pepper, to taste - 1 cup diced tomatoes - 1 cup shredded cheese - Fresh cilantro or parsley for garnish This recipe is full of vibrant colors and flavors. The bell peppers add sweetness and crunch. Quinoa provides protein, making it a healthy meal choice. I love using black beans for their creaminess and fiber. Corn adds a nice sweetness and texture too. You can choose any color of bell pepper you like. Each color brings a unique taste. Red, yellow, and green all work well. The quinoa must be rinsed to remove saponin, a bitter coating. This step makes the quinoa taste better. Using vegetable broth instead of water boosts flavor. The spices, like cumin and smoked paprika, add warmth and depth. Garlic and onion give a great base flavor. Don't forget to adjust salt and pepper to your taste. I recommend adding cheese on top for a nice finish. It melts beautifully and adds richness. You can use cheddar or a Mexican blend, based on your preference. For a pop of color, garnish with fresh cilantro or parsley. For the complete recipe, check out the [Full Recipe]. - Preheat your oven to 375°F (190°C). - Slice the tops off four large bell peppers. Remove the seeds and membranes. - Stand the peppers upright in a baking dish. This keeps them stable while cooking. - In a saucepan, add one cup of rinsed quinoa and two cups of vegetable broth. - Bring the mixture to a boil over medium heat. - Once boiling, lower the heat and cover the pot. Simmer for about 15 minutes. - Fluff the quinoa with a fork when it’s done. - In a large bowl, combine the cooked quinoa with one can of black beans, one cup of corn, and one small chopped red onion. - Add two minced garlic cloves, one teaspoon of cumin, smoked paprika, and chili powder. - Season with salt and pepper to taste. - Fold in one cup of diced tomatoes before stuffing the peppers. - Carefully spoon the quinoa mixture into each pepper. Pack it down gently. - Top each stuffed pepper with one cup of shredded cheese. - Cover the dish with aluminum foil to keep the moisture in. - Place the covered dish in the preheated oven. Bake for 25 to 30 minutes. - Remove the foil and bake for another 10-15 minutes until the cheese is golden. This recipe brings together flavors and nutrition in a fun way. You’ll enjoy the vibrant colors and tastes! For the complete recipe, check out the Full Recipe. To get the best quinoa, start by rinsing it well. This removes any bitter coating. Use a fine mesh strainer for this step. Next, combine one part quinoa with two parts vegetable broth. This adds flavor. Cook on medium heat until it boils, then lower the heat and cover. Let it simmer for about 15 minutes. The quinoa should be fluffy and all the liquid gone. Spices make a big difference. I love adding ground cumin, smoked paprika, and chili powder for warmth. You can also mix in fresh herbs like cilantro or parsley for freshness. If you want more kick, add chopped jalapeños. Olives give a nice briny taste too. Feel free to get creative with your flavors! Make your dish pop! Serve the stuffed peppers on a bed of fresh greens. This adds color and crunch. You can sprinkle extra cheese on top before serving. A squeeze of lime over the peppers brightens the dish. Consider drizzling with a creamy sauce, like ranch or yogurt, for added richness. For the full recipe, check the details above. {{image_4}} You can make quinoa stuffed peppers vegan by swapping out cheese and broth. Use a plant-based cheese or skip it entirely. For broth, substitute with water or vegetable stock. Add more flavor by mixing in nutritional yeast. For protein, try lentils or chickpeas. Add veggies like spinach, kale, or mushrooms for extra nutrients. Quinoa isn't your only option. You can use rice or couscous. Both grains offer a nice texture. If you want to add meat, chicken, turkey, or even crumbled tofu work great. Just cook the proteins before mixing them into the filling. You can also add diced olives or sun-dried tomatoes for a flavor boost. Feel free to experiment with various pepper types. Bell peppers are common, but try poblano or jalapeño for a kick. Sweet peppers make the dish mild, while spicy peppers add heat. Using different sizes can change your serving style. Smaller peppers can be appetizers, while larger ones can be main dishes. To store your quinoa stuffed peppers after cooking, let them cool first. Place them in an airtight container. This keeps them fresh and tasty. You can store them in the fridge for up to four days. If you want to enjoy them later, be sure to keep the peppers whole. This helps them stay moist. If you want to freeze your stuffed peppers, wrap each one in plastic wrap. Then, place them in a freezer-safe bag or container. This method helps prevent freezer burn. You can freeze them for up to three months. When you are ready to eat, take them out and thaw them overnight in the fridge. Reheat them in the oven at 350°F (175°C) for about 20-25 minutes. This keeps the peppers nice and warm. You can also microwave them for faster results but be careful not to overcook. Enjoy your meal with a burst of flavor! For the full recipe, check out the earlier sections. Yes, you can prepare quinoa stuffed peppers ahead. Cook the quinoa and mix it with the other ingredients. You can stuff the peppers and store them in the fridge for up to 24 hours. If you want, you can bake them later. This saves time on busy days. Look for a few signs. The peppers should be tender but still firm. The filling inside should be hot and bubbly. The cheese on top should melt and turn golden brown. These are good signs your stuffed peppers are ready to enjoy. Yes, you can use other grains. Brown rice, couscous, or farro work well. Each grain has its own cooking time. For brown rice, cook it for about 40-45 minutes. Couscous cooks quickly in about 5 minutes. Adjust cooking times based on the grain you choose. I suggest a few side dishes. A simple salad with mixed greens adds freshness. You can also serve rice or a grain like quinoa on the side. If you want a warm side, consider roasted veggies. These pair well with the stuffed peppers and add color to your plate. Absolutely! This recipe uses quinoa, which is gluten-free. The other ingredients, like beans and veggies, are also gluten-free. Just make sure to check labels on canned goods. This helps ensure no gluten sneaks in. Enjoy this healthy meal worry-free! Quinoa stuffed peppers offer a balanced meal using simple, fresh ingredients. We explored the preparation, cooking tips, and variations. Remember to rinse your quinoa for the best flavor and texture. You can easily adjust the recipe for different diets or flavor profiles. Feel free to experiment with other grains or proteins. Enjoy these tasty peppers now or save some for later. Your kitchen adventures can lead to satisfying meals that everyone loves.](https://joymealplan.com/wp-content/uploads/2025/06/105cb204-6c23-4ed0-80a6-bb54efeb7f27-768x768.webp)
![- 1 cup quinoa - 2 cups vegetable broth or water - 1 can (15 oz) black beans - 1 cup corn kernels - 1 red bell pepper - 1 cup cherry tomatoes - 1 ripe avocado - 1/4 cup red onion - 1/4 cup fresh cilantro - 1 teaspoon ground cumin - 1 teaspoon chili powder - Juice of 2 fresh limes - 3 tablespoons extra virgin olive oil - Salt and freshly cracked pepper To make a tasty Southwest Quinoa Salad, you need fresh ingredients. Quinoa is the star. It adds protein and fiber. You will also need vegetable broth or water to cook the quinoa. For the beans, I love using black beans. They add creaminess and texture. Corn gives a sweet crunch. You can use fresh or frozen corn. Now, let's talk about fresh produce. The red bell pepper adds color and a slight sweetness. Cherry tomatoes bring juiciness and bright flavor. A ripe avocado gives creaminess. Don't forget the red onion! It adds a nice bite. Finally, fresh cilantro adds a burst of flavor. For spices, cumin and chili powder create a warm, earthy taste. Fresh lime juice adds zest. The olive oil makes the salad rich and smooth. Add salt and pepper to taste. You can find the full recipe for this dish below. 1. Start by rinsing and draining 1 cup of quinoa. This step removes any bitter taste. 2. Next, combine the rinsed quinoa with 2 cups of vegetable broth in a medium-sized saucepan. 3. Set the heat to medium-high and bring it to a boil. 4. Once boiling, reduce the heat to low, cover the pan, and let it simmer for about 15 minutes. 5. After 15 minutes, the quinoa should be fluffy and all the liquid absorbed. Remove it from heat. 6. Let it sit covered for another 5 minutes. Finally, fluff the quinoa gently with a fork and set it aside to cool completely. 1. In a large mixing bowl, add the following ingredients: - 1 can (15 oz) black beans, well rinsed and drained - 1 cup corn kernels (fresh or frozen) - 1 red bell pepper, finely diced - 1 cup cherry tomatoes, halved - 1 ripe avocado, diced - 1/4 cup red onion, finely chopped - 1/4 cup fresh cilantro, roughly chopped 2. Gently mix these ingredients to combine. Make sure everything is evenly spread in the bowl. 1. In a small bowl, whisk together the following: - The juice of 2 fresh limes - 3 tablespoons extra virgin olive oil - 1 teaspoon ground cumin - 1 teaspoon chili powder - A sprinkle of salt and freshly cracked pepper 2. This dressing adds a zesty flavor to your salad, so make sure to mix well. 1. Now, fold the cooled quinoa into the salad mixture. 2. Gently combine all the ingredients until they are well mixed. 3. Taste and adjust seasoning with more salt and pepper if needed. 4. Once everything is mixed, cover the bowl and refrigerate for at least 30 minutes. This allows the flavors to meld together beautifully. For the complete recipe, you can refer to the [Full Recipe]. To avoid mushy quinoa, start by rinsing it well. Rinsing removes the bitter coating called saponin. This simple step makes a big difference in taste. After rinsing, use two cups of vegetable broth or water for every cup of quinoa. This ratio helps the quinoa cook evenly and stay fluffy. It's good to let the quinoa simmer gently. Boil it first, then cover and lower the heat. This method keeps the grains separate and light. Once cooked, let it sit for five minutes before fluffing it with a fork. This extra time helps the quinoa absorb any leftover moisture. For a stunning presentation, serve your salad in a colorful bowl. This makes the vibrant colors pop. Use a large bowl or individual plates for each guest. Garnish with fresh cilantro leaves for a bright touch. Adding lime wedges around the dish looks nice too. You can sprinkle crumbled feta cheese on top for richness. Tortilla strips add a nice crunch and extra flavor. These small touches can elevate your dish from good to great. If you want some heat, add diced jalapeños or a dash of hot sauce. This gives a nice kick to the salad. You can adjust the heat level to your taste. For sweetness, try adding diced mango or pineapple. These fruits pair well with the other flavors. They bring a fresh and tropical twist. Mixing sweet and spicy makes the salad more exciting. {{image_4}} You can boost the protein in this salad easily. Adding grilled chicken or shrimp makes it heartier. Both options pair well with the fresh flavors. I love to season the chicken with lime and spices before grilling. For a vegetarian twist, use tofu. Press and cube the tofu, then sauté it until golden. This adds a nice texture and flavor to your salad. Need a gluten-free option? Quinoa is naturally gluten-free! If you want to switch it up, try using millet or brown rice. Both work well and keep the dish light. For those on a vegan diet, this salad is already a great choice. Just ensure all ingredients, like the broth, are plant-based. You can swap lime juice with apple cider vinegar for a tangy twist. Herbs can really enhance your salad. Try adding parsley or dill to give it a fresh kick. These herbs add color and aroma too. If you want to change the citrus flavor, use orange or lemon instead of lime. They both add a sweet and tangy note, making your salad even more vibrant. Mixing in different flavors keeps your meals exciting. The Southwest Quinoa Salad stays fresh in the fridge for about 3 to 5 days. To keep it tasty, store it in an airtight container. This helps lock in flavors and keeps the salad crisp. I recommend using glass containers. They are great for keeping food fresh and safe. You can freeze this salad, but I suggest leaving out the avocado. The avocado does not freeze well and becomes mushy. If you want to freeze it, prepare the salad without the avocado. Store in a freezer-safe container. It’s best to eat it within 2 to 3 months for the best taste. To refresh the refrigerated salad, take it out and let it sit for a few minutes. This helps the flavors come back alive. Avoid reheating the salad in the microwave. The heat can make the veggies soggy. Instead, enjoy it cold or at room temperature for a crisp bite. To make the Southwest Quinoa Salad vegan, swap out any animal-based ingredients. For example, use olive oil instead of any honey or dairy products. Avocado is already vegan, so you can keep that. If you want creaminess, add more avocado or use a plant-based yogurt. Yes, you can prepare this salad ahead of time. I suggest making it a few hours before serving. This way, the flavors blend well. Just be sure to store it in the fridge. You can also make the quinoa the day before. This salad pairs well with grilled meats, like chicken or steak. It also makes a great side for BBQs. You can even enjoy it with tacos or burritos. It adds a fresh touch to any meal. Quinoa is a superfood packed with protein. It has all nine essential amino acids. Plus, it is high in fiber, which is good for digestion. The added veggies like tomatoes and peppers boost vitamins and minerals. To spice up the salad, add diced jalapeños or red pepper flakes. You can also add a splash of hot sauce to the dressing. For a smoky flavor, try adding chipotle powder. Adjust the heat to your taste. For the full recipe, check out the Southwest Quinoa Fiesta Salad. In this blog post, I shared a simple and tasty Southwest Quinoa Salad recipe. I covered ingredients, cooking steps, and storage tips. You learned how to make it vegan and delicious. Remember to experiment with flavors and ingredients. This salad is versatile and can fit many diets. Enjoy making it your own! Get creative and share it with friends and family for a delightful meal.](https://joymealplan.com/wp-content/uploads/2025/07/ba958c7b-7f9d-4e5f-ae24-7804e94fee3c-768x768.webp)


