Peppermint White Chocolate Popcorn Festive Treat Idea

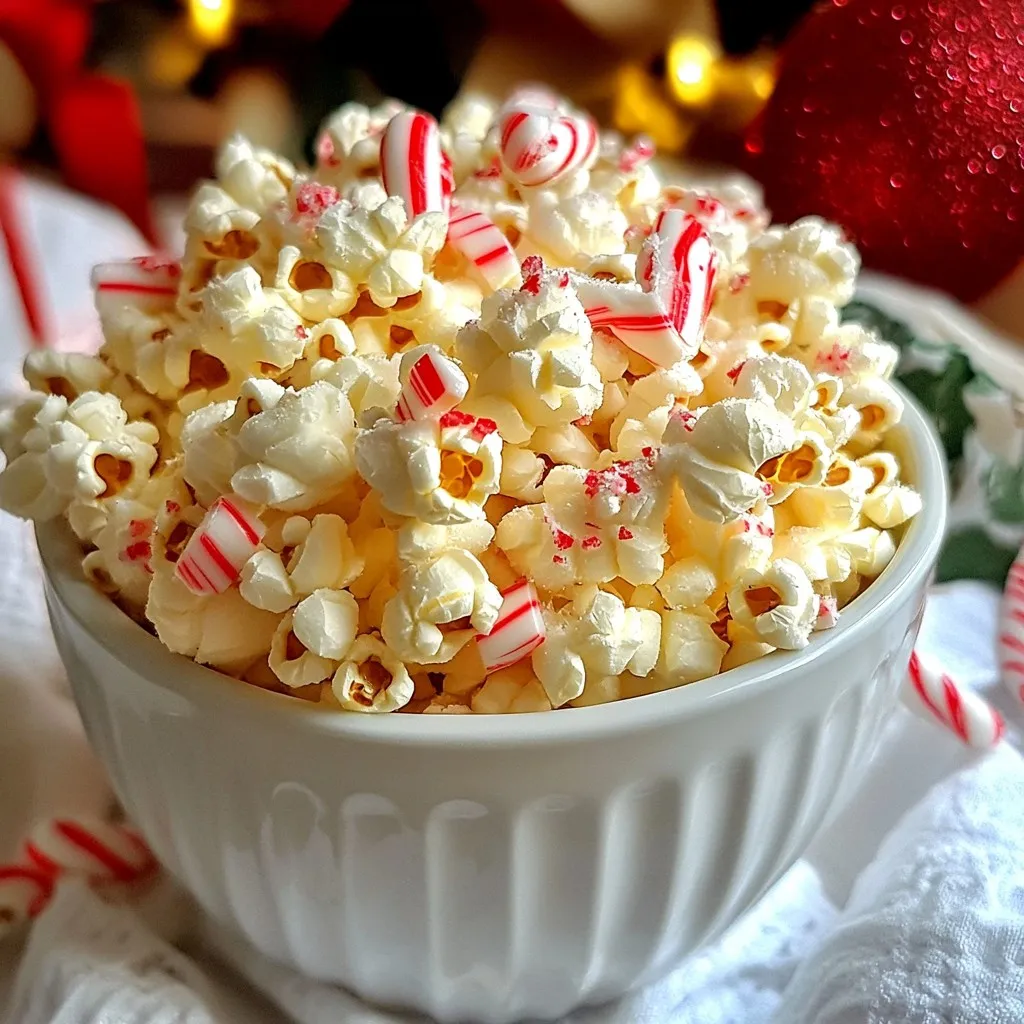
Looking for a festive treat that will delight your taste buds? Peppermint White Chocolate Popcorn is the perfect blend of sweet and minty. It’s quick to make and fun for all ages. In this post, I will share the easy steps to create this crunchy snack, plus tips to customize it to your liking. Get ready to impress your family and friends with this delicious holiday treat!
Why I Love This Recipe
- Festive Flavor: The combination of white chocolate and peppermint brings a delightful holiday spirit to every bite.
- Easy to Make: This recipe requires minimal ingredients and can be whipped up in under 40 minutes, perfect for last-minute gatherings.
- Great for Gifting: Packaged in cute bags or jars, this popcorn makes for a charming and delicious holiday gift for friends and family.
- Fun to Customize: Add your favorite mix-ins or toppings, such as nuts or chocolate drizzles, to make it uniquely yours!
Ingredients
Detailed Ingredient List
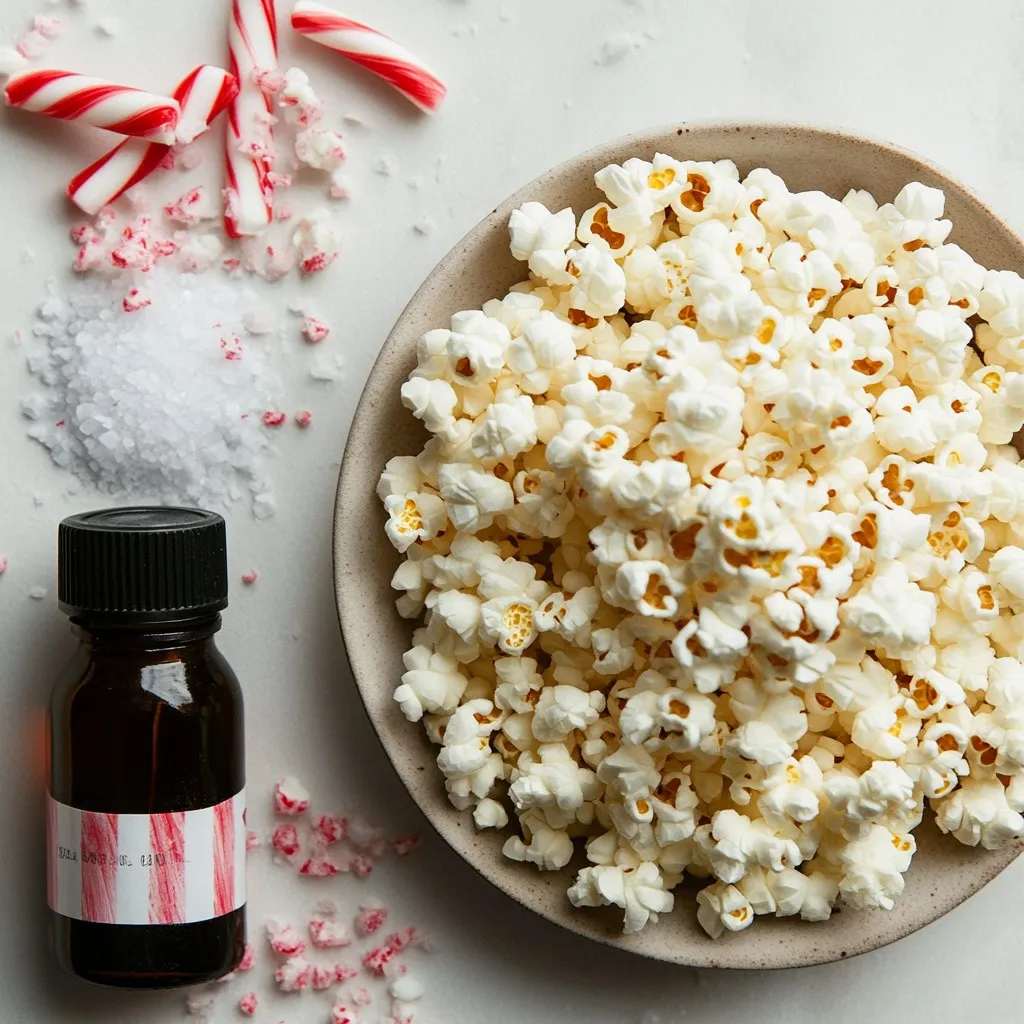
– 1/2 cup unpopped popcorn kernels
– 1 cup white chocolate chips
– 1/2 teaspoon peppermint extract
– 1/2 cup crushed candy canes
– 1/4 teaspoon sea salt
– Optional: 1 tablespoon vegetable oil for popping
To make peppermint white chocolate popcorn, you need a few simple ingredients. First, gather unpopped popcorn kernels. This will be the base of your treat. You will also need white chocolate chips for that creamy sweetness. The peppermint extract adds a festive touch, giving it a refreshing flavor. Crushed candy canes bring a crunchy texture and extra sweetness. A pinch of sea salt enhances the flavors. If you want, you can use vegetable oil to pop the kernels for a richer taste.
Choosing quality ingredients is key. Look for high-quality white chocolate chips. They melt better and taste great. For the candy canes, use fresh ones for the best crunch. The peppermint extract should be pure, not imitation. This ensures a strong, natural flavor in your popcorn.
With these ingredients ready, you’re set to create a festive and delicious snack.

Step-by-Step Instructions
How to Pop the Popcorn
To make great popcorn, you have two easy methods.
– Using a stovetop method with oil:
First, heat 1 tablespoon of vegetable oil in a large pot. Add 1/2 cup of unpopped popcorn kernels. Cover the pot with a tight lid. Shake it gently now and then. Listen for the pops. When the popping slows to about 2 seconds between pops, take the pot off the heat.
– Using an air popper for a healthier option:
If you want a lighter snack, use an air popper. Just measure 1/2 cup of kernels and follow the popper’s instructions. This method needs no oil and still gives you fluffy popcorn.
Melting the White Chocolate
Next, you need to melt the white chocolate.
– Tips for avoiding scorching:
Use a microwave-safe bowl. Add 1 cup of white chocolate chips and 1/2 teaspoon of peppermint extract. Heat it in the microwave in 30-second bursts. Stir well after each burst. This will help keep the chocolate from burning.
– How to achieve a smooth consistency:
Keep stirring until the chocolate is smooth. If it seems too thick, you can add a tiny bit of vegetable oil. This will help it flow better over the popcorn.
Coating and Mixing
Now that your popcorn and chocolate are ready, it’s time to mix!
– Best practices for even coating:
Pour the melted white chocolate over the popcorn in a large bowl. Use a spoon or spatula to toss and coat every piece. Make sure all the popcorn is covered well.
– Adding the candy canes and sea salt:
Sprinkle 1/2 cup of crushed candy canes and 1/4 teaspoon of sea salt over the popcorn mixture. Gently toss again. This adds a fun crunch and festive flavor.
Setting the Popcorn
Finally, let your treat cool and set.
– Importance of cooling time:
After mixing, line a baking sheet with parchment paper. Spread the popcorn mixture out evenly. Let it cool for about 30 minutes. This cooling helps the chocolate harden and makes it easier to break apart later.
– Tips for spreading evenly on a baking sheet:
Use a spatula to spread the popcorn into one layer. This helps it set nicely and keeps it from sticking together.
Tips & Tricks
Perfecting the Recipe
To make the best Peppermint White Chocolate Popcorn, start with the peppermint flavor. You can adjust the amount of peppermint extract to suit your taste. If you want a stronger minty kick, add a bit more. For a milder taste, use less. It’s all about your preference.
Choosing the right white chocolate is key. Look for high-quality white chocolate chips. They should contain cocoa butter for a smooth melt. Avoid chips with palm oil, as they don’t melt as well. The better the chocolate, the better your popcorn will taste.
Presentation Tips
Serving your popcorn in a fun way makes it even more special. Consider using festive bowls or clear jars. You can also sprinkle extra crushed candy canes on top for color and crunch. This adds a nice touch, especially for holiday gatherings.
If you plan to gift your popcorn, think about creative packaging. Use clear bags tied with ribbons or festive boxes. Add a tag for a personal touch. This makes your treat look homemade and thoughtful, perfect for friends and family!
Pro Tips
- Use Fresh Ingredients: Ensure your popcorn kernels and candy canes are fresh for the best flavor and texture.
- Perfectly Melted Chocolate: Stir the white chocolate regularly while melting to prevent scorching and achieve a smooth consistency.
- Cooling Time Matters: Allow the popcorn to cool completely on the baking sheet to ensure the chocolate sets properly.
- Festive Presentation: Enhance the look of your popcorn by using colorful bowls and garnishing with additional crushed candy canes or festive sprigs.

Variations
Flavor Additions
You can switch up the flavor of your popcorn easily. If you want alternatives to peppermint extract, consider using vanilla or almond extract. These flavors add a nice twist. You can also mix in nuts for extra crunch. Chopped pecans or almonds work well. Try adding mini marshmallows or sprinkles for a fun look.
Different Chocolate Options
Chocolate is key to this treat. You can use dark or milk chocolate instead of white. Dark chocolate gives a rich taste, while milk chocolate offers a sweeter flavor. Mixing chocolate types can create a unique flavor profile. For example, drizzle dark chocolate over the white chocolate popcorn for a beautiful contrast. This makes your festive treat even more special!
Storage Info
Best Practices for Storing
To keep your peppermint white chocolate popcorn fresh, store it in an airtight container. This will help prevent moisture from making it soggy. I like to use glass jars or plastic containers with tight lids. These options keep the popcorn crispy and flavorful.
– Airtight Containers: Use glass jars or plastic bins.
– Avoid Humidity: Keep popcorn in a dry place.
Shelf Life and Freezing Tips
At room temperature, this popcorn stays fresh for about 1 week. If you need to store it longer, freezing is a great option. Just make sure it’s in an airtight container to avoid freezer burn.
– Room Temperature: Lasts up to 1 week.
– Freezing: Store in an airtight container for up to 3 months.
Enjoy this festive treat anytime, knowing how to store it well!
FAQs
What is the best way to pop popcorn?
You can pop popcorn using two main methods: stovetop and microwave.
– Stovetop Method:
– Use a large pot with a lid.
– Heat 1 tablespoon of vegetable oil over medium heat. Add popcorn kernels.
– Shake the pot gently. When popping slows to 2 seconds apart, remove it from heat.
– Microwave Method:
– Place unpopped popcorn kernels in a microwave-safe bowl.
– Cover with a microwave-safe lid or plate.
– Heat in 2-3 minute intervals until popping slows.
Both methods work well, but stovetop popcorn often has a better flavor and crunch.
Can I use regular chocolate instead of white chocolate?
Yes, you can use regular chocolate, but it changes the taste.
– Proportions: Use the same amount, 1 cup of chocolate chips.
– Melting Tips: Melt it in a microwave-safe bowl in 30-second intervals. Stir after each interval. Dark or milk chocolate will need extra care not to scorch.
How do I make this recipe vegan?
To make this popcorn vegan, swap out a few ingredients.
– White Chocolate: Use dairy-free white chocolate chips.
– Peppermint Extract: Ensure it’s pure and vegan-friendly.
– Oil: Stick with vegetable oil for popping.
These simple swaps keep the festive flavors while meeting vegan needs.
This blog post covered how to make a tasty treat with popcorn. We discussed the key ingredients and steps to pop the kernels, melt the chocolate, and mix it all together. You learned tips for perfecting the recipe and ideas for fun variations. Remember, storing your popcorn well keeps it fresh. Whether for a movie night or a gift, this treat will impress. Enjoy making your delicious popcorn with peppermint and chocolate! Make it your own and have fun with i

Peppermint White Chocolate Popcorn
Ingredients
- 1/2 cup unpopped popcorn kernels
- 1 cup white chocolate chips
- 1/2 teaspoon peppermint extract
- 1/2 cup crushed candy canes
- 1/4 teaspoon sea salt
- 1 tablespoon vegetable oil (optional for popping)
Instructions
- In a large pot, heat the vegetable oil over medium heat. Add the unpopped popcorn kernels, ensuring they are evenly distributed. Cover the pot with a tight-fitting lid and gently shake it occasionally. Listen for the popping sounds, and when they slow to about 2 seconds apart, remove the pot from heat. (For a healthier option, you can also use an air popper to pop the kernels without oil.)
- In a microwave-safe bowl, combine the white chocolate chips and peppermint extract. Place the bowl in the microwave and heat in 30-second intervals, stirring well after each interval until the chocolate is completely melted and smooth. Be cautious not to overheat, as white chocolate can scorch easily.
- Transfer the freshly popped popcorn into a large mixing bowl. Drizzle the melted white chocolate over the popcorn. Using a spoon or spatula, gently toss the popcorn until every piece is beautifully coated in white chocolate.
- Sprinkle the crushed candy canes and sea salt over the white chocolate-coated popcorn. Toss gently to ensure that the candy canes and salt are evenly distributed throughout the mixture, enhancing the flavor with a festive crunch.
- Line a baking sheet with parchment paper. Spread the popcorn mixture in an even layer on the sheet, allowing it to cool completely at room temperature for about 30 minutes. This cooling step will allow the chocolate to set and will make the popcorn easier to break apart.
- Once the popcorn has cooled and the chocolate is set, break it into clusters. Serve in cheerful festive bowls or package it into gift bags for a delightful holiday treat!


![- 3 cups unsweetened shredded coconut - 1/2 cup sweetened condensed milk - 2 large egg whites - 1/4 teaspoon vanilla extract - 1/4 teaspoon almond extract - Pinch of salt - 1/2 cup dark chocolate chips (optional) These ingredients create the base for your coconut macaroons. The unsweetened shredded coconut gives it that chewy texture. Sweetened condensed milk adds creaminess and sweetness, making each bite delightful. The egg whites are crucial for lightness and fluffiness. The extracts bring in a lovely depth of flavor. If you want to add a twist, dark chocolate chips can add a rich touch. - Gluten-free options: This recipe is naturally gluten-free, perfect for those with gluten issues. - Nut-free alternatives: You can enjoy these macaroons without nuts, making them safe for nut allergies. - Vegan substitutions: For a vegan version, try using aquafaba instead of egg whites and a plant-based condensed milk. These options help everyone enjoy this treat. Whether you have dietary needs or just want to try something new, there’s a way for you to make these coconut macaroons. You can find the full recipe above to get started! Start by preheating your oven to 325°F (160°C). This step is key to baking your macaroons evenly. While the oven heats, line a baking sheet with parchment paper. This helps prevent sticking and makes cleaning up easier later. In a large mixing bowl, combine 3 cups of unsweetened shredded coconut and 1/2 cup of sweetened condensed milk. Add 1/4 teaspoon of vanilla extract, 1/4 teaspoon of almond extract, and a pinch of salt. Stir well until everything is mixed together nicely. Now, in a separate bowl, take 2 large egg whites and whip them until they form stiff peaks. This is an important step because it gives your macaroons a light and airy texture. Next, gently fold the whipped egg whites into the coconut mixture. Use a spatula and be careful not to stir too hard. You want to keep the air in the egg whites. Fold until the egg whites are just mixed in; some lumps are okay. Using a tablespoon or a small cookie scoop, portion out the mixture onto the prepared baking sheet. Make sure to space each mound about 2 inches apart. This allows them to spread a bit while baking. Now, place the baking sheet in your preheated oven. Bake the macaroons for about 20 to 25 minutes. You want them to turn a lovely golden brown. Once done, take the tray out and let the macaroons cool for about 5 minutes on the sheet. This helps them firm up. After that, transfer them to a wire rack to cool completely. For those who love chocolate, you can melt some dark chocolate chips and dip the bottoms of each macaroon. Let the chocolate set on the parchment paper. Enjoy these delightful treats from the full recipe! To make great coconut macaroons, focus on the egg whites. Whipping them correctly is key. Use a clean bowl and beaters. Beat until stiff peaks form. This step adds lightness to the macaroons. Avoid overmixing when you fold them into the coconut mix. Gently combine the ingredients. Some lumps are okay. A light touch keeps the texture airy and nice. You can boost the flavor of your macaroons in fun ways. Try adding a pinch of cinnamon or nutmeg for warmth. These spices bring depth and richness. Another idea is to add citrus zest. Lemon or lime zest gives a fresh twist. Just a small amount can make a big difference in taste. How you serve your macaroons can impress your guests. Place them on a decorative platter to catch the eye. You can garnish with shredded coconut or fresh fruit. This adds color and flair. Arrange them in clusters for an inviting look. These small touches make your dessert stand out and look professional. For the full recipe, check out the Tropical Coconut Macaroons section. {{image_4}} You can make your macaroons even better by adding chocolate. Start by melting dark chocolate chips. Use a microwave-safe bowl. Heat in 30-second bursts, stirring after each. This helps prevent burning. Alternatively, you can use a double boiler for even heating. Once the chocolate is melted, dip the bottom of each macaroon in it. Make sure to coat it well. Place the dipped macaroons back on the parchment paper. Let the chocolate harden before serving. This adds a rich flavor that complements the coconut. Want to add some nuts? Almonds and pecans work great. Simply chop them finely and mix them in with the coconut. This adds a nice crunch to the soft macaroons. If you have nut allergies, you can skip the nuts. The recipe still tastes great without them. You can also use seeds like sunflower or pumpkin for a similar texture. Always be cautious and adjust based on your needs. There are endless flavor combinations for your macaroons. One tasty option is coconut-lime. Just add lime zest and a bit of lime juice to the coconut mixture. This gives a fresh twist. Another option is vanilla bean macaroons. Instead of vanilla extract, use the seeds from a vanilla bean. This adds a lovely fragrance and flavor. You can also mix in spices like cinnamon for a warm touch. Each variation brings a new taste to your delightful tropical treats. For the complete recipe, refer to the [Full Recipe]. Store your coconut macaroons at room temperature for the best taste. Keep them in a cool, dry place. Use an airtight container to keep them fresh. This helps avoid moisture and keeps them soft. If you live in a warm climate, consider refrigerating them. The cold can help them last longer. However, be aware that refrigeration may change their texture slightly. To freeze macaroons, let them cool completely first. Once cooled, place them in a single layer on a baking sheet. Freeze for about one hour. This step prevents them from sticking together. After they are firm, transfer them to a freezer-safe bag or container. When you want to enjoy a macaroon, take it out of the freezer. Let it thaw in the fridge overnight. For a quick thaw, leave it at room temperature for a few hours. Coconut macaroons can last up to one week at room temperature. If stored in the fridge, they can last for about two weeks. Check for signs of spoilage before eating. Look for changes in texture, color, or a sour smell. If you see any of these, it’s best to toss them out. Yes, you can make coconut macaroons without egg whites. Instead, use ground flaxseed or chia seeds mixed with water. This mixture acts as a binder. For every egg white, mix 1 tablespoon of ground flaxseed or chia seeds with 2.5 tablespoons of water. Let it sit for about 10 minutes to thicken. This will give your macaroons a nice texture while keeping them egg-free. To keep your macaroons from falling apart, mix the ingredients gently. Overmixing can cause them to break. When you fold in the egg whites, do it slowly and carefully. This helps maintain air and keeps the macaroons light. Make sure to space them well on the baking sheet. This allows them to bake evenly. A good tip is to form them tightly with your hands. This will help them hold their shape during baking. Leftover shredded coconut can be used in many ways. You can add it to smoothies for extra texture. It works well in oatmeal or yogurt for a tropical twist. Consider making coconut pancakes or muffins. You can also toast it for a crunchy topping on salads or desserts. If you enjoy baking, use it in granola or energy balls. This way, you won't waste any coconut, and you'll enjoy its rich flavor in other dishes. You now know how to make coconut macaroons from scratch. We covered the essential ingredients, step-by-step instructions, and storage tips. You learned about variations, dietary options, and how to enhance flavors. Give these tasty treats a try! They are fun to make and share. Don’t forget to experiment with flavors or coatings. Enjoy your baking, and let your creativity shine!](https://joymealplan.com/wp-content/uploads/2025/06/e4df15b8-ca64-4a89-a5eb-245e13ac6d80-768x768.webp)
![For a tasty batch of pumpkin spice granola, you need these simple ingredients: - 3 cups rolled oats - 1 cup pumpkin seeds - 1 cup almond slivers - 1/2 cup pure maple syrup - 1/4 cup coconut oil, melted - 1 cup dried cranberries - 1 tablespoon pumpkin pie spice - 1/2 teaspoon pure vanilla extract - 1/4 teaspoon sea salt - Rolled oats: They provide fiber. This helps keep you full longer. - Pumpkin seeds: These are rich in zinc and magnesium. They support heart health. - Almond slivers: They add protein and healthy fats. They also boost your energy. - Pure maple syrup: This natural sweetener has antioxidants. It gives a touch of sweetness. - Coconut oil: It offers healthy fats. This adds flavor and helps with cooking. - Dried cranberries: They are a good source of vitamins. They add a sweet-tart flavor. - Pumpkin pie spice: This mix includes cinnamon and nutmeg. It brings warmth and flavor. - Pure vanilla extract: It enhances the taste. It adds a lovely aroma. - Sea salt: Just a pinch enhances all the flavors. It balances the sweetness. If you want to change things up, try these swaps: - Use honey instead of maple syrup for a different sweetness. - Swap sunflower seeds for pumpkin seeds if you have allergies. - Replace almond slivers with walnut pieces for a different nutty flavor. - Use agave syrup instead of maple syrup for a vegan option. - Try raisins or dried cherries instead of cranberries for a new taste. These choices allow you to customize your granola to fit your taste and dietary needs. Check out the Full Recipe for more details! To make pumpkin spice granola, start by gathering all your ingredients. You need oats, pumpkin seeds, almond slivers, and more. Preheat your oven to 325°F (165°C). This heat helps the granola crisp up nicely. Line a large baking sheet with parchment paper. This makes cleanup easy. In a big bowl, mix the rolled oats, pumpkin seeds, almond slivers, and sea salt. Stir them well so they blend. In another small bowl, whisk together melted coconut oil, pure maple syrup, pumpkin pie spice, and vanilla extract. This mixture adds flavor to your granola. Pour the wet mix over the dry ingredients. Stir well to coat everything. Transfer this mixture to the baking sheet. Spread it out evenly. Bake for 25 to 30 minutes. Stir every 10 minutes to avoid burning. The granola is done when it is golden brown. After baking, let it cool completely on the sheet. This step is key for making it crunchy. Once cool, add in the dried cranberries and mix them in. Store your granola in an airtight container for up to two weeks. To get the best texture, make sure not to skip the stirring. Stirring helps the granola bake evenly. If you want clusters, don’t stir too much. Let it sit in the oven without stirring for the last 10 minutes. Use high-quality maple syrup for better flavor. You can also switch the coconut oil for another oil if you prefer. Just keep the same amount. Adding nuts or seeds can give a nice crunch. Try using sunflower seeds or walnuts too. When making granola, pay attention to the color. A golden brown color means it is ready. If it looks too light, it might need more time. Consistency is also important. You want every piece to be evenly coated. Feel free to take a peek through the oven door, but avoid opening it too much. This helps keep the heat inside. For a fun touch, sprinkle some extra pumpkin pie spice on top before baking. It gives a nice aroma and flavor. Granola can be tricky. Here are some common mistakes to avoid: - Not stirring enough: Stir your mix every 10 minutes while baking. This helps prevent burning. - Using too much wet ingredients: Too much oil or syrup makes granola chewy instead of crunchy. - Not cooling properly: Allow the granola to cool on the baking sheet. This creates those tasty clusters. Want more flavor in your granola? Try these ideas: - Add cinnamon: Sprinkle in extra cinnamon for warmth. - Try nutmeg: A dash of nutmeg adds a cozy kick. - Use ginger: Ground ginger gives a nice zing to your mix. - Experiment with cardamom: This spice brings a unique taste that pairs well with pumpkin. Clusters make granola fun. Here’s how to make them: - Press down the mixture: After spreading the granola on the sheet, press it down firmly. - Bake without stirring: Bake for the first 20 minutes without stirring for bigger clusters. - Cool completely: Let it cool before breaking it apart. This helps form solid chunks. For a full recipe, check out the [Full Recipe]. {{image_4}} You can change your pumpkin spice granola by adding fun mix-ins. Try adding nuts like walnuts or pecans for crunch. You can also mix in seeds like sunflower or chia for extra nutrition. Dried fruits, such as raisins or apricots, add sweetness and chewiness. Want some chocolate? Toss in dark chocolate chips or cocoa nibs. You can create a granola that fits your taste. As fall turns to winter, you can spice up your granola even more. Add cinnamon or nutmeg for a cozy taste. Try incorporating peppermint extract for a fresh twist during the holidays. You can even mix in crushed ginger snaps for a festive crunch. Each season brings new flavors to explore, so feel free to experiment. If you need a gluten-free version, simply swap rolled oats for certified gluten-free oats. Most nuts and seeds are gluten-free, so you’re all set. For a vegan option, ensure your maple syrup is pure. You can also use agave syrup if you prefer. By making these simple swaps, anyone can enjoy your delicious granola. For the full recipe, check out the details above. To keep your pumpkin spice granola fresh, use an airtight container. Glass jars or plastic bins work well. Store it in a cool, dry place. Avoid direct sunlight, as it can make the granola stale. To extend the life of your granola, consider these tips: - Keep it sealed. Always close the lid tightly after each use. - Use small portions. Store in smaller containers for easy access. - Refrigerate if needed. If your kitchen is warm, the fridge can help. Check your granola for these signs to know if it has spoiled: - Odor. If it smells off or rancid, it's best to toss it. - Texture. It should be crunchy, not soggy or chewy. - Taste. If it tastes stale or strange, do not eat it. For the best flavor and crunch, enjoy your pumpkin spice granola within two weeks. You can find the full recipe above to get started on this tasty treat! Homemade pumpkin spice granola lasts for about two weeks. Store it in an airtight container. Keep it at room temperature to maintain its crunch. If you notice it becoming soft, it may not be fresh. Enjoy it while it's at its best! Yes, you can freeze pumpkin spice granola. Place it in a freezer-safe bag or container. It can last for up to three months in the freezer. Just remember to let it thaw before eating. This way, you can enjoy it even longer! You can find pumpkin spice granola at most grocery stores. Look in the snack aisle or the health food section. Many brands offer it, so you have options. You can also check online retailers for more choices. Making pumpkin spice granola at home is easy and rewarding. We covered the ingredients, their benefits, and tips for perfect preparation. I shared common mistakes to avoid and ways to enhance flavor. You also learned about fun variations and storage tips to keep your granola fresh. With these insights, you can create a delicious snack that fits your taste and needs. Enjoy the process and create your own unique recipes!](https://joymealplan.com/wp-content/uploads/2025/07/a68e2ffd-e611-4647-9bbb-589f309bc2c0-768x768.webp)


![To make classic banana pudding, you need these key ingredients: - 4 ripe bananas, sliced into rounds - 1 cup heavy cream - 1 cup whole milk - 1/2 cup granulated sugar - 1/4 cup cornstarch - 1/4 teaspoon kosher salt - 1 teaspoon pure vanilla extract - 2 large egg yolks - 1 package (approximately 200g) vanilla wafers - Whipped cream for topping (optional) - Additional banana slices for garnish These ingredients create the creamy base and the delightful layers that make banana pudding so special. The ripe bananas add a natural sweetness. The vanilla wafers provide crunch and texture. You can enhance your banana pudding with a few optional ingredients: - A hint of cinnamon for warmth - Chocolate chips for a sweet twist - A splash of rum extract for depth These additions can give your pudding a unique flavor. Experiment with them to find your favorite mix! If you’re missing a few ingredients, don’t worry. Here are some common substitutions you can use: - Use almond milk instead of whole milk for a dairy-free option. - Substitute coconut cream for heavy cream for a tropical flair. - Replace granulated sugar with honey or maple syrup for sweetness. These substitutions will still give you a tasty result. Just remember to adjust measurements based on taste. For the full recipe, check the [Full Recipe]. To start, gather all your ingredients. You need milk, cream, sugar, cornstarch, salt, and eggs. In a medium saucepan, mix the whole milk, heavy cream, sugar, cornstarch, and salt. Use a whisk to blend everything until smooth. Make sure there are no lumps from the cornstarch. Heat this mix over medium heat. Stir it often with a wooden spoon. You want it to thicken and bubble, which takes about 5 to 7 minutes. Next, crack the two large eggs, separating the yolks into a bowl. Whisk the yolks until they look smooth and pale. To temper the yolks, take a few spoonfuls of the hot mix and whisk them into the yolks. This step keeps the eggs from cooking too fast. After that, pour the yolk mix back into the saucepan. Cook for another 2 to 3 minutes while stirring. The pudding should be thick and creamy when done. Remove it from heat and stir in the vanilla extract. Let it cool for about 10 minutes. Now it’s time to build your pudding layers. Start with a large serving dish or individual cups. Place a layer of vanilla wafers at the bottom. Next, add a layer of sliced bananas. Pour a generous amount of pudding over the bananas and cookies. Repeat this layering until you use all ingredients. Make sure the last layer is pudding. This creates a beautiful top. After layering, cover the dish tightly with plastic wrap. This step helps keep the pudding moist. Next, place it in the fridge for at least 4 hours. This time lets the pudding chill and firm up. When you’re ready to serve, add a dollop of whipped cream on top. You can also garnish with extra banana slices for a nice touch. This dessert looks as good as it tastes! If you'd like to see the complete guide, check out the Full Recipe for more details. To get that smooth, creamy texture, follow these tips: - Whisk well: When mixing the milk and cornstarch, make sure to whisk until there are no lumps. - Stir constantly: While cooking the pudding base, stir it continuously to prevent sticking and burning. - Temper the eggs: Slowly add hot mixture to egg yolks. This helps keep them from cooking too fast. - Cool gradually: Let the pudding cool for about 10 minutes before layering. It will thicken more as it cools. To keep your pudding fresh: - Cover tightly: Use plastic wrap to seal the dish. This keeps moisture out. - Refrigerate: Always store it in the fridge. It stays good for 2-3 days. - Layer with care: If you have leftovers, keep layers separate. This avoids mushy bananas. Want to make your banana pudding even better? Try these ideas: - Add spices: A pinch of cinnamon or nutmeg can add warmth. - Use flavored wafers: Try lemon or chocolate wafers for a fun twist. - Incorporate extracts: Add a drop of almond extract for an extra layer of flavor. - Top it off: Fresh berries or nuts can give a nice crunch and taste contrast. For the full recipe, check out the details above! {{image_4}} To make chocolate banana pudding, simply add cocoa powder. Use 1/3 cup of unsweetened cocoa powder. Mix it into the milk mixture after combining the sugar and cornstarch. This gives your pudding a rich chocolate flavor. Layer it just like the classic recipe. The chocolate pairs well with bananas, creating a great dessert. For a nutty twist, add chopped pecans or walnuts. You can mix in 1/2 cup of nuts into the pudding. You can also sprinkle some on each layer. This adds a delightful crunch to each bite. The nuts contrast nicely with the creamy pudding and soft bananas. To create a vegan version, swap dairy for plant-based options. Use almond or coconut milk instead of whole milk and cream. Replace egg yolks with 1/4 cup of silken tofu blended until smooth. Sweeten with maple syrup or coconut sugar. This makes a tasty, dairy-free pudding that everyone can enjoy. Each of these variations adds a new twist to the classic banana pudding. They keep the spirit of the dessert while offering different flavors and textures. For the full recipe, make sure to check out the details above. Banana pudding has a rich history that dates back to the 19th century. This dish first appeared in American cookbooks in the late 1800s. It gained popularity in the Southern states, where fresh bananas were easy to find. The sweet, creamy dessert combined layers of pudding, bananas, and vanilla wafers. This simple yet delicious treat quickly became a staple at family gatherings and potlucks. Over the years, banana pudding has evolved in many ways. In the 1930s, brands like Nabisco made vanilla wafers popular in homes. Many cooks began using these cookies as a key ingredient. Today, you can find various versions, including chocolate and vegan options. Some recipes even add whipped cream or meringue on top for extra flavor and texture. This evolution shows how versatile and beloved banana pudding truly is. In Southern cuisine, banana pudding holds a special place. It represents comfort and warmth. Families often serve it at holidays, birthdays, and reunions. Many people have fond memories of enjoying this sweet treat with loved ones. This dessert is not just a dish; it’s a tradition passed down through generations. The combination of flavors and textures captures the essence of Southern hospitality, making it a cherished part of the culture. Yes, you can use other types of bananas. While ripe Cavendish bananas are common, you can try red or plantain bananas. Each type brings a unique flavor. Red bananas are sweeter and softer. Plantains are firmer and less sweet. Just remember, the texture and taste will change. To keep bananas from browning, you can use lemon juice. Just squeeze a little juice over the banana slices. This helps slow down oxidation. You can also cover the bananas tightly with plastic wrap. Keeping them chilled also helps. Serve the pudding soon for the best look. If you don’t have vanilla wafers, don’t worry! You can use graham crackers or shortbread cookies. Both options add a nice crunch. You can even use sponge cake for a softer layer. Get creative! The pudding will still taste great, no matter what you use. This blog shows you how to make classic banana pudding. We covered key ingredients, optional add-ins, and substitutions. I also shared simple steps for preparing, layering, and chilling the pudding. You learned tips for perfect texture and storing leftovers. Plus, I explored fun variations like chocolate and vegan options. Finally, we discussed the history and cultural roots of this dish. Banana pudding is more than a dessert; it's a beloved tradition. Enjoy creating your own version and sharing it with friends and family.](https://joymealplan.com/wp-content/uploads/2025/06/2270da16-0b21-4017-a800-73ddf1839134-768x768.webp)