Peruvian Chicken and Rice Flavorful Comfort Dish

Are you ready to explore the vibrant flavors of Peruvian Chicken and Rice? This dish combines tender chicken, aromatic spices, and fluffy rice for a warm and comforting meal. In this guide, I’ll share everything you need to know, from the key ingredients to tips for perfecting your recipe. Whether you want a classic or a spicy twist, I’ve got you covered! Dive in to discover your new favorite comfort dish.
Why I Love This Recipe
- Bold Flavors: This dish is packed with vibrant flavors from the aji amarillo paste and spices, creating a delightful taste experience.
- One-Pan Wonder: Everything cooks in one skillet, making it easy to prepare and clean up, perfect for busy weeknights.
- Comfort Food: The combination of juicy chicken and fluffy rice is the ultimate comfort food that warms the soul.
- Customizable: You can easily adjust the spice level or add your favorite vegetables to make it your own!
Ingredients
Main Ingredients for Peruvian Chicken and Rice
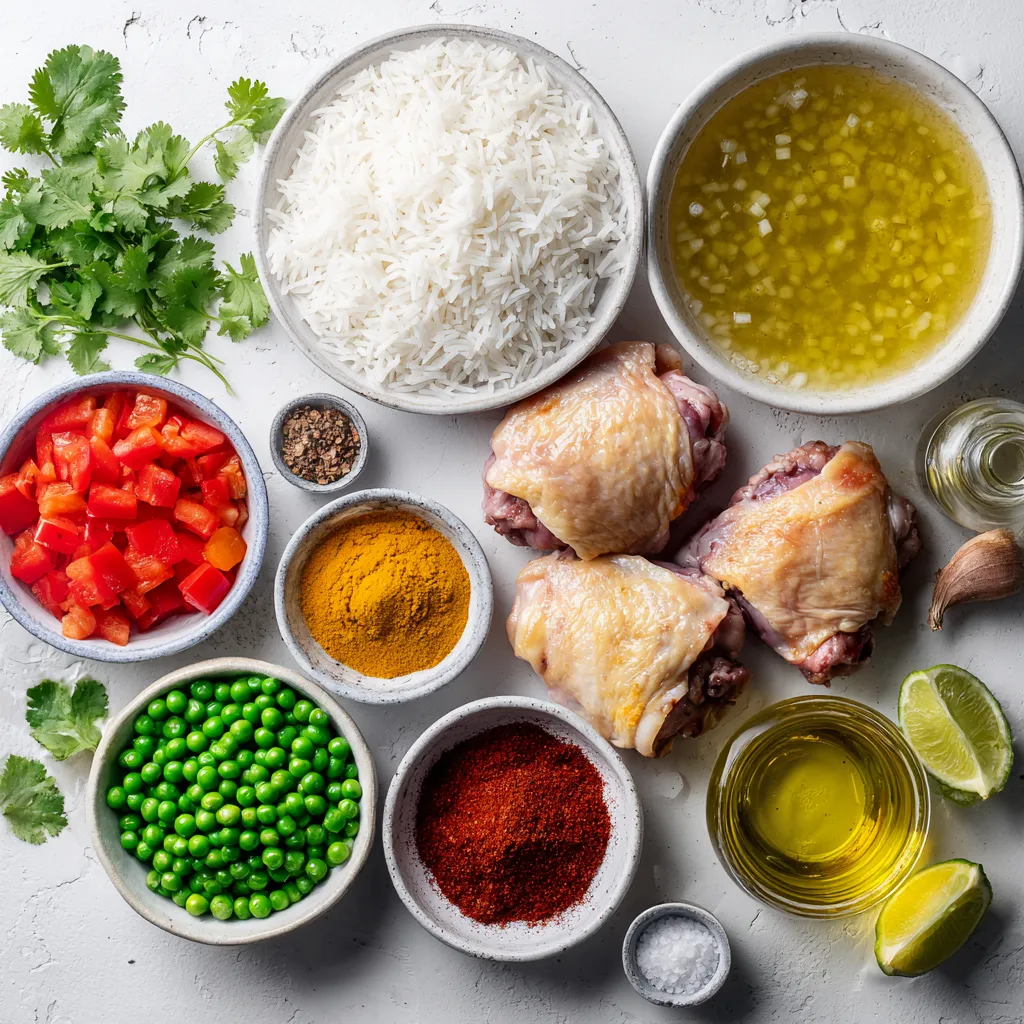
To make a delicious Peruvian chicken and rice, you’ll need:
– 4 bone-in, skin-on chicken thighs
– 1 cup long-grain white rice
– 2 cups chicken broth
– 1 medium onion, finely chopped
– 4 cloves garlic, minced
– 1 red bell pepper, diced
– 1 cup peas (fresh or frozen)
Spices and Seasonings
The right spices make this dish special. Here’s what you need:
– 2 tablespoons aji amarillo paste (or mild chili paste)
– 1 teaspoon ground cumin
– 1 tablespoon paprika
– Salt and pepper to taste
– 2 tablespoons olive oil
Optional Garnishes
These garnishes can make your dish shine:
– Fresh cilantro, chopped
– Lime wedges for serving
Using these ingredients helps you create a flavorful and cozy meal. Each one adds a unique taste. The aji amarillo paste gives a nice kick, while the cilantro adds freshness. Enjoy cooking this comforting dish!

Step-by-Step Instructions
Marinating the Chicken
Start by marinating the chicken. In a bowl, mix the chicken thighs with aji amarillo paste, ground cumin, paprika, salt, and pepper. Stir well to coat each piece. Let the chicken sit for at least 30 minutes. This marinating time helps the flavors soak in.
Searing the Chicken
Heat olive oil in a large skillet over medium-high heat. When the oil is hot, place the marinated chicken thighs skin-side down. Sear them until the skin turns golden brown and crispy, about 5 to 7 minutes. Flip the chicken and sear the other side for 5 minutes. Once browned, remove the chicken and set it aside.
Cooking the Vegetables and Rice
In the same skillet, add the chopped onion, minced garlic, and diced red bell pepper. Sauté the mix for about 4 to 5 minutes. You want the onion to turn translucent and fragrant. Then, stir in the long-grain rice. Cook it for 2 minutes to toast slightly. Pour in the chicken broth and bring to a gentle simmer.
Combining and Simmering the Dish
Nestle the seared chicken thighs back into the skillet, skin-side up. Cover the skillet tightly and lower the heat. Let it simmer for 20 to 25 minutes. This will make the rice tender and help it absorb the broth.
Adding Peas and Final Touches
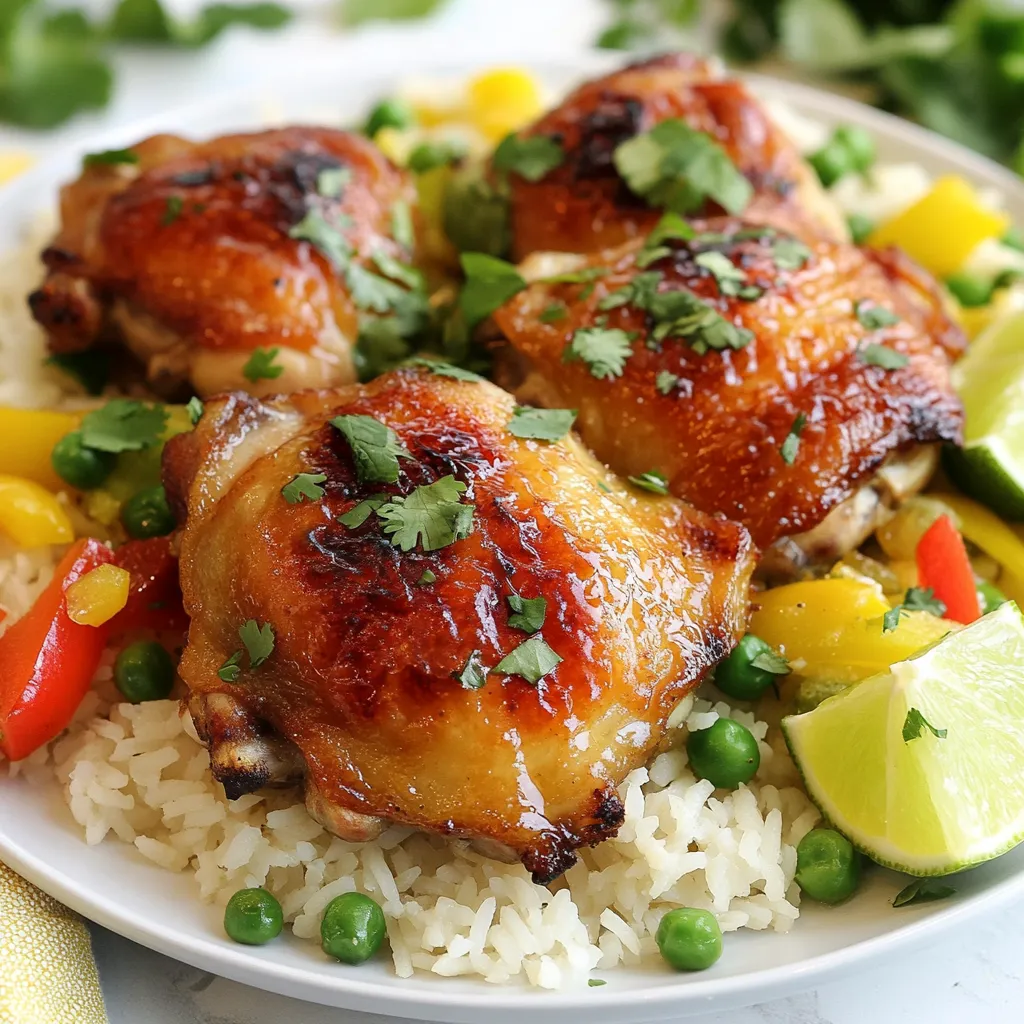
Five minutes before the cooking time is up, gently stir in the peas. Cover the skillet again to steam the peas with the rice. After the cooking time, turn off the heat. Let the skillet sit covered for 5 minutes. Fluff the rice with a fork and sprinkle fresh cilantro on top. Serve warm with lime wedges for a zesty finish.
Tips & Tricks
Selecting the Best Chicken
For this dish, I recommend using bone-in, skin-on chicken thighs. They keep the meat juicy. The skin adds flavor and a crispy texture. Look for thighs that are plump and fresh. Avoid any that feel slimy. If you prefer, you can use chicken breasts, but they may dry out.
Achieving the Perfect Rice Texture
Use long-grain white rice for this recipe. It cooks evenly and stays fluffy. Rinse the rice under cold water before cooking. This removes excess starch and prevents stickiness. Toast the rice for a couple of minutes in oil before adding the broth. This adds depth and a nutty flavor. Remember to keep the lid on while it simmers. This helps the rice absorb the liquid fully.
Flavor Enhancements and Adjustments
Want to spice things up? You can add more aji amarillo paste for heat. If you don’t have it, mild chili paste works too. Adding lime juice brightens the dish. Fresh cilantro adds a burst of flavor. You could even mix in some diced tomatoes or corn for extra color and taste. Adjust salt and pepper to your liking. Don’t be afraid to experiment!
Pro Tips
- Marination Magic: For the best flavor, marinate the chicken thighs overnight. This allows the spices to penetrate deeply into the meat, resulting in a more flavorful dish.
- Perfectly Crispy Skin: Make sure to sear the chicken skin-side down until it’s golden brown and crispy. This adds texture and flavor to the dish.
- Rice Consistency: Avoid stirring the rice too much while it’s cooking, as this can make it gummy. Let it simmer undisturbed for the best texture.
- Freshness Factor: Garnish with freshly chopped cilantro just before serving to enhance the dish’s flavor and presentation. The lime wedges also add a zesty freshness when squeezed over the top.

Variations
Vegetarian Version of Peruvian Rice
To make a vegetarian version, swap the chicken for hearty vegetables. Use mushrooms for a meaty texture. You can also add diced zucchini and carrots for more color. Replace chicken broth with vegetable broth for a full flavor. The spices still work great. You will enjoy the same zesty taste without meat.
Different Protein Options
If you want to try different proteins, think about using fish or shrimp. Both cook quickly and soak up flavors. For fish, use firm types like cod or tilapia. Shrimp adds a nice touch of sweetness. You can marinate them just like the chicken. Adjust cooking times to ensure nothing overcooks.
Spicing It Up: Alternative Chili Pastes
Aji amarillo paste gives the dish its unique kick. If you can’t find it, try other chili pastes. Sriracha or harissa can work. Each paste brings its own flavor. Just remember to start with less and taste as you go. You can always add more spice, but it’s tough to take it out!
Storage Info
Best Practices for Leftover Storage
To keep your Peruvian chicken and rice tasty, store it in an airtight container. Cool the dish to room temperature before sealing it. This helps prevent condensation, which can make the rice soggy. It can last in the fridge for up to four days. Always label the container with the date so you know when to use it.
Reheating Instructions
When you’re ready to enjoy the leftovers, reheating is easy. Place the chicken and rice in a skillet over medium heat. Add a splash of chicken broth or water to keep it moist. Stir occasionally until it’s heated through. You can also microwave it in a bowl covered with a damp paper towel. This keeps the moisture in and prevents drying out.
Freezing for Future Meals
If you want to save some for later, freezing works well. Allow the dish to cool completely, then portion it into freezer-safe bags. Remove as much air as possible to avoid freezer burn. Label each bag with the date and meal name. You can freeze it for up to three months. To reheat, thaw it overnight in the fridge and follow the reheating instructions above.
FAQs
What is aji amarillo and where can I find it?
Aji amarillo is a bright yellow chili pepper from Peru. It has a fruity flavor and mild heat. You can find aji amarillo paste in Latin markets or online. If you can’t find it, use mild chili paste as a substitute.
How can I make Peruvian Chicken and Rice gluten-free?
To make this dish gluten-free, use gluten-free chicken broth. Always check labels on rice and spices to ensure they are gluten-free. This way, you can enjoy the meal without worry.
Can I use brown rice instead of white rice?
Yes, you can use brown rice. Just keep in mind that brown rice takes longer to cook. Increase the simmering time to about 35-40 minutes. You may also need to add a little extra broth.
What side dishes pair well with Peruvian Chicken and Rice?
Some great side dishes include a fresh green salad, fried plantains, or roasted vegetables. You can also serve with avocado slices or a tangy salsa to add brightness to the meal.
How long does the dish stay fresh in the fridge?
The dish stays fresh in the fridge for about 3-4 days. Store it in an airtight container to keep it moist. Reheat it on the stove or in the microwave before serving.
Peruvian Chicken and Rice blends vibrant flavors and simple steps. We explored key ingredients like spices and optional garnishes. You learned how to marinate chicken, cook vegetables, and make perfect rice. Tips on chicken quality and flavor boosts ensure success. We also shared vegetarian options and storage methods for longevity.
Now, you can enjoy this dish anytime and impress your friends. Dive into the flavors and make it your ow

Zesty Peruvian Chicken & Rice
Ingredients
- 4 pieces bone-in, skin-on chicken thighs
- 1 cup long-grain white rice
- 2 cups chicken broth
- 1 medium onion, finely chopped
- 4 cloves garlic, minced
- 1 piece red bell pepper, diced
- 1 cup peas (fresh or frozen)
- 2 tablespoons aji amarillo paste (or mild chili paste)
- 1 teaspoon ground cumin
- 1 tablespoon paprika
- to taste salt and pepper
- 2 tablespoons olive oil
- for garnish fresh cilantro, chopped
- for serving lime wedges
Instructions
- In a mixing bowl, combine the chicken thighs with the aji amarillo paste, ground cumin, paprika, salt, and pepper. Let the mixture sit for at least 30 minutes.
- Heat the olive oil in a large skillet over medium-high heat. Sear the chicken thighs skin-side down until golden brown, about 5-7 minutes. Flip and sear the other side for 5 minutes, then remove from skillet.
- In the same skillet, add the onion, garlic, and red bell pepper. Sauté for 4-5 minutes until the onion is translucent.
- Add the rice to the skillet, stirring to coat with oil and vegetables. Cook for 2 minutes, then pour in the chicken broth and bring to a simmer.
- Nestle the seared chicken thighs back into the skillet, skin-side up. Cover and simmer for 20-25 minutes until the rice is tender.
- Five minutes before cooking time is complete, stir in the peas and cover to steam.
- Turn off the heat and let sit covered for 5 minutes. Fluff the rice and garnish with cilantro. Serve warm with lime wedges.


![- 1 cup quinoa - 2 cups vegetable broth or water - 1 can (15 oz) black beans - 1 cup corn kernels - 1 red bell pepper - 1 cup cherry tomatoes - 1 ripe avocado - 1/4 cup red onion - 1/4 cup fresh cilantro - 1 teaspoon ground cumin - 1 teaspoon chili powder - Juice of 2 fresh limes - 3 tablespoons extra virgin olive oil - Salt and freshly cracked pepper To make a tasty Southwest Quinoa Salad, you need fresh ingredients. Quinoa is the star. It adds protein and fiber. You will also need vegetable broth or water to cook the quinoa. For the beans, I love using black beans. They add creaminess and texture. Corn gives a sweet crunch. You can use fresh or frozen corn. Now, let's talk about fresh produce. The red bell pepper adds color and a slight sweetness. Cherry tomatoes bring juiciness and bright flavor. A ripe avocado gives creaminess. Don't forget the red onion! It adds a nice bite. Finally, fresh cilantro adds a burst of flavor. For spices, cumin and chili powder create a warm, earthy taste. Fresh lime juice adds zest. The olive oil makes the salad rich and smooth. Add salt and pepper to taste. You can find the full recipe for this dish below. 1. Start by rinsing and draining 1 cup of quinoa. This step removes any bitter taste. 2. Next, combine the rinsed quinoa with 2 cups of vegetable broth in a medium-sized saucepan. 3. Set the heat to medium-high and bring it to a boil. 4. Once boiling, reduce the heat to low, cover the pan, and let it simmer for about 15 minutes. 5. After 15 minutes, the quinoa should be fluffy and all the liquid absorbed. Remove it from heat. 6. Let it sit covered for another 5 minutes. Finally, fluff the quinoa gently with a fork and set it aside to cool completely. 1. In a large mixing bowl, add the following ingredients: - 1 can (15 oz) black beans, well rinsed and drained - 1 cup corn kernels (fresh or frozen) - 1 red bell pepper, finely diced - 1 cup cherry tomatoes, halved - 1 ripe avocado, diced - 1/4 cup red onion, finely chopped - 1/4 cup fresh cilantro, roughly chopped 2. Gently mix these ingredients to combine. Make sure everything is evenly spread in the bowl. 1. In a small bowl, whisk together the following: - The juice of 2 fresh limes - 3 tablespoons extra virgin olive oil - 1 teaspoon ground cumin - 1 teaspoon chili powder - A sprinkle of salt and freshly cracked pepper 2. This dressing adds a zesty flavor to your salad, so make sure to mix well. 1. Now, fold the cooled quinoa into the salad mixture. 2. Gently combine all the ingredients until they are well mixed. 3. Taste and adjust seasoning with more salt and pepper if needed. 4. Once everything is mixed, cover the bowl and refrigerate for at least 30 minutes. This allows the flavors to meld together beautifully. For the complete recipe, you can refer to the [Full Recipe]. To avoid mushy quinoa, start by rinsing it well. Rinsing removes the bitter coating called saponin. This simple step makes a big difference in taste. After rinsing, use two cups of vegetable broth or water for every cup of quinoa. This ratio helps the quinoa cook evenly and stay fluffy. It's good to let the quinoa simmer gently. Boil it first, then cover and lower the heat. This method keeps the grains separate and light. Once cooked, let it sit for five minutes before fluffing it with a fork. This extra time helps the quinoa absorb any leftover moisture. For a stunning presentation, serve your salad in a colorful bowl. This makes the vibrant colors pop. Use a large bowl or individual plates for each guest. Garnish with fresh cilantro leaves for a bright touch. Adding lime wedges around the dish looks nice too. You can sprinkle crumbled feta cheese on top for richness. Tortilla strips add a nice crunch and extra flavor. These small touches can elevate your dish from good to great. If you want some heat, add diced jalapeños or a dash of hot sauce. This gives a nice kick to the salad. You can adjust the heat level to your taste. For sweetness, try adding diced mango or pineapple. These fruits pair well with the other flavors. They bring a fresh and tropical twist. Mixing sweet and spicy makes the salad more exciting. {{image_4}} You can boost the protein in this salad easily. Adding grilled chicken or shrimp makes it heartier. Both options pair well with the fresh flavors. I love to season the chicken with lime and spices before grilling. For a vegetarian twist, use tofu. Press and cube the tofu, then sauté it until golden. This adds a nice texture and flavor to your salad. Need a gluten-free option? Quinoa is naturally gluten-free! If you want to switch it up, try using millet or brown rice. Both work well and keep the dish light. For those on a vegan diet, this salad is already a great choice. Just ensure all ingredients, like the broth, are plant-based. You can swap lime juice with apple cider vinegar for a tangy twist. Herbs can really enhance your salad. Try adding parsley or dill to give it a fresh kick. These herbs add color and aroma too. If you want to change the citrus flavor, use orange or lemon instead of lime. They both add a sweet and tangy note, making your salad even more vibrant. Mixing in different flavors keeps your meals exciting. The Southwest Quinoa Salad stays fresh in the fridge for about 3 to 5 days. To keep it tasty, store it in an airtight container. This helps lock in flavors and keeps the salad crisp. I recommend using glass containers. They are great for keeping food fresh and safe. You can freeze this salad, but I suggest leaving out the avocado. The avocado does not freeze well and becomes mushy. If you want to freeze it, prepare the salad without the avocado. Store in a freezer-safe container. It’s best to eat it within 2 to 3 months for the best taste. To refresh the refrigerated salad, take it out and let it sit for a few minutes. This helps the flavors come back alive. Avoid reheating the salad in the microwave. The heat can make the veggies soggy. Instead, enjoy it cold or at room temperature for a crisp bite. To make the Southwest Quinoa Salad vegan, swap out any animal-based ingredients. For example, use olive oil instead of any honey or dairy products. Avocado is already vegan, so you can keep that. If you want creaminess, add more avocado or use a plant-based yogurt. Yes, you can prepare this salad ahead of time. I suggest making it a few hours before serving. This way, the flavors blend well. Just be sure to store it in the fridge. You can also make the quinoa the day before. This salad pairs well with grilled meats, like chicken or steak. It also makes a great side for BBQs. You can even enjoy it with tacos or burritos. It adds a fresh touch to any meal. Quinoa is a superfood packed with protein. It has all nine essential amino acids. Plus, it is high in fiber, which is good for digestion. The added veggies like tomatoes and peppers boost vitamins and minerals. To spice up the salad, add diced jalapeños or red pepper flakes. You can also add a splash of hot sauce to the dressing. For a smoky flavor, try adding chipotle powder. Adjust the heat to your taste. For the full recipe, check out the Southwest Quinoa Fiesta Salad. In this blog post, I shared a simple and tasty Southwest Quinoa Salad recipe. I covered ingredients, cooking steps, and storage tips. You learned how to make it vegan and delicious. Remember to experiment with flavors and ingredients. This salad is versatile and can fit many diets. Enjoy making it your own! Get creative and share it with friends and family for a delightful meal.](https://joymealplan.com/wp-content/uploads/2025/07/ba958c7b-7f9d-4e5f-ae24-7804e94fee3c-768x768.webp)


