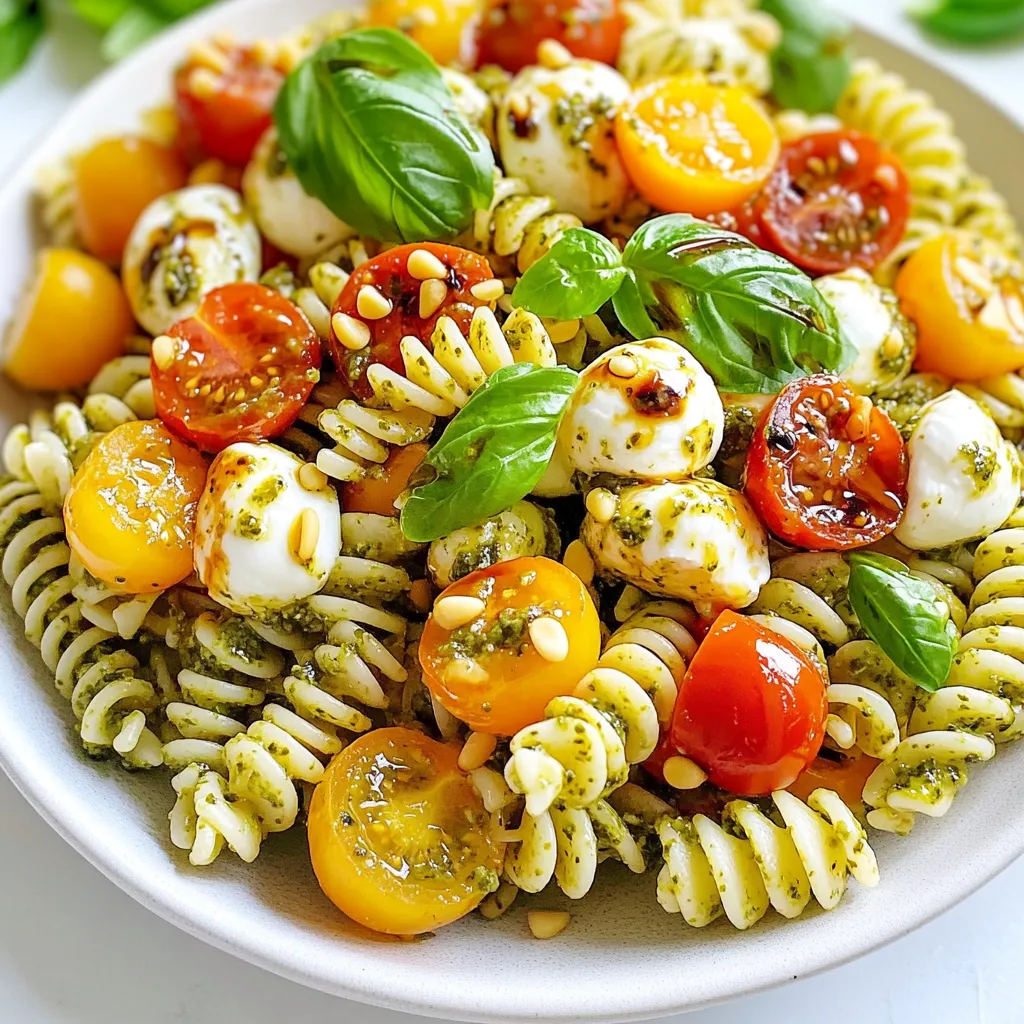
Looking for a dish that bursts with flavor and freshness? Discover how to make Pesto Caprese Pasta Salad, a vibrant blend of rotini pasta, cherry tomatoes, and creamy mozzarella. This easy recipe is perfect for lunch, dinner, or potlucks. Not only is it simple to whip up, but it also serves as a canvas for your creativity. Let’s dive into this delicious delight that will leave your taste buds singing!
Why I Love This Recipe
- Fresh and Flavorful: This Pesto Caprese Pasta Salad combines fresh ingredients, making each bite bursting with flavor.
- Easy to Prepare:
- Versatile: It can be served as a side dish or a main course, and it works well for meal prep or gatherings.
- Beautiful Presentation: The vibrant colors of the cherry tomatoes, basil, and mozzarella make it visually appealing on any table.
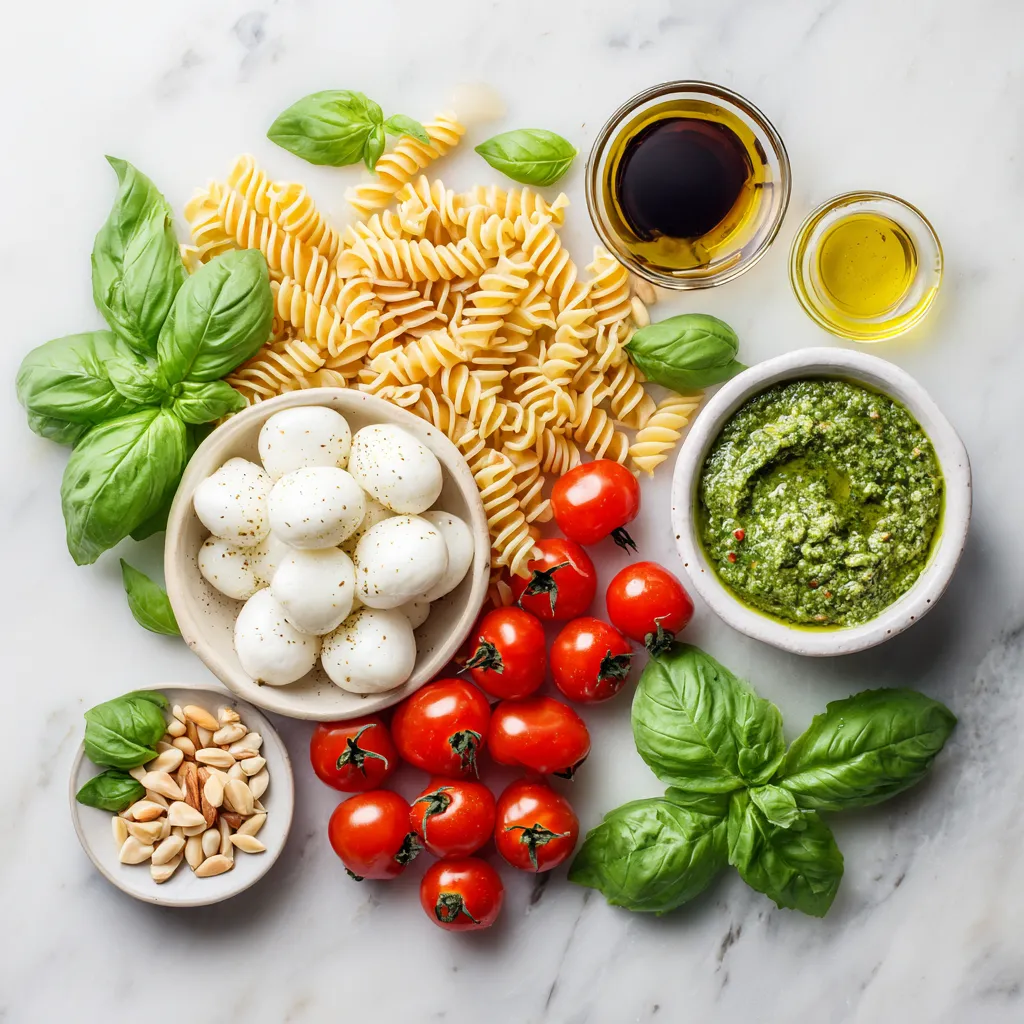
Ingredients
List of Required Ingredients
– 8 oz rotini pasta
– 1 cup cherry tomatoes, halved
– 1 cup fresh mozzarella balls (bocconcini)
– 1 cup fresh basil leaves, loosely packed
– 1/4 cup pine nuts, toasted
– 1/2 cup fresh pesto (store-bought or homemade)
– 2 tablespoons extra virgin olive oil
– Salt and freshly ground black pepper to taste
– Balsamic glaze for drizzling
Gathering fresh ingredients makes a big difference in taste. You want rotini pasta that holds sauce well. Use ripe cherry tomatoes for sweetness. I love bocconcini for its creamy texture. Don’t skip the fresh basil; it adds bright flavor.
Toasting pine nuts enhances their nutty taste. You can use store-bought pesto, but homemade is best. Extra virgin olive oil adds richness and depth. Salt and pepper elevate all the flavors. The balsamic glaze is the cherry on top, giving a sweet finish.
Make sure everything is fresh. This salad shines with quality ingredients. It’s easy to find these items at your local market. Always check for the best quality to impress your guests.
Step-by-Step Instructions
Cooking the Pasta
To start, fill a large pot with salted water. Bring this water to a rolling boil. Once boiling, add 8 ounces of rotini pasta. Cook it for about 8 to 10 minutes. You want it to be al dente, which means it should still have a little bite. After cooking, drain the pasta in a colander. Rinse it under cold water to stop the cooking process and cool it down quickly.
Preparing the Salad Ingredients
While the pasta cools, wash 1 cup of cherry tomatoes. Halve each tomato with a sharp knife. Next, take 1 cup of fresh mozzarella balls and drain them to remove excess moisture. For the pine nuts, measure out 1/4 cup. Place these in a dry skillet over medium heat. Toast them for about 3 to 4 minutes. Stir often until they turn golden brown and smell great. Keep an eye on them so they don’t burn.
Combining the Salad
In a large mixing bowl, add the cooled rotini pasta. Then, add the halved cherry tomatoes, drained mozzarella balls, and toasted pine nuts. Tear the fresh basil leaves into smaller pieces and add those too. Next, pour in 1/2 cup of fresh pesto and 2 tablespoons of extra virgin olive oil. Use a large spoon or spatula to gently toss everything together. Make sure all the ingredients are well-coated with the pesto.
Seasoning the Dish
Before you serve, taste the pasta salad. You might want to add salt and freshly ground black pepper based on your preference. Remember, the pesto may already have salt in it, so season carefully.
Serving Suggestions
To serve, scoop the pasta salad onto a nice serving platter or into individual bowls. For an extra touch, drizzle some balsamic glaze over the top just before serving. This adds sweetness and brightness to the dish. Enjoy your fresh and flavorful Pesto Caprese Pasta Salad!
Tips & Tricks
Cooking Perfect Pasta
To make the best pasta, you need to cook it just right. You want that perfect al dente texture. This means the pasta should be firm but not hard. To achieve this, boil your rotini in salted water for 8-10 minutes. Check it a minute or two before the time is up. You want it to have a slight bite when you taste it.
After you cook the pasta, rinse it properly. This stops the cooking process and cools the pasta quickly. Use cold water and pour it over the pasta in a colander. This step helps keep the pasta from getting sticky.
Enhancing Flavor
Quality pesto is key to a great dish. If you can, use homemade pesto. It tastes better and has fresher ingredients. Store-bought pesto can work too, but check for natural ingredients.
Using fresh ingredients is also important. Fresh mozzarella balls and ripe cherry tomatoes really boost flavor. Their taste shines in the salad. Don’t skip the fresh basil either. It adds a lovely aroma and taste.
Presentation Ideas
For a beautiful salad, garnishing is a must. Add extra basil leaves on top. You can also sprinkle toasted pine nuts for a nice crunch.
When serving, think about your dish. A nice platter can elevate the look. You might also use individual bowls. Drizzle balsamic glaze over the top just before serving. This adds a sweet touch that makes it pop.
Pro Tips
- Use Fresh Ingredients: The quality of your cherry tomatoes, mozzarella, and basil will significantly enhance the flavor of your pasta salad. Opt for in-season produce for the best taste.
- Perfect Pesto: If using store-bought pesto, try to select a high-quality brand or make your own. Homemade pesto can be customized to your taste, ensuring a fresher flavor.
- Chill Before Serving: Allow the pasta salad to chill in the refrigerator for at least 30 minutes before serving. This helps the flavors meld together beautifully.
- Variations: Feel free to add other ingredients like olives, arugula, or roasted red peppers to customize your pasta salad to your liking.
Variations
Ingredient Substitutions
You can easily swap out pasta types. Try using quinoa or whole wheat pasta for a healthy twist. If you want something gluten-free, go for rice pasta or chickpea pasta. Each will give a unique taste and texture.
For dairy-free options, use tofu or a nut-based cheese instead of mozzarella. These alternatives still provide creaminess. They blend well with the other flavors in the salad.
Flavor Profile Adjustments
Want to boost the protein? Adding grilled chicken or shrimp makes this dish heartier. Simply cook your protein of choice and mix it in with the pasta. It’s a great way to turn a side dish into a main course.
If you like a little heat, sprinkle in red pepper flakes. This small change can add a nice kick to your salad. Adjust the amount to fit your spice level.
Seasonal Ingredients
In spring, fresh asparagus and sweet peas can add color and crunch. Just blanch the asparagus for a few minutes before adding it to the salad. The peas add a nice pop, both in taste and texture.
For summer, think about adding zucchini or bell peppers. Slice them thin and toss them in raw. They will give your salad a fresh, crisp bite that perfectly captures summer flavors.
Storage Info
Storing Leftovers
To keep your Pesto Caprese Pasta Salad fresh, store it in the fridge. Place the salad in a sealed container. Use glass or plastic containers with tight-fitting lids. This helps keep moisture in and air out. Your pasta salad will stay fresh for about 3 to 5 days.
Freezing Options
You can freeze this pasta salad, but it may change texture. To freeze, use a freezer-safe container. Leave some space at the top, as the salad will expand. When you want to eat it, take it out and let it thaw in the fridge overnight.
To reheat, gently warm it in a pot over low heat. Stir occasionally to help it heat evenly. You can also enjoy it cold after thawing. Just add a little extra pesto and olive oil for flavor.
FAQs
How long does Pesto Caprese Pasta Salad last in the fridge?
Pesto Caprese Pasta Salad lasts about three to five days in the fridge. To keep it fresh, store it in an airtight container. This helps prevent the pasta from drying out. If you notice any moisture, use a paper towel to absorb it. This simple step keeps your salad tasty for longer.
Can I make this recipe ahead of time?
Yes, you can make this salad ahead of time. It tastes even better after resting for a few hours. To prepare it in advance, follow the recipe and store it in the fridge. Just add the balsamic glaze right before serving. This keeps the salad from getting soggy.
What can I substitute for pesto?
If you don’t have pesto, consider using other sauces. A simple mix of olive oil, garlic, and herbs works well. You can also try sun-dried tomato spread or a store-bought Italian dressing. Each option gives a different flavor but still keeps your salad fresh and delicious.
Is Pesto Caprese Pasta Salad suitable for meal prep?
Absolutely! This salad is meal prep friendly. Make a big batch and divide it into portions for the week. It holds up well, making it great for lunches or quick dinners. Just remember to add fresh basil and balsamic glaze when you’re ready to eat.
Can I adjust the ingredients to make it vegan?
Yes, you can easily make this salad vegan. Substitute fresh mozzarella with dairy-free cheese or omit it entirely. Use vegan pesto, made without cheese, or make your own. These simple swaps keep the flavors vibrant while sticking to a vegan diet.
This pasta salad is fresh and easy to make. You gather rotini, cherry tomatoes, and mozzarella. You toss them with pesto and olive oil for great flavor. Remember to use quality ingredients. This dish shines when served chilled with balsamic glaze on top. You can also switch up ingredients to suit your taste or season. Try it with different proteins or veggies. Now, you can enjoy a dish that’s perfect for any occasion, full of flavor and colo


