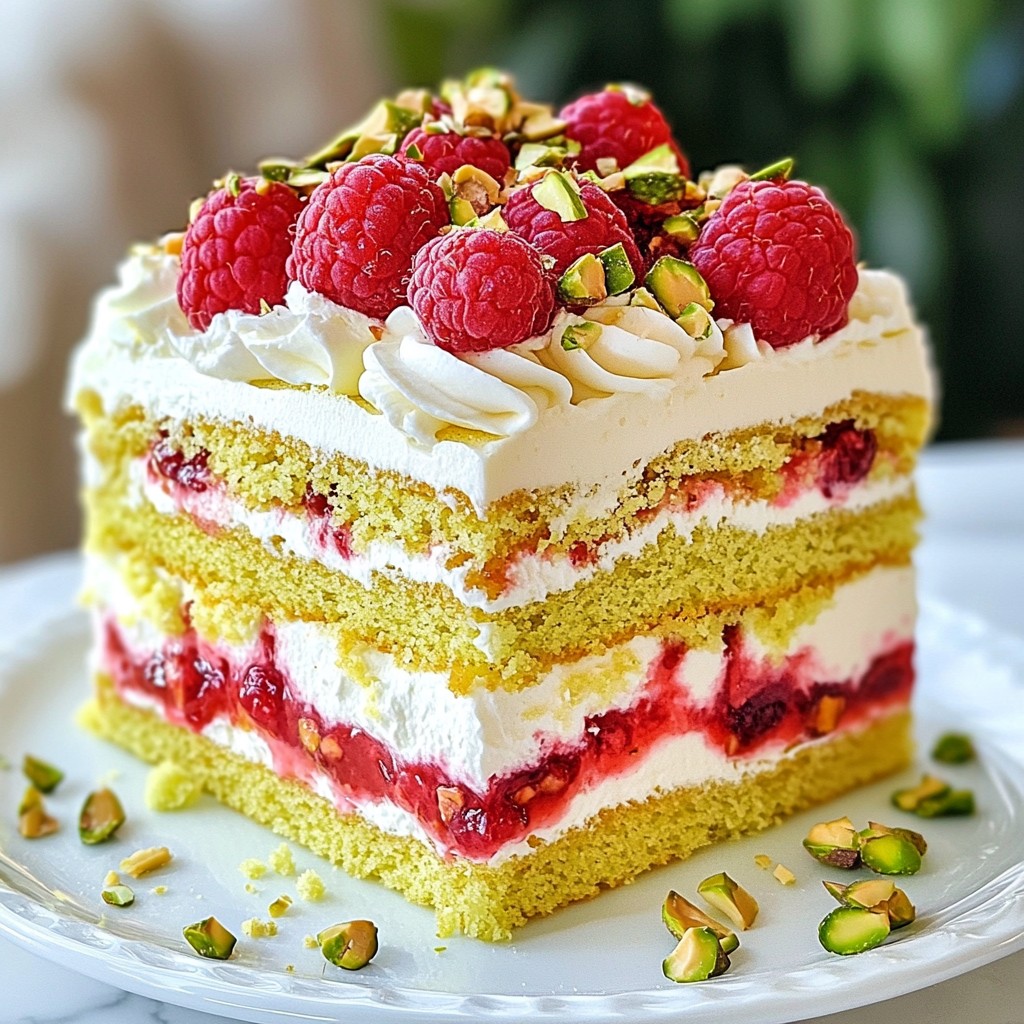
Ready for a treat that delights both the eyes and taste buds? This Pistachio Raspberry Layer Cake is the perfect blend of nutty and fruity flavors. You’ll love how easy it is to make, from the simple ingredients to the step-by-step guide I’ve laid out for you. Whether it's a special occasion or just a sweet craving, this cake makes every moment special. Let's dive into the delicious details!
Why I Love This Recipe
- Delicious Flavor Combination: The nutty richness of pistachios paired with the tartness of raspberries creates a perfect harmony of flavors.
- Stunning Presentation: This cake is a showstopper, with its vibrant colors and elegant layers that are sure to impress any guest.
- Versatile Treat: Perfect for celebrations or as a delightful afternoon snack, this cake fits any occasion.
- Easy to Make: With straightforward steps and simple ingredients, even novice bakers can create this masterpiece.
Ingredients
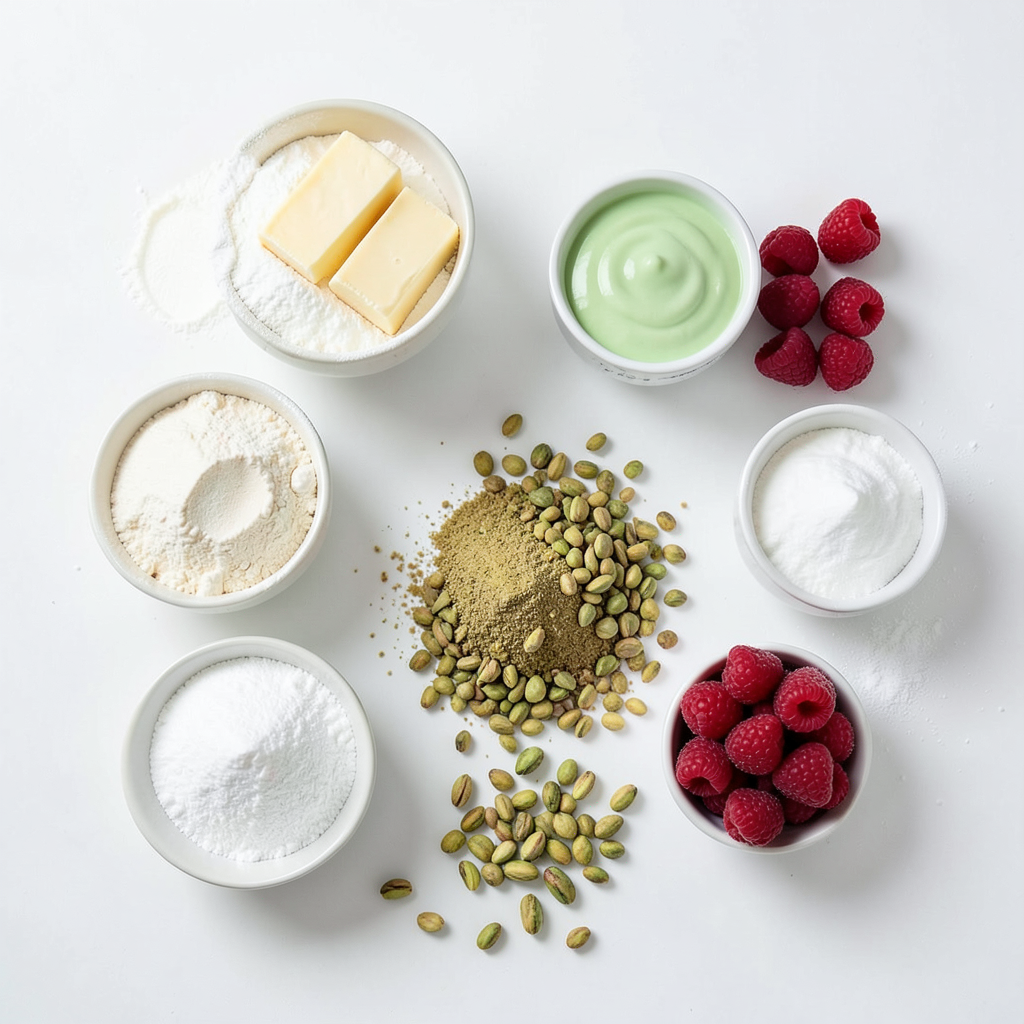
List of Ingredients for Pistachio Raspberry Layer Cake
- 2 cups all-purpose flour
- 1 cup unsalted butter, softened
- 1 ½ cups granulated sugar
- 4 large eggs, at room temperature
- 1 teaspoon vanilla extract
- 1 teaspoon almond extract
- 1 cup ground unsalted pistachios
- 1 tablespoon baking powder
- ½ teaspoon salt
- 1 cup buttermilk, at room temperature
- 1 cup fresh raspberries (plus extra for garnish)
- 2 cups heavy whipping cream, chilled
- 1 teaspoon powdered sugar
- Green food coloring (optional)
- Chopped pistachios (for decoration)
Necessary Tools and Equipment
You will need some essential tools to make this cake. Here’s a quick list:
- Three 8-inch round cake pans
- Electric mixer
- Mixing bowls
- Whisk
- Rubber spatula
- Fine-mesh sieve
- Chilled mixing bowl for whipped cream
- Wire rack for cooling cakes
- Serving plate
Ingredient Substitutions
You can make some swaps if needed. Here are a few options:
- Gluten-Free Flour: Use a gluten-free blend instead of all-purpose flour.
- Dairy-Free Butter: Replace unsalted butter with a dairy-free alternative.
- Egg Substitute: Use flax eggs or applesauce for a vegan option.
- Alternative Sweeteners: Try coconut sugar or honey if you want a different sweetness.
- Different Berries: Swap raspberries with strawberries or blueberries for a new flavor.
These substitutions can help fit your diet while still making a tasty cake.
Step-by-Step Instructions
Preparation and Baking Process
To start, preheat your oven to 350°F (175°C). This step is key for even baking. Next, prepare three 8-inch round cake pans. Grease them with butter or cooking spray and dust with flour to prevent sticking.
In a large bowl, mix the softened butter and granulated sugar. Use an electric mixer on medium speed. Beat for about 3-4 minutes until the mix is light and fluffy. Add the eggs one at a time. Mix well after each egg. Then, stir in the vanilla and almond extracts.
In another bowl, whisk together the flour, ground pistachios, baking powder, and salt. This ensures even distribution. Gradually mix the dry ingredients into the wet ingredients. Alternate with the buttermilk. Start and end with flour. Be gentle; overmixing can make the cake dense.
If you want, add a few drops of green food coloring to give a pistachio hue. Mix until the color is even. Now, divide the batter among the prepared pans. Smooth the tops with a spatula. Bake for 25-30 minutes. The cakes are done when a toothpick comes out clean from the center.
After baking, let the cakes cool in the pans for 10 minutes. Then, transfer them to a wire rack to cool completely.
Making the Raspberry Filling
While the cakes cool, prepare the raspberry filling. Place fresh raspberries in a small saucepan over low heat. Stir gently until they break down, about 3-5 minutes. This helps release the juices.
After that, strain the raspberry mixture through a fine-mesh sieve. This removes the seeds, leaving a smooth filling. Set it aside to cool.
Assembling and Frosting the Cake
Once the cakes are cool, it’s time to assemble. Place one cake layer on a serving plate. Spread a thin layer of raspberry filling on top. Then, add a generous layer of whipped cream.
Add the second layer of cake and repeat the process. Spread more raspberry filling and whipped cream. Finish with the final layer on top.
Now, use the remaining whipped cream to frost the top and sides of the cake. For a lovely touch, garnish with extra fresh raspberries and a sprinkle of chopped pistachios. This makes the cake not just tasty but also beautiful.
Tips & Tricks
Common Mistakes to Avoid
When making the Pistachio Raspberry Layer Cake, avoid overmixing the batter. This can make the cake tough. Also, be sure to let the cakes cool completely before assembling. If you don't, the whipped cream can melt. Another mistake is not measuring your ingredients correctly. Use a scale or measuring cups for accuracy.
How to Achieve the Perfect Cake Texture
To get a fluffy cake, cream the butter and sugar well. This should take about 3-4 minutes. Add the eggs one at a time, mixing well. Incorporate the dry ingredients gently. Alternate with the buttermilk, starting and ending with the flour. This helps to keep the cake light. If you want a pistachio hue, add green food coloring slowly until you reach your desired shade.
Suggested Serving Suggestions
Serve this cake chilled for the best flavor. Pair it with fresh mint leaves for a nice touch. You might also want to add a scoop of vanilla ice cream on the side. It complements the cake perfectly. For a fun twist, drizzle some raspberry sauce on the plate. This adds extra color and taste. Enjoy this cake at parties or as a special treat!
Pro Tips
- Use Room Temperature Ingredients: Ensure that your butter, eggs, and buttermilk are at room temperature. This helps to create a smoother batter and a more evenly baked cake.
- Don’t Overmix the Batter: When combining your wet and dry ingredients, mix just until combined. Overmixing can lead to a denser texture in your cake.
- Chill Your Whipped Cream Bowl: For perfectly whipped cream, chill your mixing bowl and beaters in the fridge before whipping. This helps the cream to whip up faster and hold its shape better.
- Layering Technique: When assembling your cake, make sure to spread the raspberry filling and whipped cream evenly to prevent the layers from sliding apart. A small offset spatula works great for this!
Variations
Flavor Variations (Adding Extracts or Zests)
You can easily switch up the flavors in this cake. Adding extracts can give it a new twist. For a citrus kick, try lemon or orange zest. You can also add a bit more almond extract. This will enhance the nutty taste of the pistachios. Experimenting with these additions can make each cake unique and fun.
Healthier Alternatives (Gluten-Free, Dairy-Free Options)
If you want a gluten-free cake, swap all-purpose flour for a gluten-free blend. Make sure it works well for baking. For a dairy-free option, use almond milk or coconut cream instead of buttermilk. Use a dairy-free whipped cream for frosting. These choices keep the cake tasty while making it friendlier for all diets.
Decorative Ideas for Special Occasions
To make your cake look special, use fresh fruits like raspberries on top. You can also sprinkle chopped pistachios for a nice crunch. Another idea is to add edible flowers for a pop of color. Use a cake stand to elevate the look. Each of these ideas can make your Pistachio Raspberry Layer Cake shine at any event.
Storage Info
How to Properly Store Leftovers
To keep your Pistachio Raspberry Layer Cake fresh, store it in the fridge. Place the cake in an airtight container. This helps maintain its flavor and moisture. If you have leftover slices, wrap them tightly in plastic wrap before placing them in the container. This prevents them from drying out.
Freezing Tips for Cake
You can freeze this cake for later enjoyment. First, let the cake cool completely. Wrap each layer in plastic wrap. Then, place the wrapped layers in a freezer-safe bag or container. Label it with the date. The cake can last up to three months in the freezer. When you're ready to enjoy it, thaw it overnight in the fridge.
Best Practices for Reheating
If you want to enjoy the cake warm, preheat your oven to 350°F (175°C). Remove the cake from the fridge and unwrap it. Place it on a baking sheet and heat for about 10-15 minutes. You can also use the microwave. Just warm a slice for about 15-20 seconds. Be careful not to overheat, as this may dry it out. Enjoy your delicious cake!
FAQs
How long does the Pistachio Raspberry Layer Cake last?
The Pistachio Raspberry Layer Cake stays fresh for about 3 to 4 days. Store it in the fridge. Make sure to cover it well with plastic wrap or foil. This keeps the air out and prevents it from drying out. If you want to keep it longer, consider freezing it.
Can I replace the raspberries with other fruits?
Yes, you can swap raspberries for other fruits. Strawberries, blueberries, or blackberries work well. Just remember to adjust the amount based on the fruit's size and sweetness. Fresh or frozen fruits can be used, but make sure to drain any extra juice to avoid sogginess.
What type of cake pan is best for this recipe?
I recommend using three 8-inch round cake pans. These pans help the cake layers bake evenly. Make sure to grease and flour them well before adding the batter. If you don’t have 8-inch pans, you can use 9-inch pans, but the baking time may vary.
In this blog post, we explored the ingredients, steps, and tips for making a Pistachio Raspberry Layer Cake. I shared how to gather the right tools, substitute ingredients, and avoid common mistakes to ensure success. Remember that you can customize flavors and follow best storage practices to keep your cake fresh. Use these insights to impress your friends and family with this delicious dessert. Baking can be fun and rewarding, so don’t be afraid to get creative! Enjoy every layer of your cake journey.


