
Get ready to embrace fall with my Pumpkin Spice Biscotti with White Chocolate Delight! This tasty treat combines rich pumpkin flavors and warm spices with sweet white chocolate for the perfect snack. Whether you enjoy them with a hot drink or on their own, these biscotti will warm your heart. Follow my step-by-step guide, and you’ll have a delightful batch ready in no time! Let’s dive in and make this seasonal favorite!
Ingredients
Main Ingredients
– 2 cups all-purpose flour
– 1 cup white chocolate chips
– 1/2 cup pure pumpkin puree
– 2 large eggs
Spices and Flavorings
– 1 teaspoon ground cinnamon
– 1/2 teaspoon ground nutmeg
– 1/2 teaspoon ground ginger
– 1/4 teaspoon ground cloves
– 1/2 teaspoon salt
Sweeteners
– 1/2 cup granulated sugar
– 1/4 cup brown sugar, packed
Optional Add-ins
– 1/2 cup chopped walnuts or pecans
The main ingredients create the base for this tasty biscotti. The all-purpose flour gives structure. White chocolate chips add sweet creaminess. Pumpkin puree brings moisture and flavor. The eggs act as a binding agent to hold everything together.
Next, we add spices to make it special. Ground cinnamon warms the palate. Nutmeg adds a nutty, sweet flavor. Ginger brings a hint of spice, while cloves add depth. Salt balances all the sweet flavors.
For sweetness, we use granulated sugar and brown sugar. Granulated sugar gives a clean sweetness. Brown sugar adds a slight caramel touch.
Optional add-ins like walnuts or pecans can enhance texture. They add crunch and flavor, making each bite delightful. You can mix and match ingredients based on your taste. Enjoy creating your perfect pumpkin spice biscotti!
Step-by-Step Instructions
Prepping the Oven and Baking Sheet
– Preheat oven to 350°F (175°C).
– Line baking sheet with parchment paper.
Mixing Dry Ingredients
– In a bowl, whisk together:
– 2 cups all-purpose flour
– 1 teaspoon baking powder
– 1/2 teaspoon baking soda
– 1 teaspoon ground cinnamon
– 1/2 teaspoon ground nutmeg
– 1/2 teaspoon ground ginger
– 1/4 teaspoon ground cloves
– 1/2 teaspoon salt
Setting this bowl aside lets the spices blend well.
Mixing Wet Ingredients
– In a large bowl, mix:
– 1/2 cup granulated sugar
– 1/4 cup brown sugar
– 2 large eggs
– Beat this mixture until it looks light and smooth.
– Add:
– 1/2 cup pure pumpkin puree
– 1 teaspoon vanilla extract
– Mix until everything combines well.
Combining Mixtures
– Gradually fold the dry mixture into the wet mixture.
– Be gentle to avoid overmixing.
– If you want, fold in:
– 1/2 cup chopped walnuts or pecans
– 1 cup white chocolate chips
This adds a nice texture and flavor.
Shaping and Baking
– Divide the dough into two equal parts.
– Shape each part into logs, about 12 inches long and 3 inches wide.
– Place the logs on your prepared baking sheet with space between them.
– Bake for 25-30 minutes, until they feel firm and look golden.
Slicing and Second Baking
– Remove the logs from the oven and let them cool on the sheet for 10 minutes.
– Transfer to a cutting board and slice diagonally into 1/2-inch thick pieces.
– Return the slices to the baking sheet, cut-side up.
– Bake for another 10-15 minutes until they are crisp and golden.
– After the second bake, let them cool completely on a wire rack.
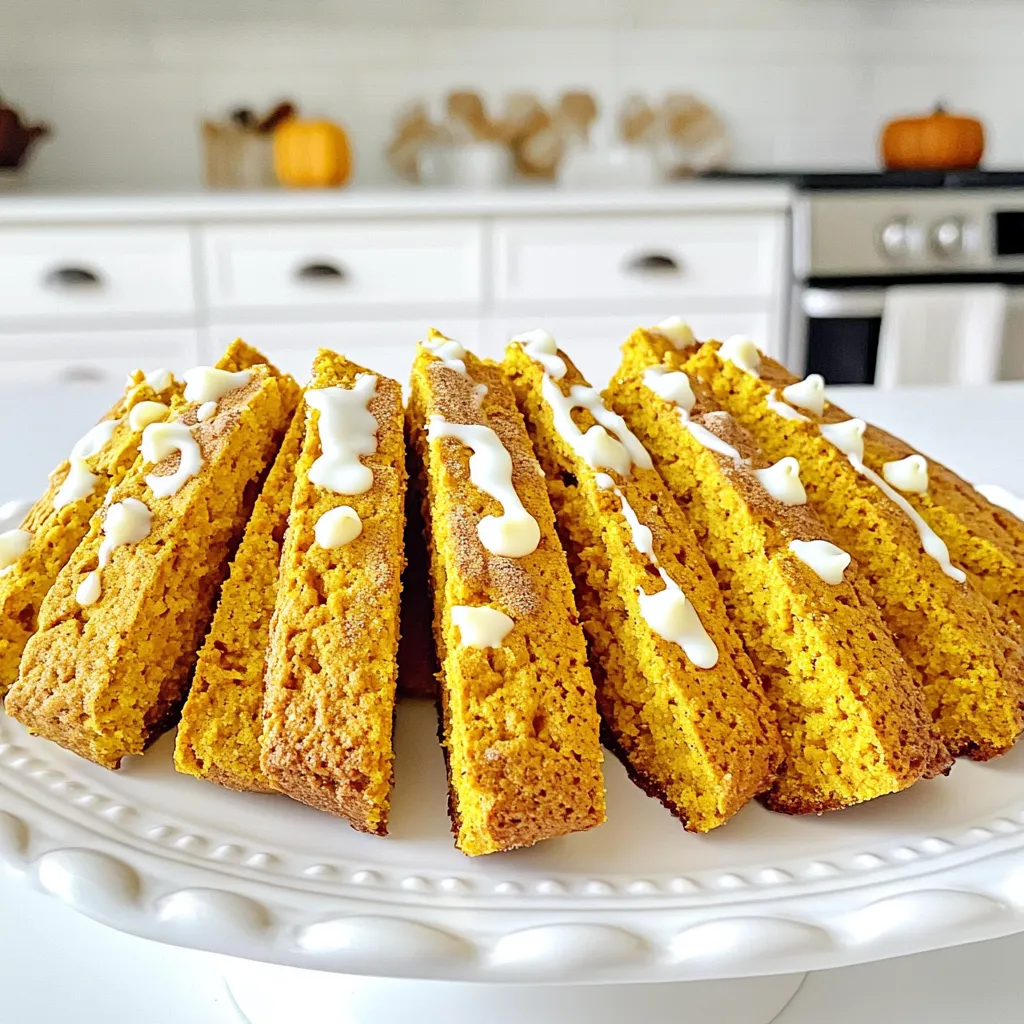
For a special touch, melt some more white chocolate and drizzle it over the cooled biscotti. Enjoy!
Tips & Tricks
Ensuring Perfect Texture
To get light and crispy biscotti, avoid overmixing the dough. Overmixing adds too much air, making the biscotti dense. Here are some tips for the right consistency:
– Mix wet ingredients until smooth.
– Fold in dry ingredients gently.
– If using nuts or chocolate, mix them in last.
Chocolate Drizzle
Melting white chocolate can be tricky. Here are the best methods to do it right:
– Use a microwave-safe bowl. Heat in short bursts of 20 seconds.
– Stir after each burst to prevent burning.
– Alternatively, use a double boiler for even melting.
For drizzling, follow these steps for an elegant touch:
– Use a fork or a piping bag to drizzle the chocolate.
– Move your hand in a back-and-forth motion over the biscotti.
– Let the chocolate set before serving.
Presentation Ideas
A beautiful presentation makes your biscotti stand out. Here are some creative ideas:
– Arrange biscotti in a glass jar for a cozy look.
– Serve on a colorful platter to catch the eye.
– Pair with a hot cup of coffee or tea for a delightful treat.
Feel free to experiment with different settings to showcase these tasty delights!
Variations
Flavor Enhancements
You can easily change the taste of your biscotti. Adding dried fruits like cranberries or apricots brings a sweet twist. Chocolate chips, dark or milk, also add richness. Nuts like almonds or hazelnuts give a great crunch. Each choice makes your biscotti unique.
Seasonal Adaptations
You might want to adjust the flavors based on the season. Try adding peppermint for winter or citrus zest for spring. For a holiday touch, mix in some festive spices like cardamom or allspice. These changes help you celebrate the season with every bite.
Gluten-Free Options
If you need a gluten-free biscotti, start with gluten-free flour blends. Almond flour works well too, but you may need to add more binding agents. Using xanthan gum can help maintain the perfect texture. With these swaps, your biscotti will still taste amazing.
Storage Info
How to Store Biscotti
To keep your pumpkin spice biscotti fresh, use an airtight container. This helps avoid moisture, which makes them soft. A glass jar or plastic container works great. Store them at room temperature in a cool, dry place. You can also place a piece of parchment paper between layers to avoid sticking.
Freezing Biscotti
To freeze your biscotti, follow these steps:
1. Cool Completely: Let the biscotti cool down on a wire rack.
2. Slice: If not sliced, cut them into the classic biscotti shape.
3. Wrap: Wrap each biscotti in plastic wrap or aluminum foil.
4. Bag: Place wrapped biscotti in a freezer-safe bag. Remove as much air as possible.
5. Label: Write the date on the bag for reference.
When you’re ready to enjoy, thaw them in the fridge or at room temperature. For the best texture, toast them in the oven for a few minutes after thawing.
Shelf Life
These tasty biscotti will last about 1 to 2 weeks at room temperature. If you store them in the fridge, they can last up to 3 weeks. Always check for any signs of spoilage before enjoying them.
FAQs
What is the best way to serve pumpkin spice biscotti?
Serve your pumpkin spice biscotti with coffee or tea. The warm drinks bring out the flavors. I love to dip the biscotti into my coffee. The crunch of the biscotti and the warmth of the drink blend perfectly. You can also pair it with a spiced chai. It adds a nice touch to your snack time!
Can I make these biscotti ahead of time?
Yes, you can make these biscotti ahead of time. Prepare them a day or two in advance. Allow them to cool completely before storing. Place them in an airtight container to keep them fresh. They will taste just as good when you are ready to enjoy them!
Can I substitute pumpkin puree with other ingredients?
You can use other ingredients in place of pumpkin puree. For instance, you can try using sweet potato puree. It gives a similar texture and flavor. Applesauce is another option, but it may change the taste slightly. Each substitute adds its own twist to the biscotti.
How do I know when my biscotti are done?
To check if your biscotti are done, look for a light golden color. They should feel firm to the touch. When you slice them, they should be crisp but not hard. Let them bake until they are just right for that perfect bite!
What if I don’t have white chocolate?
If you don’t have white chocolate, you can use milk chocolate or dark chocolate. Both options will add a rich flavor to your biscotti. You can also skip the chocolate drizzle altogether. A simple dusting of powdered sugar can work well too!
This post shared a simple way to make pumpkin spice biscotti. We discussed the key ingredients, from flour to spices. I guided you through each step, ensuring you know how to get the right texture. The tips covered how to store, freeze, and serve these tasty treats.
Now, you can whip up these delightful cookies yourself. Enjoy them fresh, or share them with friends. Happy baking, and may your biscotti be crisp and delicious!


