Pumpkin Spice Overnight Oats Simple and Tasty Recipe

Start your morning right with my simple Pumpkin Spice Overnight Oats recipe! Packed with flavors of fall, this dish combines essential ingredients like rolled oats and pumpkin puree for a tasty breakfast. You can mix in Greek yogurt for creaminess or add your favorite toppings for flair. I’ll guide you step-by-step, ensuring a delicious, ready-to-eat meal when you wake up. Let’s get started on this easy, healthy treat!
Ingredients
Essential Ingredients
To make delicious pumpkin spice overnight oats, gather these must-have items:
– 1 cup rolled oats
– 1 cup almond milk (or your preferred dairy/non-dairy milk)
– 1/2 cup pure pumpkin puree
These ingredients form the base of your recipe. Rolled oats provide a hearty texture and are nutritious. Almond milk adds creaminess without dairy. Pumpkin puree gives flavor and color.
Optional Ingredients
Feel free to enhance your oats with these optional ingredients:
– 1/4 cup Greek yogurt (for creaminess)
– Sweeteners and spices
– Toppings for garnish
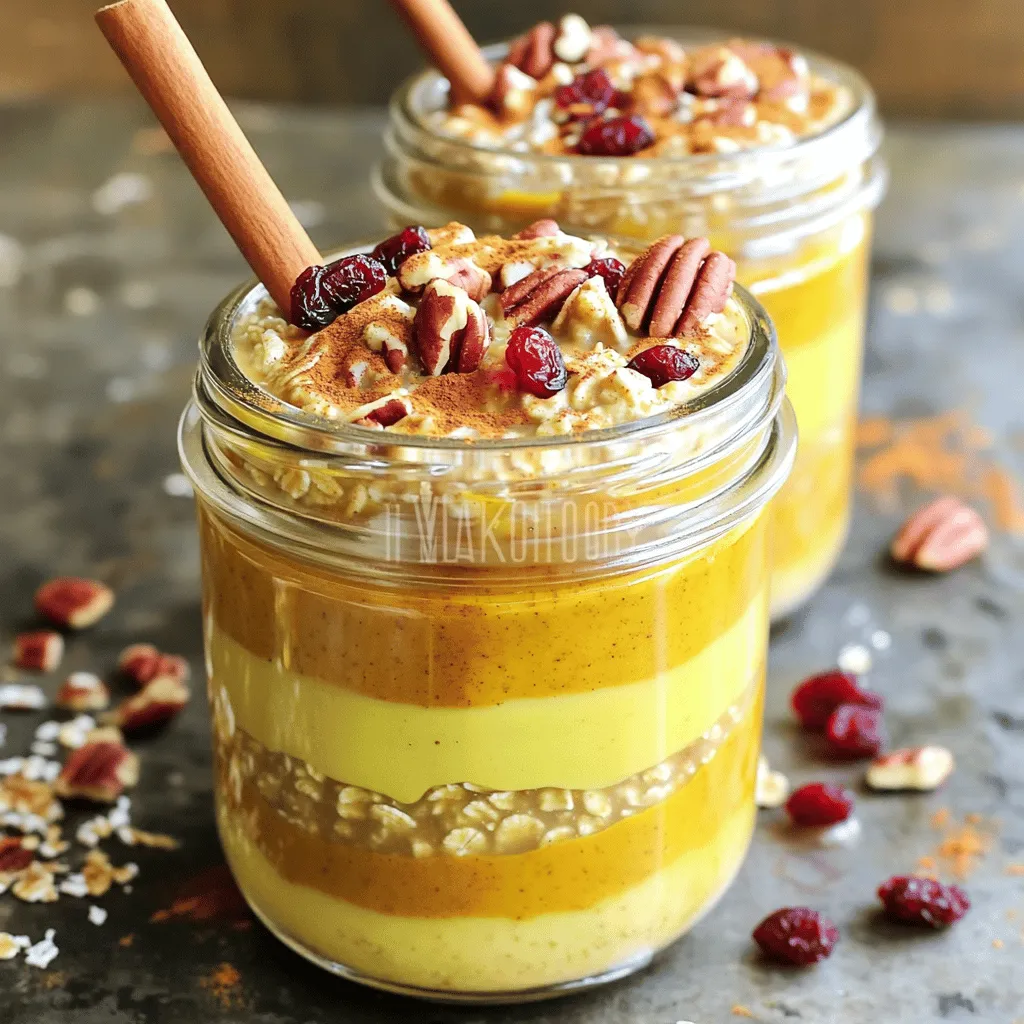
Adding Greek yogurt makes the oats extra creamy. You can sweeten them to your taste with honey or maple syrup. Toppings like chopped pecans or dried cranberries add crunch and flavor. For extra spice, consider adding cinnamon or nutmeg. Each of these elements lets you customize your overnight oats to your liking.
Step-by-Step Instructions
Preparation Steps
1. Mix the base ingredients. In a large bowl, combine 1 cup rolled oats, 1 cup almond milk, and 1/2 cup pure pumpkin puree. Add 1 tablespoon chia seeds, 1 tablespoon maple syrup, 1 teaspoon pumpkin pie spice, and 1/2 teaspoon vanilla extract. Stir well until mixed.
2. Incorporate Greek yogurt (if desired). If you want creamier oats, gently fold in 1/4 cup Greek yogurt. This step is optional but adds great texture.
3. Portion into containers. Carefully divide the oat mixture into two jars or airtight containers. Make sure to distribute the mixture evenly.
Refrigeration Guidelines
1. Seal containers. Tightly close the jars or containers to keep your oats fresh.
2. Soaking time recommendations. Place the containers in the refrigerator overnight. If you’re in a rush, let them soak for at least 4 hours. This soaking allows the oats to absorb the flavors and liquid.
3. Preparation for serving. The next morning, open the containers and stir the oats well. If they seem thick, add a splash of almond milk for a creamier texture. Top with your favorites, like chopped pecans or dried cranberries, just before enjoying.
Tips & Tricks
Optimal Storage Practices
To keep your pumpkin spice overnight oats fresh, use airtight containers. Glass jars work great. They let you see the layers and keep oats from drying out. If you prefer plastic, make sure it seals well.
Store your oats in the fridge for up to five days. After five days, the oats may lose flavor and texture. Enjoy them within this time for the best taste.
Serving Suggestions
Toppings can take your oats to the next level. I love using chopped pecans for crunch. Dried cranberries add a nice sweet-tart balance. You could also sprinkle more pumpkin spice on top for extra flavor.
Pair your oats with warm drinks like chai tea or coffee. The spices in these drinks match the oats perfectly.
Enhancing Flavor and Texture
You can easily boost the flavor of your oats. Add extra spices like cinnamon or nutmeg to your mix. If you want more sweetness, drizzle in honey or maple syrup.
For a creamier texture, fold in Greek yogurt. It makes the oats rich and smooth. You can also add a splash of milk before serving for a lighter feel.

Variations
Flavor Variations
You can easily change up your pumpkin spice overnight oats. Here are two tasty ideas:
– Maple Pecan Overnight Oats: Swap out the pumpkin spice for maple syrup and chopped pecans. This adds a warm, nutty flavor.
– Chocolate Pumpkin Spice Overnight Oats: Mix in cocoa powder for a chocolate twist. This pairs well with the pumpkin and warms your soul.
Dietary Variations
If you have dietary needs, you can still enjoy this recipe:
– Vegan options: Use plant-based yogurt instead of Greek yogurt. This keeps your dish creamy without dairy.
– Gluten-free adjustments: Always check the oats. Make sure they are labeled gluten-free. This way, you can enjoy without worry.
Seasonal Adaptations
You can also modify your oats for different seasons:
– Using other seasonal spices: Try adding nutmeg or allspice for a different flavor profile. These spices can enhance your oats.
– Modifying for summer or spring flavors: Use fresh fruits like berries or peaches instead of pumpkin. This gives your oats a light, bright taste that suits warmer months.
Storage Info
General Storage Tips
To keep your pumpkin spice overnight oats fresh, use the right containers. Airtight jars or containers work best. This helps seal in flavors and moisture. Store them in the fridge for up to five days. Make sure to label each jar with the date. This way, you won’t forget when you made them.
If you notice any changes in smell or texture, it’s best to toss them. For extra freshness, add toppings like nuts or fruits just before eating. This keeps them crunchy and tasty.
Freezer Options
You can freeze your pumpkin spice overnight oats for later. This is great for meal prep! Portion the oats into freezer-safe containers or bags. Leave some space at the top for expansion when freezing. They can last up to three months in the freezer.
When you’re ready to eat, thaw them overnight in the fridge. You can also use the microwave. Heat them in short bursts to avoid hot spots. Stir well before enjoying your tasty creation.
FAQs
Common Questions
How long do overnight oats last in the fridge?
Overnight oats can last up to five days in the fridge. Store them in airtight containers to keep them fresh. The flavors deepen over time, making them even tastier!
Can I use quick oats instead of rolled oats?
Yes, you can use quick oats, but the texture will change. Quick oats soak up liquid faster, resulting in a softer, mushier consistency. If you like your oats chewier, stick with rolled oats.
Nutritional Information
Are pumpkin spice overnight oats healthy?
Absolutely! They provide fiber, protein, and healthy fats. The oats and chia seeds give energy and keep you full longer. Plus, pumpkin is rich in vitamins A and C, which are great for your health.
What are the benefits of chia seeds?
Chia seeds are tiny powerhouses! They are high in omega-3 fatty acids, fiber, and protein. They help with digestion and keep you feeling full. Adding them to your oats boosts nutrition.
Customization Queries
Can I replace almond milk with another type?
Yes, you can use any milk you prefer. Try oat milk, soy milk, or regular dairy milk. Each type will change the flavor slightly, so choose what you like best.
What can I use instead of pumpkin puree?
If you don’t have pumpkin puree, use mashed bananas or applesauce. Both options will add sweetness and moisture. You can also use sweet potato puree for a similar flavor.
In this post, we explored how to make delicious overnight oats with simple ingredients. I shared essential and optional items, along with step-by-step instructions. You learned tips on storage and serving suggestions to enhance flavor. Remember, you can easily adjust this recipe for different tastes and diets. Keep experimenting with flavors and toppings to find your favorite mix. Enjoy nutritious breakfasts that are quick and easy to prepare!


![The ingredients for Raspberry Almond Thumbprint Cookies are simple and delightful. Each one plays a key role in creating the perfect cookie. - 1 cup unsalted butter, softened to room temperature - 3/4 cup granulated sugar - 1 cup almond flour - 2 cups all-purpose flour - 1/2 teaspoon fine sea salt - 1 teaspoon pure vanilla extract - 1/4 teaspoon pure almond extract - 1/2 cup raspberry jam - Optional: Sliced almonds for garnish Using high-quality ingredients makes a big difference. The unsalted butter gives a rich flavor and smooth texture. Granulated sugar adds sweetness and helps the cookies spread just right. Almond flour brings a nutty taste that pairs well with raspberry jam. The fine sea salt balances the sweetness and enhances all the flavors. Vanilla and almond extracts add depth to the cookies. Raspberry jam gives that burst of fruity goodness, making each bite a treat. If you want a bit of crunch, sliced almonds add a lovely touch. For the complete recipe, check out the Full Recipe. Make sure you have everything ready before you start. Happy baking! - Preheat the oven to 350°F (175°C). This step ensures your cookies bake evenly and rise well. While the oven heats, line two baking sheets with parchment paper. This prevents cookies from sticking. - Cream the butter and sugar. In a large bowl, mix the softened butter and sugar until light and fluffy. This takes about 2-3 minutes. - Combine the dry ingredients and mix in the flavorings. Gradually add almond flour, all-purpose flour, and sea salt. Stir until a soft dough forms. Then, pour in vanilla and almond extracts and mix until smooth. - Roll the dough into balls. Use your hands to shape 1-inch balls and place them on the baking sheets. Make sure to space them about 2 inches apart, so they have room to spread. - Create indentations in each ball. Use your thumb or a small spoon to press down in the center of each dough ball. This creates a well for the jam. - Fill each indentation with raspberry jam. Carefully add about 1 teaspoon of jam to each well. Be careful not to overfill, or it may spill during baking. - Optional: For a crunchy texture, press sliced almonds around the edges of the filled indentations. - Bake the cookies. Place the baking sheets in the oven and bake for 12 to 15 minutes. Look for lightly golden edges. - Cooling instructions: After baking, let the cookies sit for about 5 minutes on the baking sheets. This helps them firm up. Then, transfer them to a wire rack to cool completely. - Presentation tips: Once cooled, dust the cookies lightly with powdered sugar. Arrange them on a decorative platter with fresh raspberries and mint leaves for a vibrant look. Check out the Full Recipe for more details and tips! Achieving the perfect texture To get soft and chewy cookies, use softened butter. This helps create the right mix of air and fat. Make sure to cream it well with the sugar. Mixing should take about 2 to 3 minutes. If you want a slight crunch, use finely ground almond flour. This gives the cookies a nice bite. Ensuring even cooking For even baking, space the cookie balls well on the baking sheet. Place them about 2 inches apart. This helps prevent them from sticking together. Additionally, rotate the baking sheets halfway through the baking time. This ensures all cookies bake evenly. Recommended amendments for enhanced flavor To boost the almond flavor, add a bit more almond extract. Just a few extra drops can make a big difference. You can also add a pinch of cinnamon for warmth. It pairs well with the raspberry jam and adds depth to the taste. Alternative fillings for the thumbprint While raspberry jam is great, try other flavors too! Strawberry, apricot, or even lemon curd can work well. Each jam gives a unique twist to the cookies. You can also use chocolate ganache for a rich, sweet center. Avoiding overfilling the jam When filling the cookie indentations, use about 1 teaspoon of jam. If you add too much, it can overflow during baking. This can make a mess on your baking sheet. Stick to the recommended amount for best results. Preventing dough from spreading too much in the oven If your dough spreads too much, try chilling it for about 30 minutes before baking. This helps firm up the butter. You can also bake on parchment paper, which helps maintain shape. Keeping your dough cold is key to keeping those lovely thumbprint shapes! {{image_4}} You can play with flavors in Raspberry Almond Thumbprint Cookies. Using different fruit jams can change the taste. Try strawberry, apricot, or blueberry jam for a fun twist. Each jam brings its unique flavor, making each bite special. You can also add chocolate or citrus flavors. Mix in some cocoa powder for a chocolatey touch. Or, add a hint of lemon zest for a fresh kick. These small changes can give your cookies a new vibe. Making these cookies gluten-free is easy. Substitute regular flour with gluten-free flour blends. Look for blends that include almond or coconut flour. These options keep the cookies soft and chewy. To maintain the right texture, watch the moisture levels. Gluten-free flour often absorbs more liquid. You may need to adjust the butter or add a bit of milk. This keeps the cookies from being too dry or crumbly. You can make these cookies vegan too. Replace butter with coconut oil or vegan butter. Both options keep the cookies rich and tasty. For eggs, use flaxseed meal or applesauce. These act as great binding agents. Flaxseed meal is simple to use. Mix one tablespoon with three tablespoons of water. Let it sit for a few minutes until it thickens. This blend works well and keeps the cookies together. To keep your Raspberry Almond Thumbprint Cookies fresh, store them in an airtight container at room temperature. This helps prevent them from getting stale. I recommend enjoying them within 5 to 7 days for the best taste. If you want to save some cookies for later, you can freeze them. For baked cookies, let them cool completely. Then, place them in a freezer-safe bag or container. They will stay good for up to three months. If you prefer to freeze the dough, wrap it tightly in plastic wrap, then place it in a freezer bag. When ready, thaw the dough in the fridge overnight for the best results. Reheating your cookies is easy! To keep their soft texture, preheat your oven to 300°F (150°C). Place the cookies on a baking sheet and warm them for about 5 to 8 minutes. This method helps restore their fresh-baked taste. Enjoy them warm, and they will feel like new! To make these cookies, follow these key steps: 1. Preheat your oven to 350°F (175°C). 2. Cream butter and sugar until fluffy in a bowl. 3. Combine dry ingredients: mix almond flour, all-purpose flour, and salt. 4. Add extracts: stir in vanilla and almond extracts. 5. Shape dough into 1-inch balls and place on a baking sheet. 6. Create indentations in the dough using your thumb. 7. Fill with jam: add raspberry jam to each well. 8. Bake cookies for 12 to 15 minutes until edges are golden. 9. Cool cookies on a wire rack after baking. This simple process leads to delicious treats. For the full recipe with detailed instructions, check the [Full Recipe]. Yes, you can use different nuts! If you are allergic to almonds, consider these options: - Pecans: Their rich flavor pairs well with fruit jams. - Walnuts: They add a nice crunch and depth to the cookies. - Cashews: These nuts give a creamy texture and mild taste. Feel free to experiment with your favorite nuts. Just chop them finely to mix into the dough or use them as a garnish. Many fun variations exist for thumbprint cookies. Here are some popular adaptations: - Different jams: Try strawberry, apricot, or blueberry for a twist. - Chocolate filling: Use chocolate ganache instead of jam for a rich flavor. - Citrus zest: Add lemon or orange zest to the dough for a fresh taste. These variations keep the recipe interesting. Mixing flavors can lead to delightful surprises! This blog post covered how to make delicious Raspberry Almond Thumbprint Cookies. We explored the ingredients, preparation steps, and tips for the best results. You learned about variations, storage methods, and common mistakes to avoid. Remember, baking is fun and rewarding. Try these cookies with different jams or flavors for new twists. Keep practicing to refine your skills. Enjoy baking and sharing these tasty treats with others. You now have the tools to impress your friends and family with your cookie-making expertise.](https://joymealplan.com/wp-content/uploads/2025/07/587afd51-3098-4c90-9a32-308dc83d9cb5-768x768.webp)


![To make classic banana pudding, you need these key ingredients: - 4 ripe bananas, sliced into rounds - 1 cup heavy cream - 1 cup whole milk - 1/2 cup granulated sugar - 1/4 cup cornstarch - 1/4 teaspoon kosher salt - 1 teaspoon pure vanilla extract - 2 large egg yolks - 1 package (approximately 200g) vanilla wafers - Whipped cream for topping (optional) - Additional banana slices for garnish These ingredients create the creamy base and the delightful layers that make banana pudding so special. The ripe bananas add a natural sweetness. The vanilla wafers provide crunch and texture. You can enhance your banana pudding with a few optional ingredients: - A hint of cinnamon for warmth - Chocolate chips for a sweet twist - A splash of rum extract for depth These additions can give your pudding a unique flavor. Experiment with them to find your favorite mix! If you’re missing a few ingredients, don’t worry. Here are some common substitutions you can use: - Use almond milk instead of whole milk for a dairy-free option. - Substitute coconut cream for heavy cream for a tropical flair. - Replace granulated sugar with honey or maple syrup for sweetness. These substitutions will still give you a tasty result. Just remember to adjust measurements based on taste. For the full recipe, check the [Full Recipe]. To start, gather all your ingredients. You need milk, cream, sugar, cornstarch, salt, and eggs. In a medium saucepan, mix the whole milk, heavy cream, sugar, cornstarch, and salt. Use a whisk to blend everything until smooth. Make sure there are no lumps from the cornstarch. Heat this mix over medium heat. Stir it often with a wooden spoon. You want it to thicken and bubble, which takes about 5 to 7 minutes. Next, crack the two large eggs, separating the yolks into a bowl. Whisk the yolks until they look smooth and pale. To temper the yolks, take a few spoonfuls of the hot mix and whisk them into the yolks. This step keeps the eggs from cooking too fast. After that, pour the yolk mix back into the saucepan. Cook for another 2 to 3 minutes while stirring. The pudding should be thick and creamy when done. Remove it from heat and stir in the vanilla extract. Let it cool for about 10 minutes. Now it’s time to build your pudding layers. Start with a large serving dish or individual cups. Place a layer of vanilla wafers at the bottom. Next, add a layer of sliced bananas. Pour a generous amount of pudding over the bananas and cookies. Repeat this layering until you use all ingredients. Make sure the last layer is pudding. This creates a beautiful top. After layering, cover the dish tightly with plastic wrap. This step helps keep the pudding moist. Next, place it in the fridge for at least 4 hours. This time lets the pudding chill and firm up. When you’re ready to serve, add a dollop of whipped cream on top. You can also garnish with extra banana slices for a nice touch. This dessert looks as good as it tastes! If you'd like to see the complete guide, check out the Full Recipe for more details. To get that smooth, creamy texture, follow these tips: - Whisk well: When mixing the milk and cornstarch, make sure to whisk until there are no lumps. - Stir constantly: While cooking the pudding base, stir it continuously to prevent sticking and burning. - Temper the eggs: Slowly add hot mixture to egg yolks. This helps keep them from cooking too fast. - Cool gradually: Let the pudding cool for about 10 minutes before layering. It will thicken more as it cools. To keep your pudding fresh: - Cover tightly: Use plastic wrap to seal the dish. This keeps moisture out. - Refrigerate: Always store it in the fridge. It stays good for 2-3 days. - Layer with care: If you have leftovers, keep layers separate. This avoids mushy bananas. Want to make your banana pudding even better? Try these ideas: - Add spices: A pinch of cinnamon or nutmeg can add warmth. - Use flavored wafers: Try lemon or chocolate wafers for a fun twist. - Incorporate extracts: Add a drop of almond extract for an extra layer of flavor. - Top it off: Fresh berries or nuts can give a nice crunch and taste contrast. For the full recipe, check out the details above! {{image_4}} To make chocolate banana pudding, simply add cocoa powder. Use 1/3 cup of unsweetened cocoa powder. Mix it into the milk mixture after combining the sugar and cornstarch. This gives your pudding a rich chocolate flavor. Layer it just like the classic recipe. The chocolate pairs well with bananas, creating a great dessert. For a nutty twist, add chopped pecans or walnuts. You can mix in 1/2 cup of nuts into the pudding. You can also sprinkle some on each layer. This adds a delightful crunch to each bite. The nuts contrast nicely with the creamy pudding and soft bananas. To create a vegan version, swap dairy for plant-based options. Use almond or coconut milk instead of whole milk and cream. Replace egg yolks with 1/4 cup of silken tofu blended until smooth. Sweeten with maple syrup or coconut sugar. This makes a tasty, dairy-free pudding that everyone can enjoy. Each of these variations adds a new twist to the classic banana pudding. They keep the spirit of the dessert while offering different flavors and textures. For the full recipe, make sure to check out the details above. Banana pudding has a rich history that dates back to the 19th century. This dish first appeared in American cookbooks in the late 1800s. It gained popularity in the Southern states, where fresh bananas were easy to find. The sweet, creamy dessert combined layers of pudding, bananas, and vanilla wafers. This simple yet delicious treat quickly became a staple at family gatherings and potlucks. Over the years, banana pudding has evolved in many ways. In the 1930s, brands like Nabisco made vanilla wafers popular in homes. Many cooks began using these cookies as a key ingredient. Today, you can find various versions, including chocolate and vegan options. Some recipes even add whipped cream or meringue on top for extra flavor and texture. This evolution shows how versatile and beloved banana pudding truly is. In Southern cuisine, banana pudding holds a special place. It represents comfort and warmth. Families often serve it at holidays, birthdays, and reunions. Many people have fond memories of enjoying this sweet treat with loved ones. This dessert is not just a dish; it’s a tradition passed down through generations. The combination of flavors and textures captures the essence of Southern hospitality, making it a cherished part of the culture. Yes, you can use other types of bananas. While ripe Cavendish bananas are common, you can try red or plantain bananas. Each type brings a unique flavor. Red bananas are sweeter and softer. Plantains are firmer and less sweet. Just remember, the texture and taste will change. To keep bananas from browning, you can use lemon juice. Just squeeze a little juice over the banana slices. This helps slow down oxidation. You can also cover the bananas tightly with plastic wrap. Keeping them chilled also helps. Serve the pudding soon for the best look. If you don’t have vanilla wafers, don’t worry! You can use graham crackers or shortbread cookies. Both options add a nice crunch. You can even use sponge cake for a softer layer. Get creative! The pudding will still taste great, no matter what you use. This blog shows you how to make classic banana pudding. We covered key ingredients, optional add-ins, and substitutions. I also shared simple steps for preparing, layering, and chilling the pudding. You learned tips for perfect texture and storing leftovers. Plus, I explored fun variations like chocolate and vegan options. Finally, we discussed the history and cultural roots of this dish. Banana pudding is more than a dessert; it's a beloved tradition. Enjoy creating your own version and sharing it with friends and family.](https://joymealplan.com/wp-content/uploads/2025/06/2270da16-0b21-4017-a800-73ddf1839134-768x768.webp)

