Pumpkin Streusel Muffins Bakery Style Delight Recipe

Get ready to transform your kitchen into a bakery! In this blog post, I’ll share my favorite Pumpkin Streusel Muffins recipe. These muffins are soft, spiced, and topped with a crunchy streusel that adds a delightful finish. Whether it’s a cozy brunch or a snack, these treats will impress anyone who takes a bite. Let’s gather our ingredients and dive right into this simple and delicious recipe!
Ingredients
Dry Ingredients List
– 1 ½ cups all-purpose flour
– 1 teaspoon baking soda
– ½ teaspoon baking powder
– ½ teaspoon salt
– 1 teaspoon ground cinnamon
– ½ teaspoon ground nutmeg
– ½ teaspoon ground ginger
Wet Ingredients List
– 1 cup pumpkin puree (canned or fresh)
– ¾ cup brown sugar, packed
– ½ cup granulated sugar
– ½ cup vegetable oil
– 2 large eggs
– 1 teaspoon vanilla extract
Streusel Topping Ingredients
– ½ cup all-purpose flour
– ⅓ cup brown sugar, packed
– ½ teaspoon ground cinnamon
– ¼ cup cold unsalted butter, cubed
The ingredients for pumpkin streusel muffins blend nicely. You need a mix of dry and wet items. The dry mix gives the muffin structure, while the wet ingredients add flavor and moisture.
The flour is the base. It gives the muffins their shape. The baking soda and baking powder help them rise. The spices, like cinnamon, nutmeg, and ginger, bring warmth and taste.
The pumpkin puree is key for moisture and a rich pumpkin flavor. The sugars add sweetness and help with browning. The vegetable oil keeps the muffins soft and tender. Eggs bind everything together and add richness.
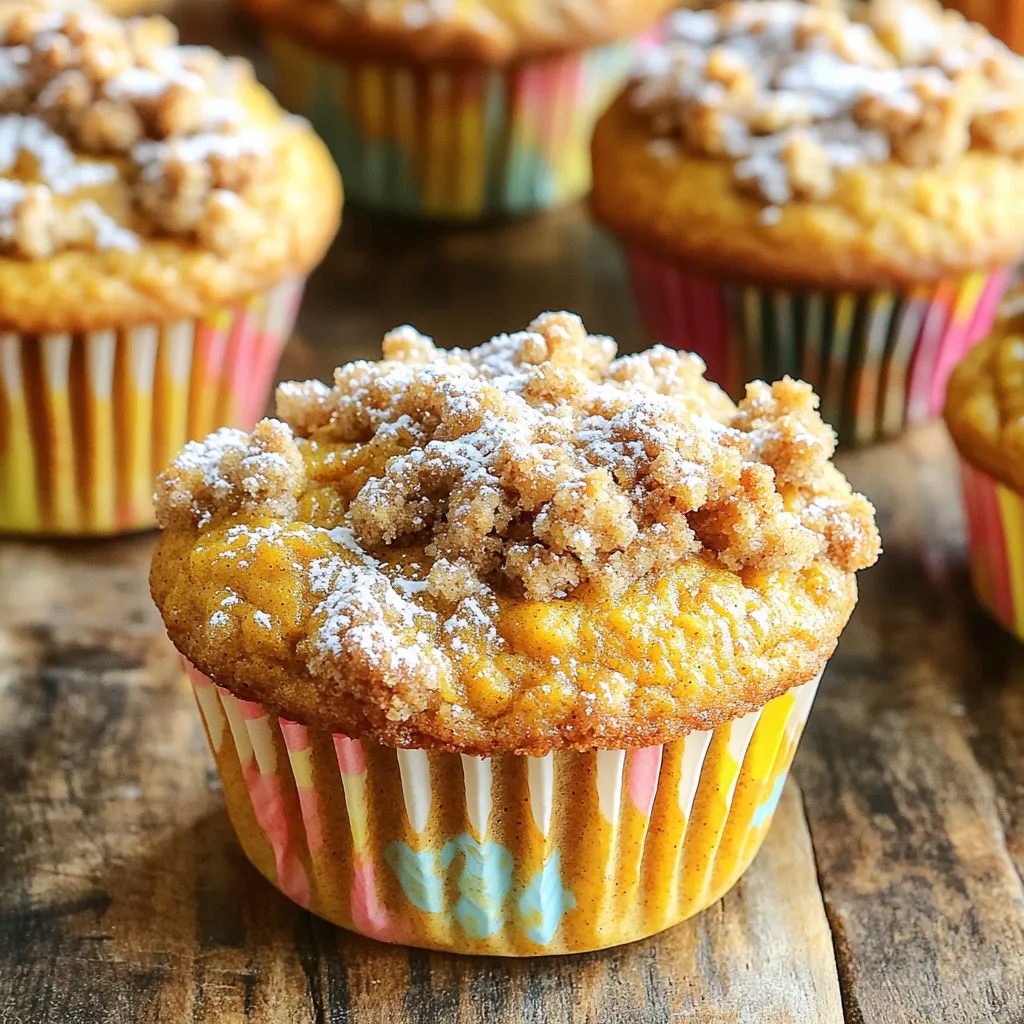
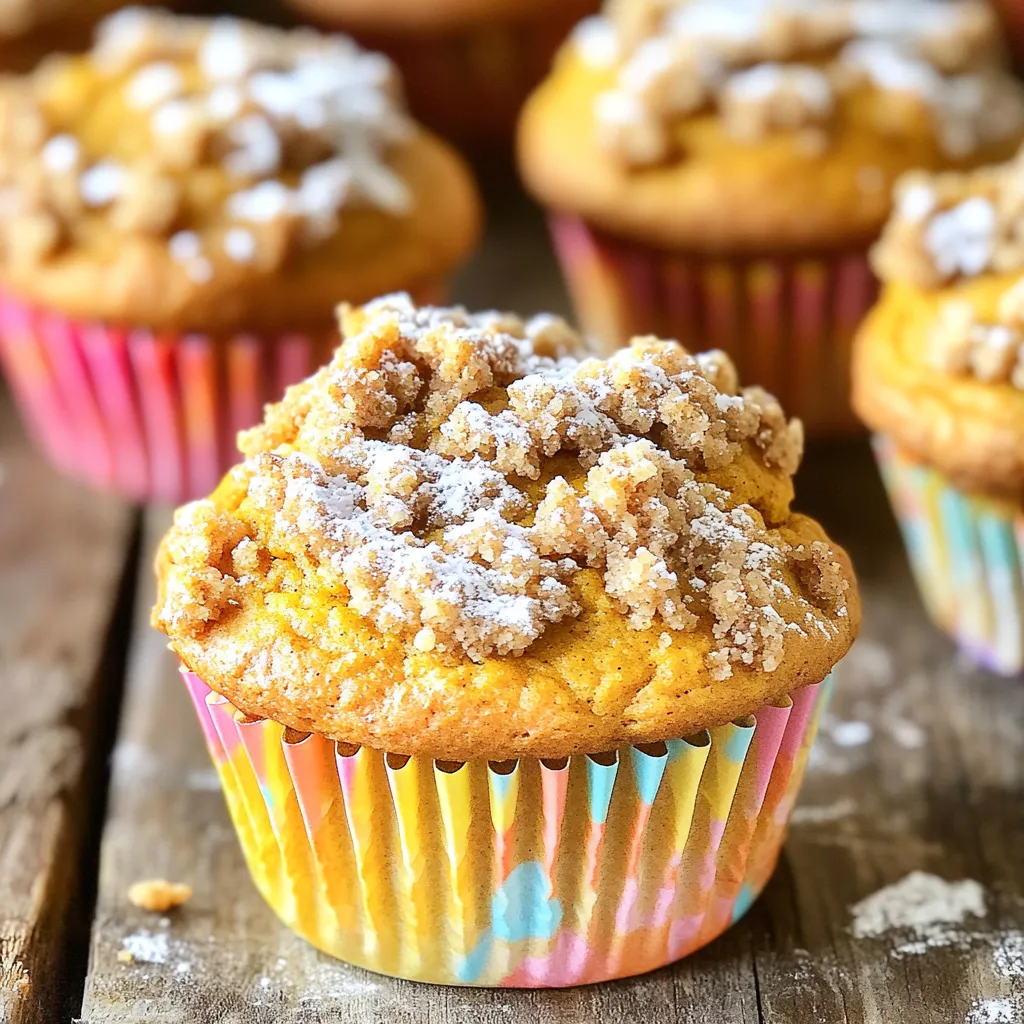
The streusel topping adds a crunchy layer on top. It’s a simple mix of flour, brown sugar, cinnamon, and butter. When baked, it turns golden and crunchy. This topping makes your muffins look and taste like a bakery treat.
Gather these ingredients, and you’re ready to make something special. Each bite will be a warm, cozy delight!
Step-by-Step Instructions
Preparing the Oven and Muffin Tin
First, preheat your oven to 350°F (175°C). This temperature helps our muffins bake evenly. Next, line a muffin tin with paper liners. If you don’t have liners, lightly grease each cup with non-stick spray. This keeps the muffins from sticking.
Combining Dry Ingredients
In a large mixing bowl, combine the dry ingredients. Use a whisk to blend 1 ½ cups of flour, 1 teaspoon of baking soda, ½ teaspoon of baking powder, and ½ teaspoon of salt. Add 1 teaspoon of ground cinnamon, ½ teaspoon of ground nutmeg, and ½ teaspoon of ground ginger. Mixing these well ensures that the spices and leavening agents spread evenly throughout the batter.
Mixing Wet Ingredients
In another bowl, mix the wet ingredients. Start with 1 cup of pumpkin puree. Add ¾ cup of packed brown sugar and ½ cup of granulated sugar. Then, pour in ½ cup of vegetable oil, crack in 2 large eggs, and add 1 teaspoon of vanilla extract. Whisk these together until the mixture is smooth and creamy. This step is key for a rich, flavorful muffin.
Merging the Mixtures
Now, slowly pour the dry mixture into the wet mixture. Stir gently as you combine them. Be careful not to over-mix; this keeps your muffins light and fluffy. If you want to add some crunch, fold in ½ cup of chopped pecans at this stage.
Preparing the Streusel Topping
In a small bowl, combine ½ cup of flour, ⅓ cup of packed brown sugar, and ½ teaspoon of ground cinnamon. Cut in ¼ cup of cold, cubed unsalted butter. Use your fingertips or a pastry cutter to mix until you see a coarse, crumbly texture form. This streusel will add a crunchy topping to your muffins.
Filling the Muffin Tin
Now it’s time to fill the muffin tin. Scoop the batter into each cup, filling them about ⅔ full. This gives them room to rise. Generously sprinkle the streusel topping over each muffin. It adds flavor and texture.
Baking the Muffins
Place the muffin tin in your preheated oven. Bake the muffins for 18-20 minutes. To check if they are done, insert a toothpick into the center of a muffin. It should come out clean or with just a few crumbs attached.
Cooling and Serving
Once baked, let the muffins cool in the tin for about 5 minutes. Carefully transfer them to a wire rack to cool completely. These muffins taste great warm, especially with a drizzle of maple syrup or a light dusting of powdered sugar. Enjoy!
Tips & Tricks
How to Achieve the Perfect Muffin Texture
To get soft and fluffy muffins, watch your mixing. Combine the wet and dry ingredients gently. Over-mixing makes them dense. Mix until just combined and stop. Also, do not skip the baking powder and baking soda. They help the muffins rise.
Substitutions for Ingredients
You can swap ingredients if needed. Use apple sauce instead of oil for a healthier option. If you don’t have brown sugar, white sugar works too. Want it dairy-free? Replace eggs with flax eggs. Just mix one tablespoon of flaxseed meal with three tablespoons of water.
Best Practices for Streusel Topping
For a great streusel topping, keep the butter cold. This helps create a nice crumb. Use your fingertips to mix the butter in. This keeps the butter from melting too fast. Don’t be shy with the topping; add enough for a good crunch.

Variations
Adding Different Nuts or Fruits
You can switch up the nuts or fruits to make these muffins your own. Instead of pecans, try walnuts or almonds for a different crunch. You can also add dried fruits like cranberries or raisins. These additions bring new flavors and textures. Just chop them up and fold them into the batter. You can add about half a cup of nuts or fruits to keep the balance right. This way, every muffin can have its own surprise!
Gluten-Free Option
Want to make these muffins gluten-free? You can use a gluten-free flour blend. Make sure it has a good mix of flours and starches. This helps keep the muffins light and fluffy. Replace the all-purpose flour with the gluten-free blend in equal amounts. Check that your baking powder and baking soda are also gluten-free. This way, everyone can enjoy these tasty muffins!
Dairy-Free Adjustments
If you want to make dairy-free muffins, it’s easy! Swap the butter in the streusel topping for coconut oil or a dairy-free margarine. For the muffin batter, use a dairy-free milk like almond or oat milk instead of regular milk. This change keeps the muffins moist and delicious without any dairy. You won’t lose any flavor, and everyone can enjoy them!
Storage Info
How to Store Muffins for Freshness
To keep your pumpkin streusel muffins fresh, place them in an airtight container. You can store them at room temperature for up to three days. If you want them to last longer, consider refrigerating them. This can help preserve their moist texture. Just remember that they may dry out if left too long in the fridge.
Freezing Muffins for Later Use
You can freeze these muffins for up to three months. First, let them cool completely. Then wrap each muffin tightly in plastic wrap. After that, place them in a freezer-safe bag or container. Label the bag with the date. When you’re ready to enjoy them, just take out the muffins and let them thaw at room temperature.
Reheating Instructions
Reheating is easy! You can warm the muffins in the oven or microwave. For the oven, set it to 350°F (175°C) and heat for about 5-10 minutes. If you’re in a hurry, use the microwave. Heat each muffin for about 15-20 seconds. Enjoy them warm for the best taste!
FAQs
Can I use fresh pumpkin instead of canned?
Yes, you can use fresh pumpkin. First, cook the pumpkin until soft. Then, puree it until smooth. This adds a lovely flavor and texture. Just make sure to drain any excess water from the puree. Fresh pumpkin can make your muffins extra special!
How do I know when the muffins are done baking?
Check the muffins around 18 minutes. Insert a toothpick into the center of a muffin. If it comes out clean or with a few crumbs, they are done. If the toothpick has wet batter, bake for a few more minutes. Keep an eye on them to avoid over-baking.
What can I serve with pumpkin streusel muffins?
These muffins pair well with warm drinks like coffee or tea. A dollop of whipped cream adds sweetness and creaminess. You can also serve them with a drizzle of maple syrup for extra flavor. They are great for breakfast or as a snack!
In this blog post, we explored how to make perfect pumpkin streusel muffins. We covered the key ingredients, step-by-step instructions, and helpful tips for great texture. You learned about fun variations and storage methods too. Baking muffins can be simple and enjoyable with the right approach. Keep these tips in mind to create delicious treats every time. Enjoy sharing your tasty muffins with friends and family!


. Start by preheating the air fryer to 350°F (175°C). This step helps your donuts cook evenly. It only takes a few minutes, so don’t skip this part! In a mixing bowl, combine the dry ingredients. You’ll need: - 1 cup all-purpose flour - 1/2 cup granulated sugar - 1 1/2 teaspoons baking powder - 1/4 teaspoon salt - 1/2 teaspoon ground cinnamon - 1/4 teaspoon ground nutmeg (optional) Whisk these ingredients together until there are no lumps left. This ensures a smooth donut texture. Next, grab another bowl to mix the wet ingredients. You’ll need: - 1/2 cup milk - 1 large egg - 2 tablespoons unsalted butter, melted - 1 teaspoon vanilla extract Whisk these until the mixture is smooth. This adds flavor and moisture to your donuts. Now, slowly add the wet mixture to the dry ingredients. Stir gently until a soft dough starts to form. Be careful not to overmix. A delicate touch gives your donuts their light texture. Lightly flour your countertop. Roll the dough out to about 1/2 inch thick. Use a donut cutter or two round cutters to cut out the donuts. If you have dough scraps, reroll them to make more donuts. Place the shaped donuts in the air fryer basket. Make sure you don’t overcrowd them. Cook for 5-6 minutes until they turn golden brown. Flip them halfway through for even cooking. While your donuts cook, mix the cinnamon sugar in a shallow dish. Combine: - 1/4 cup granulated sugar - 1 tablespoon ground cinnamon This will give your donuts that sweet and spicy touch. Once the donuts are done, take them out of the air fryer. While they are still warm, roll each donut in the cinnamon sugar mixture. Make sure they are coated on all sides for a tasty finish. Let the coated donuts cool for a few minutes on a wire rack. This helps them set. Serve them warm or at room temperature. They are perfect for sharing or enjoying with a cup of coffee! For the full recipe, check out the details above. To make great donuts, the dough must be soft but not sticky. After mixing, it should feel smooth. If it’s too wet, add a little more flour. If it’s too dry, add a splash of milk. Remember, don’t overmix! This keeps the donuts light and fluffy. Use a donut cutter or two different-sized round cutters. Press straight down without twisting. Twisting can seal the edges and stop the donuts from rising. If you don’t have a cutter, use a glass for the larger circle. A small bottle cap works for the center hole. Preheat your air fryer to 350°F (175°C). Cook the donuts for 5-6 minutes. Flip them halfway to ensure they brown evenly. Keep an eye on them! Every air fryer cooks a bit differently, so check for a golden color. For a lovely look, serve your donuts on a pretty plate. Dust them with extra cinnamon for a nice touch. You can also put some cinnamon sugar in a small bowl for dipping. This makes it fun and tasty for everyone! Enjoy your homemade treats! {{image_4}} You can make chocolate glazed donuts with this base recipe. After cooking the donuts, melt some chocolate chips in a bowl. Dip each warm donut into the melted chocolate. Let excess chocolate drip off before placing them on a wire rack. You can add sprinkles on top for some fun color and texture. This adds a rich flavor that pairs well with the cinnamon sugar. To create pumpkin spice donuts, swap out some of the milk with pumpkin puree. Add a tablespoon of pumpkin pie spice to the dry ingredients. This gives the donuts a warm, fall flavor. The result is a moist donut that is perfect for autumn. Serve them fresh with a light dusting of cinnamon sugar. If you need nut-free donuts, just ensure all your ingredients are nut-free. Use regular all-purpose flour, which is safe for most people. For gluten-free donuts, you can use a gluten-free flour blend. Make sure the blend has xanthan gum to help with texture. This way, everyone can enjoy these tasty treats without worry. For more ideas, check out the Full Recipe. To keep your donuts fresh, place them in an airtight container. They can stay at room temperature for up to two days. For longer storage, refrigerate them. Just remember, cold donuts can lose some of their charm. If you want to save some donuts for later, freezing is a great option. Wrap each donut in plastic wrap and place them in a freezer-safe bag. They can last for up to three months in the freezer. Label the bag with the date so you know when to enjoy them! When you’re ready to enjoy your frozen donuts, take them out of the freezer. Let them thaw in the fridge overnight. You can warm them in the air fryer at 350°F for about 3 to 5 minutes. This will make them soft and tasty again, just like fresh! For more details, check the Full Recipe. Yes, you can use self-rising flour. Just skip the baking powder and salt. Self-rising flour has these ingredients already mixed in. Your donuts will still taste great! You can use unsweetened applesauce or mashed banana. About 1/4 cup works well as a replacement for one egg. This keeps your donuts moist and adds a bit of sweetness. To make the donuts healthier, you can reduce the sugar. Try using a sugar alternative like stevia or monk fruit. You can also add more whole grains by using whole wheat flour. It’s an easy swap! Yes, you can bake them! Just preheat your oven to 350°F (175°C). Place the donuts on a baking sheet and bake for about 10-12 minutes. They will not be as crispy, but they’ll still be tasty! These donuts stay fresh for about two days at room temperature. If you want them to last longer, store them in an airtight container in the fridge. You can also freeze them for up to three months. Just reheat when you're ready to enjoy! For the full recipe, check the details in the previous sections! This blog post covers everything you need to make air fryer donuts. We discussed the ingredients, step-by-step instructions, helpful tips, and fun variations. Remember to store your donuts well for freshness, and feel free to try different flavors. Donut-making can be simple and fun. I hope you enjoy making these tasty treats! Now go ahead and create your delicious batch!](https://joymealplan.com/wp-content/uploads/2025/07/9fe56699-c2ee-4d7f-b420-cb85b6682c39-768x768.webp)

![- 3 ripe bananas, thoroughly mashed - 1/2 cup unsweetened applesauce - 1/2 cup packed brown sugar - 1/4 cup granulated sugar - 2 large eggs, at room temperature - 1 teaspoon pure vanilla extract - 1 teaspoon baking soda - 1/2 teaspoon baking powder - 1/4 teaspoon fine salt - 1 1/2 cups all-purpose flour - 1 cup semi-sweet chocolate chips, plus an extra handful for topping - 1/2 teaspoon ground cinnamon (optional) When measuring ingredients, accuracy is key. Use standard measuring cups and spoons. For flour, spoon it into the cup and level it off with a knife. This gives you the right amount without packing it down. Bananas should be fully ripe, as this makes the bread sweeter and more flavorful. If you need alternatives, here are some options: - Substitute applesauce with yogurt for a creamier texture. - Use coconut sugar instead of brown sugar for a lower glycemic index. - If you're out of eggs, try using flaxseed meal mixed with water as a binder. - For gluten-free options, use a 1:1 gluten-free flour blend. - Swap semi-sweet chocolate chips with dark chocolate or white chocolate for a twist. These substitutions can change the flavor but keep the essence of the bread intact. You can easily customize this recipe to fit your pantry and taste! If you're curious about the full recipe, check out the Choco-Banana Bliss Bread . Start by gathering all your ingredients. You need ripe bananas, applesauce, sugars, eggs, vanilla, baking soda, baking powder, salt, flour, chocolate chips, and optional cinnamon. Preheat your oven to 350°F (175°C). Grease a 9x5-inch loaf pan with butter or cooking spray. This helps the bread come out easily after baking. In a large bowl, mash the ripe bananas until smooth. Add the applesauce, brown sugar, and granulated sugar. Mix well with a fork or whisk. Next, add the eggs and vanilla extract. Stir until everything is blended. In a separate bowl, whisk the dry ingredients: baking soda, baking powder, salt, and cinnamon if you like. Slowly add this dry mix to the wet mix. Fold gently with a spatula. Be careful not to overmix; you want a light, fluffy bread. Finally, fold in the chocolate chips, saving a few for the top. Pour the batter into the prepared loaf pan. Smooth the top with a spatula. Sprinkle the reserved chocolate chips on top for extra chocolate goodness. Bake in your preheated oven for 60-65 minutes. Check doneness by inserting a toothpick into the center. If it comes out clean or with a few moist crumbs, it's done. Once baked, let the loaf cool in the pan for 10 minutes. Then transfer it to a wire rack to cool fully before slicing. Enjoy your warm, chocolate chip banana bread! For the full recipe, check [Full Recipe]. To get the right texture in your chocolate chip banana bread, use ripe bananas. Ripe bananas are sweet and soft, making the bread moist. Mash them well to avoid lumps. Mix the wet and dry ingredients gently. Overmixing can make the bread tough. Aim for a light and fluffy loaf. Many people add too much flour, which can dry out the bread. Always measure flour correctly. Another mistake is not baking long enough. A toothpick should come out with a few moist crumbs but not wet batter. Also, don't skip the cooling time before slicing. This helps the bread set properly. For extra flavor, add ground cinnamon to your batter. It pairs well with bananas and chocolate. You can also use vanilla extract for a richer taste. If you want more texture, try adding nuts like walnuts or pecans. They add crunch and depth to your bread. For the full recipe, check out the Choco-Banana Bliss Bread details! {{image_4}} Adding nuts can give your chocolate chip banana bread a nice crunch. I often use walnuts or pecans. Chop them into small pieces. Fold in about half a cup into your batter. This step adds flavor and texture. You can also toast the nuts for extra taste. Just watch them closely to avoid burning. While semi-sweet chocolate chips are classic, feel free to switch it up. Dark chocolate chips add a rich taste. Milk chocolate chips make the bread sweeter. White chocolate creates a creamy contrast with the banana flavor. Use one type or mix them for a fun twist. Just keep the total amount around a cup. You can enhance your banana bread with spices or extracts. Ground cinnamon adds warmth. A pinch of nutmeg can make it cozy. Try adding a teaspoon of almond or coconut extract for a unique twist. These small changes can make your bread special. Get creative and find your favorite combination! To keep your chocolate chip banana bread fresh, wrap it tightly in plastic wrap or store it in an airtight container. This method helps retain moisture and flavor. You can leave it at room temperature for up to three days. If you want it to last longer, consider freezing it. Freezing banana bread is easy and smart. First, let the bread cool completely. Then, slice the bread into individual pieces. Wrap each slice in plastic wrap or foil. Place the wrapped slices in a freezer bag. You can freeze them for up to three months. For best results, label the bag with the date. When you want to enjoy your banana bread again, reheating is simple. Take out a slice and let it sit at room temperature for a few minutes. You can use a microwave for quick reheating. Heat it for about 15-20 seconds. For a crispy crust, pop it in a toaster oven for a few minutes. Enjoy your slice warm with butter or cream cheese. To ripen bananas fast, place them in a paper bag. Add an apple or a ripe banana for best results. The ethylene gas they produce speeds up ripening. Check them daily until they're soft and sweet. Yes, you can use frozen bananas. Just thaw them before mashing. Drain any excess liquid to avoid soggy bread. Frozen bananas often have more flavor, making your bread even tastier. To check if your bread is done, insert a toothpick into the center. If it comes out clean or with a few moist crumbs, it’s ready. The bread should feel firm and spring back when gently pressed. You have many options for overripe bananas! Try making smoothies for a creamy texture. You can also create banana pancakes or muffins. Another idea is to freeze them for later use in baking or smoothies. In this post, we covered key ingredients and steps for making banana bread. We explored tips to perfect its texture and avoid common mistakes. You can try fun variations by adding nuts or different chocolates. We also discussed how to store leftovers and freeze your bread. Banana bread is easy to make and delicious. Now, it’s your turn to get baking!](https://joymealplan.com/wp-content/uploads/2025/05/475bee4b-eacd-4984-83f8-73c9916382a2-768x768.webp)

