Rainbow Veggie Pinwheel Wraps Simple and Tasty Snack

Looking for a fun and colorful snack? Rainbow Veggie Pinwheel Wraps are not only simple to make, but they’re also delicious and packed with nutrients! I’ll guide you through the easy steps to whip up this tasty treat that’s perfect for kids and adults alike. Whether you’re planning a party or just need a quick meal, these wraps are a vibrant way to enjoy fresh veggies. Let’s get started!
Why I Love This Recipe
- Colorful and Fun: These pinwheel wraps are not only delicious but also visually appealing, making them a hit for parties and gatherings.
- Healthy and Nutritious: Packed with fresh veggies and healthy fats from avocado, these wraps are a nutritious choice for a quick meal or snack.
- Quick and Easy: With just 15 minutes of prep time, these wraps are perfect for a busy day when you need something satisfying and healthy.
- Customizable: You can easily swap in your favorite veggies or spreads, making these wraps adaptable to your personal taste preferences.
Ingredients
List of Ingredients
– 4 large whole wheat tortillas
– 1 cup hummus (choose your favorite flavor)
– 1 cup fresh spinach leaves
– 1 cup assorted bell peppers (thinly sliced for color variety)
– 1 cup grated carrots
– 1 cup cucumber, thinly sliced
– 1 ripe avocado, sliced
– ½ cup cream cheese (optional, for added creaminess)
– Salt and freshly ground pepper, to taste
– Fresh herbs (such as basil or cilantro), chopped, for garnish
Optional Ingredients for Enhanced Flavor
You can add extras to make these wraps even better. Try adding sliced olives for saltiness. Pickled jalapeños offer a nice kick. Sun-dried tomatoes add a sweet, tangy flavor. You can also use flavored hummus for a tasty twist.
Nutritional Information per Serving
Each serving of Rainbow Veggie Pinwheel Wraps has about 150-200 calories. They are rich in vitamins and fiber. The wraps provide good fats from avocado and healthy carbs from whole wheat tortillas. This snack is not just delicious; it’s also nutritious!

Step-by-Step Instructions
Preparation Steps
To make Rainbow Veggie Pinwheel Wraps, start with clean hands and a clear surface. Grab your large whole wheat tortillas. Lay them flat on a cutting board. This gives you space to work. Next, spread a layer of hummus over each tortilla. Use a spatula or the back of a spoon. Leave a half-inch gap at the edges. If you want, add cream cheese on top for creaminess.
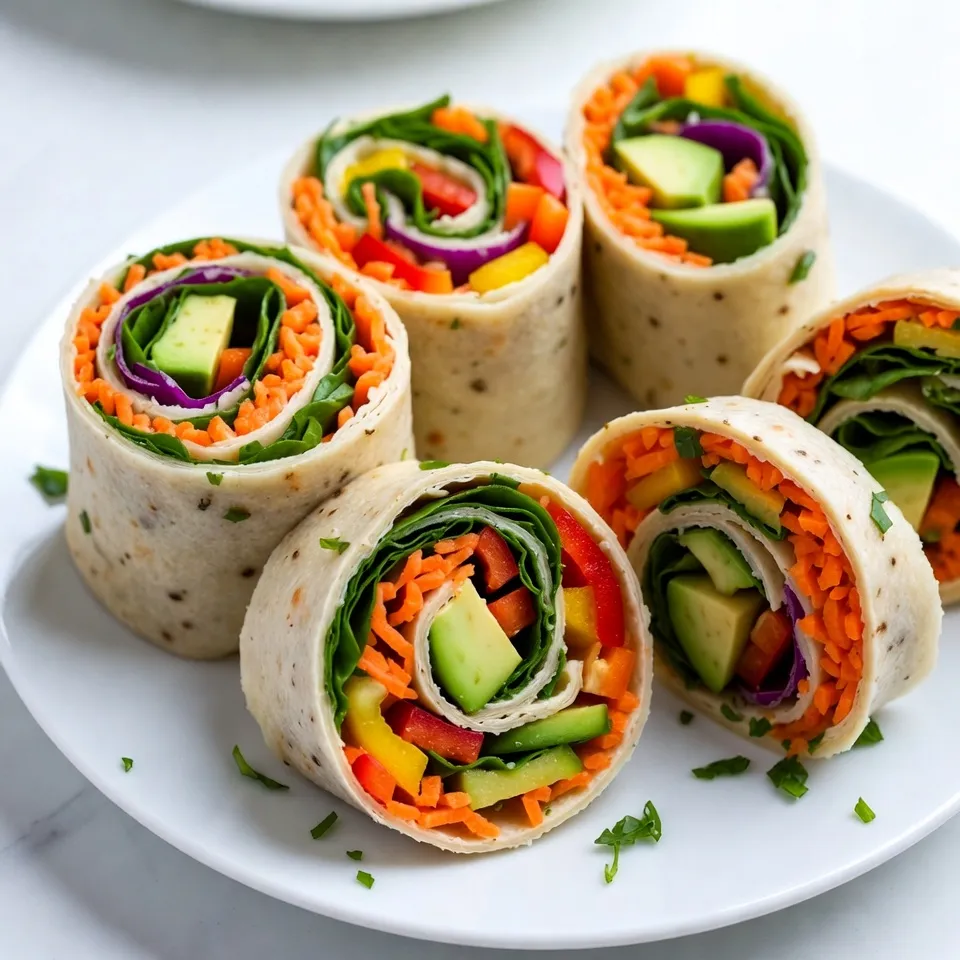
Now it’s time for the fun part—layering the veggies! First, add a handful of fresh spinach leaves. Then, sprinkle on assorted bell peppers. Use different colors for a bright look. Next, add grated carrots and cucumber slices. Finally, layer in the avocado. It adds a nice, creamy texture.
After stacking the veggies, season with salt and freshly ground pepper. This enhances the flavors.
Rolling Technique for Perfect Pinwheels
Now, let’s roll the tortillas. Start at one end and carefully roll it up tightly. Keep the filling inside. If you roll too loosely, the veggies may spill out. Aim for a tight roll for the best pinwheels. Once rolled, grab a sharp knife. Cut each pinwheel into 1-inch thick slices. This size is great for serving.
Serving Suggestions for Presentation
To make your pinwheel wraps look great, arrange the slices on a nice platter. You can add fresh herbs on top for color. For an extra touch, serve with a small bowl of dipping sauce. Tzatziki or a zesty vinaigrette works well. This adds flavor and fun to your snack. Enjoy your colorful and tasty pinwheel wraps!
Tips & Tricks
How to Choose the Best Vegetables
Pick fresh, bright vegetables for these wraps. The colors make the wraps fun and tasty. Look for crisp bell peppers, firm cucumbers, and vibrant carrots. Spinach should be dark green and not wilting. Choose ripe avocados that give slightly when pressed. This ensures a creamy texture in every bite. If you can, buy local and in season for the best flavor.
Tips for Even Spreading of Hummus and Cream Cheese
To spread hummus or cream cheese well, use a spatula or the back of a spoon. Start from the center and move outward. Leave about half an inch at the edge so the filling won’t spill. If you want an even creamier wrap, spread the cream cheese over the hummus. This adds richness and flavor.
How to Store Leftover Pinwheels
If you have extra pinwheels, store them in an airtight container. Place parchment paper between layers to keep them from sticking. You can keep them in the fridge for up to two days. If you need to save them longer, you can freeze them. Just remember to wrap them well to prevent freezer burn. Thaw in the fridge before serving.
Pro Tips
- Use Fresh Ingredients: Always opt for fresh vegetables and herbs to enhance the flavor and nutritional value of your pinwheel wraps.
- Experiment with Hummus Flavors: Try different hummus flavors like roasted red pepper, garlic, or spicy harissa to add variety and excitement to your wraps.
- Cutting Technique: Use a sharp knife to cut the pinwheels for clean edges, and wipe the knife between cuts to keep the presentation neat.
- Chill Before Serving: For best results, refrigerate the assembled wraps for about 30 minutes before cutting to help them hold their shape.

Variations
Creative Ingredient Swaps
You can easily swap ingredients in rainbow veggie pinwheel wraps. For example, use spinach wraps instead of whole wheat tortillas. This adds color and flavor. You can also try different veggies. Think about adding radishes or shredded red cabbage. These swaps keep the wraps fresh and fun.
Dietary Modifications (Vegan, Gluten-Free)
If you need vegan options, skip the cream cheese. Use extra hummus for creaminess. Choose gluten-free tortillas instead of whole wheat. This makes the wraps safe for those with gluten issues. You can still enjoy all the great flavors.
Flavor Infusions with Different Spreads
Changing the spread can give your pinwheels new life. Try avocado spread for a rich taste. Or use a spicy salsa for a kick. You can also mix hummus with herbs for a unique twist. These simple changes can make the wraps exciting and different every time.
Storage Info
Best Practices for Storing Prepared Wraps
To keep your rainbow veggie pinwheel wraps fresh, store them in an airtight container. This method keeps moisture out and helps retain their crunch. You can line the container with a paper towel to absorb any extra moisture. If you have cut pinwheels, place parchment paper between layers. This step prevents them from sticking together.
How Long Can You Keep Pinwheel Wraps?
You can store prepared pinwheel wraps in the fridge for about 3 days. After that, their taste and texture may decline. To enjoy them at their best, eat them within that time. If you notice any off smell or sliminess, discard them right away.
Freezing and Thawing Instructions
You can also freeze pinwheel wraps for longer storage. First, wrap each pinwheel tightly in plastic wrap. Then, place them in a freezer-safe bag or container. They can last up to 2 months in the freezer. To thaw, move them to the fridge overnight. This method helps maintain their flavor and texture. Avoid microwaving them, as this can make the wraps soggy. Enjoy your delicious wraps whenever you need a quick snack!
FAQs
Can I make these pinwheels ahead of time?
Yes, you can make these pinwheels ahead of time. Just prepare them and wrap each one tightly in plastic wrap. Store them in the fridge for up to a day. This helps the flavors blend well. When you’re ready to serve, just slice them into pieces and enjoy.
How can I add protein to my veggie pinwheels?
Adding protein is easy! You can include cooked chicken, turkey, or even tofu. Spread some hummus on the tortilla first. Then, layer your veggies and add the protein. You can also use cheese, like feta or mozzarella, for extra flavor. This makes your pinwheels more filling and nutritious.
What can I serve with rainbow veggie pinwheel wraps?
These pinwheels pair well with many sides. You can serve them with a tasty dip like tzatziki or a light vinaigrette. Fresh fruit salad or crunchy veggie sticks are great choices too. They add color and nutrition to your meal. You can also enjoy them with a light soup for a complete lunch.
In this article, we covered how to make tasty veggie pinwheel wraps. You learned about the key ingredients, preparation steps, and how to enhance flavors. I shared tips for choosing the best veggies, spreading ingredients evenly, and storing leftovers. We also explored variations based on dietary needs and creative swaps. These wraps are fun to make and perfect for meals or snacks. Enjoy making your own healthy pinwheels, and don’t hesitate to get creative with flavors! You’ll find that these wraps are not just healthy but also quite delightfu

Rainbow Veggie Pinwheel Wraps
Ingredients Â
- 4 large whole wheat tortillas
- 1 cup hummus
- 1 cup fresh spinach leaves
- 1 cup assorted bell peppers
- 1 cup grated carrots
- 1 cup cucumber
- 1 ripe avocado
- 0.5 cup cream cheese
- to taste salt
- to taste freshly ground pepper
- for garnish fresh herbs
InstructionsÂ
- Begin by laying out the large whole wheat tortillas flat on a clean surface or a cutting board to prepare for assembly.
- Using a spatula or the back of a spoon, evenly spread a generous layer of hummus over each tortilla, ensuring you leave about half an inch gap along the edges. If you're opting for the cream cheese, spread it over the hummus for extra creaminess.
- Next, create a colorful veggie layer: start with a handful of fresh spinach leaves, followed by an even distribution of the vibrant sliced bell peppers, grated carrots, cucumber slices, and sliced avocado.
- To enhance the flavor of the wrap, lightly sprinkle salt and freshly ground pepper over the layered vegetables.
- Carefully roll each tortilla tightly from one end to the other, ensuring the filling remains securely inside without spilling out.
- Once fully rolled, use a sharp knife to slice each pinwheel into 1-inch thick pieces, perfect for serving.
- Arrange the delightful pinwheel slices on a serving platter, and garnish with fresh herbs to add a pop of color and an aromatic finish.


![- 1 ripe mango, diced into small cubes - 2 ripe avocados, diced into small cubes - 1 small red onion, finely chopped - 1 jalapeño, minced - 1/4 cup fresh cilantro, finely chopped - Juice of 2 limes - Salt and pepper to taste - Optional: 1/2 teaspoon ground cumin To create a vibrant mango avocado salsa, you need fresh, tasty ingredients. First, pick a ripe mango. A ripe mango should feel slightly soft when you press it. Next, choose ripe avocados. They should also yield slightly to gentle pressure. The red onion adds a nice crunch and color. Finely chop it for the best texture. The jalapeño brings the heat. If you want less spice, remove the seeds. Fresh cilantro adds a bright flavor. Always choose fresh herbs for the best taste. Lime juice helps balance the sweetness of the fruits. It also keeps the avocados from browning. Salt and pepper enhance all the flavors. If you like a warm taste, add ground cumin. You can switch things up based on your taste. Try different types of onions, like white or green. They each bring a unique flavor. You can also add black beans or corn for extra texture and nutrition. If you love spice, add more jalapeño or try other peppers. Each choice lets you make this salsa your own. Explore and enjoy the creative process. Check out the Full Recipe for more details! - Start with a ripe mango. Cut it into small cubes. Place the mango in a large mixing bowl. - Next, take two ripe avocados. Dice them into small cubes, too. Add them gently to the bowl. - Now, grab a small red onion. Finely chop it and mix it into the bowl. - For some heat, use a jalapeño. Deseed it and mince it based on your spice level. - Chop 1/4 cup of fresh cilantro. This herb adds a bright flavor to the salsa. - Finally, squeeze the juice of two limes into the bowl. This keeps the avocados fresh. - Combine all the fresh ingredients carefully. Use a gentle folding motion. - This method keeps the avocados and mango intact. You want a nice texture in your salsa. - Pour in the lime juice and season with salt and pepper. If you like, add 1/2 teaspoon of ground cumin. - Mix everything together until well blended. Make sure not to break the avocado pieces. - Before serving, taste your salsa. Adjust the flavors if needed. - Add a pinch of salt or more lime juice for brightness. - Check the texture. It should be fresh and chunky, not mushy. You can find the Full Recipe for more details. Enjoy this fresh and vibrant salsa! Choosing the best mango and avocado is key. Look for a mango that feels slightly soft when you squeeze it. The skin should be mostly yellow with some red. For avocados, choose ones that yield to gentle pressure. They should feel soft but not mushy. Knowing when fruits are perfectly ripe matters. A ripe mango has a sweet smell at the stem end. The avocado should be dark green or nearly black. Check both fruits daily if you buy them unripe. To store salsa and preserve freshness, cover it tightly with plastic wrap. Press the wrap down to touch the salsa. This limits air exposure, keeping it bright. You can also store it in an airtight container. Best practices for flavor development overnight include letting the salsa sit in the fridge for at least an hour. This allows the flavors to marry. The lime juice helps keep the avocados from browning. Serve the salsa in a vibrant bowl for eye-catching appeal. A colorful dish makes the salsa pop on your table. Garnish with a sprig of cilantro on top for extra flair. Ideal accompaniments include crispy tortilla chips for dipping. You can also serve it with grilled meats like chicken or fish. Mango avocado salsa adds a fresh kick to any meal. Don’t forget to check the [Full Recipe] for more details! {{image_4}} You can change the fruits in this salsa. Try adding diced pineapple or peach for a sweet twist. These fruits bring a bright flavor and can make your salsa unique. If you want a vegan option, you can use black beans or corn. They add protein and make the salsa heartier. Many cultures have their own takes on salsa. You can add ingredients like mango or cilantro to reflect those flavors. For a spicy kick, adjust the jalapeño or add other peppers. For example, try using serrano peppers for more heat. Each region adds a special touch that can excite your taste buds. This salsa shines as a dip or topping. Serve it with crispy tortilla chips for a fun snack. You can also use it on grilled chicken or fish for a fresh meal. It adds color and flavor to your plate. Get creative with how you serve it, and enjoy the burst of flavors. For the full recipe, check out the complete guide above! To keep your Mango Avocado Salsa fresh, store it in the fridge. Place it in an airtight container. This helps prevent exposure to air, which can cause browning. Your salsa will last about 2 to 3 days in the fridge. Look for signs of spoilage, like an off smell or brown color in the avocados. If you see these signs, it's best to toss it out. Can you freeze Mango Avocado Salsa? Yes, but it's not the best option. Freezing can change the texture of avocados. If you choose to freeze it, do so right after making it. Use a freezer-safe container, leaving some space at the top for expansion. When you thaw it, the salsa might be watery. To fix this, drain any excess liquid before serving. Choose the best storage container for your salsa. Glass or BPA-free plastic containers work well. Airtight options are ideal because they keep air out. This helps maintain flavor and freshness. Using the right container can make a big difference in how long your salsa lasts. Mango Avocado Salsa stays fresh in the fridge for about 2 to 3 days. After that, the avocados may turn brown. You can freeze it, but it’s best to eat it fresh. If you freeze it, use it within a month for the best taste. Yes, you can swap ingredients based on your needs. If you're allergic to avocados, try using diced cucumbers instead. If you don’t like cilantro, fresh parsley works too. For a milder taste, skip the jalapeño or use sweet bell peppers. This salsa pairs well with many dishes. Serve it with tortilla chips for a crunchy snack. It’s also great on grilled chicken or fish. Try it on tacos or as a topping for burrito bowls for added flavor. The spice level depends on how much jalapeño you use. If you remove the seeds and ribs, it will be milder. If you like heat, add more jalapeño or try a spicier pepper. Adjusting the amount gives you control over the spice. Yes, you can prep it ahead! If you want to make it a day before, do so. Just add lime juice to keep the avocados bright. Store it in an airtight container in the fridge. This will help the flavors blend nicely. For the best taste, mix in the avocado right before serving. For the full recipe, check out the [Full Recipe]. Mango Avocado Salsa combines fresh ingredients for a tasty dish. We covered how to pick ripe fruits and mix flavors. You learned about variations, storage tips, and serving ideas. This salsa is perfect for gatherings or a light snack. It’s simple to make and adjust to your taste. Enjoy making it and share the joy of fresh flavors with others!](https://joymealplan.com/wp-content/uploads/2025/07/8dfe7157-a149-4f91-a822-36a2fad97dae-768x768.webp)

![- 1 can (15 oz) chickpeas, thoroughly drained and rinsed - 1 perfectly ripe avocado, peeled and pitted - 1 cup cherry tomatoes, halved - 1 medium cucumber, diced - 1/4 red onion, finely chopped - 1/4 cup fresh cilantro, chopped - 2 tablespoons freshly squeezed lemon juice - 1 tablespoon high-quality olive oil - Sea salt and freshly ground black pepper - 1/4 teaspoon ground cumin - Extra herbs for garnish - Each serving has about 200 calories. - Key vitamins include vitamin C, vitamin K, and fiber. This avocado chickpea salad packs a punch of flavor and nutrients! You get protein from chickpeas, healthy fats from avocado, and lots of vitamins from fresh veggies. The combo is not just tasty; it is good for you too. Pair this salad with pita chips for a crunchy bite. For the full recipe, check out the [Full Recipe]. To start, you need to mash the avocado. Take a ripe avocado and cut it in half. Remove the pit and scoop the flesh into a bowl. Use a fork to mash it. You want it creamy but still chunky. This adds a nice texture to your salad. Next, mix in the chickpeas. Open a can of chickpeas, drain and rinse them well. Carefully add them to the mashed avocado. Gently fold the chickpeas into the avocado. Be careful not to mash them. You want to keep the chickpeas whole for great bites. Now it's time to add in your vegetables. Chop up one cup of cherry tomatoes in half, dice a cucumber, and finely chop a quarter of a red onion. Don’t forget the cilantro! Add all these colorful veggies to your bowl. Gently mix everything together until the ingredients are well combined and coated in avocado. Then, you’ll make the dressing. In a small bowl, whisk together two tablespoons of freshly squeezed lemon juice and one tablespoon of high-quality olive oil. Add sea salt and freshly ground black pepper to taste. If you like, you can add a quarter teaspoon of ground cumin for extra flavor. This dressing will brighten the salad and tie everything together nicely. Now, drizzle the dressing over the chickpea and avocado mixture. Toss the salad gently. Make sure each ingredient gets a nice coat of dressing. Taste the salad. If it needs more flavor, adjust your seasoning. You can add more salt or lemon juice if you want it brighter. For the best taste, serve your salad right away. If you have time, let it chill in the refrigerator for 15-20 minutes. This allows the flavors to mix well. Don’t forget to check out the Full Recipe for more details! To select ripe avocados, look for ones that yield slightly when pressed. They should feel soft but not mushy. If they are hard, leave them at room temperature for a few days. Once ripe, keep them in the fridge to slow down the ripening process. To store leftover salad, use an airtight container. This keeps the salad fresh for up to two days. If you notice browning from the avocado, add a bit more lemon juice to help keep it vibrant. For a tasty pairing, serve your salad with crispy pita chips. The crunch adds a fun texture. You can also enjoy it on toasted bread for a quick meal. To present the salad, use a colorful bowl. Garnish with extra cilantro for a lively look. A sprinkle of sea salt on top can enhance the visual appeal, too. One common mistake is over-mashing the avocado. You want a creamy yet chunky texture. This keeps the salad interesting. Another mistake is not seasoning adequately. Be sure to taste and adjust your salt and lemon juice. Proper seasoning brings out all the fresh flavors in this dish. {{image_4}} You can easily boost your avocado chickpea salad with protein. Here are two great options: - Grilled chicken or shrimp: Both add a delicious, savory flavor. Just grill them and slice them up before mixing in. - Tofu for a vegetarian option: Tofu is a great meat substitute. Use firm tofu, press it, and cube it. Then toss it in for added protein. Adding new flavors can make your salad even better. Try these ideas: - Adding feta cheese: Crumbled feta adds a tangy taste that pairs well with the creamy avocado. - Experimenting with different dressings: You can switch up the dressing to change the flavor. Try balsamic, ranch, or a spicy vinaigrette for a twist. Using fresh, seasonal ingredients makes your salad shine. Here are some tips: - Incorporating seasonal veggies: Add bell peppers, radishes, or zucchini when they are in season for extra crunch and flavor. - Switching up herbs for different flavors: Try basil, parsley, or dill instead of cilantro to give your salad a new taste. These variations can turn your avocado chickpea salad into a unique dish every time you make it. For the full recipe, check out the earlier section. To keep your salad fresh, store it in the fridge. Use an airtight container to seal in the flavors. This method helps prevent browning and keeps the salad crisp. If you have space, consider using glass containers. They do not absorb odors and help you see the salad clearly. This salad lasts about three days in the fridge. After that, the ingredients may start to spoil. Check for signs like brown avocado or a sour smell. If you see either, it’s best to toss the salad. Freshness is key to enjoying this dish. Can you freeze avocado chickpea salad? I do not recommend freezing it. The avocado and tomatoes do not freeze well. They can become mushy when thawed. If you want to freeze, store the chickpeas and veggies separately. This way, you can mix fresh ingredients when you’re ready to eat. To make your avocado chickpea salad creamy, mash the ripe avocado well. Use a fork for this step. Aim for a mix of smooth and chunky textures. This keeps it interesting. Combine the mashed avocado with chickpeas gently. Folding helps maintain the shape of the chickpeas. Also, add a drizzle of olive oil for extra creaminess. Finally, use fresh lemon juice to brighten the flavors. These steps ensure your salad has a rich, creamy base. Yes, you can prepare this salad in advance. Start by chopping all the vegetables and storing them separately. This keeps them fresh and crisp. Mash the avocado just before serving. If you mash it early, it may brown. To keep the salad fresh, store it in an airtight container. You can also add lemon juice to the avocado to slow down browning. Chill the salad in the fridge for about 20 minutes before serving. This helps the flavors blend well. If you want to switch things up, try other legumes. White beans are a great option. They have a mild taste and a creamy texture. Black beans can add a fun twist with a bolder flavor. You can also use lentils for a different texture. Each legume gives a unique taste to the salad. So, feel free to get creative with your choices. Yes, this salad is gluten-free. All the main ingredients, like chickpeas and vegetables, are naturally free from gluten. This makes it a great option for those with gluten sensitivities. Always check your ingredient labels, especially for dressings. Some pre-made dressings may contain gluten. Using fresh lemon juice and olive oil ensures your dressing stays gluten-free. Enjoy this light and healthy salad without worry! For the full recipe, check out this Creamy Avocado Chickpea Delight. This blog post covered how to make a tasty avocado chickpea salad. We discussed key ingredients and gave precise steps for preparation. I shared helpful tips on freshness, serving ideas, and common mistakes to avoid. You can customize it with proteins or seasonal veggies. In summary, this salad is simple, nutritious, and versatile. It’s perfect for any meal. I encourage you to try it and share it with others. Enjoy crafting your delicious creation!](https://joymealplan.com/wp-content/uploads/2025/06/f9e70452-dbea-4dff-b8d7-5421933c3ab4-768x768.webp)
![- 1 cup fresh spinach, finely chopped - 1 cup canned artichoke hearts, well-drained and chopped - 1/2 cup cream cheese, softened to room temperature - 1/2 cup sour cream - 1/2 cup mozzarella cheese, freshly shredded - 1/4 cup Parmesan cheese, finely grated - 2 cloves garlic, minced - 1 teaspoon fresh lemon juice - Salt and freshly ground black pepper to taste - 1/4 teaspoon red pepper flakes (optional) - Tortilla chips or freshly sliced baguette for serving The ingredients for creamy spinach artichoke dip come together easily. You can choose fresh or canned artichokes. I prefer fresh spinach for flavor, but both work well. Cream cheese gives the dip its base, making every bite rich and smooth. The sour cream adds tanginess. For that cheesy pull, I use mozzarella. Parmesan adds a salty bite that brightens the whole dish. I always add fresh garlic for depth. A splash of lemon juice lifts the flavors, making them pop. Salt and pepper balance the dish. If you like heat, use red pepper flakes. They add a nice kick without overwhelming the flavors. Serve with tortilla chips or a sliced baguette for dipping. Each bite of this dip is a creamy, cheesy delight. For the full recipe, check the section above. Preheating your oven to 350°F (175°C) is key for this dip. This step makes sure your dip cooks evenly. You want it to bubble and get a nice golden color. Skipping this step can lead to an uneven bake. In a large bowl, mix together the cream cheese, sour cream, mozzarella, and Parmesan. Use a spatula or a hand mixer to blend until smooth. This creates a rich and creamy base. The cream cheese must be soft for easy mixing. Make sure there are no lumps. A smooth texture makes the dip great for dipping. Next, gently fold in the chopped spinach and artichoke hearts. Add in the minced garlic, lemon juice, salt, pepper, and red pepper flakes if you like some heat. Stir carefully to mix everything well. This is where the magic happens. The flavors of spinach and artichokes blend to create a delicious combination. Now, spoon the mixture into a baking dish. Spread it evenly to create a uniform layer. Place the baking dish in the preheated oven and bake for 25 to 30 minutes. You want to see bubbling around the edges and a light golden top. This means your dip is ready. Once baked, let it cool for a few minutes before serving. This short wait allows the flavors to meld beautifully, making it taste even better. For the Full Recipe, visit the provided link. To get that smooth and creamy dip, mix your cheeses well. Start with softened cream cheese and sour cream. This helps avoid lumps. Use a spatula or hand mixer to blend everything until it's nice and smooth. When you add spinach and artichokes, fold them in gently. This keeps the dip fluffy and creamy. Want to kick up the flavor? Add more garlic! You can use three or four cloves if you love garlic. Fresh herbs like basil or parsley also boost taste. A sprinkle of cayenne pepper adds a fun kick. Experiment with Italian seasoning for a unique twist. Each addition brings new flavor layers to your dip. Serve your dip warm for the best experience. When it comes out of the oven, let it cool for a few minutes. This allows the flavors to blend well. Serve it hot with tortilla chips or sliced baguette. The warmth makes it extra inviting and tasty. For a lovely touch, sprinkle some extra Parmesan on top before serving. {{image_4}} You can make this dip lighter by swapping some ingredients. Use low-fat cream cheese and sour cream for a healthier twist. Greek yogurt is another great choice. It adds creaminess without the extra fat. You won't miss the full-fat versions. Plus, you still get that rich taste you love. Want to change up the flavor? Try adding different cheeses. Cheddar or gouda can give it a fun kick. You can also mix in spices like cumin or paprika. These simple tweaks can make your dip unique. Don’t be afraid to experiment. Each time, you can create a new favorite. For a vegan version, replace dairy products with plant-based alternatives. Use cashew cream or tofu for the cream cheese. You can also use coconut yogurt instead of sour cream. Nutritional yeast gives it a cheesy flavor. These swaps keep the dish creamy while being vegan-friendly. Enjoy delicious flavors without the dairy! For the full recipe, check out [Full Recipe]. Store leftover dip in an airtight container. This keeps the dip fresh and tasty. Place it in the fridge within two hours of serving. For longer storage, you can freeze it. Use a freezer-safe container and label it with the date. Make sure to leave some space for expansion when freezing. To reheat your dip, use an oven or a microwave. In the oven, preheat to 350°F (175°C). Place the dip in a baking dish and cover it with foil. Heat for about 15-20 minutes, or until warm. In the microwave, heat in short bursts of 30 seconds, stirring in between. This way, you keep the dip creamy and avoid a rubbery texture. The dip lasts about 3-4 days in the fridge. Make sure it is sealed well. If frozen, it can last up to 2 months. To enjoy the best flavor, eat it within this time. Always check for any off smell or change in texture before eating. Yes, you can make this dip ahead of time! Prepare the dip and store it in the fridge. Use an airtight container to keep it fresh. You can make it a day before your event. Just remember to bake it right before serving. If you want to reheat it, warm it in the oven until it's hot and bubbly. This dip pairs well with many snacks. Try serving it with: - Tortilla chips - Fresh vegetable sticks like carrots and celery - Sliced baguette - Pita chips These options add crunch and freshness. They also bring out the creamy flavor of the dip. You can bake this dip in a slow cooker! First, mix all the ingredients as usual. Then, place the mixture in the slow cooker. Cook it on low for about 2 to 3 hours. Stir it occasionally to keep it smooth. This method makes the dip perfect for parties, as it stays warm and ready to enjoy. For the full recipe, check out the complete guide above. This creamy spinach artichoke dip is easy to make and fun to share. We covered the key ingredients and detailed step-by-step instructions to guide you. Remember to adjust flavors and textures to your liking, and don’t hesitate to explore variations. Whether making it healthier or trying vegan options, there’s a version for everyone. Store any leftovers properly, and reheat to enjoy it warm again. With this recipe, you are set for tasty gatherings and comfy nights in. Enjoy your delicious creation!](https://joymealplan.com/wp-content/uploads/2025/07/4577691d-75b4-487d-8cf6-776305dcf758-768x768.webp)

