Roasted Red Pepper Pasta Flavorful and Easy Recipe

Are you ready to enjoy a delicious meal that’s quick and easy? This roasted red pepper pasta is packed with flavor and comfort, making it perfect for any night. With simple steps and fresh ingredients, you can whip up a dish that impresses family and friends alike. Follow me as I guide you through this tasty recipe that will spice up your dinner table effortlessly! Let’s dive in and create something amazing.
Why I Love This Recipe
- Deliciously Creamy: The roasted red peppers create a rich and creamy sauce that envelops the pasta perfectly, providing a burst of flavor in every bite.
- Simple Ingredients: This recipe uses common pantry staples, making it easy to whip up a delicious meal without a lengthy grocery list.
- Customizable Heat: The red pepper flakes allow you to adjust the spice level, making this dish suitable for both mild and adventurous eaters.
- Quick and Easy: With a total time of just 40 minutes, this pasta dish is perfect for busy weeknights when you want something satisfying without a lot of fuss.
Ingredients
List of Ingredients
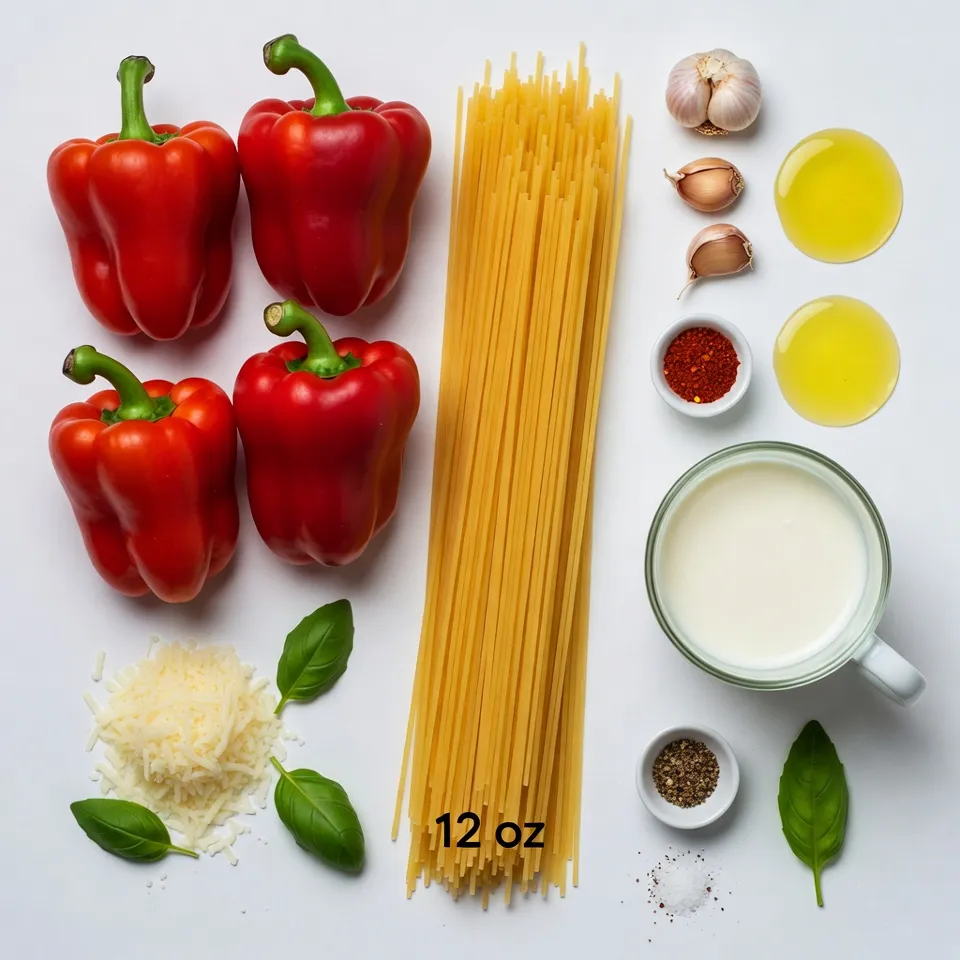
– 4 large red bell peppers
– 12 oz pasta (spaghetti or penne recommended)
– 1 cup heavy cream
– 1 cup grated Parmesan cheese
– 3 cloves garlic, minced
– 2 tablespoons olive oil
– 1 teaspoon red pepper flakes (adjust based on heat preference)
– Salt and black pepper to taste
– Fresh basil leaves for garnish
Optional Ingredients and Substitutions
You can switch up the pasta type. Use gluten-free pasta for a gluten-free option. If you want a lighter sauce, try using half-and-half instead of heavy cream. For a vegan version, use cashew cream and nutritional yeast in place of cheese. You can add grilled chicken or shrimp for extra protein. If you like more heat, add more red pepper flakes or a dash of hot sauce.
Nutritional Information
This roasted red pepper pasta is rich and satisfying. Each serving has about:
– Calories: 600
– Protein: 20g
– Fat: 30g
– Carbohydrates: 70g
– Fiber: 3g
– Sugar: 3g
This meal gives you a good balance of nutrients while being super tasty. Enjoy it as a hearty dinner or a special treat!

Step-by-Step Instructions
Roasting the Peppers
Start by preheating your oven to 450°F (230°C). Slice the red bell peppers in half. Remove the seeds and stems. Place the peppers cut side down on a baking sheet. Using parchment paper makes cleanup easy. Roast them for about 20 to 25 minutes. Look for charred and blistered skins. Once done, take them out and let them cool. When cool, peel off the skins and set the peppers aside.
Cooking the Pasta
While the peppers roast, bring a large pot of salted water to a boil. Add your choice of pasta, either spaghetti or penne. Cook according to package directions until al dente. Drain the pasta, but save about 1 cup of the cooking water. This water helps to adjust sauce thickness later. Set the pasta aside for now.
Making the Sauce
In a blender, add the peeled roasted peppers, heavy cream, and minced garlic. Pour in the olive oil and sprinkle red pepper flakes for a kick. Add a pinch of salt and black pepper. Blend until the mixture is smooth and creamy. No chunks should remain. This sauce is the star of your dish.
Combining Pasta and Sauce
Heat a large skillet over medium heat. Pour in the blended roasted red pepper sauce. Gently warm the sauce, stirring now and then. If the sauce feels too thick, add a bit of the reserved pasta water. Gradually, mix in the cooked pasta. Toss it carefully to coat every piece with that lovely sauce.
Adding Cheese
Once the pasta is coated, take the skillet off the heat. Stir in the grated Parmesan cheese. Mix until the cheese melts into the sauce. Taste your dish and adjust the seasoning. You may want to add more salt, black pepper, or red pepper flakes based on your taste.
Serving Suggestions
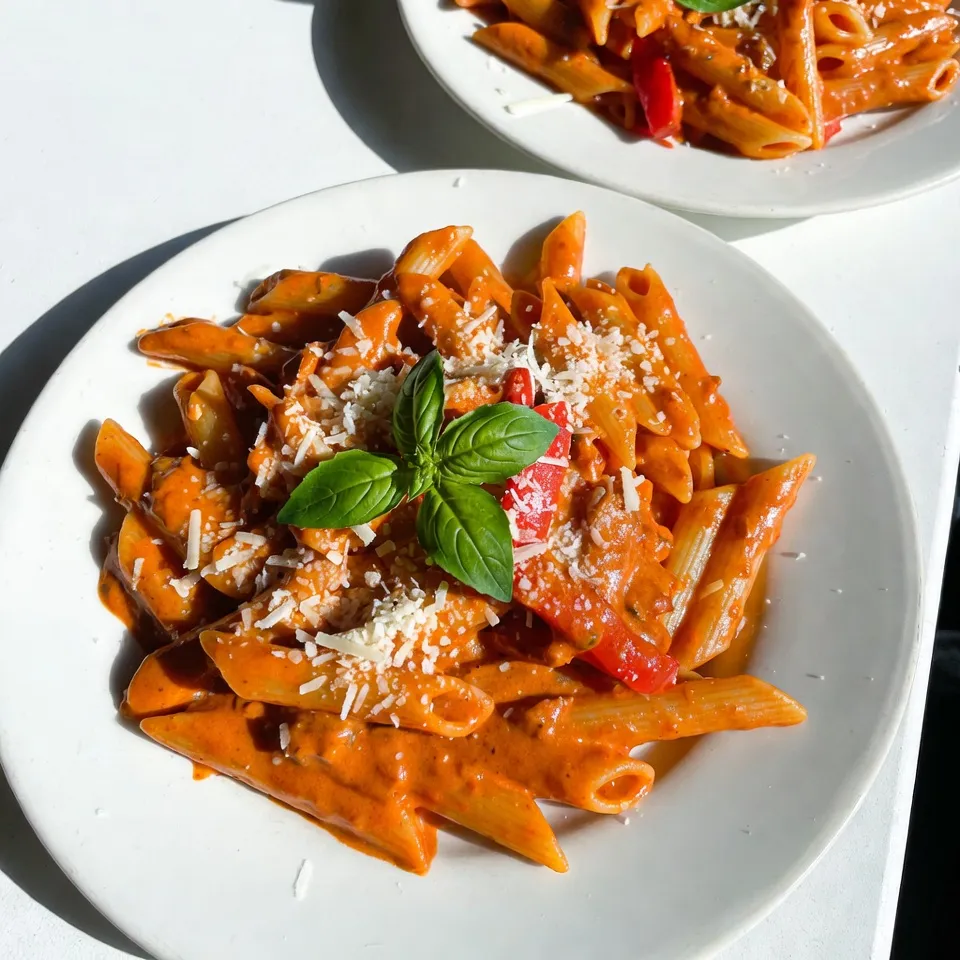
Spoon the creamy roasted red pepper pasta onto plates. Garnish with fresh basil leaves for color and taste. You can also sprinkle more Parmesan cheese on top. This dish looks great and tastes even better. Enjoy your meal!
Tips & Tricks
How to Roast Peppers Perfectly
Roasting peppers gives them a sweet and smoky taste. Start by preheating your oven to 450°F (230°C). Cut the peppers in half and remove the seeds. Place them cut side down on a baking sheet lined with parchment paper. Roast for about 20-25 minutes until the skins are charred. After roasting, let them cool. The skins will peel off easily. This method brings out the best flavor.
Choosing the Right Pasta
For this recipe, I recommend using spaghetti or penne. These shapes hold the sauce well. Spaghetti gives you long, twirling bites, while penne offers a sturdy, hearty option. Choose what you like best, but remember to cook the pasta until it’s al dente. This means it should be firm when you bite it.
Adjusting Heat Levels
If you like heat, add more red pepper flakes to the sauce. Start with one teaspoon, then taste and adjust. If it’s too spicy, you can balance it with more cream or cheese. For a milder dish, use less or skip the flakes. Always taste as you go to find your perfect heat level.
Pro Tips
- Choose the Right Pasta: For this creamy sauce, spaghetti or penne works best as they hold the sauce well, ensuring each bite is flavorful.
- Adjust the Heat: Feel free to modify the amount of red pepper flakes based on your heat preference. Start with less if you’re unsure, and add more to taste.
- Fresh Ingredients Matter: Using fresh basil and good-quality Parmesan cheese will elevate the flavor of your dish significantly, making it taste even more delicious.
- Perfect Sauce Consistency: If your sauce is too thick, gradually add reserved pasta water until you reach your desired creaminess without watering it down.

Variations
Vegan Roasted Red Pepper Pasta
To make vegan roasted red pepper pasta, swap heavy cream for coconut cream. This change adds a rich taste without dairy. Use nutritional yeast instead of Parmesan cheese for a cheesy flavor. Add a splash of lemon juice for brightness. This dish stays creamy and delicious.
Adding Protein Options
For a protein boost, add cooked chicken or shrimp. Simply toss them in with the pasta before serving. You can also use chickpeas or lentils for a plant-based protein. These options make the meal filling and satisfying. Adjust the cooking time as needed to ensure everything is warm.
Gluten-Free Alternatives
If you need a gluten-free option, choose gluten-free pasta. Many brands offer great textures that mimic traditional pasta. You can also use spiralized vegetables like zucchini or carrots for a low-carb choice. These alternatives keep the dish light and fresh. Enjoy the same great flavors without the gluten!
Storage Info
Storing Leftovers
After enjoying your roasted red pepper pasta, store leftovers in an airtight container. Let the pasta cool down first. You can keep it in the fridge for up to 3 days. If you want to keep it longer, consider freezing.
Freezing Instructions
To freeze your pasta, place it in a freezer-safe container. Make sure to label it with the date. Roasted red pepper pasta can last in the freezer for about 2 to 3 months. When you’re ready to eat, just thaw it in the fridge overnight.
Reheating the Pasta
To reheat, you have a few options. You can use the microwave or stovetop. For the microwave, place pasta in a bowl and cover it with a lid. Heat for 1 to 2 minutes. Stir halfway through. For the stovetop, add pasta and a splash of water to a pan. Heat over low heat until warm. Add more sauce if needed to keep it creamy.
FAQs
Can I use jarred roasted red peppers?
Yes, you can use jarred roasted red peppers. They save time and effort. Look for those in water or oil. Drain them well before blending. The taste will still be delicious!
How can I make it spicier?
To add heat, use more red pepper flakes. You can also mix in some chopped fresh chili. Adjust the amount based on your taste. Start small, then add more if needed.
What side dishes pair well with roasted red pepper pasta?
Great side dishes include garlic bread and mixed salad. You can also serve it with grilled vegetables. These dishes balance the creamy pasta well.
How long will the leftovers last in the fridge?
Leftovers will last about three to four days. Store them in an airtight container. Reheat on the stove or in the microwave for best results.
Can I make this ahead of time?
Yes, you can prepare the sauce in advance. Store it in the fridge for up to three days. Cook the pasta fresh when ready to serve. This keeps everything tasty and fresh!
This blog post covered how to make roasted red pepper pasta, from ingredients to variations. You learned how to roast peppers, cook pasta, and make a tasty sauce. We also shared tips on perfect roasting and choosing pasta types. Plus, we offered ideas for vegan and gluten-free options.
In the end, this dish is easy and fun to make. Enjoy trying different spices and toppings. Happy cookin

Roasted Red Pepper Pasta
Ingredients
- 4 large red bell peppers
- 12 oz pasta (spaghetti or penne recommended)
- 1 cup heavy cream
- 1 cup grated Parmesan cheese
- 3 cloves garlic, minced
- 2 tablespoons olive oil
- 1 teaspoon red pepper flakes
- to taste salt and black pepper
- for garnish fresh basil leaves
Instructions
- Preheat your oven to 450°F (230°C). Halve the red bell peppers and remove the seeds and stems. Arrange the peppers cut side down on a baking sheet lined with parchment paper for easy cleanup. Roast in the preheated oven for approximately 20-25 minutes, or until the skins are charred and blistered. Once roasted, remove from the oven and allow to cool. When cool enough to handle, peel the skins off the peppers and set aside.
- While the peppers are roasting, fill a large pot with water and add a generous amount of salt. Bring to a boil, then add the pasta. Cook according to the package instructions until al dente. Drain the pasta, reserving about 1 cup of the pasta cooking water for later use. Set the drained pasta aside.
- In a blender or food processor, combine the peeled roasted red peppers, heavy cream, minced garlic, olive oil, red pepper flakes, and a pinch of salt and pepper. Blend the mixture until it becomes smooth and creamy, ensuring there are no chunks remaining.
- In a large skillet set over medium heat, pour in the blended roasted red pepper sauce. Gently heat the sauce, stirring occasionally. If the sauce appears too thick, gradually add a small amount of the reserved pasta water until you reach your desired consistency. Add the cooked pasta into the skillet and carefully toss to coat the pasta evenly with the sauce.
- Once the pasta is well coated, remove the skillet from the heat. Stir in the grated Parmesan cheese, mixing until it melts and integrates into the sauce. Taste and adjust the seasoning with additional salt, black pepper, or red pepper flakes if desired.
- Spoon the creamy roasted red pepper pasta onto plates or into bowls. Garnish with fresh basil leaves and sprinkle with extra Parmesan cheese for added flavor, if desired.


![To make a tasty sweet potato hash, gather these simple ingredients: - 2 medium sweet potatoes, peeled and diced into 1/2-inch cubes - 1 red bell pepper, finely diced - 1 green bell pepper, finely diced - 1 small red onion, finely diced - 2 cloves garlic, minced - 1 teaspoon smoked paprika - 1/2 teaspoon ground cumin - Salt and freshly ground black pepper to taste - 3 tablespoons extra-virgin olive oil - 4 large eggs (optional, for serving) - Fresh parsley, chopped (for garnish) Fresh herbs can brighten your hash. Try adding: - Chopped cilantro for a fresh kick - Thyme for an earthy flavor - Chives for a mild onion taste - Oregano for a hint of sweetness Experiment with spices too. You can add chili powder for heat or turmeric for color. Choosing the right cooking oil is key. I recommend: - Extra-virgin olive oil: Rich in healthy fats and flavor. - Avocado oil: Great for high heat and packed with vitamins. - Coconut oil: Adds a unique taste and is good for cooking. Each oil brings its own benefits, making your sweet potato hash even better. For the best result, use extra-virgin olive oil in this recipe. You will love the flavor! For the full recipe, check out the details above. 1. Start by heating 2 tablespoons of olive oil in a large skillet over medium heat. Wait until the oil shimmers. 2. Carefully add the diced sweet potatoes to the skillet. Season them with salt, pepper, smoked paprika, and cumin. Stir to coat the sweet potatoes evenly. 3. Let the sweet potatoes cook for 10-12 minutes. Stir them occasionally. They should soften and turn golden-brown on the edges. 4. Next, add the diced red onion and bell peppers to the skillet. Cook while stirring for another 5-7 minutes. All the veggies should become tender and slightly caramelized. 5. In the last minute, add the minced garlic to the skillet. Stir well and cook until the garlic smells great, about 30 seconds. Taste and adjust seasoning if needed. 6. If you want to add eggs, heat the last tablespoon of olive oil in another pan over medium heat. Cook the eggs to your liking, either fried sunny-side-up or poached. 7. Serve by spooning the sweet potato hash onto plates or bowls. Top with a cooked egg and sprinkle fresh parsley for color. This recipe uses several key cooking techniques: - Sautéing: This method cooks the sweet potatoes and veggies quickly, creating a nice browning effect. - Seasoning: Adding spices like smoked paprika and cumin enhances the flavor. - Layering: Cooking veggies in stages helps build depth in taste and texture. - Garnishing: Adding fresh parsley brightens up the dish visually and adds freshness. - Use medium heat to ensure even cooking. High heat can burn the sweet potatoes. - Stir often, especially after adding the onions and bell peppers. This keeps them from sticking and burning. - Keep an eye on the garlic. It can burn quickly, so add it last. - If you see the veggies getting too dark, lower the heat and add a splash of water to steam them. For more details, check the Full Recipe. To achieve the best texture for your sweet potato hash, follow these tips: - Cut sweet potatoes into even 1/2-inch cubes. This helps them cook evenly. - Pre-cook sweet potatoes in the microwave for 3-4 minutes. This speeds up cooking. - Cook on medium heat. This prevents burning while allowing them to crisp up. - Stir occasionally, so they don’t stick to the pan. This keeps a nice texture. You can elevate the flavors of your sweet potato hash with these ideas: - Add fresh herbs like thyme or rosemary for a burst of freshness. - Include a splash of lime juice or vinegar for extra zing. - Experiment with different spices, like chili powder or turmeric, for warmth. - Top with avocado or feta cheese for creaminess and richness. Avoid these common mistakes for a perfect sweet potato hash: - Don’t overcrowd the skillet. This can lead to steaming instead of browning. - Avoid using old or dry sweet potatoes. Fresh ones yield better flavor and texture. - Don’t skip the seasoning early on. It helps build flavor from the start. - Be careful not to overcook the garlic. It can turn bitter if burned. For the full recipe, check out Savory Sweet Potato Hash . {{image_4}} You can change up your sweet potato hash with many vegetables. Adding spinach gives it a nice green touch. Kale is another great choice; it adds a hearty bite. Try zucchini for a mild taste. You can even toss in some corn for sweetness. Each vegetable adds its own flavor and texture. To make your hash more filling, add protein. Cooked bacon or sausage provides a savory kick. If you want a leaner option, try diced chicken. For a meatless choice, black beans work well. They add protein and a creamy texture. You can even sprinkle feta cheese on top for a salty finish. Making your hash vegan is easy. Simply skip the eggs and use olive oil for cooking. You can also add nutritional yeast for a cheesy flavor. For gluten-free, all the ingredients in the recipe are safe. Just ensure any added condiments are gluten-free. This way, everyone can enjoy your delicious sweet potato hash! For the complete recipe, check out the [Full Recipe]. To keep your sweet potato hash fresh, let it cool first. Place it in an airtight container. Store it in the fridge for up to four days. This keeps the flavors intact. Be sure to label the container with the date. This helps you track how long it has been stored. If you want to save some for later, freezing is a great option. Use a freezer-safe container or bag. Portion it out to make reheating easier. Make sure to squeeze out as much air as possible. This helps prevent freezer burn. Sweet potato hash can freeze well for up to three months. When it’s time to eat your leftovers, reheating is easy. You can use a skillet or microwave. If using a skillet, add a splash of olive oil. Heat it on medium until warmed through. Stir occasionally to avoid sticking. If using a microwave, cover your dish to keep moisture in. Heat in short bursts, stirring in between. This helps keep the flavors fresh and vibrant. For more detailed instructions, check out the Full Recipe. Yes, you can make sweet potato hash in advance. Cook it fully and let it cool. Store it in an airtight container in the fridge. It stays fresh for up to three days. When ready to eat, just reheat it in a skillet. This keeps the flavors intact and makes serving easy. Sweet potato hash is super versatile. You can serve it for breakfast, lunch, or dinner. Top it with fried or poached eggs for a hearty breakfast. Add avocado slices for creaminess. For lunch, pair it with a green salad. You can also serve it as a side dish with grilled chicken or fish. The options are endless! You can customize your sweet potato hash in many fun ways. Try adding different vegetables like zucchini or mushrooms. For a spicy kick, toss in jalapeños. You can mix in cooked sausage or bacon for added flavor. If you prefer a vegan option, skip the eggs and add chickpeas. Use herbs like thyme or cilantro to enhance the taste. Get creative and make it your own! For the full recipe, check out the savory sweet potato hash section. This article covered how to make sweet potato hash. We discussed ingredients, cooking steps, and tips for perfect texture. You learned about variations, storage, and common questions. Each section helps you craft a tasty dish. As you make your hash, remember to experiment with flavors and textures. This dish is versatile and can fit many diets. Enjoy your cooking, and don't hesitate to make it your own!](https://joymealplan.com/wp-content/uploads/2025/06/a9a4856f-e5e6-4dd7-b1d4-7d775511eecc-768x768.webp)


