If you’re craving a tasty snack that’s easy to make, these roasted sweet potato wedges are your answer. They’re crispy, flavorful, and perfect for any meal or gathering. Follow along as I share simple steps to achieve that perfect crunch and irresistible taste. From the right ingredients to expert tips, you’ll transform your kitchen into a sweet potato haven in no time. Let’s get started!
Ingredients
List of Ingredients
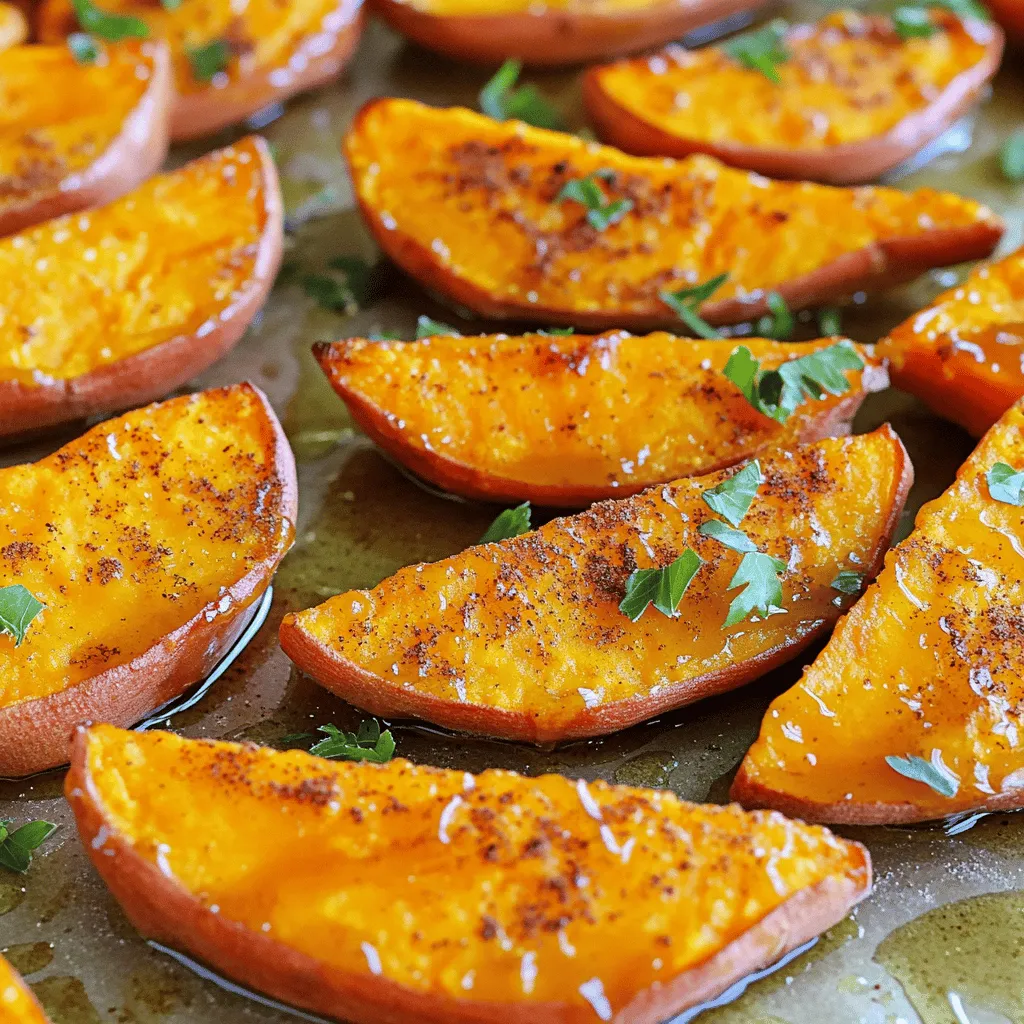
– 3 medium sweet potatoes, thoroughly scrubbed and cut into wedges
– 3 tablespoons extra virgin olive oil
– 2 tablespoons pure maple syrup
– 1 teaspoon ground cinnamon
– ½ teaspoon smoked paprika
– ½ teaspoon garlic powder
– Sea salt and freshly ground black pepper, to taste
– Fresh parsley, finely chopped, for garnish (optional)
Sweet potatoes are the star of this dish. They bring a great natural sweetness and creamy texture. The olive oil adds richness and helps the wedges become crisp. Maple syrup enhances the sweetness and adds a lovely glaze. Ground cinnamon and smoked paprika give warmth and depth. Garlic powder brings savory notes, while sea salt and black pepper balance the flavors. Optionally, you can add chopped parsley for color and freshness.Enjoy the process of cooking and the tasty results!
Step-by-Step Instructions
Preparation of the Sweet Potatoes
First, preheat your oven to 425°F (220°C). This heat will help make the wedges crispy. While the oven warms up, line a baking sheet with parchment paper. This stops the wedges from sticking and makes cleanup easy.
Next, take 3 medium sweet potatoes. Scrub them well under cold water. This removes dirt and any chemicals. Now, cut each sweet potato into wedges. Aim for even sizes so they cook at the same rate.
Mixing the Ingredients
In a large bowl, add your sweet potato wedges. Pour in 3 tablespoons of extra virgin olive oil. Toss gently to coat each wedge well. The oil gives the sweet potatoes a lovely flavor and helps them crisp up.
Now it’s time to add some flavor! Drizzle 2 tablespoons of pure maple syrup over the wedges. Then, sprinkle 1 teaspoon of ground cinnamon, ½ teaspoon of smoked paprika, and ½ teaspoon of garlic powder. Don’t forget to add sea salt and freshly ground black pepper to taste. Mix everything thoroughly until every wedge is covered in that tasty seasoning blend.
Roasting the Sweet Potato Wedges
Take your seasoned wedges and spread them out on the prepared baking sheet. Make sure they are in a single layer. If they are too close together, they won’t crisp up nicely.
Put the baking sheet in your preheated oven. Roast the wedges for 25 to 30 minutes. Halfway through, flip them over to ensure even cooking. You want them to be tender inside and have a nice crisp outside.
Once done, take them out of the oven and let them cool for a few minutes. If you like, sprinkle some finely chopped parsley on top for a fresh look. Now, you’re ready to enjoy your savory maple cinnamon roasted sweet potato wedges!
Tips & Tricks
Achieving the Perfect Crispiness
To get that ideal crispiness, space is key. Lay your wedges out in a single layer on the baking sheet. If they touch, they will steam instead of roast. I recommend using a parchment-lined sheet for easy cleanup and even cooking. Set your oven to 425°F (220°C) for the best results. This high heat helps to caramelize the sugars in the sweet potatoes, making them sweet and crispy.
Flavor Enhancements
You can boost the flavor by adding spices or herbs. Try cumin, chili powder, or rosemary for a twist. If you want to marinate, mix olive oil with garlic and herbs. Let the wedges soak for at least 30 minutes before roasting. This extra step can deepen the flavor and make them even more tasty.
Timing Adjustments
Wedge thickness affects cooking time. Thin wedges cook in about 20 minutes, while thicker ones need longer, around 30 to 35 minutes. Keep an eye on them! Look for golden edges and a soft center to tell when they are done. Flipping them halfway through cooking helps achieve even browning and crispness. Enjoy the delightful texture and taste of perfectly roasted sweet potato wedges!

Variations
Cheesy Roasted Sweet Potato Wedges
You can make cheesy roasted sweet potato wedges by adding cheese. Try cheddar, parmesan, or feta for great flavor. Sprinkle the cheese on top of the wedges before roasting. This will make them creamy and rich.
To adjust cooking time, add cheese in the last five minutes of roasting. This way, the cheese melts but does not burn. Keep an eye on it to get that perfect melt!
Spicy Sweet Potato Wedges
If you want heat, try adding spices. Chili powder, cayenne pepper, or smoked paprika work well. Mix these into your oil and seasoning blend before tossing the sweet potatoes.
For dipping sauces, I recommend ranch or spicy aioli. These sauces balance the heat and add creaminess. You can also try a cool yogurt sauce for a tasty contrast.
Herb-Infused Variants
For herb-infused wedges, add fresh herbs to your mix. Rosemary, thyme, or sage can elevate the flavor. Chop them finely and blend them with your oil and seasonings.
Garnish with extra herbs after roasting. This adds color and flair to your dish. You can also sprinkle lemon zest for a bright finish.
These variations keep the roasted sweet potato wedges fun and exciting!
Storage Info
Storing Leftovers
To keep your roasted sweet potato wedges fresh, refrigerate them quickly. Place them in an airtight container. This helps to lock in moisture and flavor. Use a container that is not too large, so the wedges fit snugly. This prevents them from becoming mushy.
Reheating Instructions
When it’s time to enjoy your leftovers, reheating them properly is key. The best method is to use an oven. Preheat your oven to 400°F (200°C). Spread the wedges on a baking sheet. Heat them for about 10 to 15 minutes. This method keeps them crispy. You can also use an air fryer for a quick option, cooking for about 5 to 7 minutes.
Freezing Options
If you want to save some for later, freezing is a great choice. First, let the wedges cool completely. Then, spread them on a baking sheet in a single layer. Freeze them for about an hour until firm. After that, transfer them to a freezer-safe bag or container. Remove as much air as possible. When you’re ready to eat, thaw the wedges in the fridge overnight before reheating.
FAQs
Can I use other types of potatoes?
Yes, you can use other types of potatoes. If you want a different taste, try regular potatoes, like russets or Yukon golds. They will still give you a nice texture and flavor. You may need to adjust cooking time since these potatoes can cook faster than sweet potatoes.
How do I know when the wedges are done?
Look for a few signs to know when the wedges are done. The edges should be golden brown and crispy. You can also poke a wedge with a fork. If it feels soft inside, it is ready. Don’t forget to flip them halfway through cooking for even browning.
What are some serving suggestions?
These wedges are very versatile! Serve them with dips like ranch or garlic aioli. They pair well with grilled chicken or fish. You can even use them as a side for a fresh salad. Offer a drizzle of extra maple syrup for added sweetness.
Is this recipe suitable for meal prep?
Yes, this recipe is great for meal prep! You can make the wedges ahead of time and store them in the fridge. Keep them in an airtight container for up to three days. To reheat, simply pop them in the oven at 350°F (175°C) for about 10 minutes for a crispy finish.
This post explored how to make delightful roasted sweet potato wedges. We discussed ingredients, preparation steps, and tips for perfect crispiness. You can customize your wedges with cheese, spices, or fresh herbs. Remember to store leftovers properly, and I shared reheating tips to keep them crispy. These wedges work well alongside many meals and are great for meal prep. Enjoy experimenting with flavors and serving options. You now have the tools to make these tasty snacks a hit!


