Roasted Veggie Power Bowl Healthy and Simple Recipe

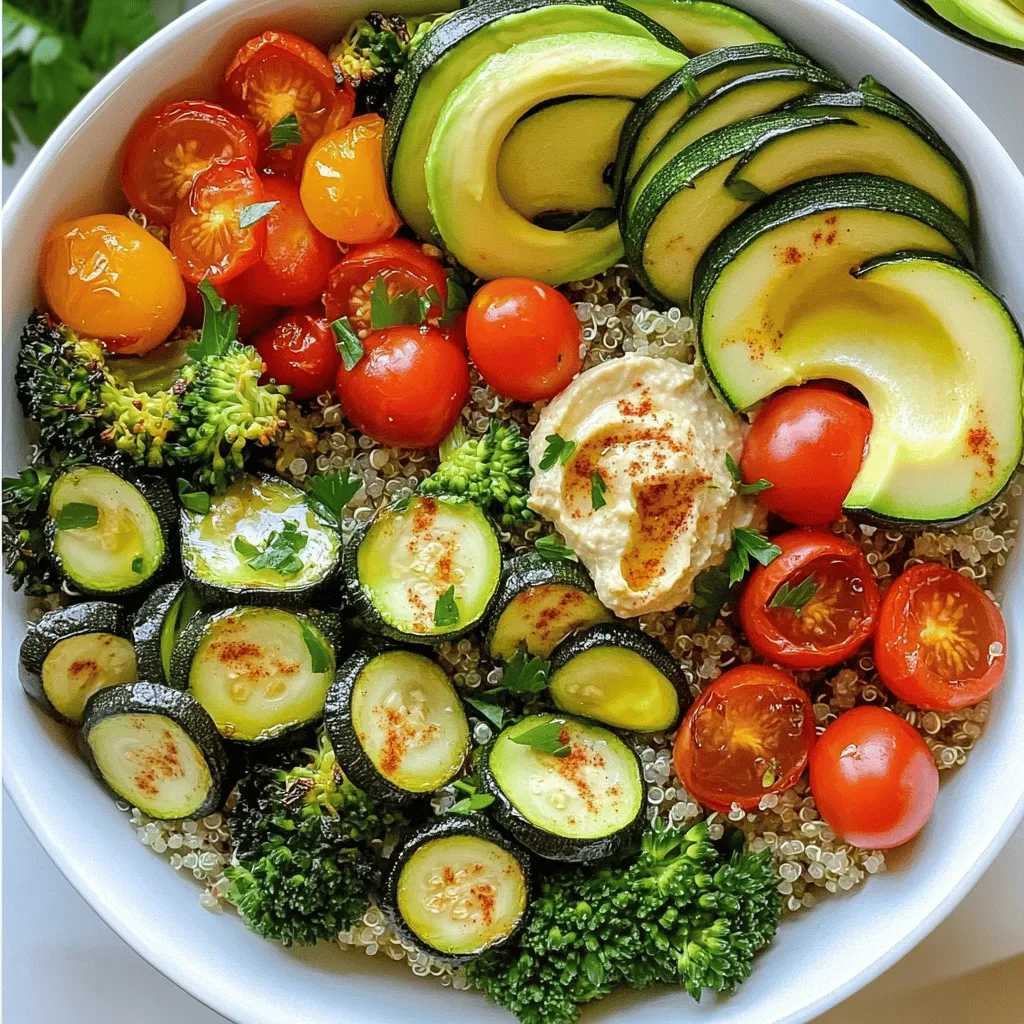
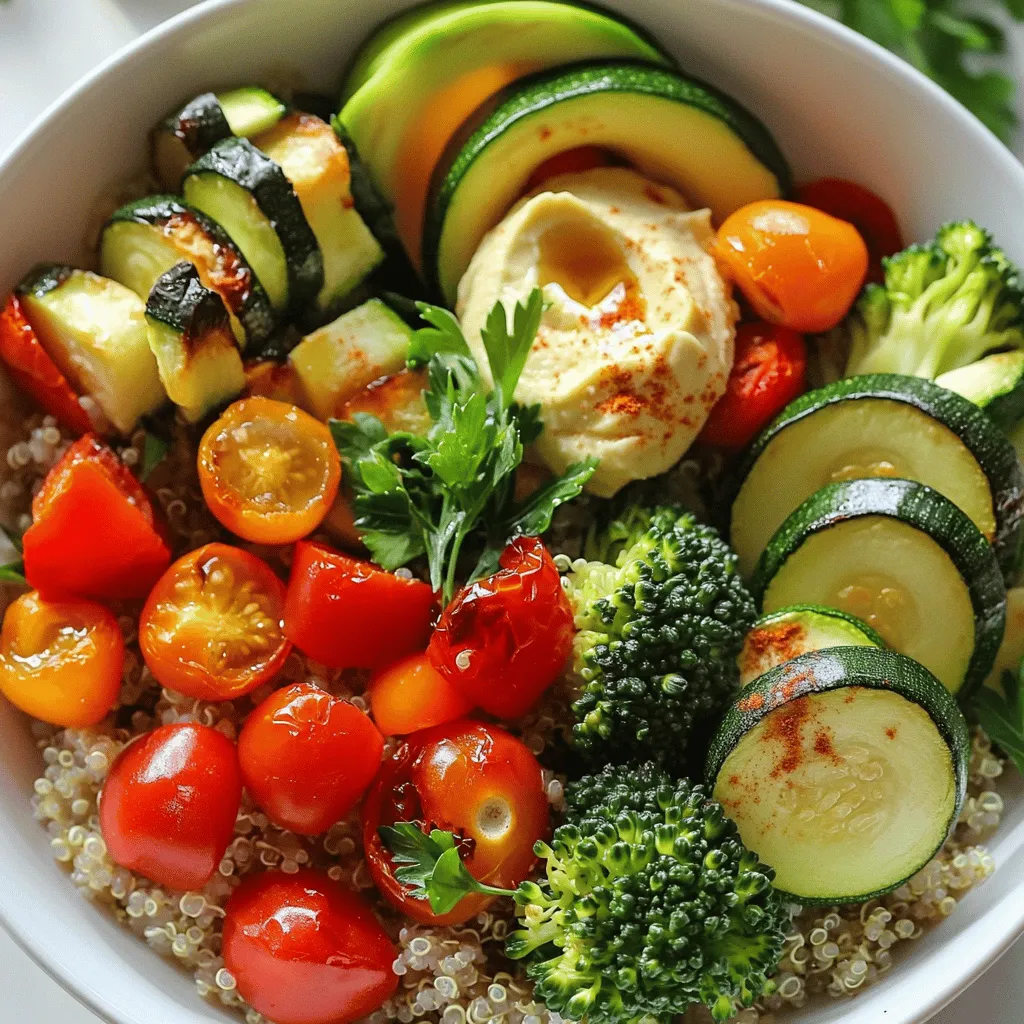
Looking for a tasty and healthy meal? My Roasted Veggie Power Bowl is the answer! This simple recipe combines quinoa, colorful roasted veggies, and fresh toppings for a satisfying dish. Packed with nutrients and easy to customize, this bowl is perfect for any occasion. Join me as we explore the steps and tips to create a delicious meal that fuels your day. Let’s dive in and get cooking!
Ingredients
Main Ingredients
– 1 cup quinoa, thoroughly rinsed
– 2 cups vegetable broth
– 1 medium zucchini, diced into bite-sized pieces
– 1 large red bell pepper, chopped into chunks
– 1 cup cherry tomatoes, halved
– 1 cup broccoli florets, evenly sized
– 2 tablespoons extra virgin olive oil
– 1 teaspoon garlic powder
– 1 teaspoon smoked paprika
– Salt and freshly cracked black pepper to taste
– 1 ripe avocado, beautifully sliced
– ¼ cup hummus (choose your favorite store-bought or homemade)
– Fresh parsley, finely chopped for a vibrant garnish
Optional Ingredients
– Hummus varieties
– Additional spices and herbs
Suggested Health Benefits
Quinoa is more than just a grain. It has protein, fiber, and minerals. This makes it a great choice for energy. It also helps you feel full.
Roasted vegetables pack a punch, too. They are high in vitamins and antioxidants. Broccoli supports your immune system. Zucchini helps keep your heart healthy. Red bell peppers are loaded with vitamin C. Cherry tomatoes are sweet, tasty, and good for your skin. Overall, this bowl is a powerhouse of nutrition.
Step-by-Step Instructions
Preparing the Oven and Ingredients
1. First, preheat your oven to 425°F (220°C). This heat helps the veggies roast well.
2. Next, prepare your vegetables. You will need zucchini, red bell pepper, cherry tomatoes, and broccoli. Dice the zucchini into small cubes and chop the bell pepper into chunks. Halve the cherry tomatoes and cut the broccoli into even florets.
Roasting Process
1. In a large baking sheet, combine the diced zucchini, chopped red bell pepper, halved cherry tomatoes, and broccoli florets.
2. Drizzle with extra virgin olive oil. Sprinkle garlic powder, smoked paprika, salt, and black pepper on top. Toss everything together so the veggies are coated well.
3. Spread the veggies in a single layer on the baking sheet. This helps them roast evenly.
4. Roast the vegetables for 20-25 minutes. They should be tender and have a nice caramelized color. Stir them halfway through cooking to make sure they brown evenly.
Cooking Quinoa
1. While the veggies roast, pour 2 cups of vegetable broth into a medium saucepan. Bring it to a boil on high heat.
2. Once it boils, add 1 cup of rinsed quinoa and stir gently. Then, reduce the heat to low and cover the pan with a lid.
3. Let it simmer for about 15 minutes. The quinoa should absorb all the liquid and become fluffy.
You now have roasted veggies and perfectly cooked quinoa ready for your power bowl!
Tips & Tricks
How to Perfectly Roast Vegetables
To roast vegetables well, set your oven to 425°F (220°C). This temperature helps the veggies turn golden and sweet. Roast for 20 to 25 minutes. Make sure to stir them halfway. This keeps the cooking even so all sides get that nice color.
Quinoa Cooking Hacks
For fluffy quinoa, rinse it well before cooking. This removes the bitter outer layer. Use two cups of vegetable broth for one cup of quinoa. You can also cook quinoa in a rice cooker. It gives great results with little effort. Just follow the same water ratio!
Presentation Suggestions
When you serve your power bowl, use shallow dishes. This lets you artfully arrange the quinoa and veggies. Layer them nicely for a great look. Add a sprinkle of sesame seeds or a drizzle of balsamic glaze for extra flair. It makes the dish pop visually!

Variations
Ingredient Substitutions
You can switch grains in your bowl. Try brown rice or farro for a new twist. Each grain offers unique flavor and texture. You can also use different vegetables based on the season. In spring, add asparagus or snap peas. In fall, roasted sweet potatoes or Brussels sprouts shine. Be creative and choose what you love!
Dressing Options
Dressings can transform your bowl. I love making homemade dressings. For a simple one, mix olive oil, lemon juice, and a pinch of salt. You can also try yogurt-based dressings for creaminess. Flavorful dips like tzatziki or pesto pair well too. These choices add zest and depth to your meal.
Protein Additions
Adding protein boosts the meal’s nutrition. Beans or lentils work great for a plant-based option. Chickpeas add a nice crunch too! If you enjoy meat, add grilled chicken or shrimp for extra flavor. Tofu is another great choice. It soaks up flavors and adds texture. Mix and match to find your perfect power bowl!
Storage Info
Short-term Storage
To keep your Roasted Veggie Power Bowl fresh, store leftovers in the fridge. Place the quinoa and veggies in separate airtight containers. This helps each component stay fresh longer. Use within three to four days for the best taste.
Long-term Storage
If you want to save your leftovers for later, freezing is a great option. Portion the quinoa and veggies into freezer-safe bags. Squeeze out the air before sealing. You can freeze them for up to three months. When you’re ready to eat, thaw them overnight in the fridge. Reheat the veggies and quinoa in a microwave or on the stove until hot.
Meal Prep Recommendations
Preparing your Roasted Veggie Power Bowl in advance saves time. Cook the quinoa and roast the veggies ahead. Store them in meal prep containers. Clear, labeled glass containers work best. This makes it easy to grab a healthy meal on busy days. You can also pack your favorite toppings, like avocado, separately to keep them fresh!
FAQs
Common Questions About Roasted Veggie Power Bowls
Can I use frozen vegetables?
Yes, you can use frozen vegetables. They save time and are still healthy. Just make sure to adjust the roasting time. Frozen veggies may need a few extra minutes to cook well.
How do I reheat leftovers?
Reheating is easy! You can microwave the bowl for 1-2 minutes. Stir halfway through to heat evenly. For a crispy texture, warm it in the oven at 350°F for about 10 minutes.
Nutritional Queries
Is this recipe vegan-friendly?
Absolutely! This recipe is vegan-friendly. It uses only plant-based ingredients. You can enjoy it without any animal products.
How many calories per serving?
Each serving has about 350 calories. This number may vary based on the ingredients you choose. It’s a filling, healthy choice for any meal.
Customization Questions
What else can I add to the bowl?
Get creative! You can add beans, nuts, or seeds for extra protein. You can also try different veggies like carrots or sweet potatoes.
Can it be made gluten-free?
Yes, it’s easy to make it gluten-free! Just ensure your quinoa is certified gluten-free. All the other ingredients are naturally gluten-free too.
In this blog post, we explored how to make a tasty roasted veggie power bowl. We covered essential ingredients like quinoa and roasted vegetables, plus fresh toppings. I shared step-by-step instructions for roasting veggies and cooking quinoa, along with useful tips for a perfect dish. I also discussed variations, storage methods, and answered common questions.
These power bowls are healthy, easy, and versatile. You can mix and match to fit your taste. Now, enjoy your cooking and create your own delicious version!


![- 2 cups cooked chicken, shredded - 1 cup canned black beans, rinsed and drained - 1 cup fresh or frozen corn kernels The main ingredients create the heart of the chicken enchiladas. First, shredded chicken offers a tender and juicy base. I love using rotisserie chicken for ease. Black beans add protein and fiber, making the meal hearty. Corn brings sweetness and a pop of color. Each ingredient plays a role in making this dish satisfying. - 1 small red onion, finely chopped - 2 cloves garlic, minced - 1 teaspoon ground cumin - 1 teaspoon chili powder Aromatics and seasonings elevate the flavor. The red onion adds a sweet, savory taste. Garlic brings depth and aroma that fills your kitchen. Cumin provides a warm, earthy note. Chili powder adds a gentle kick. These elements create a rich base for the enchiladas. - 8 small corn tortillas - 2 cups shredded cheese (cheddar or Mexican blend) - ¼ cup fresh cilantro, chopped (for garnish) Tortillas hold everything together. I prefer corn tortillas for their authentic flavor. They warm up nicely, making them easy to roll. Cheese melts beautifully, creating a creamy topping. I recommend using a blend for extra flavor. Fresh cilantro adds brightness and a fresh touch. Together, these elements create a delightful finish to your enchiladas. For the full recipe, check out the Spicy Chicken Enchiladas. - Preheat your oven to 350°F (175°C). - Sauté red onion and garlic until fragrant. Start by heating a drizzle of oil in a large skillet over medium heat. Add the finely chopped red onion. Sauté for about 3-4 minutes until the onion turns soft and clear. Then, add the minced garlic and cook for another minute. This step makes your kitchen smell amazing and sets the stage for great flavor. - Combine chicken, black beans, corn, onion-garlic mixture, salsa, cumin, and chili powder. In a big mixing bowl, add the shredded chicken, rinsed black beans, and corn. Pour in the sautéed onion and garlic mixture, along with your choice of salsa. To spice it up, add cumin and chili powder. Mix everything well. This filling is packed with protein and flavor, making your enchiladas both tasty and hearty. - Warm tortillas and fill with chicken mixture. - Roll and arrange in baking dish. Now, warm the corn tortillas in a dry skillet or microwave. This makes them soft and easy to roll. Take about ¼ cup of the chicken mixture and place it in the center of each tortilla. Sprinkle a little cheese on top, then roll them up tightly. Place the rolled tortillas seam-side down in a greased 9x13 inch baking dish. This step is where the magic begins! - Cover with salsa and cheese, bake with foil, then uncovered. Pour any remaining salsa over the top of the enchiladas. Sprinkle the rest of the cheese evenly on top. Cover your baking dish with aluminum foil to keep the moisture in. Bake in the preheated oven for 20 minutes. After that, remove the foil and bake for another 10 minutes. You want the cheese to melt and bubble. Once done, let the enchiladas cool for a few minutes. Garnish with fresh cilantro before serving. This adds a fresh flavor and a lovely touch. Enjoy your homemade chicken enchiladas! For more detailed steps, check out the Full Recipe. - Ensure tortillas are pliable to prevent cracking. Warm them in a skillet or microwave. - Use a mix of cheeses for more flavor. Try combining cheddar and pepper jack. - Serve with sour cream and additional cilantro for extra zest. - Integrate sides like rice or refried beans to complete the meal. - Overfilling tortillas can make them hard to roll. Stick to ¼ cup of filling. - Not letting them cool before serving can lead to a messy plate. Give them a few minutes. {{image_4}} You can make your chicken enchiladas even better for you. - Swap out cheese for a low-fat version. This change cuts calories. - Use whole wheat tortillas for extra fiber. This option boosts nutrition. Want to spice things up? Add some fun flavors! - Add jalapeños for extra heat. This will make your dish lively! - Experiment with different salsas. Try mild, medium, or spicy. Each adds a unique taste. Need to adjust for dietary needs? No problem! - Make it vegetarian by using black beans only. This keeps it hearty and filling. - Use corn tortillas for gluten-free options. They work perfectly in this dish. Feel free to explore these variations and make the recipe your own! To keep your chicken enchiladas fresh, store them in an airtight container. This helps prevent moisture loss and keeps flavors intact. Place them in the fridge where they can stay good for about 3-4 days. Label the container with the date, so you remember when you made them. If you want to save some for later, freezing is a great option. Wrap each enchilada tightly in foil before placing them in a freezer bag. This protects them from freezer burn. They can last for up to 3 months in the freezer. When you're ready to eat, simply thaw them overnight in the fridge. For the best taste and texture, reheat your enchiladas in the oven. Preheat your oven to 350°F (175°C). Place the enchiladas in a baking dish, cover with foil, and heat for about 20-25 minutes. Remove the foil for the last 5 minutes to crisp up the cheese. Enjoy them warm! Chicken enchiladas last about 3-4 days when stored properly. Keep them in an airtight container to maintain freshness. Always check for any signs of spoilage before eating leftovers. Yes, you can assemble chicken enchiladas ahead of time. Just prepare them and place them in the fridge before baking. This is a great way to save time, especially on busy days. You can add many tasty toppings to your enchiladas. Some options include: - Avocado - Guacamole - Green onions - Olives Feel free to get creative with your toppings. They can add color and flavor. You can easily customize this recipe. Adjust the spices to fit your taste. Add your favorite vegetables to the filling, like bell peppers or spinach. This makes the dish more personal and fun. Yes, you can use a slow cooker for this dish. Cook the filling in the slow cooker first. Then, assemble the enchiladas and bake them as usual. This method adds rich flavors and makes cooking easier. For the full recipe, check [Full Recipe]. Chicken enchiladas are simple and fun to make. You need cooked chicken, black beans, corn, and cheese. Follow the steps to prepare, mix, and bake them to perfection. Use tips to avoid common mistakes and enjoy variations for your taste. Remember, leftovers are easy to store and reheat. You can customize this dish with your favorite toppings too. Enjoy this tasty meal with friends and family!](https://joymealplan.com/wp-content/uploads/2025/07/08f715d1-a8ab-4086-9fca-7ff252efa8d5-768x768.webp)


![- 1 lb ground beef - 1 can (28 oz) crushed tomatoes - 4 cups beef broth The main ingredients make this lasagna soup hearty and filling. Ground beef gives it a rich flavor. The crushed tomatoes add a sweet and tangy taste. Beef broth helps to create a savory base. This combo makes every spoonful comforting. - 1 cup ricotta cheese - 1 cup shredded mozzarella cheese - 1/2 cup grated Parmesan cheese Cheese plays a big role in this dish. Ricotta cheese brings creaminess. It melts beautifully and adds depth. The mozzarella cheese makes each bowl cheesy and gooey. Finally, Parmesan cheese gives a salty kick. Together, these cheeses create a lovely layering of texture and taste. - 2 cloves garlic, minced - 1 medium onion, finely chopped - 1 teaspoon dried basil - 1 teaspoon dried oregano Seasonings and aromatics are key to flavor. Fresh garlic and onion add wonderful aroma while cooking. Dried basil and oregano give a classic Italian taste. These simple ingredients transform the soup from basic to fantastic. Don't skimp on these; they make a big difference! For the full recipe, check [Full Recipe]. To start, I heat a splash of olive oil in a large pot over medium heat. Next, I add the chopped onion and sauté it for about 3-4 minutes. I want the onion to be soft and a bit clear. Then, I toss in the minced garlic. I stir it for about 30 seconds to let the aroma bloom. After that, I add 1 pound of ground beef to the pot. I break it into smaller pieces as it cooks. I cook until the beef is browned. If there is too much fat, I carefully drain it. Now comes the exciting part. I stir in 28 ounces of crushed tomatoes and 4 cups of beef broth. Then, I sprinkle in 1 teaspoon of dried basil, 1 teaspoon of dried oregano, and optional crushed red pepper flakes for heat. I season it with salt and black pepper. I increase the heat to bring the soup to a rolling boil. Once the soup boils, I lower the heat. I add 8 broken lasagna noodles into the pot. I let the soup simmer for about 10-12 minutes. I stir it occasionally, so the noodles do not stick. I want them to be al dente, just firm enough to bite into. For the complete recipe, check out the Full Recipe. To make your lasagna soup shine, use fresh herbs for garnish. Fresh basil adds a bright taste. It lifts the flavor and looks great too. You can even chop some and stir them in right before serving. For heat, balance the spices. Use crushed red pepper flakes for a kick. Adjust the amount to your taste. Start small, then add more if you like spice. Keep the noodles from becoming mushy by stirring them often. Once you add the broken noodles, pay attention! They should cook for about 10 to 12 minutes. If you want a thicker soup, mix in a little extra ricotta. It makes the soup creamy. You can also add more crushed tomatoes to thicken it up. Just remember to adjust the seasoning. Serve the soup in rustic bowls for a cozy look. A drizzle of olive oil on top adds a nice shine. It also enhances the flavor. Pair the soup with crusty bread for dipping. This makes each bite more satisfying. You can even sprinkle some extra cheese on top for a gourmet touch. {{image_4}} You can easily make this soup vegetarian. Instead of ground beef, use mushrooms or lentils. Mushrooms add a nice texture and flavor. Lentils are hearty and full of protein. Both options keep the soup filling and tasty. You will still enjoy the rich flavors of the sauce. If you need a gluten-free option, swap regular pasta for gluten-free pasta. Many stores carry great gluten-free noodles now. They cook up just as well as regular pasta. Just follow the package instructions for best results. This way, everyone can enjoy the soup without worry. Feel free to add more veggies to your soup! Spinach is a great choice; it wilts nicely and adds nutrients. Zucchini can also be a fun addition. You can chop it up and throw it in during the last few minutes of cooking. This boosts the flavor and makes the soup even heartier. Check out the Full Recipe for more ideas on how to customize your lasagna soup! To store your Easy Lasagna Soup, let it cool first. Then, pour the soup into an airtight container. Make sure to seal it well. Place it in the fridge. It will stay fresh for about 3 to 4 days. When you're ready to eat, just reheat it on the stove or in the microwave. Stir occasionally to heat evenly. If you want to save some for later, freezing is a great option. Pour the cooled soup into freezer-safe containers. Leave some space at the top, as the soup will expand when frozen. You can freeze the soup for up to 3 months. To reheat, thaw it in the fridge overnight. Heat it on the stove until warm, stirring often. You can add a little extra broth if it seems too thick. For the best taste, try to eat your soup within a week of making it. After that, the flavors may not be as fresh. Always check for signs of spoilage before eating. If it smells off or looks strange, it’s best to throw it out. Enjoy your Easy Lasagna Soup while it’s at its best! To make Easy Lasagna Soup, follow these simple steps: 1. Heat olive oil in a large pot. 2. Sauté chopped onion until it's soft. 3. Add minced garlic and ground beef. Cook until the beef is brown. 4. Stir in crushed tomatoes, beef broth, and spices. 5. Bring the soup to a boil, then add broken lasagna noodles. 6. Simmer for about 10-12 minutes until noodles are al dente. This soup is easy and quick. You can enjoy a warm bowl in just 30 minutes. For the full recipe, check out the [Full Recipe]. Yes, you can mix and match cheeses! Here are some tasty options: - Use cottage cheese instead of ricotta for a different texture. - Swap mozzarella for provolone for a sharper taste. - Try adding goat cheese for a tangy flavor. Feel free to experiment with your favorite cheeses. It’s a fun way to make the soup unique! Lasagna soup can be healthy if you watch your portions. It has protein from the beef and calcium from the cheese. Here are some tips to keep it nutritious: - Use lean ground beef or turkey to cut down on fat. - Add extra veggies like spinach or bell peppers for more nutrients. - Control your cheese portions to lower the calorie count. This soup can fit well in a balanced diet if you enjoy it in moderation. Absolutely! Making lasagna soup ahead of time is easy. Here are some tips: - Prepare the soup base and store it in the fridge. Add noodles when you heat it up. - You can freeze the soup too. Just leave out the noodles, as they get mushy when frozen. - To reheat, warm it on the stove over low heat. Stir often to keep it from sticking. Making it ahead saves time and fills your home with a lovely aroma! This blog post covers how to make easy lasagna soup, starting with key ingredients like ground beef, tomatoes, and cheese. I shared step-by-step instructions to guide you through cooking the base and building the soup. Helpful tips teach you how to enhance flavor and texture. For those with dietary needs, I included variations and storage info for leftovers. Lasagna soup is a flexible and fun dish. Enjoy tailoring it to your taste, and impress your family tonight.](https://joymealplan.com/wp-content/uploads/2025/06/4153c456-5d21-4a28-8392-80b5992a6e3c-768x768.webp)