Rotisserie Buffalo Chicken Dip Flavorful Party Treat

Looking to impress your guests at your next gathering? Try my Rotisserie Buffalo Chicken Dip! This rich and spicy dip combines creamy goodness with tender shredded chicken, making it a perfect choice for any party. With easy prep steps and optional ingredients that elevate the flavor, you’ll have a crowd-pleaser on your hands. Ready to dive in and learn how to make this tasty treat? Let’s get started!
Why I Love This Recipe
- Flavorful Kick: This dip combines the perfect balance of creamy and spicy, making it a crowd-pleaser at any gathering.
- Easy Preparation: With minimal prep time and simple ingredients, this recipe allows you to whip up an impressive dish in no time.
- Versatile Serving Options: Enjoy it with tortilla chips, fresh veggies, or even on toast for a delicious twist!
- Customizable: Adjust the level of buffalo sauce and blue cheese to fit your personal taste preferences.
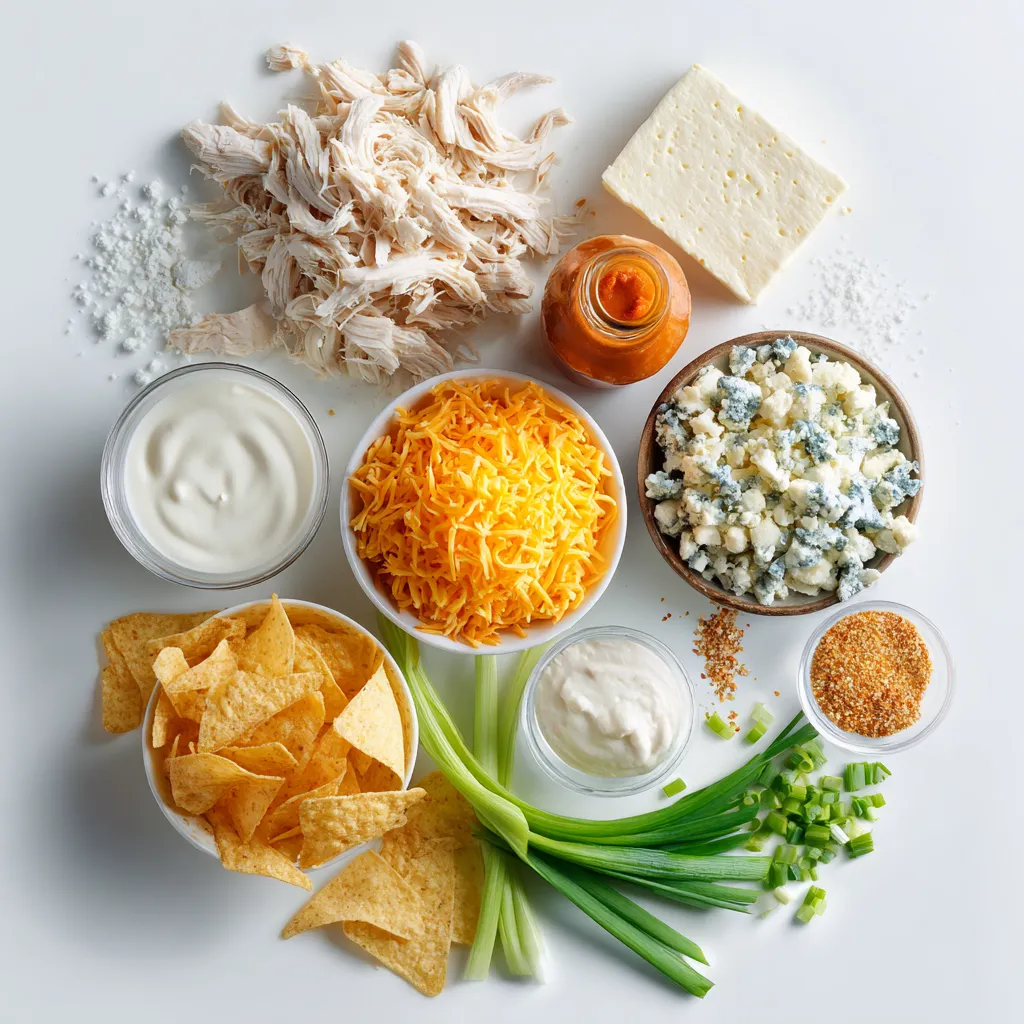
Ingredients
Main Ingredients
– 2 cups rotisserie chicken, shredded
– 1 cup cream cheese, softened to room temperature
– 1 cup Greek yogurt
– 1/2 cup buffalo sauce
Optional Ingredients
– 1/2 cup blue cheese crumbles
– Fresh green onions, chopped, for garnish
Seasoning
– 1 teaspoon garlic powder
– 1 teaspoon onion powder
– Salt and black pepper, to taste
The main ingredients form the heart of this dip. The rotisserie chicken gives it a great base. I love using shredded chicken for its tender texture. Cream cheese and Greek yogurt add creaminess and tang. Buffalo sauce brings the heat and flavor that everyone loves.
You can boost the flavor with optional blue cheese crumbles. They add a nice bite and richness. Fresh green onions provide a pop of color and a fresh taste. Don’t skip them if you want a bright finish.
For seasoning, I use garlic powder and onion powder. They bring depth without overpowering the dip. Salt and black pepper help balance the flavors. Taste as you go to get it just right.

Step-by-Step Instructions
Preheating and Mixing
– Preheat your oven to 350°F (175°C).
– In a large bowl, mix cream cheese, Greek yogurt, and buffalo sauce until smooth.
Combining Ingredients
– Fold in shredded rotisserie chicken and seasonings like garlic and onion powder.
– Taste the mix and adjust with salt and pepper as you like.
Baking
– Transfer the mix to an 8×8-inch baking dish and layer with cheddar cheese.
– Bake for 20-25 minutes until bubbly and golden on top.
When you prep this dip, the smell of buffalo sauce fills the kitchen. It’s hard to resist! This dip is creamy and packed with flavor. You can serve it with tortilla chips or veggie sticks. I love to add green onions on top for a fresh touch. Enjoy every bite!
Tips & Tricks
Preparation Tips
– Use a hand mixer for a smoother consistency.
– Pack the dip firmly in the baking dish for better texture.
To make your buffalo chicken dip smooth, a hand mixer works wonders. It blends the cream cheese and Greek yogurt perfectly. If you don’t have a mixer, a spatula can do the job too, but it may take longer.
Next, be sure to pack the dip firmly into your baking dish. This helps the dip hold its shape after baking. It will create a great texture when you scoop it out later.
Serving Tips
– Serve warm with tortilla chips or fresh vegetable sticks.
– Provide bowls of extra buffalo sauce and blue cheese on the side.
When it comes to serving, warm is best! Serve the dip with crispy tortilla chips or fresh veggie sticks like carrots and celery. These add a nice crunch and balance the creaminess of the dip.
For added fun, set out small bowls of extra buffalo sauce and blue cheese dressing. This lets guests customize their dip. Some may want more heat, while others might prefer a creamy touch.
Flavor Enhancement
– Experiment with different types of cheese or spice levels.
– Allow the dip to cool slightly before serving to enhance flavors.
Don’t be afraid to play with flavors! Try different cheeses like pepper jack for a spicy kick. You can also adjust the spice level by adding more or less buffalo sauce.
Let the dip cool for a few minutes after baking. This helps the flavors settle and makes it easier to serve. It will taste even better once it has had a moment to rest!
Pro Tips
- Perfectly Shredded Chicken: For the best texture, use a rotisserie chicken that is still warm. The heat makes shredding easier and keeps the chicken moist.
- Adjusting Spice Levels: If you prefer a milder dip, start with less buffalo sauce and add more gradually until you reach your desired heat level.
- Cheese Melting Tips: For a beautifully golden topping, broil the dip for the last 2-3 minutes of baking. Just keep an eye on it to prevent burning!
- Make-Ahead Option: Prepare the dip in advance and store it in the refrigerator. Just remember to let it come to room temperature before baking to ensure even cooking.

Variations
Cheese Variations
You can change the cheese for great new flavors. Substitute blue cheese with feta or mozzarella. Both add a nice touch. If you want more heat, try adding pepper jack cheese. It gives the dip a spicy kick.
Chicken Alternatives
You might want to switch up the chicken too. Shredded rotisserie turkey works well in this dip. Grilled chicken is also a tasty option. If you prefer a meatless version, try using beans. They add protein and flavor.
Sauce Variations
Sauce can change the whole taste of your dip. Experiment with different hot sauces for unique flavors. Each one brings a different level of heat. You can also mix in ranch dressing. This gives the dip a creamy twist that many love.
Storage Info
Refrigeration
To store leftovers, place the dip in an airtight container. Use a glass or plastic container that seals well. Ensure it is cool before sealing. This keeps the dip fresh for up to 3-4 days. Label the container with the date for easy tracking.
Reheating
When you reheat the dip, keep the texture in mind. The best way to reheat is in the oven. Preheat your oven to 350°F (175°C). Heat for about 15-20 minutes until warm. If you use a microwave, heat in short bursts of 30 seconds. Stir between bursts to heat evenly.
Freezing
Yes, you can freeze the dip for later use! To freeze, let it cool completely. Place it in a freezer-safe container. Make sure to leave some space at the top, as the dip will expand. It can last for up to 3 months in the freezer. To thaw, move it to the fridge overnight before reheating.
FAQs
Can I make Rotisserie Buffalo Chicken Dip ahead of time?
Yes, you can prepare this dip ahead. Mix all the ingredients and place them in a baking dish. Cover it with plastic wrap and store it in the fridge. When you’re ready to serve, just bake it. This saves time and lets the flavors blend.
What can I serve with this dip?
You can serve this dip with many tasty options. Here are some ideas:
– Tortilla chips
– Fresh vegetable sticks like carrots and celery
– Crackers
These choices add crunch and freshness, making your dip even more enjoyable.
How spicy is the dip?
The spice level of this dip depends on the buffalo sauce you choose. If you like it mild, use less sauce. For more heat, add more sauce. You can also mix in a dash of cayenne pepper for an added kick. Adjust it to suit your taste!
Can I use non-dairy alternatives?
Yes, you can make this dip vegan. Use non-dairy cream cheese instead of regular cream cheese. Swap Greek yogurt for a non-dairy yogurt. These simple changes still give you that creamy texture and rich flavor. Enjoy your dip while sticking to your dietary needs!
In this article, I shared a simple and tasty Rotisserie Buffalo Chicken Dip recipe. We covered key ingredients, easy steps to prepare it, and helpful tips to enhance your dish. You learned about variations and storage options to keep it fresh. This dip is perfect for parties or game days. It’s quick to make and always a crowd-pleaser. Don’t hesitate to try the variations and adjust the flavors to your liking. Enjoy creating and sharing this delicious dip with friends and famil

Buffalo Bliss Chicken Dip
Ingredients
- 2 cups rotisserie chicken, shredded
- 1 cup cream cheese, softened to room temperature
- 1 cup Greek yogurt
- 1/2 cup buffalo sauce
- 1 cup shredded cheddar cheese
- 1/2 cup blue cheese crumbles
- 1 teaspoon garlic powder
- 1 teaspoon onion powder
- to taste salt
- to taste black pepper
- for garnish fresh green onions, chopped
- for serving tortilla chips or fresh vegetable sticks
Instructions
- Preheat your oven to 350°F (175°C).
- In a large mixing bowl, combine the softened cream cheese and Greek yogurt, along with the buffalo sauce. Blend until smooth and creamy.
- Gently fold in the shredded rotisserie chicken, garlic powder, onion powder, and half of the shredded cheddar cheese. Mix until well incorporated.
- Taste the mixture and season with salt and pepper as necessary.
- Transfer the mixture into an 8x8-inch baking dish and spread it into an even layer.
- Sprinkle the top with the remaining cheddar cheese and add the blue cheese crumbles, if using.
- Bake for approximately 20-25 minutes until bubbly and the cheese is melted and slightly golden.
- Allow to cool for about 5 minutes before serving.
- Just before serving, sprinkle with chopped green onions.


![To make Garlic Parmesan Roasted Asparagus, gather these fresh items: - 1 bunch of fresh asparagus, trimmed - 3 tablespoons extra virgin olive oil - 4 cloves of garlic, finely minced - 1/2 cup freshly grated Parmesan cheese - 1 teaspoon freshly grated lemon zest - 1/2 teaspoon red pepper flakes (optional for a spicy kick) - Sea salt and freshly cracked black pepper to taste - Fresh parsley, chopped (for garnish) Using fresh ingredients makes a big difference. Fresh asparagus has a nice crunch and bright flavor. If you can't find fresh asparagus, you can use frozen, but the texture will change. Extra virgin olive oil adds a rich taste. You can swap it with avocado oil if desired. Minced garlic is key for flavor. If you want milder garlic, use garlic powder instead. Parmesan cheese brings a salty, nutty flavor. For a dairy-free option, try nutritional yeast for a cheesy taste. Lemon zest wakes up the dish. If you don’t have lemon, use lime zest for a different twist. Fresh ingredients are essential for great taste. They add vibrant flavors and textures that dried or stale items can’t match. The freshness of the asparagus shines through when roasted. It becomes tender and slightly crispy, perfect with garlic and cheese. Using fresh garlic enhances the aroma and flavor of the dish. Plus, fresh parsley adds a pop of color and freshness when you garnish the asparagus. Always choose fresh when you can. It makes a simple dish like Garlic Parmesan Roasted Asparagus truly stand out. For the full recipe, check out the details above! Start by trimming the asparagus. Hold a spear in your hand and bend it gently. The asparagus will snap at the right point. This is where the tough part ends. I usually take about an inch off. Rinse the asparagus under cold water to remove any dirt. Pat them dry with a clean towel. This step is key to getting a nice roast. In a large bowl, add the trimmed asparagus. Pour in the extra virgin olive oil. Use your hands to toss the asparagus, ensuring they are well-coated. Next, add the minced garlic, grated Parmesan cheese, and lemon zest. If you like spice, sprinkle in red pepper flakes. Season with sea salt and freshly cracked black pepper. Toss everything again until the asparagus is fully coated in the tasty mix. Now, arrange the asparagus on a lined baking sheet. Make sure they are in a single layer. This helps them cook evenly. Place the baking sheet in the oven set to 425°F (220°C). Roast for about 15 to 20 minutes. Check on them halfway through. You want them tender with crispy edges. When done, take them out and let them cool for a few minutes. Garnish with chopped parsley for a fresh look. For the full recipe, check the details above. To get that perfect crispiness, start with fresh asparagus. The thinner the spears, the better they crisp up. Make sure to coat them evenly with olive oil. This helps them roast nicely. Lay the asparagus in a single layer on the baking sheet. If they overlap, they can steam instead of roast. Keep an eye on them while they cook. You want them tender with slightly crispy edges. You can adjust the flavors to fit your taste. If you love garlic, add more minced cloves. For a kick, sprinkle in more red pepper flakes. If you prefer a milder taste, reduce the garlic or skip the flakes. Add a squeeze of lemon juice after roasting for extra brightness. Experiment until you find your perfect mix. Serve your Garlic Parmesan Roasted Asparagus warm. It pairs well with grilled meats or fish. You can also serve it alongside pasta dishes. For a fun twist, add it to salads or grain bowls. Garnish with fresh parsley for a pop of color. For more flavor, drizzle balsamic reduction over the top. This adds a sweet balance to the savory notes. Check out the Full Recipe for more ideas! {{image_4}} You can make Garlic Parmesan Roasted Asparagus more exciting. Try adding lemon juice for zest. A squeeze of fresh lime also brightens the dish. For a smoky flavor, add smoked paprika. You can also mix in nuts, like almonds or pine nuts, for added crunch. If you want a cheesy twist, use feta or goat cheese instead. The options are endless, and each adds a new layer of taste. If you prefer a vegan option, swap the Parmesan cheese for a plant-based cheese. Nutritional yeast is a great choice too. It gives a cheesy flavor without dairy. You can also use a mix of sunflower seeds and garlic powder to mimic the cheese flavor. This way, you still enjoy the savory goodness without any animal products. You can cook asparagus in many ways. Grilling gives it a nice smoky taste. To grill, toss the asparagus in oil and seasonings, then place it on the grill for about 5-7 minutes. Air frying is also a great method. It cooks the asparagus quickly while keeping it crisp. Just set your air fryer to 400°F (200°C) and cook for 8-10 minutes. Each method offers a unique flavor and texture, so feel free to experiment. For full details on the recipe, check the Full Recipe section! To store Garlic Parmesan Roasted Asparagus, first let it cool down. Place it in an airtight container. Make sure to keep it in the fridge. This keeps it fresh and tasty for later. You can also use a resealable plastic bag if you prefer. Just squeeze out the air before sealing. When you are ready to enjoy the leftovers, preheat your oven to 350°F (175°C). Spread the asparagus on a baking sheet. Heat for about 10 minutes. This will help restore its crispiness. If you want a quicker method, use the microwave. Heat it for 30 seconds at a time until warm. You can store Garlic Parmesan Roasted Asparagus in the fridge for up to 3 days. After that, it may lose its flavor and texture. If you want to keep it longer, consider freezing it. Wrap it well and store it in the freezer for up to 2 months. Just remember, the texture may change after freezing. For the best taste, enjoy it fresh or within a few days. For the full recipe, check out the earlier sections. Yes, you can use frozen asparagus. However, fresh asparagus tastes better. Frozen asparagus may have more water, which can affect the final texture. If you use frozen ones, reduce the roasting time. Cook them until they are tender but still hold their shape. Asparagus is perfectly roasted when it is bright green and tender. The tips should be slightly crispy. You can test doneness by piercing a spear with a fork. If it goes through easily, it is ready. Keep an eye on the time. Roasting takes about 15-20 minutes at 425°F. Yes, you can make this recipe in advance. Roast the asparagus, then cool it down. Store it in the fridge for up to 3 days. When ready to serve, reheat it in the oven for a few minutes. This keeps the flavors fresh and the texture nice. For the full recipe, check [Full Recipe]. This blog post covered how to make garlic parmesan roasted asparagus. You learned about key ingredients and how fresh ones make a big difference. I shared easy steps to prepare, mix, and roast the asparagus to perfection. You also found tips for crispiness, flavor, and serving ideas. Plus, variations let you explore new tastes, and I provided advice on storing leftovers. Use this guide to make a delicious dish. Enjoy your cooking and make your meals healthier and tastier!](https://joymealplan.com/wp-content/uploads/2025/06/31f02132-0972-47ce-ba26-05432beb78d0-768x768.webp)
