Sausage and Broccoli Skillet Simple Dinner Delight

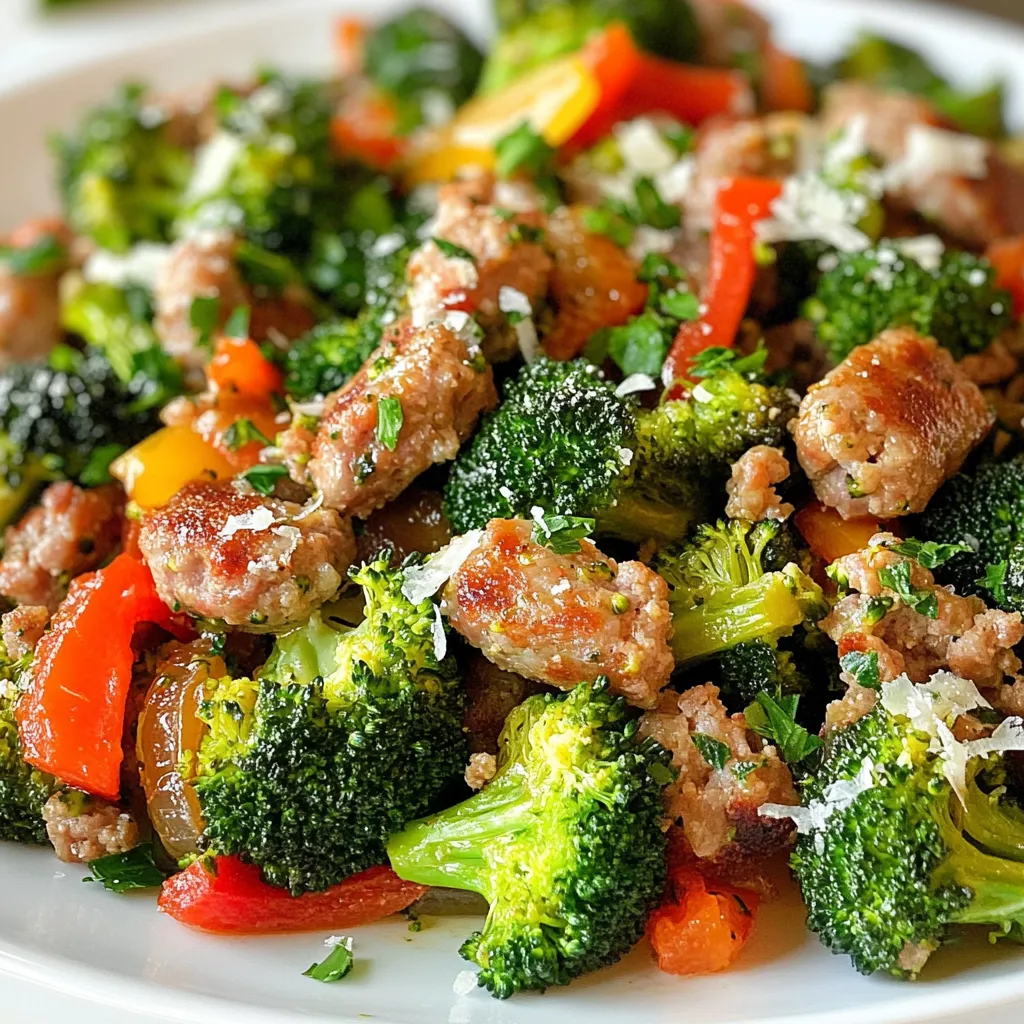
Looking for a quick, tasty meal that packs a punch? My Sausage and Broccoli Skillet is a perfect choice! In just one pan, you can combine hearty Italian sausage with fresh broccoli and vibrant veggies. It’s simple, satisfying, and full of flavor. Ready to make your dinner stress-free? Let’s dive into the ingredients and get cooking!
Why I Love This Recipe
- Quick and Easy: This recipe comes together in just 25 minutes, making it perfect for busy weeknights.
- Flavorful Combination: The blend of Italian sausage, fresh vegetables, and Parmesan creates a deliciously satisfying dish.
- Healthy Ingredients: With plenty of broccoli and wholesome ingredients, this dish is both nutritious and delicious.
- Customizable: You can easily adjust the spice level by choosing mild or spicy sausage and adding more red pepper flakes.
Ingredients
Main Ingredients
– 1 pound Italian sausage
– 4 cups fresh broccoli florets
– 1 medium onion
– 3 cloves garlic
– 1 red bell pepper
Seasonings and Garnishes
– 1 tablespoon olive oil
– 1 teaspoon red pepper flakes
– Salt and pepper to taste
– ½ cup grated Parmesan cheese
– Fresh parsley for garnish
Cooking Equipment
– Large skillet
– Spatula
– Measuring spoons and cups
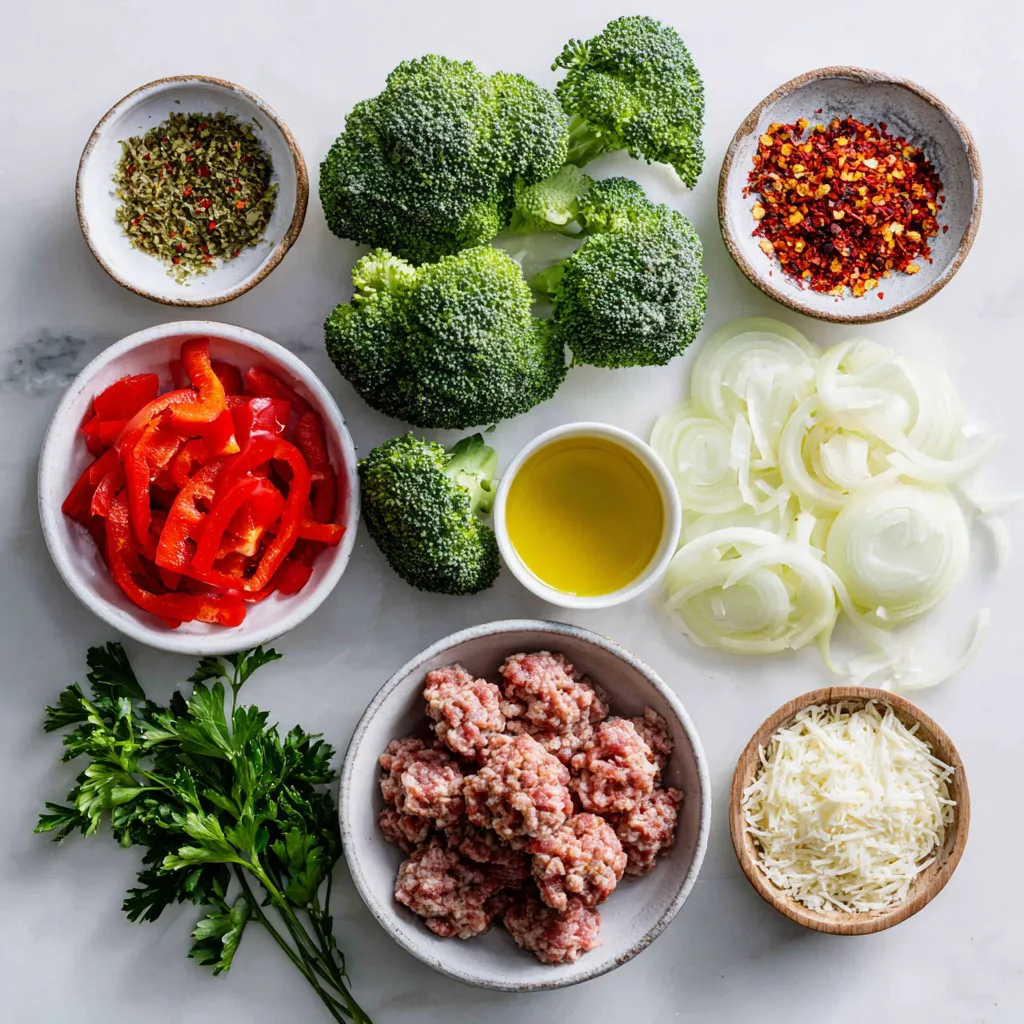
The main ingredients for this dish are simple and fresh. You need Italian sausage, which brings great flavor. You can pick either mild or spicy sausage based on your taste. Fresh broccoli adds a nice crunch and bright color. The onion and garlic bring a sweet and savory taste, while the red bell pepper adds a hint of sweetness.
For seasonings, olive oil helps cook everything beautifully. Red pepper flakes give a touch of heat, but you can skip them if you prefer less spice. Always season with salt and pepper to make the flavors pop. The Parmesan cheese melts and adds a creamy richness, and fresh parsley finishes the dish with a fresh touch.
You will need a large skillet, a spatula for stirring, and measuring spoons and cups to get your ingredients just right. Having these tools ready makes cooking smooth and fun.

Step-by-Step Instructions
Preparing the Sausage
1. Heat a large skillet over medium heat. Add one tablespoon of olive oil.
2. Once the oil shimmers, take your Italian sausage. Remove the casing carefully.
3. Crumble the sausage into the skillet. Stir frequently with a spatula.
4. Cook the sausage until it turns brown, about 5 to 7 minutes.
Sautéing the Vegetables
1. When the sausage is browned, add the thinly sliced onion.
2. Next, toss in the red bell pepper strips. Stir to mix.
3. Add the minced garlic for flavor. Sauté for 3 to 4 minutes.
4. Cook until the onion and pepper become tender and fragrant.
Cooking the Broccoli
1. Gently fold in the fresh broccoli florets. Stir everything together.
2. Pour in about ¼ cup of water. This adds steam for the broccoli.
3. Cover the skillet with a lid. Let it cook for 5 to 6 minutes.
4. The broccoli should turn bright green and stay crisp.
5. After cooking, uncover the skillet. Season with red pepper flakes, salt, and black pepper.
6. Sprinkle ½ cup of grated Parmesan cheese on top. Stir gently to combine.
7. Cook for another 2 minutes, stirring occasionally, until the cheese melts.
8. Remove from heat and garnish with fresh chopped parsley before serving.
Tips & Tricks
Cooking Tips
To ensure your sausage is cooked through, use a spatula to break it apart in the skillet. Cook it until it turns brown and no pink remains, about 5 to 7 minutes. Timing is key when adding each ingredient. Add the onion and red bell pepper right after the sausage. Sauté them for 3 to 4 minutes before adding garlic. This step builds a deep flavor base.
When you add broccoli, pour in ¼ cup of water. This creates steam that helps cook the broccoli evenly. Cover the skillet for 5 to 6 minutes until the broccoli is bright green and tender.
Ingredient Substitutions
If you want a lighter option, use chicken or turkey sausage instead of Italian sausage. Both choices work well and keep the dish tasty. For last-minute additions, consider tossing in some cherry tomatoes or spinach. They add color and freshness.
Serving Suggestions
Serve the dish hot in shallow bowls. This allows the vibrant colors to shine. For a nice touch, sprinkle extra Parmesan on top and add a twist of black pepper. You can also pair it with crusty bread or a simple green salad for a complete meal.
Pro Tips
- Choose Your Sausage Wisely: Depending on your preference for spice, select either mild or spicy Italian sausage to best suit your taste buds.
- Perfect Broccoli Texture: Avoid overcooking the broccoli; it should be bright green and tender-crisp for the best flavor and texture.
- Garlic Infusion: Add minced garlic just before the vegetables to maximize its aromatic qualities without burning it.
- Garnish for Presentation: Fresh parsley not only adds a pop of color but also enhances the dish’s flavor, making it more appealing.

Variations
Spicy Twist
Want more heat in your Sausage and Broccoli Skillet? You can add more red pepper flakes. Start with one teaspoon and taste as you go. Adjust it based on your heat preference. You can also use spicy sausage varieties. Look for Italian sausage labeled as hot or spicy. This adds a bold flavor and a kick to your dish.
Vegetarian Version
If you want a meatless option, substitute the sausage with plant-based alternatives. Look for veggie sausage or mushrooms for a hearty texture. You can also add more vegetables to enrich the dish. Consider adding bell peppers, zucchini, or carrots. These choices will add color, flavor, and nutrition, making it just as delightful.
One-Pan Meal
For a complete meal, think about adding pasta or rice. Cook your pasta in the same skillet after the sausage and veggies. This saves time and adds flavor. Adjust cooking times accordingly. If you add rice, ensure it cooks through. Follow package instructions for best results. This method makes your meal filling and easy to serve.
Storage Info
Refrigeration Guidelines
To keep leftovers fresh, store them in an airtight container. Glass or plastic containers work well. Make sure to cool the dish to room temperature before sealing it. This helps prevent moisture buildup. You can store the dish in the fridge for up to three days.
Reheating Options
The best way to reheat this dish is on the stove. Heat it in a skillet over medium heat. Stir often to warm it evenly. You can also use a microwave, but be careful. If you microwave it, add a splash of water to keep the broccoli crisp. This will help avoid sogginess.
Freezing Tips
Yes, you can freeze this dish. To freeze, let it cool completely. Then, place it in a freezer-safe container. Remove as much air as possible before sealing. This helps prevent freezer burn. When you’re ready to enjoy it, thaw it overnight in the fridge. Reheat it on the stove for the best taste.
FAQs
Can I use frozen broccoli instead of fresh?
Yes, you can use frozen broccoli. It is quick and easy. Here are the pros and cons:
– Pros: Frozen broccoli is convenient and has a long shelf life. It can save time.
– Cons: Frozen broccoli may be softer than fresh. It can lose some crunch when cooked.
How long does it take to cook sausage?
Cooking sausage usually takes about 5 to 7 minutes. Here are some general times for different types:
– Italian Sausage (ground): 5 to 7 minutes until browned.
– Links: 10 to 15 minutes, turning often, until cooked through.
– Chicken or Turkey Sausage: 7 to 10 minutes, also until cooked through.
What can I serve with Sausage and Broccoli Skillet?
This skillet dish is versatile and pairs well with many sides. Here are some great options:
– Rice: White or brown rice soaks up the flavors.
– Pasta: Use a simple pasta for a filling meal.
– Bread: Crusty bread is perfect for dipping.
– Salad: A fresh green salad adds a nice crunch.
This blog covered how to make a delicious sausage and broccoli skillet. We explored the key ingredients, cooking steps, tips, and variations for customization. You can make it spicy or vegetarian, or even turn it into a full meal with pasta. Store leftovers properly and reheat them for the best taste.
Enjoy this dish with family and friends, and feel free to experiment! Happy cookin

Sizzling Sausage & Broccoli Delight
Ingredients
- 1 pound Italian sausage
- 4 cups fresh broccoli florets
- 1 medium onion
- 3 cloves garlic
- 1 medium red bell pepper
- 1 tablespoon olive oil
- 1 teaspoon red pepper flakes
- to taste salt
- to taste freshly cracked black pepper
- 0.5 cup grated Parmesan cheese
- for garnish fresh parsley
Instructions
- In a large skillet, heat the olive oil over medium heat until shimmering.
- Carefully remove the casing from the Italian sausage and crumble it directly into the skillet. Cook the sausage, stirring frequently with a spatula, until it is nicely browned and cooked through, about 5 to 7 minutes.
- Once the sausage is browned, add the sliced onion and red bell pepper to the skillet, followed by the minced garlic. Sauté the mixture for an additional 3 to 4 minutes, or until the vegetables are tender and fragrant.
- Next, gently fold in the broccoli florets, stirring everything together. Pour in about ¼ cup of water to introduce some steam for the broccoli. Immediately cover the skillet with a lid and let it cook for 5 to 6 minutes, or until the broccoli turns bright green and is tender yet crisp.
- After 5 to 6 minutes, uncover the skillet. Season the mixture with red pepper flakes, salt, and freshly cracked pepper to taste. Evenly sprinkle the grated Parmesan cheese across the top and stir gently until combined.
- Allow the dish to cook for an additional 2 minutes, stirring occasionally, until the cheese has melted and the entire dish is heated through.
- Remove the skillet from the heat and garnish your delicious creation with fresh chopped parsley right before serving.


![- 2 boneless, skinless chicken breasts - 8 oz penne pasta - 1 tablespoon Cajun seasoning - 2 tablespoons olive oil - 1 medium onion - 3 cloves garlic - 1 red bell pepper - 1 cup heavy cream - 1 cup chicken broth - 1 cup grated Parmesan cheese - Salt and pepper - Fresh parsley The ingredients for this dish come together to create a rich and tasty meal. You’ll notice how each part plays a role in the final flavor. The chicken gives protein and heartiness, while the pasta acts as a lovely base. The Cajun seasoning adds a spicy kick that makes this dish stand out. If you want to change things up, I have options for you. - For dairy alternatives, you can use coconut milk or almond milk instead of heavy cream. This keeps the dish creamy without dairy. - If you need a chicken substitute, consider using tofu or chickpeas. They both provide protein and soak up the sauce well. - For gluten-free pasta, options like rice or quinoa pasta work great. They cook differently, so keep an eye on them while cooking. With these substitutions, you can still enjoy a delicious creamy Cajun chicken pasta that fits your needs. Enjoy making this dish your own! If you want to see the full recipe, check out the [Full Recipe]. To cook the penne pasta, start by bringing a large pot of water to a rolling boil. Add a generous pinch of salt. This helps enhance the pasta's flavor. Once the water is boiling, add the penne pasta. Follow the package instructions for cooking time, usually around 11-12 minutes. You want it to be al dente, which means it should be firm to the bite. To check, taste a piece a minute or two before the time is up. When ready, drain the pasta in a colander and set it aside. In a large skillet, heat the olive oil over medium-high heat. Add the diced chicken pieces to the skillet. Season them generously with Cajun seasoning, salt, and pepper. Cook the chicken for about 5-7 minutes. You want it to be fully cooked through and golden brown. Use a meat thermometer to check if it reaches 165°F. Once cooked, remove the chicken from the skillet and place it on a plate. Set it aside while you prepare the other ingredients. In the same skillet, reduce the heat slightly. Add the finely chopped onion and minced garlic. Sauté them for about 2-3 minutes until the onion turns translucent and fragrant. Next, add the sliced red bell pepper. Cook for another 3-4 minutes until the pepper softens a bit. Then, pour in the heavy cream and chicken broth. Increase the heat until the mixture starts to simmer gently. Once simmering, lower the heat to keep it warm. Now, gradually mix in the grated Parmesan cheese. Stir continuously to melt the cheese completely. This will give your sauce a rich, creamy texture. Finally, return the sautéed chicken and drained penne pasta to the skillet. Toss everything together well, ensuring every piece of pasta is coated in the creamy sauce. Taste and adjust the seasoning if needed. To make your creamy Cajun chicken pasta even better, consider adding more spices. You can try smoked paprika or cayenne for extra heat. Fresh herbs like thyme or basil can also brighten the dish. To balance the creaminess, add a splash of lemon juice or a dash of vinegar. This adds a nice zing and cuts through the richness. Avoid overcooking your chicken by using medium heat. Cook it until golden brown, about 5-7 minutes. For pasta, watch the clock! Boil it until al dente, which means it should still have a slight bite. Drain it right away to stop the cooking. For a smooth sauce, stir continuously as you add cheese. This helps it melt evenly without clumping. If the sauce gets too thick, add a bit of chicken broth until it reaches your desired consistency. Plating makes a big difference! Serve your pasta in shallow bowls for a nice look. Drizzle some extra cream sauce on top to make it inviting. A sprinkle of extra Parmesan cheese adds a lovely touch. For garnish, fresh parsley works wonders. It adds color and a fresh taste. You might even add a slice of lemon on the side. This lets your guests squeeze a bit of juice over their pasta for a burst of flavor. For the full recipe, check out the detailed instructions above. {{image_4}} You can make a great vegetarian version of this dish. Replace the chicken with veggies. Use mushrooms, zucchini, or spinach for a fresh taste. For protein, add chickpeas or tofu. 1. Cook the Veggies: Sauté the vegetables until they soften. 2. Season Well: Use Cajun seasoning on the veggies to keep that flavor. 3. Follow the Sauce Steps: Keep the sauce the same, and mix in your veggies. This way, you keep the creamy goodness and add healthy veggies! Want more heat? You can boost the spice in a few ways. - Add Hot Sauce: Mix in your favorite hot sauce while cooking the chicken. - Use Spicy Peppers: Dice jalapeños or cayenne peppers and sauté with the onions. - Extra Cajun Seasoning: Add a bit more Cajun seasoning to the chicken for a kick. These small tweaks will give your pasta a fiery twist! If you love seafood, swap the chicken for shrimp or scallops. 1. Cook Seafood: Sauté shrimp or scallops until they turn pink and opaque. 2. Follow the Same Steps: Use the same sauce and pasta methods. 3. Adjust Cooking Time: Seafood cooks fast, so watch it closely. This change creates a rich, ocean-inspired version of the dish. Don't forget to check out the Full Recipe for more details! To keep your creamy Cajun chicken pasta fresh, store it in the fridge. Place the pasta in airtight containers. This helps prevent it from drying out and keeps the flavors strong. Make sure to cool the pasta to room temperature before sealing it. If you're storing it for more than a few days, consider freezing it. Just remember that freezing may change the texture a bit. When you’re ready to enjoy your leftovers, use gentle reheating methods. The best options are the stovetop or microwave. If you use the stovetop, add a splash of chicken broth or a little cream. This helps keep the sauce creamy. Stir often to avoid sticking. If using a microwave, cover the dish with a damp paper towel. This helps trap moisture. Heat in short bursts, stirring in between, until warm. Enjoy your creamy Cajun chicken pasta just like the first time! Yes, you can make this dish ahead of time. Here are some tips: - Cook the pasta: You can cook the penne pasta earlier on. Drain it well and toss it with a little oil to prevent sticking. - Prepare the chicken: Sauté the chicken and store it in the fridge. Reheat it before mixing with pasta. - Make the sauce: You can prepare the creamy sauce in advance. Store it in an airtight container in the fridge. - Combine before serving: Mix everything together just before serving. This keeps the pasta fresh and hot. Pair this pasta with these delicious sides: - Garlic bread: A warm, crusty garlic bread complements the dish perfectly. - Caesar salad: A fresh Caesar salad adds a nice crunch and balances the creamy pasta. - Steamed vegetables: Broccoli or green beans offer a healthy touch and color to your meal. - Corn on the cob: Sweet corn is a fun side that goes well with Cajun flavors. Adjusting the serving size is simple. Here’s how: - Double ingredients: If you want to serve eight, just double each ingredient in the recipe. - Halve ingredients: For two servings, cut the amounts in half. - Scale easily: Keep the ratios the same, so the flavors remain balanced. - Use measuring tools: A scale or measuring cups can help ensure precision when scaling down or up. You can find the [Full Recipe] online for more details! This blog post covered a delicious creamy Cajun chicken pasta recipe. You learned about the key ingredients, including chicken, pasta, and spices. We explored cooking methods and tips to enhance flavors. Variations allowed you to personalize your dish. Don't forget proper storage and reheating tips to enjoy leftovers. Embrace your culinary skills and try this recipe. It’s quick, satisfying, and perfect for any meal. Enjoy your cooking adventure!](https://joymealplan.com/wp-content/uploads/2025/06/ca6cae42-757f-40a7-bcb0-99b7cd192fd8-768x768.webp)
![To make Easy Chicken Shawarma, gather these items: - 500g boneless, skinless chicken thighs - 2 tablespoons extra virgin olive oil - 3 cloves garlic, finely minced - 1 tablespoon ground cumin - 1 tablespoon ground coriander - 1 tablespoon smoked paprika - 1 teaspoon ground turmeric - 1 teaspoon ground cinnamon - 1 teaspoon sea salt - ½ teaspoon freshly ground black pepper - Juice of 1 large lemon - 4 soft pita breads - Fresh parsley, finely chopped, for garnish - Tomato, cucumber, and red onion, thinly sliced, for serving - Creamy yogurt or rich tahini sauce, for drizzling This list covers all you need for vibrant flavors. You can swap chicken thighs for chicken breasts if you prefer leaner meat. If you're short on spices, try a ready-made shawarma mix for ease. To prepare this dish, you'll need: - A medium mixing bowl for the marinade - A whisk to blend the ingredients - A grill or large skillet for cooking - A meat thermometer to check doneness - Storage containers for leftovers Using a meat thermometer ensures you cook the chicken to 75°C (165°F). This keeps it juicy and safe to eat. Store any leftovers in airtight containers for up to three days. Enjoy your flavorful meal, and don't forget to check the [Full Recipe] for all the steps! To start, we need to make a tasty marinade. Take a medium mixing bowl and combine these ingredients: - 2 tablespoons extra virgin olive oil - 3 cloves garlic, finely minced - 1 tablespoon ground cumin - 1 tablespoon ground coriander - 1 tablespoon smoked paprika - 1 teaspoon ground turmeric - 1 teaspoon ground cinnamon - 1 teaspoon sea salt - ½ teaspoon freshly ground black pepper - Juice of 1 large lemon Whisk these together until mixed well. This mix makes your chicken full of flavor. Next, add the 500g boneless, skinless chicken thighs. Make sure every piece is coated in the marinade. Cover the bowl tightly with plastic wrap. For the best taste, let it sit in the fridge for at least 1 hour. If you can, leave it overnight for even better flavor. When you are ready to cook, preheat your grill or a large skillet on medium-high heat. You want it nice and hot. Take the marinated chicken out of the fridge. Let it sit at room temperature for about 10 minutes. This helps it cook evenly. Place the chicken on the hot grill or skillet. Cook for about 6-8 minutes on each side. You want the chicken to have a nice char and be fully cooked. Check that the internal temperature reaches 75°C (165°F). Once cooked, let the chicken rest for 5 minutes. Then slice it into thin strips. This gives you a tender texture. Now, it’s time to fill our pitas. Take your warm pita bread and place a good amount of sliced chicken inside. For extra crunch and color, add some fresh toppings: - Fresh parsley, finely chopped - Tomato, thinly sliced - Cucumber, thinly sliced - Red onion, thinly sliced Finish your shawarma with a drizzle of creamy yogurt or zesty tahini sauce. Wrap the pita up tight, and it's ready to eat! Enjoy your homemade shawarma delight! For a complete guide, check out the Full Recipe. To achieve the best char marks on your chicken, start with a hot grill or skillet. Make sure the grill is preheated to medium-high heat. Cook the chicken without moving it too much. Let it sit for about 6 to 8 minutes on each side. This allows those crispy, golden marks to form. Resting the chicken before slicing is also key. Once you take the chicken off the heat, let it rest for 5 minutes. This helps the juices stay inside the meat. When you slice it, the chicken will be tender and juicy. Pair your chicken shawarma with tasty side dishes. A fresh tabbouleh salad makes a great choice. You can also serve hummus or baba ganoush for dipping. These flavors complement the shawarma well. For drinks, a chilled lemonade or mint tea works nicely. These drinks balance the spices and add a refreshing touch. Want to spice things up? Try adding a pinch of cayenne pepper to the marinade. This will give your chicken an extra kick. You can also drizzle some sriracha or harissa sauce over the finished shawarma for added heat. If you prefer milder flavors, simply reduce the spices. Use less cumin or paprika in the marinade. This way, you can adjust the taste to suit your preferences. For more variety, try adding fresh herbs like mint or dill for a burst of freshness. For the full recipe, check the section above. {{image_4}} You can easily make this dish plant-based. Use chickpeas or tofu instead of chicken. For chickpeas, drain and rinse one can. Toss them with the same marinade. If you choose tofu, press it to remove water and cut it into cubes. Marinate the tofu just like the chicken. For a veggie-loaded option, try grilled vegetables. Zucchini, bell peppers, and mushrooms work great. Slice them into strips and marinate them. Grill until they are tender and slightly charred. If you do not have a grill, don’t worry! You can use an Instant Pot. Cook the marinated chicken on high pressure for about 8 minutes. This keeps the chicken juicy. You can also use an oven. Preheat it to 200°C (400°F). Place the chicken on a baking sheet and roast for 20-25 minutes. Check that the chicken reaches 75°C (165°F) inside. Another great choice is the slow cooker. Add the marinated chicken and cook on low for 6-8 hours. This makes the chicken very tender and flavorful. To make your shawarma extra special, try new toppings. Feta cheese adds a nice salty flavor. Pickled vegetables can give a tangy crunch. You can also experiment with sauces. A spicy harissa or cool tzatziki can change the flavor. Consider regional spices too. Try za'atar for a herby taste or sumac for tartness. Each spice can make your shawarma unique. For the full recipe, check out Shawarma Delight: Easy Chicken Edition. To keep your chicken shawarma fresh, store it properly. Place the leftover chicken in an airtight container. This will help maintain its flavor and moisture. For the best taste, eat leftovers within three days. If you have assembled pitas, store the chicken and veggies separately. This keeps the pita from getting soggy. You can keep the sliced chicken in the fridge for three days, too. When it's time to enjoy your leftovers, reheating is key. Use a skillet or oven to heat the chicken. This method helps keep the chicken juicy. Avoid using a microwave, as it can dry out the meat. Heat the chicken over medium heat for about five minutes. Stir it gently to keep it moist. If the chicken seems dry, add a splash of water or broth. You can freeze leftover chicken shawarma for later. Place the cooled chicken in a freezer-safe container. Make sure to remove excess air to prevent freezer burn. It can last up to three months in the freezer. When you're ready to eat, thaw the chicken in the fridge overnight. Reheat it on the stove for the best texture. You can enjoy that delicious flavor anytime! Chicken shawarma is a popular dish from the Middle East. It has roots in the Levant region. Traditionally, cooks stack marinated meat on a vertical spit. They cook it slowly, letting the juices flow down. The meat is then shaved off in thin strips. The spices in shawarma are what make it special. Common spices include cumin, coriander, and paprika. These give the chicken a warm, rich flavor. Shawarma is often served in pita bread with fresh veggies and sauce. Yes, you can prep chicken shawarma in advance. Marinate the chicken the night before. This helps the flavors mix well. When you are ready to cook, take it out of the fridge. Cook it fresh for the best taste. You can also slice the cooked chicken and store it. Place it in an airtight container in the fridge. It will last for about 3 days. Just reheat it when you are ready to eat. If you want to change things up, try these alternatives to pita bread: - Flatbreads - Tortillas - Naan bread - Lettuce wraps for a low-carb option These options work well with the chicken and veggies. You can also serve shawarma over rice or in a bowl with salad. To make a gluten-free chicken shawarma, choose gluten-free pita or flatbreads. Look for brands that clearly state they are gluten-free. You can also use lettuce as a wrap. Always check the spice blend for gluten. Some pre-made spices might contain gluten. Make your own mix using cumin, paprika, and other safe spices. The best sauces for chicken shawarma include: - Creamy yogurt sauce - Rich tahini sauce Yogurt sauce is smooth and tangy. It cools down the spices. Tahini sauce is nutty and flavorful. Both add a wonderful touch to your shawarma. Drizzle them on top or serve them on the side for dipping. For the full recipe, check out Shawarma Delight: Easy Chicken Edition. In this guide, we explored how to make Easy Chicken Shawarma from start to finish. We covered essential ingredients, tools, marinating techniques, cooking methods, and clever tips for serving and storing leftovers. You can easily customize this dish for various tastes and dietary needs, ensuring everyone enjoys it. With a little practice, you’ll master the art of shawarma. Get ready to impress your family and friends with your new skills in the kitchen!](https://joymealplan.com/wp-content/uploads/2025/07/dcd86bca-5250-4056-852d-a4436d844aa2-768x768.webp)
