Sausage Tortellini Soup Flavorful Easy Comfort Meal

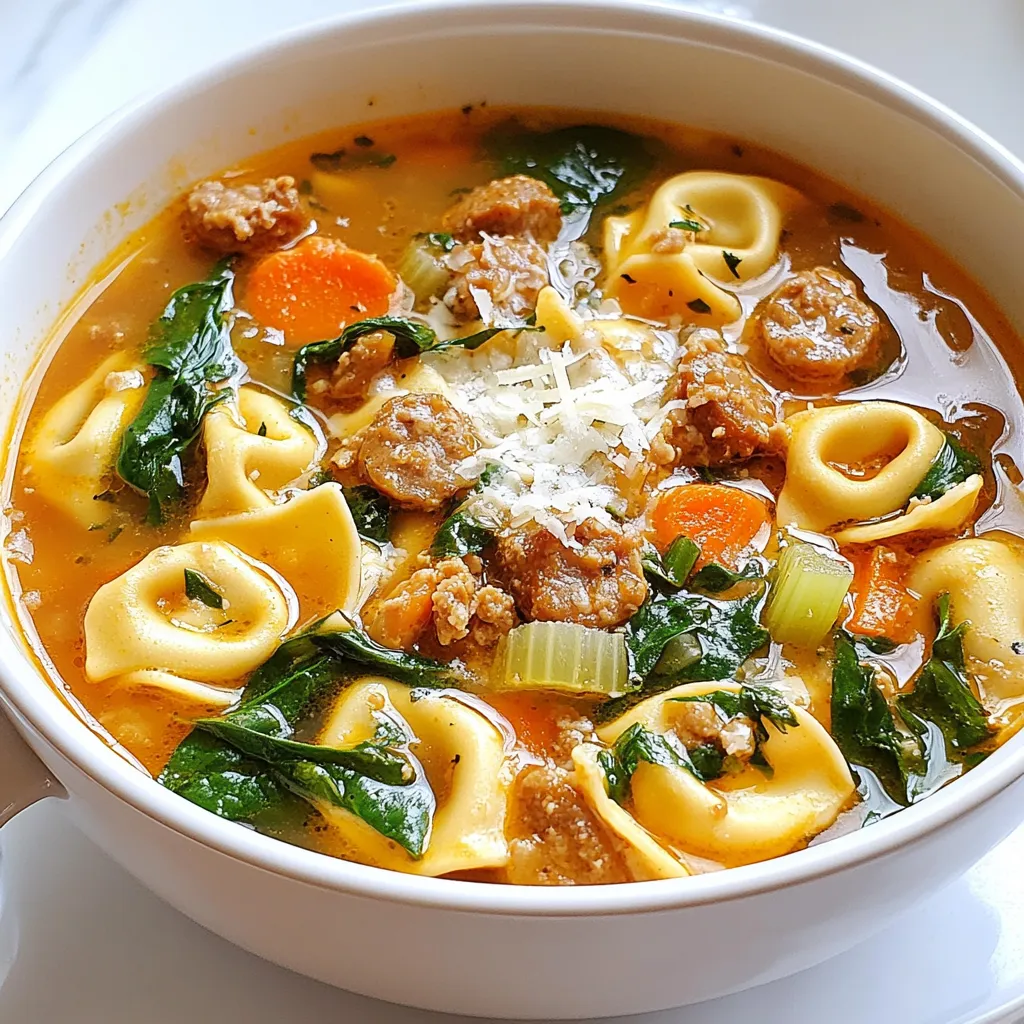
Looking for a hearty meal that warms your soul? This Sausage Tortellini Soup is your answer. Packed with rich flavors and simple ingredients, it brings comfort to any table. You’ll find it easy to make, and even easier to love. Let’s dive into this delicious recipe and discover how you can create a cozy dish that the whole family will enjoy!
Why I Love This Recipe
- Comforting and Hearty: This soup is the ultimate comfort food, perfect for chilly evenings. The combination of Italian sausage and cheese tortellini makes every bowl feel like a warm hug.
- Easy to Make: With just a few simple steps, this recipe comes together in about 30 minutes, making it a fantastic choice for busy weeknights.
- Nutritious Ingredients: Packed with vegetables like carrots, celery, and spinach, this soup not only tastes great but also provides a nutritious boost to your meal.
- Customizable: You can easily adjust the flavors by choosing mild or spicy sausage and adding your favorite veggies, making this recipe versatile for different tastes.
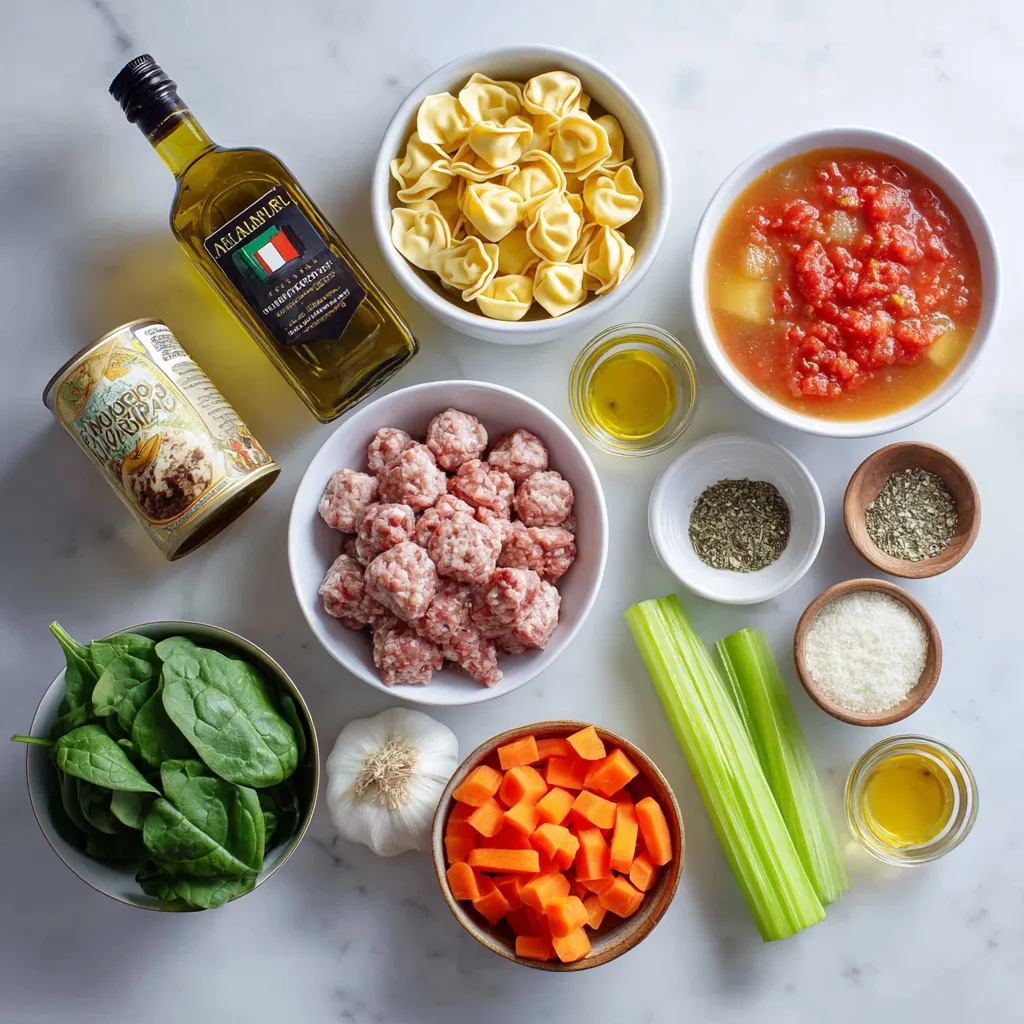
Ingredients
Essential Ingredients
– 1 tablespoon olive oil
– 1 pound Italian sausage (mild or spicy)
– 1 medium onion, finely diced
– 3 cloves garlic, minced
– 2 medium carrots, peeled and diced
– 2 celery stalks, diced
– 6 cups rich chicken broth
– 1 can (14 ounces) diced tomatoes, undrained
To make this soup shine, start with good ingredients. The olive oil adds richness. Italian sausage gives it a hearty flavor. The vegetables—onion, carrots, celery, and garlic—add depth. Chicken broth and tomatoes create a solid base for your soup.
Seasonings and Extras
– 1 teaspoon dried basil
– 1 teaspoon dried oregano
– Salt and freshly ground black pepper to taste
– 1 package (9 ounces) cheese tortellini
– 2 cups fresh baby spinach
– Grated Parmesan cheese for serving
For seasoning, dried basil and oregano bring warmth. Salt and pepper enhance all the flavors. The cheese tortellini adds a delightful bite. Fresh spinach adds color and nutrition. Finally, top your soup with grated Parmesan for a creamy finish.

Step-by-Step Instructions
Preparing the Soup Base
1. Heating Oil and Browning Sausage:
– Start by pouring 1 tablespoon of olive oil into a large pot.
– Heat it over medium heat until it shimmers.
– Add 1 pound of Italian sausage to the pot.
– Use a wooden spoon to break it apart into smaller pieces.
– Cook for about 5-7 minutes until the sausage is browned and cooked through.
2. Sautéing Vegetables:
– Once the sausage is ready, add in 1 medium diced onion, 2 diced carrots, and 2 diced celery stalks.
– Cook these for another 5-7 minutes until the onion turns soft and translucent.
Building Flavor
3. Adding Garlic and Spices:
– Toss in 3 minced cloves of garlic.
– Sauté for 1 more minute until the garlic releases its strong aroma.
4. Incorporating Broth and Tomatoes:
– Pour in 6 cups of rich chicken broth and 1 can of undrained diced tomatoes.
– Add 1 teaspoon of dried basil and 1 teaspoon of dried oregano.
– Season with salt and freshly ground black pepper.
– Bring the soup mixture to a gentle simmer.
Finalizing the Soup
5. Simmering for Flavor Development:
– Let the soup simmer for about 10 minutes.
– This helps flavors blend and softens the veggies.
6. Cooking Tortellini and Adding Spinach:
– Add 1 package of cheese tortellini to the pot.
– Cook according to package instructions, usually about 3-5 minutes.
– In the last minute, stir in 2 cups of fresh baby spinach until it wilts.
Taste the soup as you go, adjusting seasonings for a perfect finish. Enjoy your warm, hearty meal!
Tips & Tricks
Enhancing Flavor
To get more flavor in your Sausage Tortellini Soup, try adding spices. A pinch of red pepper flakes can add heat. You can also use smoked paprika for a smoky touch. Fresh herbs like parsley or thyme can brighten the dish.
For cooking techniques, don’t skip browning the sausage. This step adds depth. Let the vegetables cook until soft and sweet. Sauté garlic until fragrant, but don’t burn it. This brings out its best flavor.
Ingredient Substitutions
If you want to change the protein, turkey sausage works well. It’s leaner but still tasty. You can also use plant-based sausage for a vegan option.
For vegetables, feel free to switch things up. Add bell peppers, zucchini, or green beans for more texture. Use kale instead of spinach for a heartier bite. Just adjust cooking times to keep everything tender.
Pro Tips
- Choose Your Sausage Wisely: Select a high-quality Italian sausage for the best flavor. Experiment with different spice levels to match your taste preferences. Mild sausage offers a savory base, while spicy adds a kick to the soup.
- Prep Your Veggies in Advance: Chop all vegetables ahead of time to streamline your cooking process. This ensures that you can focus on cooking without interruptions, making the process smoother and more enjoyable.
- Enhance with Fresh Herbs: For an added layer of flavor, consider garnishing your soup with fresh basil or parsley just before serving. This will elevate the presentation and provide a burst of freshness with each spoonful.
- Perfectly Cooked Tortellini: Keep an eye on the tortellini while cooking. Overcooking can lead to a mushy texture. Aim to cook them just until they float to the top for the best bite.

Variations
Customizing Ingredients
You can change the tortellini to suit your tastes. Try using different filled pastas like spinach or mushroom tortellini. Each type adds its own flavor. You can also use fresh pasta instead of dry for a softer bite.
Adding more vegetables makes this soup even better. Bell peppers bring a sweet crunch, while zucchini adds a nice texture. You can toss in kale or corn for more color and nutrients. Feel free to mix and match based on what you have at home!
Dietary Modifications
If you need gluten-free options, look for gluten-free tortellini made from rice or chickpeas. These alternatives work well in the soup and taste great too.
For a vegan version, swap the sausage for plant-based sausage. Use vegetable broth instead of chicken broth. Replace cheese tortellini with a vegan option or make your own with flour and water. You can also skip the cheese topping or use a dairy-free alternative.
Making these changes lets you enjoy this soup, no matter your diet!
Storage Info
Storing Leftovers
To keep your Sausage Tortellini Soup fresh, follow these steps:
– Refrigeration: Store leftovers in an airtight container. This helps prevent spills and keeps the soup fresh. It stays good for up to three days in your fridge.
– Freezing: For longer storage, freeze the soup. Use freezer-safe bags or containers. Leave some space at the top for expansion. The soup can last for up to three months in the freezer.
Reheating Instructions
When it’s time to enjoy your leftovers, here’s how to reheat the soup:
– Proper Reheating: Pour the soup into a pot. Heat it over medium heat. Stir occasionally until it reaches a gentle simmer. This helps heat the soup evenly.
– Preventing Overcooking: Avoid boiling the soup. This can make the tortellini mushy. Heat just until hot to keep the flavors fresh and the texture right.
These simple steps ensure your Sausage Tortellini Soup tastes great, even days later!
FAQs
Common Questions
How long can I store Sausage Tortellini Soup?
You can store Sausage Tortellini Soup in the fridge for about 3-4 days. Make sure to keep it in an airtight container. If you want to keep it longer, you can freeze it. When frozen, it can last for up to 3 months. Just remember to thaw it in the fridge before reheating.
Can I use frozen tortellini?
Yes, you can use frozen tortellini in this soup. Just add it directly to the pot without thawing. It will cook in about the same time as fresh tortellini. This makes it a great option for busy nights when you need a quick meal.
Preparation Tips
Is there a quicker way to make this soup?
To save time, you can use pre-cooked sausage. Just add it to the pot with the veggies. You can also prepare the vegetables ahead of time. This way, you can skip some steps and get the soup ready in about 20 minutes.
What can I serve with Sausage Tortellini Soup?
This soup pairs well with crusty bread or a fresh salad. You might enjoy garlic bread for a tasty side. A sprinkle of extra Parmesan cheese on top makes it even better. You can also serve it with a light green salad for balance.
This blog post covered how to make Sausage Tortellini Soup. It highlighted the key ingredients like olive oil, Italian sausage, and fresh veggies. I shared steps for preparing the soup base and building flavor. I also gave tips on customizations, storage, and reheating.
Remember, you can adjust this recipe to fit your taste. Whether you want a vegetarian option or different spices, the choices are yours. Enjoy making this tasty soup for any mea

Hearty Sausage Tortellini Soup
Ingredients
- 1 tablespoon olive oil
- 1 pound Italian sausage
- 1 medium onion, finely diced
- 3 cloves garlic, minced
- 2 medium carrots, peeled and diced
- 2 stalks celery, diced
- 6 cups rich chicken broth
- 1 can diced tomatoes, undrained (14 ounces)
- 1 teaspoon dried basil
- 1 teaspoon dried oregano
- to taste salt and freshly ground black pepper
- 1 package cheese tortellini (9 ounces)
- 2 cups fresh baby spinach
- for serving grated Parmesan cheese
Instructions
- In a large, heavy-bottomed pot, pour in the olive oil and place it over medium heat. Once heated, add the Italian sausage. Cook for approximately 5-7 minutes, using a wooden spoon to break up the sausage into bite-sized pieces. Ensure the meat is browned evenly.
- Once the sausage is cooked through, add the diced onion, carrots, and celery to the pot. Sauté these vegetables for another 5-7 minutes until they are tender and the onion is translucent.
- Incorporate the minced garlic into the mixture and sauté for an additional minute, just until you can smell its aromatic warmth.
- Pour the chicken broth into the pot along with the undrained diced tomatoes, dried basil, and dried oregano. Season the mixture with salt and freshly ground black pepper, and bring the soup to a gentle simmer.
- Allow the soup to simmer for about 10 minutes. This not only infuses the flavors but also helps the vegetables soften further.
- Add the tortellini to the pot and cook according to package instructions, which should take around 3-5 minutes until they are tender.
- In the final minute of cooking, stir in the fresh spinach, gently folding it into the soup until it wilts and brightens the dish.
- Taste the soup and adjust the seasoning with more salt or pepper if needed.


![- 4 large bell peppers (any color of your choice) - 1 cup quinoa, thoroughly rinsed - 2 cups vegetable broth - 1 can (15 oz) black beans, drained and rinsed - 1 cup corn kernels - 1 small red onion, finely chopped - 2 cloves garlic, minced - 1 teaspoon ground cumin - 1 teaspoon smoked paprika - 1 teaspoon chili powder - Salt and freshly cracked black pepper, to taste - 1 cup diced tomatoes - 1 cup shredded cheese - Fresh cilantro or parsley for garnish This recipe is full of vibrant colors and flavors. The bell peppers add sweetness and crunch. Quinoa provides protein, making it a healthy meal choice. I love using black beans for their creaminess and fiber. Corn adds a nice sweetness and texture too. You can choose any color of bell pepper you like. Each color brings a unique taste. Red, yellow, and green all work well. The quinoa must be rinsed to remove saponin, a bitter coating. This step makes the quinoa taste better. Using vegetable broth instead of water boosts flavor. The spices, like cumin and smoked paprika, add warmth and depth. Garlic and onion give a great base flavor. Don't forget to adjust salt and pepper to your taste. I recommend adding cheese on top for a nice finish. It melts beautifully and adds richness. You can use cheddar or a Mexican blend, based on your preference. For a pop of color, garnish with fresh cilantro or parsley. For the complete recipe, check out the [Full Recipe]. - Preheat your oven to 375°F (190°C). - Slice the tops off four large bell peppers. Remove the seeds and membranes. - Stand the peppers upright in a baking dish. This keeps them stable while cooking. - In a saucepan, add one cup of rinsed quinoa and two cups of vegetable broth. - Bring the mixture to a boil over medium heat. - Once boiling, lower the heat and cover the pot. Simmer for about 15 minutes. - Fluff the quinoa with a fork when it’s done. - In a large bowl, combine the cooked quinoa with one can of black beans, one cup of corn, and one small chopped red onion. - Add two minced garlic cloves, one teaspoon of cumin, smoked paprika, and chili powder. - Season with salt and pepper to taste. - Fold in one cup of diced tomatoes before stuffing the peppers. - Carefully spoon the quinoa mixture into each pepper. Pack it down gently. - Top each stuffed pepper with one cup of shredded cheese. - Cover the dish with aluminum foil to keep the moisture in. - Place the covered dish in the preheated oven. Bake for 25 to 30 minutes. - Remove the foil and bake for another 10-15 minutes until the cheese is golden. This recipe brings together flavors and nutrition in a fun way. You’ll enjoy the vibrant colors and tastes! For the complete recipe, check out the Full Recipe. To get the best quinoa, start by rinsing it well. This removes any bitter coating. Use a fine mesh strainer for this step. Next, combine one part quinoa with two parts vegetable broth. This adds flavor. Cook on medium heat until it boils, then lower the heat and cover. Let it simmer for about 15 minutes. The quinoa should be fluffy and all the liquid gone. Spices make a big difference. I love adding ground cumin, smoked paprika, and chili powder for warmth. You can also mix in fresh herbs like cilantro or parsley for freshness. If you want more kick, add chopped jalapeños. Olives give a nice briny taste too. Feel free to get creative with your flavors! Make your dish pop! Serve the stuffed peppers on a bed of fresh greens. This adds color and crunch. You can sprinkle extra cheese on top before serving. A squeeze of lime over the peppers brightens the dish. Consider drizzling with a creamy sauce, like ranch or yogurt, for added richness. For the full recipe, check the details above. {{image_4}} You can make quinoa stuffed peppers vegan by swapping out cheese and broth. Use a plant-based cheese or skip it entirely. For broth, substitute with water or vegetable stock. Add more flavor by mixing in nutritional yeast. For protein, try lentils or chickpeas. Add veggies like spinach, kale, or mushrooms for extra nutrients. Quinoa isn't your only option. You can use rice or couscous. Both grains offer a nice texture. If you want to add meat, chicken, turkey, or even crumbled tofu work great. Just cook the proteins before mixing them into the filling. You can also add diced olives or sun-dried tomatoes for a flavor boost. Feel free to experiment with various pepper types. Bell peppers are common, but try poblano or jalapeño for a kick. Sweet peppers make the dish mild, while spicy peppers add heat. Using different sizes can change your serving style. Smaller peppers can be appetizers, while larger ones can be main dishes. To store your quinoa stuffed peppers after cooking, let them cool first. Place them in an airtight container. This keeps them fresh and tasty. You can store them in the fridge for up to four days. If you want to enjoy them later, be sure to keep the peppers whole. This helps them stay moist. If you want to freeze your stuffed peppers, wrap each one in plastic wrap. Then, place them in a freezer-safe bag or container. This method helps prevent freezer burn. You can freeze them for up to three months. When you are ready to eat, take them out and thaw them overnight in the fridge. Reheat them in the oven at 350°F (175°C) for about 20-25 minutes. This keeps the peppers nice and warm. You can also microwave them for faster results but be careful not to overcook. Enjoy your meal with a burst of flavor! For the full recipe, check out the earlier sections. Yes, you can prepare quinoa stuffed peppers ahead. Cook the quinoa and mix it with the other ingredients. You can stuff the peppers and store them in the fridge for up to 24 hours. If you want, you can bake them later. This saves time on busy days. Look for a few signs. The peppers should be tender but still firm. The filling inside should be hot and bubbly. The cheese on top should melt and turn golden brown. These are good signs your stuffed peppers are ready to enjoy. Yes, you can use other grains. Brown rice, couscous, or farro work well. Each grain has its own cooking time. For brown rice, cook it for about 40-45 minutes. Couscous cooks quickly in about 5 minutes. Adjust cooking times based on the grain you choose. I suggest a few side dishes. A simple salad with mixed greens adds freshness. You can also serve rice or a grain like quinoa on the side. If you want a warm side, consider roasted veggies. These pair well with the stuffed peppers and add color to your plate. Absolutely! This recipe uses quinoa, which is gluten-free. The other ingredients, like beans and veggies, are also gluten-free. Just make sure to check labels on canned goods. This helps ensure no gluten sneaks in. Enjoy this healthy meal worry-free! Quinoa stuffed peppers offer a balanced meal using simple, fresh ingredients. We explored the preparation, cooking tips, and variations. Remember to rinse your quinoa for the best flavor and texture. You can easily adjust the recipe for different diets or flavor profiles. Feel free to experiment with other grains or proteins. Enjoy these tasty peppers now or save some for later. Your kitchen adventures can lead to satisfying meals that everyone loves.](https://joymealplan.com/wp-content/uploads/2025/06/105cb204-6c23-4ed0-80a6-bb54efeb7f27-768x768.webp)


![To make this savory sweet potato black bean chili, gather these main ingredients: - 2 medium sweet potatoes, peeled and cut into 1-inch cubes - 1 can (15 oz) black beans, thoroughly rinsed and drained - 1 can (14.5 oz) diced tomatoes - 1 medium onion, finely chopped - 2 cloves garlic, finely minced - 1 bell pepper, diced - 1 cup vegetable broth - 2 teaspoons ground cumin - 1 teaspoon smoked paprika - 1 teaspoon chili powder - ½ teaspoon dried oregano - Salt and freshly cracked pepper to taste - 2 tablespoons extra virgin olive oil - Fresh cilantro, chopped, for garnish - Lime wedges, for serving If you want to take your chili to the next level, you can add some optional ingredients: - 1-2 jalapeños, diced for heat - 1 cup corn, for sweetness and crunch - 1 teaspoon cayenne pepper, for extra spice - 1 tablespoon apple cider vinegar, to brighten flavors This chili is not just tasty; it’s also packed with nutrition. Here’s a quick breakdown: - Calories: About 250 per serving - Protein: 10 grams - Fat: 7 grams - Carbohydrates: 45 grams - Fiber: 12 grams - Sugars: 5 grams This dish is rich in fiber and protein, making it a filling meal. It also provides a good source of vitamins A and C from the sweet potatoes and peppers. For the full recipe, check out the provided link! Start by gathering your ingredients. You need sweet potatoes, black beans, diced tomatoes, onion, garlic, bell pepper, vegetable broth, spices, olive oil, salt, and pepper. Make sure to peel and cube the sweet potatoes into 1-inch pieces. Rinse the black beans well and drain them. Chop the onion and garlic finely. Dice the bell pepper. This will set you up for success! Heat olive oil in a large pot over medium heat. Add the chopped onion and bell pepper. Sauté them for about 5 minutes until they are soft. Then, add the minced garlic. Stir for 1 minute until you smell its great aroma. Next, add the sweet potatoes, diced tomatoes, and vegetable broth. Sprinkle in cumin, smoked paprika, chili powder, oregano, and season with salt and pepper. Mix everything together. Bring the mix to a gentle boil, then lower the heat. Cover the pot and let it simmer for 25-30 minutes. The sweet potatoes should be tender and easy to fork. Finally, fold in the black beans and let them warm for about 5 minutes. Taste it and adjust the seasoning if you want. Serve the chili hot in vibrant bowls. Top each bowl with fresh cilantro and a lime wedge. The lime adds a nice burst of flavor. For more richness, you can add a dollop of avocado or sour cream. This chili tastes great and looks beautiful on the table. For the full recipe, check out the [Full Recipe] link! To boost flavors in your sweet potato black bean chili, use a few easy tricks. Start by sautéing your onions and peppers in olive oil. This step builds a solid flavor base. Make sure they soften and release their natural sugars. Next, add garlic for aroma, stirring it briefly. This brings out the richness in your chili. Using smoked paprika adds depth. It gives a subtle, smoky taste that lifts the dish. Always taste as you go. Adjusting the seasoning lets you find the perfect balance. Many people rush when cooking chili. Give your sweet potatoes enough time to soften. If they are still hard, your chili will not taste great. Another mistake is ignoring the beans. Be sure to fold them in gently so they don’t break apart. Also, don’t skip the lime! It brightens the flavors. Lastly, avoid overcooking the chili. A gentle simmer is enough to meld the flavors without losing texture. If you like heat, there are simple ways to spice things up. Start with mild chili powder, then add cayenne or hot sauce for more warmth. You can also use diced jalapeños for a fresh kick. For less heat, choose milder peppers and skip the extra spices. Always taste before serving. This way, you can adjust the spice level to suit everyone’s palate. {{image_4}} This chili is already vegetarian and vegan. You can enhance it by adding more veggies. Try using zucchini, corn, or mushrooms. These add texture and flavor. You can also swap the vegetable broth for a homemade version. Just boil water with herbs and spices to boost taste. This chili is gluten-free as is. If you want, you can add gluten-free grains. Quinoa or brown rice make great additions. Cook them separately and mix them in before serving. This will give you a hearty meal without gluten. You can make this chili your own with fun add-ins. Try adding fresh spinach or kale for extra greens. A splash of lime juice brightens the flavors. For a smoky kick, add chipotle peppers in adobo sauce. You can also top it with avocado, cheese, or yogurt. These toppings add creaminess and contrast. Check out the Full Recipe for more ideas! To keep your sweet potato black bean chili fresh, first, let it cool down. Then, pour it into an airtight container. This helps prevent spills and keeps the flavor locked in. You can store it in the fridge for up to three days. Make sure to label the container with the date for easy tracking. If you want to save your chili for later, freezing is a great option. Use freezer-safe bags or containers. Pour the chili into the bags, leaving some space for expansion. Seal them tightly to avoid freezer burn. You can freeze your chili for up to three months. Remember to label the bags with the date so you know when to use them. When you're ready to enjoy your chili again, there are a few ways to reheat it. The best method is to use a pot on the stove. Heat it over medium-low heat, stirring often until it's hot. If you prefer the microwave, pour the chili into a microwave-safe bowl. Cover it loosely and heat for 2-3 minutes, stirring halfway through. Always check that it’s hot all the way through before serving. For added flavor, squeeze some fresh lime juice on top before you dig in! If you do not have sweet potatoes, you can use butternut squash or regular potatoes. Both options will add a nice texture and flavor to the chili. You may also try carrots for a slightly sweeter taste. Adjust the cooking time as needed, since these veggies may take different times to cook. To add heat to your chili, you can use fresh jalapeños or serrano peppers. Chop them up and add them with the onions. You can also increase the chili powder or smoked paprika. Adding a dash of hot sauce or cayenne pepper at the end can give it an extra kick too! Yes, canned black beans work great in this recipe. They save time and still taste delicious. Make sure to rinse and drain them well before adding to the chili. This helps remove excess sodium and keeps the flavor balanced. To serve more people, just double or triple the ingredients. Keep the same cooking steps, but watch the cooking time. You may need a larger pot to accommodate the extra chili. Always taste and adjust seasoning as you increase the amounts. For the full recipe, check out the earlier section. This article covered key ingredients and cooking steps for your dish. You learned about optional ingredients for added flavor and useful tips to improve taste. We explored variations, including vegetarian and gluten-free options. You also picked up on how to store leftovers and common questions. Remember, cooking is fun, and experimenting makes it even better. Enjoy your dish and feel proud of your culinary skills!](https://joymealplan.com/wp-content/uploads/2025/07/8c039768-80c3-4c1c-94c6-06aef8e7156d-768x768.webp)