Savory Spinach Ricotta Stuffed Shells Simple Recipe

Looking for a cozy, delicious dish that’s easy to make? Spinach Ricotta Stuffed Shells are perfect for you! This recipe combines creamy ricotta, fresh spinach, and gooey cheese, all stuffed into jumbo pasta shells. In just a few simple steps, you can whip up this savory meal that will impress your family and friends. Ready to dive into this tasty journey? Let’s get cooking!
Why I Love This Recipe
- Deliciously Cheesy: The combination of ricotta, mozzarella, and Parmesan creates a rich and creamy filling that melts in your mouth.
- Healthy Spinach Boost: Fresh spinach adds a nutritious touch, making these stuffed shells a delightful way to enjoy your greens.
- Comfort Food Classic: Stuffed shells are the ultimate comfort food, perfect for family dinners or cozy nights in.
- Easy to Prepare: This recipe is straightforward and can be made ahead of time, making it a convenient option for busy weeknights.
Ingredients
Main Ingredients for Spinach Ricotta Stuffed Shells
– 12 large jumbo pasta shells
– 1 cup ricotta cheese
– 1 cup fresh spinach, finely chopped
– 1 cup mozzarella cheese, shredded
– 1/2 cup grated Parmesan cheese
Additional Ingredients
– 1 large egg
– 2 cloves garlic, minced
– 1 teaspoon dried oregano
– 1/2 teaspoon salt
– 1/4 teaspoon black pepper
– 2 cups marinara sauce
– Fresh basil leaves for garnish
To make the best spinach ricotta stuffed shells, gather these main ingredients. You need jumbo pasta shells for a hearty base. Ricotta cheese gives a creamy texture. Fresh spinach adds color and flavor. Mozzarella and Parmesan cheeses bring richness and a nice crust when baked.
You will also need a few additional ingredients. A large egg helps bind your filling. Garlic adds a punch of flavor. Dried oregano gives a hint of warmth. Salt and black pepper enhance all the tastes. Marinara sauce creates a savory layer and keeps the dish moist. Lastly, fresh basil leaves not only look great but also add freshness when serving.
This combination of ingredients makes the dish simple yet full of flavors. Each bite offers a delightful experience.

Step-by-Step Instructions
Preparing the Pasta
To start, bring a large pot of salted water to a boil. Once it bubbles, add 12 large jumbo pasta shells. Cook them until they are al dente, about 8-10 minutes. Then, drain the shells and let them cool on a plate. This makes it easier to fill them later.
Making the Filling
In a big bowl, mix 1 cup of ricotta cheese with 1 cup of finely chopped fresh spinach. Add in half of the shredded mozzarella cheese and 1/2 cup of grated Parmesan cheese. Next, crack in 1 large egg and toss in 2 minced cloves of garlic. Season the mix with 1 teaspoon of dried oregano, 1/2 teaspoon of salt, and 1/4 teaspoon of black pepper. Stir until everything is creamy and well combined.
Stuffing the Shells
Now, preheat your oven to 375°F (190°C). Grab a teaspoon or piping bag to fill each shell. Carefully stuff each cooled pasta shell with the ricotta-spinach mixture. Press gently to ensure the filling fits snugly inside.
Assembling the Dish
Take a 9×13 inch baking dish and spread 1 cup of marinara sauce evenly across the bottom. Lay the stuffed shells in a single layer over the sauce. Pour the rest of the marinara sauce on top, making sure each shell is coated. Finally, sprinkle the reserved mozzarella cheese over the shells.
Baking the Shells
Cover the baking dish with aluminum foil. Place it in your preheated oven and bake for 25 minutes. After that, remove the foil and bake for an additional 10-15 minutes. You want the cheese to be bubbly and golden.
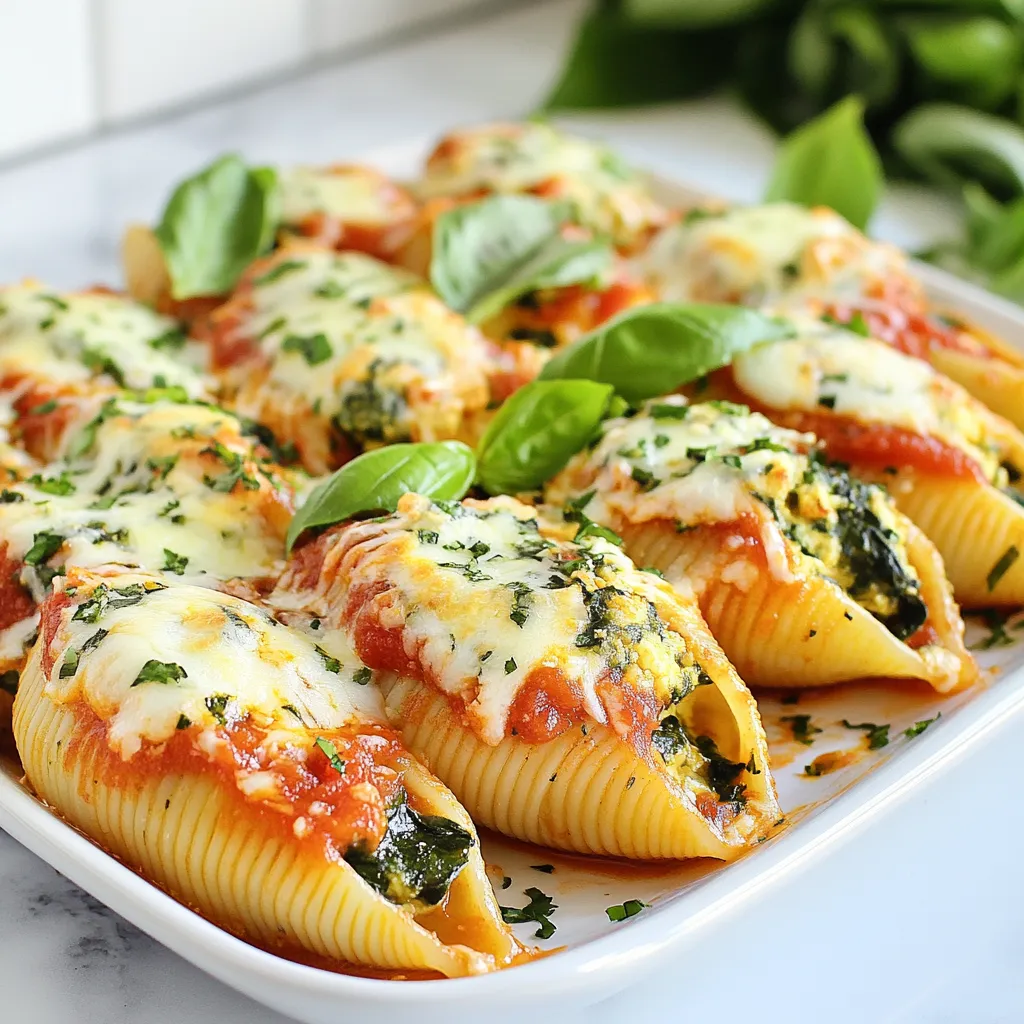
Garnishing and Serving
After baking, let the dish rest for a few minutes. This helps the flavors settle. To finish, add fresh basil leaves on top for a pop of color and flavor. Now, it’s time to serve and enjoy your savory spinach ricotta stuffed shells!
Tips & Tricks
Common Mistakes to Avoid
– Overcooking the pasta shells: Always cook the shells until al dente. This means they should be firm when you bite into them. Overcooked shells will break when you fill them.
– Under-seasoning the filling: Make sure to taste your filling mix. Use enough salt, pepper, and spices. This helps the flavors pop in your dish.
Perfecting the Filling
– Achieving the right consistency: Your filling should be creamy but not too runny. If it’s too thin, add a bit more ricotta or cheese. This keeps it from spilling out of the shells.
– Substituting ingredients for dietary needs: You can swap ricotta for tofu to make it dairy-free. Use gluten-free pasta shells if you need a gluten-free option. This way, everyone can enjoy the dish.
Serving Suggestions
– Pairing with sides: Serve your stuffed shells with a fresh salad or warm garlic bread. A simple green salad adds a nice crunch. Garlic bread is a great way to soak up extra sauce.
– Best wine or beverage pairings: A light red wine like Pinot Noir goes well with these shells. If you prefer non-alcoholic drinks, try sparkling water with lemon. This helps balance the rich flavors.
Pro Tips
- Use Fresh Spinach: For the best flavor and texture, opt for fresh spinach instead of frozen. It enhances the dish’s taste and appearance.
- Customize Your Cheese: Feel free to mix in other cheeses like feta or goat cheese for added depth and a unique flavor profile.
- Prevent Sticking: Lightly grease your baking dish before adding the marinara sauce to prevent the shells from sticking.
- Let It Rest: Allow the stuffed shells to rest for a few minutes after baking. This helps the filling set and makes serving easier.

Variations
Meat Lovers Spinach Ricotta Stuffed Shells
You can easily turn your Spinach Ricotta Stuffed Shells into a meat lover’s dream. Simply add ground beef or sausage to the filling. Cook the meat first until it is brown. Mix it into the ricotta, spinach, and cheese mixture for a heartier dish. Adjust the cooking time by adding a few extra minutes in the oven. This helps the meat blend with the flavors.
Vegan Spinach Stuffed Shells
For a vegan twist, focus on dairy-free substitutions. Use vegan ricotta or blended tofu instead of traditional ricotta. You can also use nutritional yeast for a cheesy flavor. Instead of egg, use a flaxseed meal mixture to hold the filling together. Try adding other veggies like mushrooms or sun-dried tomatoes to the filling for more depth.
Gluten-Free Options
If you need gluten-free options, choose gluten-free pasta shells. Many brands offer great alternatives that taste similar to regular pasta. Check the labels for safe ingredients. You can also adapt other ingredients, like sauces, to ensure they are gluten-free. This way, everyone can enjoy the stuffed shells without worry.
Storage Info
Refrigeration Guidelines
To store leftovers, place them in an airtight container. Make sure to cool them first. They stay fresh for about 3 to 5 days in the fridge. Always check for any signs of spoilage before eating.
Freezing Instructions
The best way to freeze stuffed shells is to do it before baking. Place them in a single layer on a baking sheet. Once frozen, transfer them to a freezer bag. They can last up to 3 months in the freezer. To thaw, move them to the fridge overnight before cooking.
Reheating Methods
You can reheat spinach ricotta stuffed shells in the oven or microwave. The oven gives a better texture. Heat them at 350°F (175°C) for about 20 minutes. In the microwave, heat in 1-minute bursts until warm. Cover with a damp paper towel to keep moisture. This helps maintain flavor and prevents drying out.
FAQs
How long do Spinach Ricotta Stuffed Shells take to prepare?
The total time to make Spinach Ricotta Stuffed Shells is about 55 minutes.
– Prep time is around 20 minutes.
– Cooking takes about 35 minutes.
Can I make Spinach Ricotta Stuffed Shells ahead of time?
Yes, you can prepare these shells in advance.
– Stuff the shells and place them in a baking dish.
– Cover tightly and refrigerate for up to 24 hours.
– Bake them straight from the fridge, adding a few extra minutes to the cooking time.
Are there any vegetarian alternatives for this dish?
This dish is already vegetarian-friendly.
– You can replace cheeses with dairy-free options.
– Consider adding mushrooms or zucchini for extra texture.
What can I serve with Spinach Ricotta Stuffed Shells?
These stuffed shells pair well with various side dishes.
– A fresh green salad is a great option.
– Garlic bread adds a nice touch.
– Serve with a light tomato soup for a cozy meal.
Spinach ricotta stuffed shells are tasty and easy to make. We covered the main ingredients, step-by-step instructions, and tips to perfect your dish. Remember to adjust for dietary needs or preferences. Don’t forget to store leftovers properly and enjoy them later. This dish is great for sharing with family and friends. With these tools and tricks, you can make a meal that pleases everyone. Happy cooking and enjoy your delicious shell

Cheesy Spinach Delight Stuffed Shells
Ingredients Â
- 12 large jumbo pasta shells
- 1 cup ricotta cheese
- 1 cup fresh spinach, finely chopped
- 1 cup mozzarella cheese, shredded
- 0.5 cup grated Parmesan cheese
- 1 large egg, lightly beaten
- 2 cloves garlic, minced
- 1 teaspoon dried oregano
- 0.5 teaspoon salt
- 0.25 teaspoon black pepper
- 2 cups marinara sauce
- to taste fresh basil leaves for garnish
InstructionsÂ
- In a large pot, bring salted water to a rolling boil. Carefully add the jumbo pasta shells and cook according to the package instructions until al dente. Once cooked, drain the shells and set them aside to cool slightly to handle.
- In a large mixing bowl, thoroughly combine the ricotta cheese, chopped spinach, half of the shredded mozzarella, grated Parmesan, beaten egg, minced garlic, dried oregano, salt, and black pepper. Mix until the ingredients are evenly incorporated and creamy.
- Preheat your oven to 375°F (190°C). Using a teaspoon or a piping bag, carefully fill each cooled pasta shell with the rich ricotta-spinach mixture, pressing gently to pack the filling in.
- Spread 1 cup of marinara sauce evenly over the bottom of a 9x13 inch baking dish. Arrange the stuffed shells in a single layer on top of the sauce. Pour the remaining marinara sauce over the shells, ensuring they are well coated. Sprinkle the top with the reserved mozzarella cheese.
- Cover the baking dish tightly with aluminum foil and place it in the preheated oven. Bake for 25 minutes, then remove the foil and let it bake uncovered for an additional 10-15 minutes, or until the cheese is beautifully bubbly and golden.
- Once baked, allow the dish to rest for a few minutes before serving. Garnish generously with fresh basil leaves for an aromatic touch and vibrant color.


![- 12 oz pasta (penne, fusilli, or preferred variety) - 2 large red bell peppers - 1 cup raw cashews (soaked in water) - 1 tablespoon olive oil - 3 cloves garlic, minced - 1 cup vegetable broth - 1 tablespoon nutritional yeast - 1 tablespoon freshly squeezed lemon juice - Salt and pepper to taste - Fresh basil leaves for garnish For this vegan creamy roasted red pepper pasta, I love using red bell peppers. They bring sweetness and a lovely color. Start with 12 ounces of your favorite pasta. I prefer penne or fusilli, but any shape you like works. Next, grab two large red bell peppers. These will be roasted to bring out their flavor. Don’t forget the cashews! Use one cup of raw cashews. Soak them in water for at least two hours. This step makes them creamy when blended. Now, let’s talk about the extra ingredients. You’ll need one tablespoon of olive oil for cooking. Garlic adds great taste, so use three cloves, minced. For a nice base, use one cup of vegetable broth. We also need one tablespoon of nutritional yeast for a cheesy flavor. Add one tablespoon of freshly squeezed lemon juice to brighten the sauce. Season with salt and pepper to taste. Finally, fresh basil leaves will make a beautiful garnish. This recipe is easy to follow and packed with flavor. Check out the Full Recipe for more details and instructions! - Preheat your oven to 425°F (220°C). - Slice the red bell peppers in half and remove seeds and stems. - Place them cut side down on a baking sheet. - Roast for 20-25 minutes until the skins blister and char. - Let the peppers cool for a few minutes. - Peel off the skins and chop the peppers into small pieces. - In a large pot, bring salted water to a boil. - Add your pasta and cook until al dente, following package instructions. - Before draining, reserve about 1 cup of the pasta water. - Drain the pasta and set it aside for later. - In a blender, add the roasted peppers, soaked cashews, and garlic. - Pour in the vegetable broth, nutritional yeast, and lemon juice. - Season with a pinch of salt and pepper. - Blend until smooth and creamy, scraping the sides if needed. - Adjust the sauce consistency with reserved pasta water as desired. - Add the cooked pasta back into the pot. - Pour the creamy sauce over the pasta and mix well. - Gently heat the mixture on low for 2-3 minutes. - Taste and adjust seasoning with more salt and pepper if needed. This simple guide helps you create a delightful vegan creamy roasted red pepper pasta that bursts with flavor. For the complete recipe, check the [Full Recipe]. Enjoy cooking! To achieve perfect pasta texture, follow these simple steps. Always cook your pasta in salted water. This enhances flavor and ensures the pasta cooks evenly. Aim for al dente, which means firm to the bite. It should not be mushy. Reserve a cup of pasta water before draining. This water helps to adjust your sauce later. For roasting peppers effectively, preheat your oven to 425°F. Slice the red bell peppers in half and remove the seeds. Place them cut side down on a baking sheet. Roast them for about 20 to 25 minutes. You want the skins to blister and char lightly. This caramelizes their sugars and boosts sweetness. Adjusting seasoning is key for a balanced dish. Start with a pinch of salt and pepper, then taste your sauce. If it needs more flavor, add more salt or lemon juice. For creaminess, you can also add a splash of vegetable broth. Using fresh or dried herbs can elevate your dish. Fresh basil adds brightness. Dried oregano or thyme brings depth. Add these herbs during the blending process for a more integrated flavor. Garnishing can transform your dish. Fresh basil leaves add a pop of color and freshness. Sprinkle some nutritional yeast on top for a cheesy flavor. Crushed red pepper flakes can add a nice kick. For visual appeal, plate your pasta with care. Swirl the noodles for a nice shape. You can also arrange extra basil leaves artfully around the dish. Serve your Vegan Creamy Roasted Red Pepper Pasta hot for the best experience. Enjoy your meal! For the full recipe, check out the details above. {{image_4}} For the sauce base, you can swap the cashews with other nuts. Almonds or macadamia nuts work well. If you want a nut-free option, try using sunflower seeds. They blend into a creamy texture too. If you need gluten-free pasta, use brown rice pasta or chickpea pasta. Both these options taste great and keep the dish healthy. They also add a unique flavor to your pasta. You can make this dish even heartier by adding proteins. Chickpeas or lentils are great choices. They cook quickly and blend well with the sauce. Just stir them in after mixing the pasta with the sauce. If you prefer something meatier, try vegan sausage or tofu. Cook them separately, then mix in with the pasta. This adds a nice texture and extra flavor. This pasta pairs well with side salads or crusty bread. A simple green salad adds freshness and crunch. Garlic bread is a great choice to soak up the creamy sauce. For meal prep, store the pasta in airtight containers. You can make it ahead and reheat it for quick lunches. Just warm it gently on the stove or in the microwave. This dish stays delicious for days! For the full recipe, check out the complete guide. To store leftovers, let the pasta cool down first. Place it in an airtight container. This keeps it fresh for up to four days. When you want to eat it again, take out the amount you need. For reheating, I recommend using the stove. Add a splash of water or vegetable broth. Heat it gently over low heat. Stir often to avoid burning. You can also use the microwave. Just cover it and heat in short bursts. Stir in between to heat evenly. For freezing, I suggest separating the sauce from the pasta. Store the sauce in a freezer-safe container. It will last up to three months in the freezer. You can freeze the pasta too, but it may change texture. If you freeze it, store it in a separate bag. When you're ready to use, thaw the sauce in the fridge overnight. Reheat on the stove, adding a splash of broth if needed. For frozen pasta, boil it for a few minutes until warm. This keeps your vegan creamy roasted red pepper pasta delightful and fresh! For the full recipe, check out the previous sections. Yes, you can use different types of pasta. Here are some suggestions: - Penne: This shape holds sauce well. - Fusilli: The spirals trap sauce nicely. - Spaghetti: Classic choice that works with creamy sauces. - Gluten-free options: Look for rice or chickpea pasta. Feel free to choose your favorite! To add heat, try these tips: - Red pepper flakes: Sprinkle them in the sauce for a kick. - Cayenne pepper: Add a pinch to the blended sauce. - Hot sauce: Mix in your favorite brand to taste. These options let you control the spice level. No, this recipe contains cashews. However, you can make it nut-free. Here are some alternatives: - Sunflower seeds: They blend smoothly and add creaminess. - Pumpkin seeds: A great nut-free option with a slightly different flavor. - Silken tofu: This gives a creamy texture without nuts. These substitutes work well and keep the dish tasty. To make it nut-free, simply substitute the cashews. Here’s how: 1. Choose a nut-free base: Use sunflower seeds or silken tofu. 2. Blend the new ingredient: Just like the cashews, blend them smooth. 3. Adjust seasoning: You may need to tweak the flavors to balance the change. This way, you can enjoy the dish without nuts. For the full recipe, check out the details above. This blog covers a tasty, creamy pasta dish using roasted peppers and cashews. You learned about the ingredients, step-by-step cooking, and tips for best results. Variations give you flexibility with proteins and flavors. Plus, I shared easy storage methods for leftovers. Remember, cooking can be fun and creative! Try different ingredients to make it your own. Enjoy making this flavorful recipe and make it a family favorite. Your kitchen adventures await!](https://joymealplan.com/wp-content/uploads/2025/07/982ba21e-a058-40ff-b3d3-28c410105247-768x768.webp)
