Get ready for a tasty treat with my Savory Sweet Chili Crockpot Meatballs! You’ll love making these easy meatballs packed with flavor. All you need are simple ingredients like ground beef, breadcrumbs, and sweet chili sauce. I’ll guide you step-by-step, so you can impress friends and family at your next gathering. Let’s dive into this delicious recipe that will have everyone coming back for seconds!
Why I Love This Recipe
- Easy Preparation: This recipe requires minimal prep time, making it perfect for busy weeknights or gatherings.
- Flavorful Sauce: The sweet chili sauce adds a deliciously tangy and sweet flavor that pairs perfectly with the meatballs.
- Versatile Dish: These meatballs can be served as an appetizer, main dish, or even added to a stir-fry for a quick meal.
- Slow Cooker Convenience: Cooking in the crockpot allows the flavors to meld beautifully while you go about your day.
Ingredients
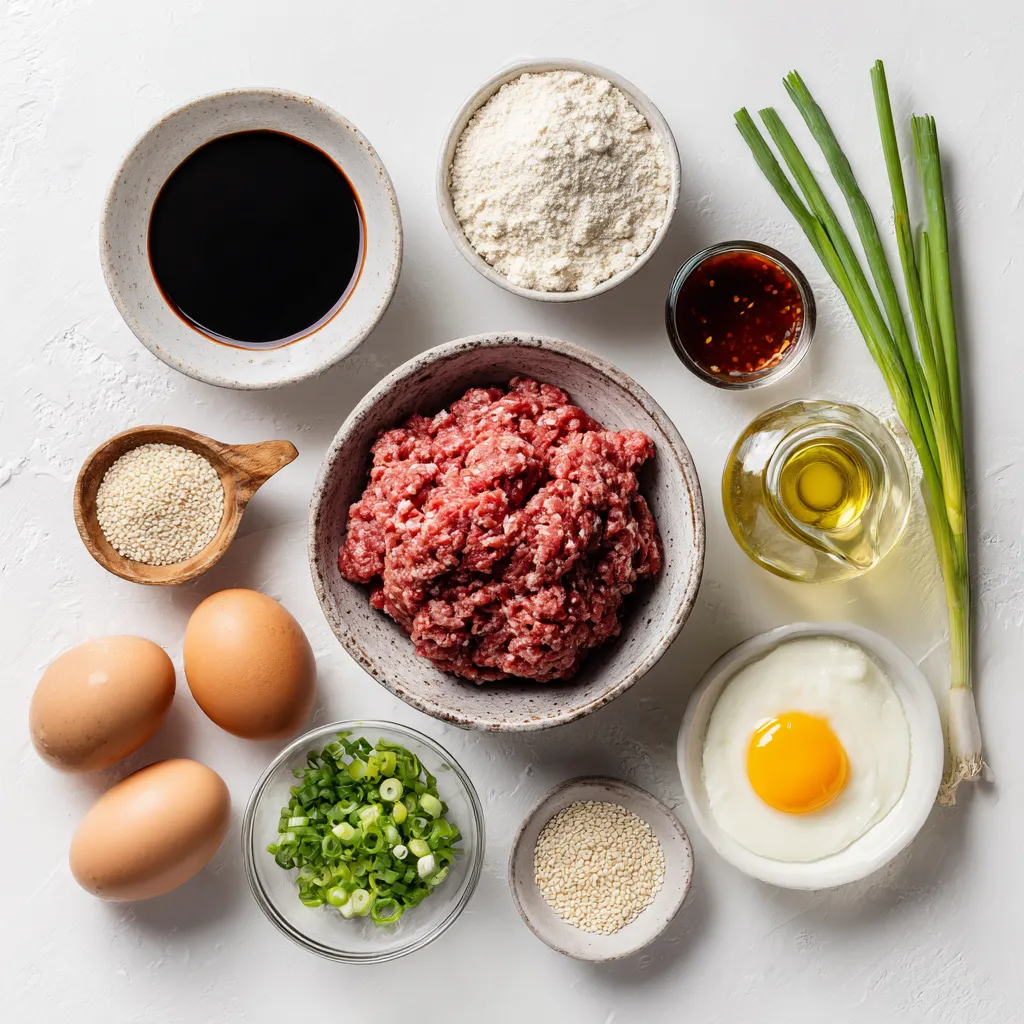
List of Ingredients
– Ground beef or turkey
– Breadcrumbs
– Egg
– Green onions
– Soy sauce
– Garlic powder
– Ginger powder
– Sweet chili sauce
– Rice vinegar
– Sesame oil
– Seasoning (salt and pepper)
– Garnish (sesame seeds)
Gathering the right ingredients is key to making great sweet chili crockpot meatballs. Start with 1 pound of ground beef or turkey. This choice gives you a juicy base. You can also use chicken if you like. Next, grab 1 cup of breadcrumbs. This adds texture and helps the meatballs hold their shape.
You will need 1 large egg to bind everything together. Chop 2 tablespoons of green onions for a fresh taste. Soy sauce adds umami; use 1 tablespoon. For flavor depth, mix in 1 teaspoon each of garlic and ginger powder.
The star of this dish is the sweet chili sauce. Use 1 cup for that sweet and spicy kick. Add 1 tablespoon of rice vinegar for a tangy touch. Drizzle in 1 teaspoon of sesame oil for a nutty flavor. Don’t forget to season with salt and pepper to taste.
Finally, for the finishing touch, have sesame seeds on hand to sprinkle on top. This adds a nice crunch and visual appeal. With these ingredients, you’re set to make delicious meatballs that will wow everyone.
Step-by-Step Instructions
Preparing the Meatball Mixture
1. Start by placing the ground beef or turkey in a large bowl.
2. Add the breadcrumbs, egg, green onions, soy sauce, garlic powder, ginger powder, salt, and pepper.
3. Mix the ingredients with your hands or a spoon until well blended.
4. Shape the mixture into small meatballs, about 1 inch in size.
5. Place the meatballs on a baking tray, leaving space between each one.
Making the Sweet Chili Sauce
1. In another bowl, whisk together the sweet chili sauce, rice vinegar, and sesame oil.
2. Make sure the sauce is smooth and well mixed.
3. Once ready, set it aside to coat the meatballs later.
Cooking the Meatballs in the Crockpot
1. Place the meatballs into the crockpot in a single layer.
2. Pour the sweet chili sauce mixture over the meatballs. Ensure each meatball gets coated.
3. Cover the crockpot with the lid. Set it to cook on low for 6-8 hours or on high for 3-4 hours.
4. For best results, check that the meatballs are cooked through and tender.
5. After cooking, stir the meatballs gently in the sauce before serving.
Tips & Tricks
Achieving Perfect Meatballs
To make great meatballs, start with your mixture. Mix the ground beef or turkey, breadcrumbs, egg, and seasonings well. You want a sticky yet firm texture. If it feels too dry, add a splash of water or another egg. Aim for 1-inch meatballs. This size cooks evenly and stays juicy.
Enhancing Flavor Profiles
To boost flavors, consider adding a pinch of red pepper flakes or chopped cilantro. You can also marinate the meatball mix for a few hours. This helps the flavors blend. Try adding fresh herbs like basil or parsley. They bring extra freshness to the dish.
Serving Suggestions
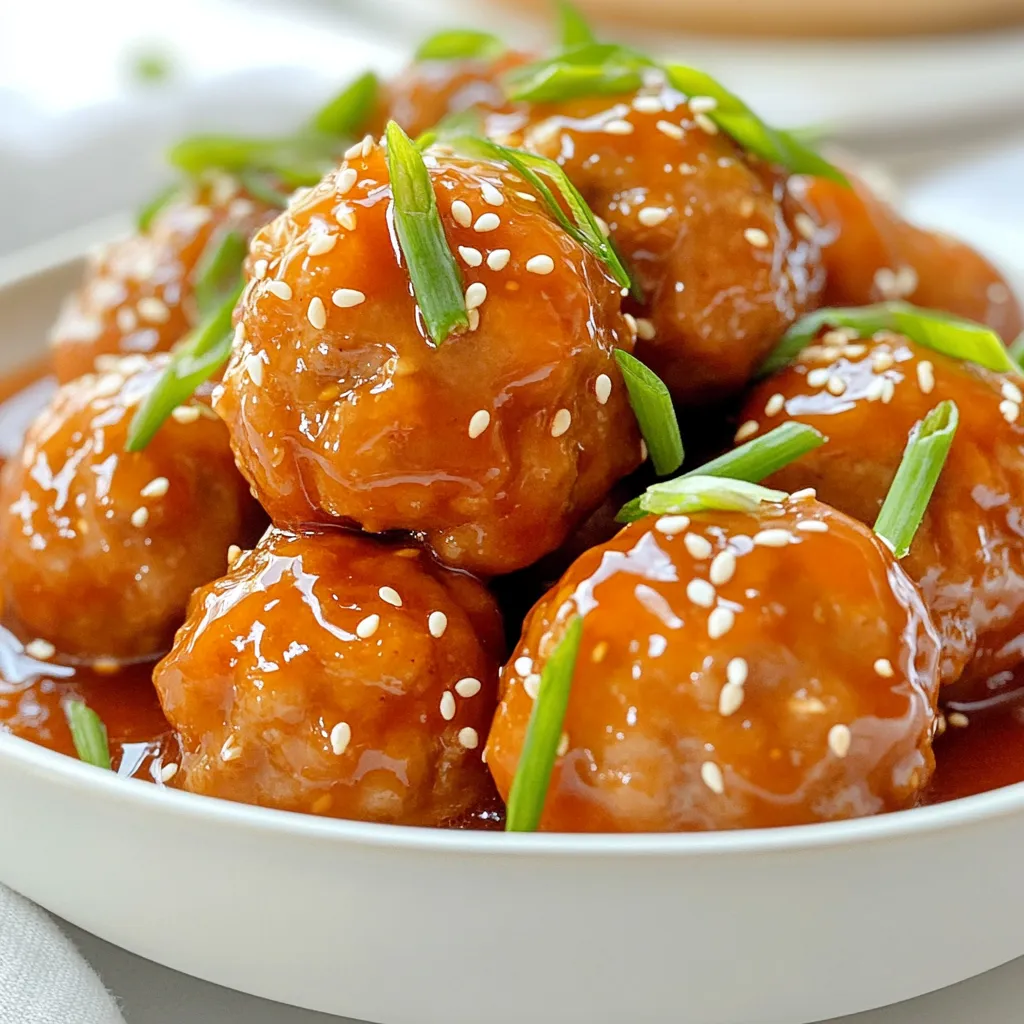
For a beautiful presentation, serve meatballs in a shallow bowl. Drizzle extra sweet chili sauce on top. Sprinkle sesame seeds for crunch. Pair with steamed rice or noodles for a full meal. The sweet and spicy sauce complements the carbs well. Add a side of stir-fried veggies for color and nutrition.
Pro Tips
- Use Fresh Ingredients: Fresh ground meat and produce enhance the flavor and texture of your meatballs, making them more delicious and satisfying.
- Don’t Overmix: When combining the meatball mixture, be careful not to overmix. This helps keep the meatballs tender and prevents them from becoming tough.
- Customize Your Sauce: Feel free to adjust the sweetness and heat level of the sweet chili sauce by adding more vinegar or hot sauce according to your taste preferences.
- Garnish for Presentation: A sprinkle of sesame seeds and chopped green onions not only adds color but also provides an extra crunch and flavor boost to your dish.
Variations
Alternative Proteins
You can switch up the protein for these meatballs. Ground chicken or pork works well. Both options keep the dish juicy and tender. If you prefer a meat-free meal, try using lentils or chickpeas. Just mash them well and mix in the other ingredients. This way, you can enjoy a tasty vegetarian treat.
Sauce Modifications
Want to make your own sauce? Mix equal parts of honey and soy sauce for a quick homemade sweet chili. If you like heat, add sriracha for a spicy kick. This will turn your meatballs into a fiery delight.
Adding Vegetables
Adding finely diced veggies boosts the nutrition in your meatballs. Try bell peppers, carrots, or spinach. These not only add color but also enhance the flavor. If you’re health-conscious, consider using oats instead of breadcrumbs. This keeps the meatballs moist while cutting down on carbs.
Storage Info
Refrigeration Guidelines
Store your leftover meatballs in an airtight container. They will stay fresh for up to four days in the fridge. When you are ready to eat, simply reheat them in the microwave or on the stove. Heat them gently to keep them moist and flavorful.
Freezing Meatballs
You can freeze meatballs before or after cooking. For pre-cooked meatballs, place them in a single layer on a tray until they freeze. Once frozen, place them in freezer bags. For cooked meatballs, let them cool first, then freeze in containers. When you’re ready to eat, thaw them overnight in the fridge. Reheat gently in the microwave or on the stove.
Shelf Life
In the fridge, store meatballs for up to four days. Check for any off smells or changes in color as signs of spoilage. If you see mold, it’s best to discard them. Proper storage keeps your sweet chili crockpot meatballs safe and tasty!
FAQs
Can I make these meatballs ahead of time?
Yes, you can make these meatballs ahead of time! This recipe is great for meal prep. You can mix your meatball ingredients and shape them into balls. Then, store them in the fridge for up to 24 hours before cooking. You can also freeze them. Place the raw meatballs in a single layer on a baking sheet. Freeze until solid, then transfer them to a freezer bag. They will last for about three months. When you are ready to cook, you can go straight to the crockpot from frozen. Just add an extra hour to the cooking time.
What do I do if my meatball mixture is too dry?
If your meatball mixture is too dry, don’t worry! You can fix this easily. First, add a little more egg or some milk to the mix. This will help bind the meatballs and add moisture. If you prefer, you can also add a splash of soy sauce. This will add flavor and help with the texture. Mix well after adding any extra ingredients. You want a moist but firm mixture that holds its shape when formed into balls.
Can I cook these on the stove instead of a crockpot?
Yes, you can cook these meatballs on the stove! If you want to use the stovetop, heat a large skillet over medium heat. Add a little oil to the pan. Once hot, add the meatballs in batches. Cook for about 10-12 minutes, turning occasionally. Make sure they are brown on all sides and cooked through. You can then add the sweet chili sauce to the skillet. Let it simmer for a few minutes, coating the meatballs in the sauce. This method is quicker and great if you don’t have a crockpot!
This post covered how to make tasty meatballs. We discussed ingredients and steps to cook them. I shared tips for perfect meatballs and ways to make them unique. You can even store leftovers for later meals.
These meatballs are easy, fun, and full of flavor. Try my ideas to make your dish better. Enjoy each bite and share with friends. Happy cookin


