Sesame Crusted Ahi Tuna Savory Dinner Delight

Craving a flavorful dinner that impresses without the fuss? Enter sesame crusted ahi tuna! This easy-to-make dish combines fresh tuna and a crunchy sesame coating, creating a delightful meal that dazzles your taste buds. With simple ingredients and a few key steps, you’ll be on your way to a savory dinner delight that’s perfect for any occasion. Let’s dive into this delicious recipe!
Why I Love This Recipe
- Fresh Ingredients: This recipe uses fresh ahi tuna and ripe avocado, ensuring a deliciously vibrant dish that bursts with flavor.
- Quick and Easy: With a total prep and cook time of just 15 minutes, this dish is perfect for a quick yet impressive meal.
- Texture Contrast: The crunchy sesame crust paired with the tender tuna creates a delightful contrast that enhances the eating experience.
- Visual Appeal: The colorful presentation, featuring greens and avocados, makes this dish not only tasty but also a feast for the eyes.
Ingredients
Main Ingredients
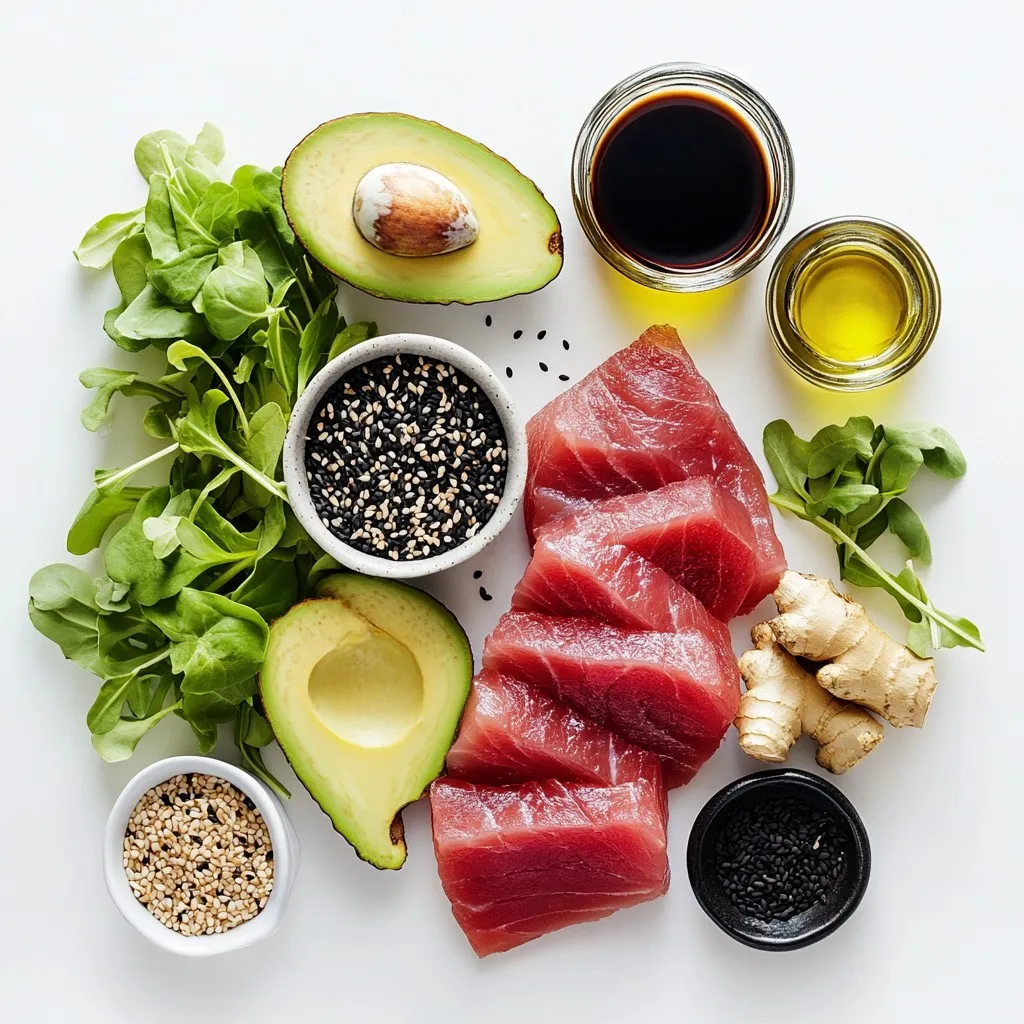
– 2 ahi tuna steaks (approximately 6 oz each)
– 2 tablespoons black sesame seeds
– 2 tablespoons white sesame seeds
– 1 tablespoon soy sauce
– 1 tablespoon olive oil (plus extra for searing)
– 1 teaspoon fresh ginger, finely grated
– 1 teaspoon garlic, finely minced
– Salt and freshly ground black pepper, to taste
Accompaniments
– 1 ripe avocado, sliced into thin wedges
– A handful of mixed greens (for serving)
– Wasabi and pickled ginger (for garnish)
Step-by-Step Instructions
Preparation Steps
1. First, combine black and white sesame seeds in a small bowl. Mix well and set aside.
2. Next, whisk together soy sauce, olive oil, grated ginger, minced garlic, salt, and black pepper in another bowl.
Cooking Instructions
1. Pat the ahi tuna steaks dry with a paper towel. This step helps achieve a great sear.
2. Brush both sides of the steaks with the soy sauce mixture.
3. Press each side of the tuna steaks into the sesame seed mix. Make sure they are coated well.
4. Heat a non-stick skillet over medium-high heat. Add a little olive oil and swirl it around.
5. Place the tuna steaks in the skillet. Sear for 1-2 minutes on each side for a rare finish.
6. After searing, remove the tuna from the skillet. Let it rest for 2 minutes.
7. Slice the tuna into thin strips across the grain for tenderness.
Presentation Instructions
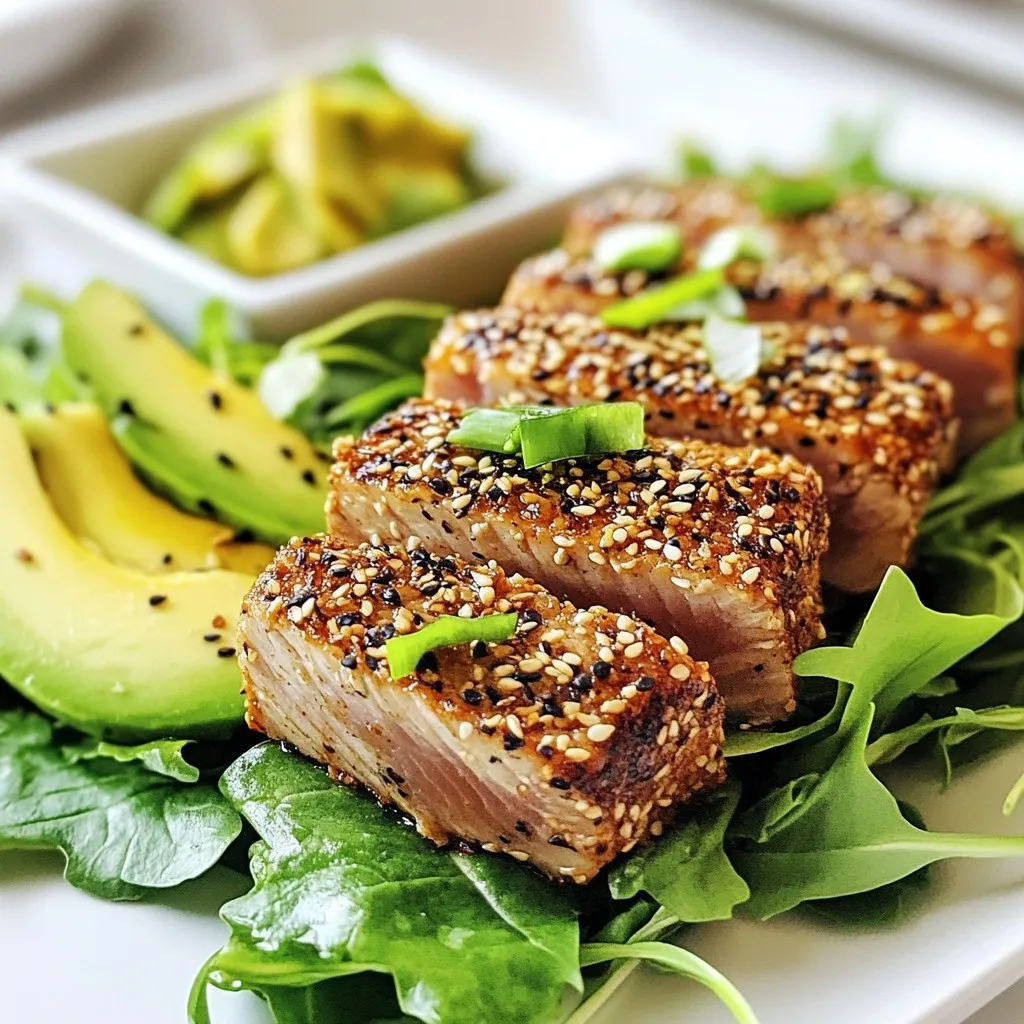
1. Create a bed of mixed greens on each plate.
2. Arrange the sliced avocado around the greens.
3. Lay the sliced tuna over the top for a beautiful finish.
4. Add wasabi and pickled ginger on the side for extra flavor.
This dish not only tastes amazing, but it looks stunning. Enjoy the bright colors and fresh flavors!

Tips & Tricks
Cooking Tips
– Achieving the perfect sear: Start with a hot skillet. Heat it over medium-high heat before adding olive oil. This helps the tuna get that nice brown crust. Pat the tuna dry with a paper towel to remove moisture. This step is key to a great sear.
– Preventing overcooking the tuna: Sear the tuna steaks for just 1-2 minutes on each side for a rare finish. If you want it more cooked, add just a little extra time. Be careful not to leave it too long; otherwise, it will become dry and tough.
Serving Suggestions
– Best side dishes to pair with sesame crusted ahi tuna: Serve this dish with a fresh salad or steamed veggies. The bright flavors of mixed greens and ripe avocado balance the strong taste of the tuna. You can also add rice or quinoa for a more filling meal.
– Creative plating ideas for visual appeal: To make your dish pop, arrange the sliced tuna over a bed of greens. Place the avocado wedges around the tuna. Drizzle some of the leftover soy sauce mixture over the top. Sprinkle extra sesame seeds on the plate for a touch of elegance. This presentation makes the dish look as good as it tastes!
Nutritional Information
Macro Nutrients
Each serving of sesame crusted ahi tuna provides a healthy balance of macronutrients. You get about 35 grams of protein, 20 grams of fat, and 2 grams of carbohydrates. The high protein content supports muscle growth and repair. The fats mainly come from the tuna and olive oil, providing healthy omega-3 fatty acids.
Health Benefits
Ahi tuna is rich in protein and low in calories. It contains essential vitamins and minerals, like vitamin D and selenium. Eating ahi tuna can help boost your heart health due to its omega-3 content.
Sesame seeds offer great health benefits too. They are packed with fiber, protein, and healthy fats. These tiny seeds can help lower cholesterol and improve heart health.
Avocado is another superstar in this dish. It provides healthy fats and fiber. Avocado is great for heart health and can help keep you full longer. The combination of ahi tuna, sesame seeds, and avocado makes this dish not just tasty but also very nutritious!
Pro Tips
- Use Fresh Ingredients: Fresh ahi tuna and ripe avocados significantly enhance the flavor and texture of the dish. Always opt for high-quality, sushi-grade tuna.
- Perfecting the Sear: Ensure your skillet is hot enough before adding the tuna. A good sear locks in moisture and creates a delicious crust.
- Cutting Technique: Slice the tuna against the grain to ensure each piece is tender and easy to chew. This enhances the overall eating experience.
- Garnish Wisely: Adding wasabi and pickled ginger not only elevates the dish’s flavor profile but also adds an attractive color contrast to the plate.

Variations
Flavor Enhancements
You can easily change up the flavors in your sesame crusted ahi tuna. Try adding spices like cayenne or paprika for a kick. Fresh herbs like cilantro or basil can add a bright touch. You can also experiment with citrus zest, like lemon or lime, for a refreshing zing.
Consider different cooking methods too. Grilling the tuna gives it a smoky flavor that works well with sesame. Just brush the tuna with the soy sauce mixture and then grill it for about 1-2 minutes on each side. This will add a nice char and enhance the taste.
Ingredient Substitutions
If you can’t find ahi tuna, don’t worry. You can use salmon or swordfish as great alternatives. Both have a rich flavor, and they work well with sesame seeds.
For a vegan option, try using firm tofu. Press the tofu to remove excess water, then coat it in the sesame seed mixture. You can also enhance tofu’s flavor by marinating it in soy sauce. This gives you a similar taste without using fish.
Storage Info
Storing Leftovers
To keep sesame crusted ahi tuna fresh, store it in an airtight container. Place it in the fridge right after serving. Use it within two days for the best taste. If you want to store it longer, freeze the tuna. Wrap it tightly in plastic wrap, then place it in a freezer bag. Frozen ahi tuna can last up to three months. Remember to label the bag with the date.
Reheating Tips
Reheat your tuna carefully to keep its texture. The best method is using a skillet. Warm it over low heat for a few minutes. This helps maintain the crispiness of the sesame crust. Avoid using the microwave, as it can make the tuna chewy and dry. If you prefer a quick method, place it in a toaster oven on low heat. This way, you can enjoy the flavors just as you did when it was freshly cooked.
FAQs
Common Questions
How do I know when ahi tuna is cooked to perfection?
Ahi tuna should be seared for 1-2 minutes on each side for a rare finish. The center should stay pink and soft. If you prefer it more cooked, leave it on a bit longer. However, avoid overcooking so it remains tender.
Can I use frozen ahi tuna steaks?
Yes, you can use frozen ahi tuna steaks. Just thaw them in the fridge overnight before cooking. This helps maintain texture and flavor. Make sure to pat them dry before searing for the best results.
What should I serve with sesame crusted ahi tuna?
I recommend serving it with fresh avocado and mixed greens. The creaminess of the avocado complements the tuna’s flavor. You can also add wasabi and pickled ginger for an extra kick.
Cooking Techniques
What is the best way to sear ahi tuna?
Heat a non-stick skillet over medium-high heat. Use olive oil to coat the pan. Sear the tuna steaks for about 1-2 minutes per side. This gives a nice crust while keeping the inside tender.
Can I make the sesame crust ahead of time?
Yes, you can mix the sesame seeds ahead of time. Store them in an airtight container until you are ready to use them. This saves time during your cooking process and keeps the seeds fresh.
You’ve learned how to make delicious sesame crusted ahi tuna with easy steps. We covered the main ingredients and tips for perfect cooking. I shared fun ways to serve and store your dish. Don’t forget the healthy benefits of the ingredients. Whether you try new spices or substitute ingredients, there are many ways to enjoy this meal. Now, it’s time to get cooking! Enjoy your tasty dish and impress your family and friend

Sesame Crusted Ahi Tuna
Ingredients
- 2 steaks ahi tuna
- 2 tablespoons black sesame seeds
- 2 tablespoons white sesame seeds
- 1 tablespoon soy sauce
- 1 tablespoon olive oil
- 1 teaspoon fresh ginger, finely grated
- 1 teaspoon garlic, finely minced
- to taste salt and freshly ground black pepper
- 1 whole ripe avocado, sliced into thin wedges
- a handful mixed greens
- to taste wasabi and pickled ginger
Instructions
- In a small mixing bowl, combine the black and white sesame seeds thoroughly. Set this blend aside for later use.
- In a separate bowl, whisk together the soy sauce, olive oil, grated ginger, minced garlic, and a pinch of salt and freshly ground black pepper until well combined.
- Using a paper towel, gently pat the ahi tuna steaks dry to remove excess moisture, ensuring a good sear. Then, brush both sides of the steaks evenly with the prepared soy sauce mixture.
- Carefully press each side of the tuna steaks into the sesame seed mixture, making sure they are completely and evenly coated for maximum flavor and crunch.
- Heat a non-stick skillet over medium-high heat. Once it’s hot, add a drizzle of olive oil, swirling it to coat the pan evenly.
- Place the tuna steaks in the skillet and sear for about 1-2 minutes on each side for a rare finish. If you prefer your tuna more cooked, you can leave it on for a little longer, but take care not to overcook to maintain a firm yet tender exterior.
- Once seared to your liking, remove the tuna from the skillet and allow it to rest for about 2 minutes before slicing it into thin strips across the grain for tenderness.
- To serve, create a bed of mixed greens on each plate. Arrange the sliced avocado around the greens, then elegantly lay the sliced tuna over the top for a visually appealing finish.
- Garnish with wasabi and pickled ginger presented on the side for an added kick and flavor enhancement.


![To make oven-baked chicken fajitas, you will need: - 1 lb boneless, skinless chicken breasts, sliced into thin strips - 1 red bell pepper, sliced into thin strips - 1 yellow bell pepper, sliced into thin strips - 1 medium onion, sliced into thin wedges - 3 tablespoons extra virgin olive oil - 2 teaspoons chili powder - 1 teaspoon ground cumin - 1 teaspoon smoked paprika - 1 teaspoon garlic powder - 1 teaspoon onion powder - Salt and freshly ground black pepper to taste - 8 small flour or corn tortillas These ingredients come together to create a burst of flavors. The chicken brings protein, while the peppers and onion add color and crunch. Seasonings like chili powder and cumin enhance the taste, making every bite exciting. You can elevate your fajitas with these optional toppings: - Sour cream - Guacamole - Freshly chopped cilantro - Lime wedges These toppings add creaminess, freshness, and zest. Feel free to mix and match based on your preference. Here are the tools you need to prepare your fajitas: - Large baking sheet - Parchment paper - Mixing bowl - Spatula or your hands for mixing - Knife and cutting board Using these tools makes the cooking process smooth. The baking sheet helps in even cooking, while the mixing bowl keeps things clean. If you follow the [Full Recipe], you will have a delicious meal ready in no time! To start, gather your ingredients. You will need: - 1 lb boneless, skinless chicken breasts, sliced into thin strips - 1 red bell pepper, sliced into thin strips - 1 yellow bell pepper, sliced into thin strips - 1 medium onion, sliced into thin wedges - 3 tablespoons extra virgin olive oil - 2 teaspoons chili powder - 1 teaspoon ground cumin - 1 teaspoon smoked paprika - 1 teaspoon garlic powder - 1 teaspoon onion powder - Salt and freshly ground black pepper to taste - 8 small flour or corn tortillas - Optional toppings: sour cream, guacamole, freshly chopped cilantro, lime wedges Begin by preheating your oven to 400°F (200°C). Line a large baking sheet with parchment paper. This helps with easy cleanup. In a big mixing bowl, combine all the sliced chicken and veggies. Drizzle the olive oil over them. Add the spices: chili powder, cumin, smoked paprika, garlic powder, onion powder, salt, and pepper. Now, mix everything well. Use your hands or a spatula to toss the chicken and veggies. Make sure every piece gets coated in oil and spices. This step is key for flavor. Spread the chicken and veggies evenly on the prepared baking sheet. Ensure there’s space between pieces for even cooking. Bake in the oven for 25 to 30 minutes. Halfway through, stir the mixture. Check that the chicken reaches an internal temperature of 165°F (75°C). The veggies should be tender and slightly caramelized. After baking, let the mixture rest for a few minutes. While it rests, warm your tortillas. You can microwave them wrapped in a damp paper towel or heat them in a skillet. To serve, place a generous scoop of the chicken and veggie mix in each tortilla. Add sour cream, guacamole, and cilantro. A squeeze of lime juice adds a nice touch! Enjoy this easy yet delicious meal. For the complete process, refer to the Full Recipe. To get juicy chicken, use thin strips. Thin pieces cook faster and stay tender. Always check the internal temperature. It should reach 165°F (75°C) for safety. If you have time, marinate the chicken in spices and olive oil for a few hours. This adds flavor and keeps it moist. Cut the vegetables into uniform sizes. This helps them cook evenly. Use a large baking sheet. Spread the veggies out to avoid steaming. Stir them halfway through baking. This promotes even browning and caramelization. Aim for a tender texture with some charred edges for extra flavor. Warm the tortillas before serving. You can use a microwave or a skillet. For the microwave, wrap them in a damp paper towel. Heat them in short bursts for a soft finish. If using a skillet, heat on medium until they become pliable. This makes them easier to fold and fill. For the full recipe, check the section earlier in the article. {{image_4}} You can switch chicken for shrimp or tofu. Shrimp cooks fast and adds a sweet taste. Just adjust the cooking time to around 15-20 minutes. Tofu is great for a plant-based meal. Use firm tofu for the best texture. Press it to remove excess water. Then, cut it into strips and season like chicken. Feel free to mix in other veggies. You can add zucchini, mushrooms, or even corn. Each veggie brings its own flavor and texture. Try using fresh jalapeños for a spicy kick. You can also use frozen veggies if fresh ones aren’t available. Just ensure they are thawed and well-drained before mixing. Get creative with your spices! You can try taco seasoning for a different taste. Or, mix in some lime zest for brightness. If you like heat, add cayenne pepper or chipotle powder. Experimenting with these flavors makes each meal unique. Don't be afraid to try unusual combinations. This is your chance to explore new tastes. Check out the Full Recipe for more ways to spice things up! After enjoying your oven-baked chicken fajitas, you may have some leftovers. To store them well, let the fajitas cool down to room temperature. Then, place them in an airtight container. This keeps the flavors fresh and prevents sogginess. You can store them in the fridge for up to three days. If you want to keep them longer, consider freezing. When you are ready to eat your leftovers, reheating them properly is key. For the best results, use an oven. Preheat your oven to 350°F (175°C). Spread the fajitas on a baking sheet and cover them with foil. Heat for about 10 to 15 minutes, or until warmed through. This method keeps the chicken juicy and the veggies crisp. You can also use a microwave, but this may make the tortillas soft. If you want to save your fajitas for later, freezing is easy. First, make sure they are completely cool. Then, place your fajitas in a freezer-safe bag or container. Remove as much air as possible before sealing. Label the bag with the date. You can freeze them for up to three months. When ready to enjoy, thaw the fajitas in the fridge overnight before reheating. This way, they taste just as good as when you first made them. For the full recipe, check out the earlier sections. To make your oven-baked chicken fajitas healthier, you can swap some ingredients. Use skinless chicken thighs instead of breast for more flavor. Add more veggies like zucchini or mushrooms for extra fiber. You can also replace olive oil with cooking spray to cut calories. Use whole grain tortillas rather than white flour ones. This change boosts fiber and nutrients. Finally, skip the sour cream or use a low-fat version. Yes, you can prepare fajitas ahead of time. Just season the chicken and veggies the night before. Store them in the fridge in a sealed container. This helps the flavors blend nicely. Bake them when you are ready to eat. If you want to save time, you can also cook the fajitas fully. Store the cooked fajitas in the fridge for up to three days. Reheat them in the oven for best results. The best tortillas for fajitas depend on your taste. Flour tortillas are soft and easy to fold. They are a classic choice. Corn tortillas have a nice flavor and are gluten-free. They can be a bit more fragile but pair well with fajitas. You can also try whole wheat tortillas for a healthier option. Choose the type you enjoy most, and your fajitas will shine. Check out the full recipe for more tips! In this article, we explored how to make delicious oven-baked chicken fajitas. We covered the main ingredients, cooking steps, and helpful tips for perfect results. You also learned about fun variations to customize your dish and smart ways to store leftovers. Now, you can enjoy tasty fajitas at home. Get creative with your toppings and enjoy sharing this meal with friends and family. The key is to have fun and make it your own. Happy cooking!](https://joymealplan.com/wp-content/uploads/2025/06/95795fac-5c59-44b7-b221-1c1b2c95851f-768x768.webp)


