Smothered Chicken and Rice Comforting Easy Dinner

Looking for an easy, comforting dinner? Smothered Chicken and Rice is just the meal you need! With tender chicken thighs, flavorful rice, and fresh veggies, it’s a dish that warms both the heart and stomach. Plus, you can customize it to suit your taste! Join me as I guide you through simple steps to create this delicious recipe that will quickly become a family favorite. Let’s dive in!
Why I Love This Recipe
- Comfort Food Classic: This dish combines tender chicken with creamy rice, making it a warm and satisfying meal that feels like a hug in a bowl.
- Flavor Explosion: The blend of smoked paprika, cayenne, and thyme infuses the chicken and rice with a depth of flavor that’s hard to resist.
- One-Pan Wonder: Cooking everything in one skillet means less cleanup, allowing you to enjoy your meal without the hassle of a messy kitchen.
- Customizable Delight: You can easily adjust the heat level or add your favorite vegetables to make this dish uniquely yours!
Ingredients
Main Ingredients
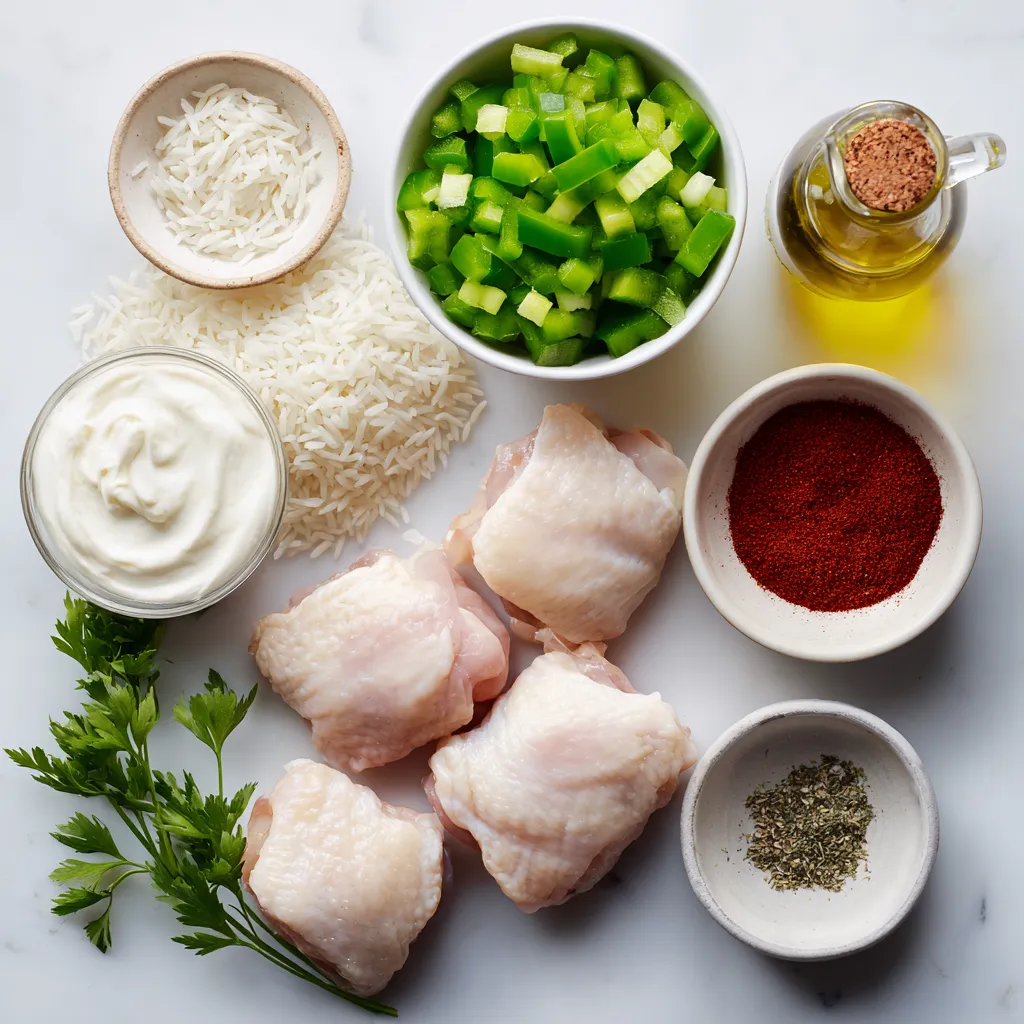
– 4 boneless, skinless chicken thighs
– 1 cup long-grain white rice
– 2 cups low-sodium chicken broth
– 1 medium onion, diced
– 3 cloves garlic, minced
– 1 green bell pepper, diced
– 1 teaspoon smoked paprika
– 1/2 teaspoon cayenne pepper (adjust according to heat preference)
– 1 teaspoon dried thyme
– 1 tablespoon olive oil
– Salt and freshly ground black pepper to taste
– 1 cup heavy cream
For this dish, I love using chicken thighs. They stay juicy and tender. Rice is the base, soaking up all the tasty broth. I prefer long-grain white rice for its fluffy texture. The onion and garlic give a strong flavor, while the green bell pepper adds a nice crunch.
The spices are key too. Smoked paprika gives a warm, smoky taste. Adjust the cayenne pepper to make it mild or spicy. Thyme adds a lovely earthy note. Don’t forget to season with salt and pepper to boost the taste.
Optional Garnishes
– Fresh parsley
– Lemon wedges
Garnishing with fresh parsley adds color and a hint of freshness. Lemon wedges are great for a zesty finish. You can squeeze some juice over the dish right before eating for a bright flavor. These simple touches elevate the whole meal.

Step-by-Step Instructions
Searing the Chicken
First, let’s prepare the chicken. Season the chicken thighs with salt, pepper, smoked paprika, and cayenne pepper. Heat olive oil in a skillet over medium-high heat. Once hot, lay the chicken thighs in the skillet. Cook for 5-7 minutes on each side. The chicken should be browned and cooked through. When done, remove the chicken and set it aside on a plate.
Sautéing the Vegetables
Next, we will sauté the vegetables. Use the drippings left in the skillet for flavor. Add diced onion and green bell pepper. Cook for about 5 minutes until the onion looks soft. Add minced garlic and stir for another minute. The garlic will add a lovely aroma to our dish.
Cooking the Rice
Now, it’s time to cook the rice. Stir in the long-grain white rice with the sautéed vegetables. Mix well to coat the rice. Cook for 2-3 minutes. This step will help the rice soak up the flavors from the oil and vegetables.
Combining Ingredients
Add the low-sodium chicken broth to the skillet. Stir gently to mix all the ingredients. Now, lay the seared chicken thighs back into the skillet on top of the rice. Let this mixture come to a gentle simmer.
Making it Creamy
After simmering, take the skillet off the heat. Slowly stir in the heavy cream. Make sure it mixes well with the rice and chicken. This will give the dish a rich and creamy texture. Taste and adjust the seasonings if needed.
Final Presentation
For the final touch, sprinkle chopped fresh parsley over the dish. This adds a nice pop of color and freshness. Serve the smothered chicken and rice in wide, shallow bowls. You can add a lemon wedge for some zest on the side. Enjoy this warm and comforting meal!
Tips & Tricks
Perfecting the Chicken
To make the chicken shine, start with boneless, skinless thighs. They stay juicy and cook well. Sear them in olive oil over medium-high heat. This gives a nice brown crust. Season the chicken with salt, pepper, smoked paprika, and cayenne pepper. Adjust the cayenne for your spice level. A good rule is to let the chicken rest after cooking. This helps keep it moist.
Rice Cooking Tips
For perfect rice, use long-grain white rice. Rinse it under cold water first. This removes extra starch and prevents stickiness. When cooking, use two cups of low-sodium chicken broth. This adds flavor. If your rice turns out too mushy, it may have too much liquid. Next time, reduce the broth slightly. If it’s too firm, add a bit more broth and cook longer.
Enhancing Flavor
To boost flavor, try adding herbs like thyme or bay leaves. These add depth to your dish. You could also sprinkle in garlic powder or onion powder for extra taste. Don’t forget to taste as you cook. This way, you can adjust seasonings. For a personal twist, add some sautéed mushrooms or spinach. This gives a nice texture and flavor boost.
Pro Tips
- Perfectly Cooked Rice: Rinse the rice under cold water before cooking to remove excess starch, which can make it gummy.
- Enhance the Flavor: For an extra flavor boost, consider adding a bay leaf or a sprig of fresh thyme to the broth while it simmers.
- Adjusting Creaminess: If you prefer a lighter version, substitute half of the heavy cream with unsweetened almond milk or low-fat milk.
- Garnishing Tips: Add a squeeze of fresh lemon juice over the dish just before serving for a bright, zesty finish.

Variations
Different Protein Options
You can switch out chicken for other meats. Pork chops or turkey work great. Just adjust the cooking times to ensure they cook through. If you want a lighter meal, try fish like salmon or tilapia. They add a nice flavor, too.
For a vegetarian option, use firm tofu or seitan. Both soak up flavors well. Cook them until golden brown to add texture. You can also use chickpeas for protein. They give a nice bite and pair well with the creamy sauce.
Flavor Profile Adjustments
To add heat, use different peppers. Jalapeños or serranos can bring the spice. Just chop them finely and mix them in during the vegetable stage. If you like milder heat, use bell peppers.
You can also change the herbs in the dish. Fresh thyme or rosemary can add depth. Basil gives a fresh kick, while oregano brings a warm flavor. Mix and match herbs to find your favorite blend.
Additional Ingredients
Seasonal vegetables can make your dish even better. In spring, add asparagus or peas. In fall, try butternut squash or sweet potatoes. They add color and nutrition.
For more variety, think about adding mushrooms. They add an earthy taste and meaty texture. You could also toss in spinach or kale just before serving for a healthy touch.
Storage Info
Refrigeration Instructions
To store leftovers properly, first let the smothered chicken and rice cool down. Place it in an airtight container. Make sure the lid seals tightly. Store it in the fridge for up to three days.
Freezing Techniques
For freezing, use a freezer-safe container. Divide the dish into single servings for easy meals later. Label the container with the date. You can freeze it for up to three months.
To reheat, thaw it overnight in the fridge. Then, warm it in a skillet over low heat. Stir gently to heat evenly. You can also use the microwave, but cover it to keep moisture in.
Shelf Life
When stored in the fridge, the dish stays good for about three days. In the freezer, it can last up to three months.
Watch for signs of spoilage. If you see mold or smell something off, toss it out. Always trust your senses when checking food freshness.
FAQs
Can I use brown rice instead of white?
Yes, you can use brown rice. Keep in mind that brown rice takes longer to cook than white rice. You will need about 45 minutes of cooking time for brown rice. Use 2 ½ cups of chicken broth instead of 2 cups. This extra liquid helps the brown rice cook properly.
What can I serve with smothered chicken and rice?
You can serve many side dishes with smothered chicken and rice. Some great options include:
– Steamed broccoli
– Garlic bread
– Green salad with vinaigrette
– Roasted vegetables
These sides add color and balance to your meal.
How can I make this dish gluten-free?
To make smothered chicken and rice gluten-free, swap the chicken broth for a gluten-free version. Check labels on your broth to ensure it’s safe. You can also use gluten-free flour if you want to thicken the sauce.
Is this dish suitable for meal prep?
Yes, smothered chicken and rice is perfect for meal prep. Cook the dish in advance and store it in airtight containers. It stays fresh in the fridge for up to four days. You can also freeze it for up to three months. Just reheat it in the microwave or on the stove before serving.
In this article, we covered how to make smothered chicken and rice. We explored key ingredients like chicken thighs, rice, and veggies. You learned step-by-step instructions for cooking and making it creamy. I shared tips to perfect the chicken and rice, plus variations for creativity.
This dish is flexible and fun. Enjoy making it your own, and don’t hesitate to experiment with flavors. Your kitchen journey will surely be rewardin

Smothered Chicken and Rice Delight
Ingredients
- 4 pieces boneless, skinless chicken thighs
- 1 cup long-grain white rice
- 2 cups low-sodium chicken broth
- 1 medium onion, diced
- 3 cloves garlic, minced
- 1 piece green bell pepper, diced
- 1 teaspoon smoked paprika
- 0.5 teaspoon cayenne pepper
- 1 teaspoon dried thyme
- 1 tablespoon olive oil
- to taste salt and freshly ground black pepper
- 1 cup heavy cream
- to taste fresh parsley, chopped
Instructions
- In a large, non-stick skillet, heat the olive oil over medium-high heat. Generously season the chicken thighs with salt, pepper, smoked paprika, and cayenne pepper. Once the oil is shimmering, add the chicken thighs to the skillet. Cook for approximately 5-7 minutes on each side, or until they are nicely browned and cooked through. Once done, remove the chicken from the skillet and set aside on a plate.
- In the same skillet, using the flavorful drippings left behind, add the diced onion and green bell pepper. Sauté for about 5 minutes, or until the onion becomes translucent and soft. Add the minced garlic to the skillet and cook for an additional minute, stirring frequently until fragrant.
- Stir in the long-grain white rice into the skillet with the sautéed vegetables. Mix well to ensure the rice is evenly coated with the oil and vegetable mixture, cooking for about 2-3 minutes.
- Carefully pour the chicken broth into the skillet, stirring gently to combine all ingredients. Next, lay the seared chicken thighs back into the skillet on top of the rice mixture. Allow the mixture to come to a gentle simmer.
- Reduce the heat to low, cover the skillet with a lid, and let it simmer for approximately 20-25 minutes.
- After the rice is cooked and has absorbed the broth, remove the skillet from the heat. Gradually stir in the heavy cream, ensuring that it mixes thoroughly with the chicken and rice.
- Before serving, sprinkle a generous amount of fresh, chopped parsley over the dish for a burst of freshness and color.


![- 1 lb boneless, skinless chicken thighs, cut into bite-sized chunks - 2 tablespoons olive oil - 1 cup broccoli florets, washed and trimmed - 1 red bell pepper, sliced into thin strips - 1 cup snap peas, ends trimmed - 1 small carrot, julienned - 3 green onions, finely chopped - 2 cloves garlic, minced - 1 tablespoon fresh ginger, grated - 1/4 cup low-sodium soy sauce - 2 tablespoons honey - 1 tablespoon rice vinegar - 1 teaspoon sesame oil - Salt and freshly ground black pepper to taste - Toasted sesame seeds for garnish The chicken is the star here. I use boneless, skinless thighs for juiciness. They cook quickly and stay tender. For veggies, I choose bright broccoli, sweet bell pepper, crisp snap peas, and a touch of carrot for color. Fresh garlic and ginger add a zing. The sauce blends soy sauce, honey, rice vinegar, and sesame oil for a sweet and savory mix. - Other protein options: shrimp, beef, or tofu - Additional veggies: zucchini, mushrooms, or bell peppers - Garnishes and toppings: cilantro, green onions, or chili flakes You can swap chicken for shrimp, beef, or even tofu for a vegetarian twist. Feel free to add other veggies like zucchini or mushrooms. They all taste great! Top with fresh cilantro or chili flakes for extra flavor. This dish is fun to customize based on what you have at home. For more details, you can check the Full Recipe. To start, gather your teriyaki sauce ingredients. You need low-sodium soy sauce, honey, rice vinegar, sesame oil, garlic, and ginger. In a small bowl, mix these ingredients well. A whisk works great here. This sauce adds a sweet and savory taste to your dish. Next, heat olive oil in a large skillet or wok. Use medium-high heat for the best results. When the oil shimmers, add the chicken chunks. Sprinkle a pinch of salt and black pepper over it. Cook for about 5-7 minutes. Turn the chicken often until it is brown and cooked through. Remove the chicken and set it aside on a plate. In the same skillet, add your vegetables: broccoli, bell pepper, snap peas, and carrot. Stir them for 3-4 minutes. You want the veggies to stay bright and start to soften. This keeps them crunchy and full of flavor. Now, return the cooked chicken to the skillet. Pour the teriyaki sauce over everything. Toss gently to coat the chicken and veggies evenly. Cook for another 2-3 minutes. This allows the flavors to meld nicely. Finally, remove the skillet from the heat. Stir in finely chopped green onions. This adds a fresh taste. To serve, spoon the stir fry onto plates. Sprinkle toasted sesame seeds on top for a nice finish. You can serve it over jasmine rice or alongside quinoa. This makes a complete meal. Enjoy the vibrant colors and flavors! - Overcooking the chicken: Overcooked chicken turns dry and tough. Cook it just until it's no longer pink inside. This usually takes about 5-7 minutes on medium-high heat. - Vegetable texture issues: If you overcook the veggies, they lose their crispness. Stir fry them for about 3-4 minutes. They should be bright and tender but still crunchy. - Flavor tweaks: Want more heat? Add chili flakes or sriracha to your teriyaki sauce. Prefer a sweeter taste? Mix in more honey or brown sugar. Adjust the sauce to match your taste. - Alternative vegetables: You can swap out the veggies based on what you have. Try bell peppers, zucchini, or even bok choy. Mix and match for fun flavors and colors. - Sweetness adjustments: If the sauce is too sweet, add a splash of soy sauce. If it’s not sweet enough, add more honey. Taste as you go to get it just right. - Thickness options: To thicken your sauce, simmer it longer in the pan. For a thinner sauce, add a bit of water or broth. This helps you control the sauce for your liking. By following these tips, you'll create a teriyaki chicken stir fry that's both delicious and fun to make. If you're ready to dive in, check out the Full Recipe for all the details! {{image_4}} You can easily make this dish fit your diet. - Low-Carb Options: Swap the chicken for shrimp or tofu. Use cauliflower rice instead of white rice. This keeps the flavor but cuts carbs. - Vegetarian or Vegan Swaps: For a plant-based dish, use tofu or tempeh. You can also add more veggies like bell peppers or mushrooms. You can give your stir fry a twist. - Different Sauce Options: Try a hoisin sauce or sweet chili sauce for a different taste. You can even add peanut butter for a creamy texture. - Cultural Twists on Stir Fry: Add spices like curry powder for an Indian flavor. Or use a teriyaki sauce recipe from Japan. Each culture adds its unique flair. Using seasonal produce can enhance your dish. - Best Vegetables to Use Per Season: In spring, use asparagus and snap peas. In summer, add zucchini and bell peppers. Fall is great for carrots and squash. Winter brings hearty greens like kale. - Sustainable Sourcing Tips: Shop local farmers' markets. This supports local farms and gets you fresh ingredients. You can also look for organic labels to ensure quality. Explore these options to make your teriyaki chicken stir fry even more special! To store your teriyaki chicken stir fry, first let it cool down. Place it in an airtight container. This helps keep the flavors fresh. You can refrigerate it for up to three days. If you want to keep it longer, freezing is a good option. Use a freezer-safe container or bag. It can last up to three months in the freezer. When you're ready to eat your leftovers, reheating is easy. For the microwave, place the stir fry in a bowl. Cover it with a microwave-safe lid. Heat it for one to two minutes, stirring halfway. This ensures even heating. If you prefer a skillet, heat a small amount of oil over medium heat. Add the stir fry and stir until warm, about three to five minutes. In the fridge, your teriyaki chicken stir fry lasts about three days. Be sure to check for signs of spoilage before eating. If you see any mold or if it smells off, it's best to throw it away. When frozen, the stir fry can sit for up to three months. After that, the taste may not be as good. Always trust your senses when it comes to food safety. You can serve teriyaki chicken stir fry with rice or noodles. Here are some great options: - Jasmine rice: This fluffy rice pairs well with teriyaki sauce. - Brown rice: A healthier option with more fiber. - Egg noodles: These add a nice chew to your meal. - Quinoa: A protein-rich choice that adds texture. - Side salad: A fresh salad can balance the flavors. Try pairing your stir fry with steamed or sautéed vegetables. Broccoli, bok choy, and carrots work well. You can also serve it with a light soup for a complete meal. Yes, you can make teriyaki chicken stir fry in advance. Here are some tips: - Cook and cool: Prepare the dish fully, then cool it quickly. - Store properly: Place it in an airtight container in the fridge. - Reheat gently: When ready to eat, heat it on the stove or in the microwave. Meal prep makes busy nights easier. You can also chop veggies ahead of time. This saves time and lets you enjoy a fresh meal. Teriyaki chicken stir fry is tasty and nutritious. Here are the key facts: - Caloric content: One serving has about 350 calories. - Protein: It has around 30 grams of protein from chicken. - Carbohydrates: Expect about 30 grams, mostly from veggies and sauce. - Fat: It contains about 10 grams, mostly healthy fats from olive oil. This dish is rich in vitamins and minerals, thanks to the colorful veggies. Broccoli offers vitamin C, while carrots are high in beta-carotene. Enjoy this dish for a balanced meal! For the complete instructions and ingredient list, check out the [Full Recipe]. Teriyaki chicken stir fry is a simple dish to make at home. You learned key ingredients, how to prepare the sauce, and tips for cooking. Avoid common mistakes like overcooking chicken. Customize your stir fry with different veggies or proteins to suit your taste. Remember, fresh ingredients make a big difference. Whether you serve it fresh or store leftovers, this dish is delicious. Enjoy creating your own unique stir fry!](https://joymealplan.com/wp-content/uploads/2025/06/4a36c5e3-194c-4011-88f6-f3f1f5f34a05-768x768.webp)
![To make Easy Chicken Tikka Masala, gather these essential ingredients: - 500g chicken breast, diced into bite-sized pieces - 1 cup plain yogurt - 2 tablespoons garam masala - 1 tablespoon ground cumin - 1 tablespoon ground coriander - 1 teaspoon turmeric - 1 teaspoon chili powder (adjust for spice level) - 4 cloves of garlic, finely minced - 1 inch fresh ginger, grated - 2 tablespoons olive oil - 1 medium onion, finely chopped - 1 can (400g) diced tomatoes, with juices - 1 cup coconut milk - Salt, to taste - Fresh cilantro (coriander), chopped, for garnish To boost the taste, you can add these optional items: - 1 tablespoon lemon juice for a tangy twist - 1-2 green chili peppers, chopped, for extra heat - 1 teaspoon sugar to balance flavors - Additional spices like cinnamon or cardamom for depth You will need these items to make cooking easier: - A large mixing bowl for marinating chicken - A sharp knife and cutting board for prep - A skillet or frying pan for cooking - A spoon or spatula for stirring - Measuring spoons for accurate ingredient amounts - A serving dish for presentation Gathering these ingredients and utensils sets you up for a flavorful cooking experience. Enjoy the process of making this delightful dish! To start, take a mixing bowl. In it, add 1 cup of plain yogurt. Then, mix in 2 tablespoons of garam masala, 1 tablespoon of ground cumin, and 1 tablespoon of ground coriander. Next, add 1 teaspoon of turmeric and 1 teaspoon of chili powder. You can adjust the chili powder to suit your taste. Finally, add half of the minced garlic and the grated ginger. Stir everything together until it forms a smooth marinade. This mix is key to a flavorful dish. Now, take 500g of diced chicken breast. Add it to the marinade you just made. Make sure every piece is well-coated. This is where the magic happens! Cover the bowl with plastic wrap or a lid. Place it in the refrigerator for at least 1 hour. For the best flavor, let it sit overnight. This allows the spices to soak into the chicken. Heat 2 tablespoons of olive oil in a large skillet over medium heat. Once the oil is hot, add 1 finely chopped onion. Sauté it for about 5 minutes until it turns soft and clear. Next, add the remaining minced garlic and grated ginger. Cook for 1-2 more minutes. This step fills your kitchen with a lovely aroma. Now, add the marinated chicken to the skillet. Reserve any leftover marinade. Cook the chicken for about 7-10 minutes until it browns. Then, pour in the can of diced tomatoes with their juices and the reserved marinade. Stir everything together and bring it to a simmer. Let it cook for 10 more minutes. Lower the heat, and stir in 1 cup of coconut milk. Mix it well. Let it simmer gently for another 10 minutes. You can add water if you want a thinner sauce. Season with salt to taste. When it’s ready, turn off the heat and let it sit for a few minutes. This resting time helps the flavors blend well. For the full recipe, refer to the earlier section. To get the best flavor, marinate your chicken well. Use plain yogurt as your base. Yogurt helps to tenderize the meat and adds a tangy taste. Mix yogurt with spices like garam masala, cumin, and turmeric. This mixture will coat every piece of chicken. Make sure to let it marinate for at least one hour. For the best results, marinate overnight. This gives the spices more time to soak in. Cooking techniques matter a lot. Start by sautéing onions in olive oil. This adds sweetness and depth to your dish. After the onions are soft, add garlic and ginger for more flavor. These ingredients should cook just until fragrant. This step enhances the taste of the whole dish. When adding the marinated chicken, let it brown well. Browning adds a nice texture. Finally, add diced tomatoes and coconut milk, stirring thoroughly to combine. To make your meal complete, serve Chicken Tikka Masala with basmati rice or naan. The rice soaks up the sauce, making every bite delicious. Naan is perfect for scooping up the sauce. For a fresh touch, garnish with chopped cilantro. You can also add lime wedges for extra zing. This adds a bright flavor that balances the spices. For more fun, consider serving a side salad or yogurt raita to cool things down. {{image_4}} You can easily swap chicken for vegetables or tofu. For a vegetarian version, use firm tofu. Cut it into cubes and marinate just like the chicken. You can also use mixed vegetables like bell peppers, zucchini, and cauliflower. These options soak up the spices nicely. Cook them until they're tender. The flavors will still shine through. Not everyone enjoys the same level of heat. If you want less spice, reduce the chili powder. Start with a half teaspoon and taste as you go. For more heat, add extra chili powder or even fresh chopped chilies. Remember, you can always add more, but it’s hard to take it away. If you have dietary needs, you can make changes easily. For a dairy-free version, use almond yogurt instead of plain yogurt. If you're gluten-free, check that all spices and canned goods are gluten-free. Coconut milk is a great dairy substitute, but you can also use vegetable broth for a lighter sauce. You can find the full recipe [here]. To store leftover chicken tikka masala, let it cool down first. Then, place it in an airtight container. This helps keep it fresh. Store it in the fridge for up to four days. If you want to keep it longer, consider freezing it. When reheating chicken tikka masala, use the stove for the best taste. Place it in a pan over low heat. Stir occasionally to warm it evenly. You can add a splash of water or coconut milk if it seems too thick. You can also use a microwave, but be careful not to overheat. To freeze chicken tikka masala, ensure it is fully cooled. Place it in freezer-safe bags or containers. Remove as much air as possible to prevent freezer burn. It can last up to three months in the freezer. When ready to eat, thaw it in the fridge overnight before reheating. Yes, you can make Easy Chicken Tikka Masala ahead of time. Prepare the dish, then cool it down. Store it in a sealed container in the fridge for up to three days. When ready to eat, just reheat on the stove until hot. This helps the flavors meld even more! If you want to swap out coconut milk, try using heavy cream or Greek yogurt. These options add creaminess without losing flavor. You can also use almond milk, but it may change the taste a bit. Just remember to adjust the seasoning to keep it tasty. Easy Chicken Tikka Masala can be made spicy or mild. The chili powder is the main spice. Start with a small amount if you prefer less heat. You can always add more later, but you can’t take it out once it’s in! Adjust it to your taste for the best experience. We explored how to make easy Chicken Tikka Masala, focusing on ingredients, instructions, and tips. You learned about required and optional ingredients that elevate flavor. Understanding marinating and cooking steps ensures juicy chicken. Plus, I shared ways to adapt recipes for different diets and spice levels. In closing, enjoy your meal and feel free to experiment. Happy cooking!](https://joymealplan.com/wp-content/uploads/2025/07/7203decf-58c7-4016-ac99-38120703d330-768x768.webp)

![This recipe is simple and fun to make. Here’s what you need: - 1 lb large shrimp, peeled and deveined - 4 tablespoons unsalted butter - 4 cloves garlic, minced - 1 teaspoon red pepper flakes (adjust to taste) - 1 lemon, juiced and zested - 1/4 cup chicken broth - 1/4 cup freshly chopped parsley - Salt and pepper to taste - 8 oz linguine or spaghetti - Grated Parmesan cheese for serving (optional) If you don’t have some ingredients, don’t worry! Here are some easy swaps: - Shrimp: You can use scallops or chicken instead. - Butter: Olive oil works well for a lighter touch. - Chicken broth: Vegetable broth or white wine can add nice flavor. - Parsley: Fresh basil or cilantro can give a different taste. - Lemon: Lime juice can be a zesty alternative. These substitutes keep the dish tasty and fun. You can mix and match as you like! This easy garlic shrimp scampi takes just 25 minutes to make. You will need about 10 minutes for prep and 15 minutes for cooking. It’s quick and perfect for busy nights. You can serve it to four people, so it’s great for a small family meal or a cozy dinner. 1. Cook the pasta: Start by boiling a large pot of salted water. Add 8 oz of linguine or spaghetti. Cook it according to the package directions until it is al dente. Remember to save 1/2 cup of the pasta water before you drain it. Set the pasta aside in a bowl. 2. Sauté the shrimp: In a large skillet, melt 2 tablespoons of butter over medium heat. Once it is bubbly, add 1 lb of peeled and deveined shrimp in a single layer. Sprinkle with salt and pepper. Cook for 2-3 minutes until they turn pink. Flip them and cook for another 1-2 minutes. Remove the shrimp and set them aside. 3. Make the garlic sauce: In the same skillet, lower the heat to medium-low. Add the remaining 2 tablespoons of butter and 4 cloves of minced garlic. Sauté for 1 minute until it smells great and turns lightly golden. Be careful not to burn the garlic. 4. Add flavor: Stir in 1 teaspoon of red pepper flakes, the juice and zest of 1 lemon, and 1/4 cup of chicken broth. Raise the heat a bit to bring this to a gentle simmer. Let it reduce for 2-3 minutes so the flavors blend well. 5. Combine everything: Add the shrimp back to the skillet, along with the cooked pasta and half of the 1/4 cup of chopped parsley. Toss gently, adding the reserved pasta water a little at a time until you reach a creamy sauce. It should not be too thick. 6. Finish and serve: Taste the dish and adjust with more salt and pepper if needed. Serve hot, topped with the rest of the parsley and some grated Parmesan cheese if you like. - Use fresh shrimp for the best taste. - Don’t overcrowd the pan when cooking shrimp. This helps them cook evenly. - Be careful with the garlic; it should be fragrant but not burnt. - Save some pasta water to adjust the sauce later. - Garnish with fresh parsley and lemon for a bright finish. For the full recipe, check out the [Full Recipe]. Enjoy your cooking! When making garlic shrimp scampi, avoid these common errors: - Overcooking shrimp: Cook shrimp for just 2-3 minutes on one side. Flip and cook for another 1-2 minutes. They should be pink and firm, not rubbery. - Burning garlic: Sauté garlic on medium-low heat. Brown garlic adds flavor, but burnt garlic ruins your dish. - Skipping pasta water: Reserve some pasta cooking water. It helps create a creamy sauce. To make your scampi even tastier: - Use fresh ingredients: Fresh shrimp and garlic will give the best flavor. - Add herbs: Fresh parsley brightens the dish. You can also try basil or oregano for extra flavor. - Experiment with spices: Adjust red pepper flakes for heat. A pinch of smoked paprika can add depth. Cooking pasta is simple, but there are key tips: - Use plenty of water: A large pot helps the pasta cook evenly. - Salt the water: This adds flavor to the pasta. Aim for a tablespoon of salt per gallon of water. - Don’t rinse pasta: Rinsing washes away the starch that helps the sauce stick. Keep it warm and toss it with the shrimp and sauce right away. For the full recipe, check out the [Full Recipe]. {{image_4}} You can easily add vegetables to your garlic shrimp scampi. Spinach, broccoli, or bell peppers work well. Just sauté them for a few minutes before adding the shrimp. This adds color and nutrients without changing the dish's taste much. Plus, you get a nice crunch with each bite. It’s a great way to sneak in some veggies for the kids or anyone who needs more greens. If you want to switch things up, you can use chicken or scallops instead of shrimp. For chicken, cut it into bite-sized pieces. Sauté it until golden and cooked through, just like the shrimp. For scallops, sear them for a few minutes on each side. Both options add their own unique flavor to the dish. This makes it fun to try new things while keeping the same garlic sauce. For a gluten-free version, use gluten-free pasta. There are many options available now, like rice or quinoa pasta. They cook similarly to regular pasta. Just follow the package instructions. You can also serve the garlic shrimp over zucchini noodles as a fresh twist. This gives you a light meal that is still full of flavor. To store leftover shrimp scampi, let it cool first. Place it in an airtight container. It can stay in the fridge for up to three days. Make sure to cover it well to keep flavors fresh. Avoid leaving it out for too long, as this can lead to spoilage. When reheating, do it gently to prevent overcooking the shrimp. Use a skillet over low heat and add a splash of broth or water. This keeps the dish moist. Stir often and check the shrimp closely. You want them warm but not rubbery. You can freeze shrimp scampi if needed. Use a freezer-safe container and leave some space for expansion. It can last for up to three months in the freezer. To thaw, place it in the fridge overnight. Reheat gently as described above. Enjoy your meal even after a long time! Yes, you can use frozen shrimp for this recipe. Just be sure to thaw them first. Place the shrimp in cold water for about 15-20 minutes. This helps them defrost quickly and evenly. Using frozen shrimp is a great time saver and still gives you a tasty dish. You can tell shrimp are done when they turn bright pink and curl slightly. This usually takes about 3-5 minutes of cooking. If they look opaque and firm, they are ready to eat. Overcooking can make them tough, so keep a close eye! Garlic shrimp scampi pairs well with several dishes. Here are some ideas: - A fresh green salad with lemon vinaigrette. - Garlic bread for a delicious side. - Steamed vegetables like broccoli or asparagus for color. - A glass of white wine, such as Sauvignon Blanc, to enhance the meal. Exploring these options will make your meal even better. Enjoy mixing flavors and textures! You can create a delicious Garlic Shrimp Scampi using easy ingredients and simple steps. The recipe includes cooking tips to prevent mistakes and ways to boost flavor. You can also make variations by adding veggies or using chicken. Remember to store leftovers properly and reheat them for the best taste. This dish brings joy to any meal. By following this guide, you can impress family and friends with your cooking skills. Enjoy making your own tasty Shrimp Scampi!](https://joymealplan.com/wp-content/uploads/2025/06/198ad0f3-6fc3-464f-bcc6-4256f6587cb9-768x768.webp)