Are you ready to elevate your dessert game? These Spiced Chai Latte Cupcakes bring rich, cozy flavors to every bite. Imagine soft, fluffy cupcakes infused with cinnamon, ginger, and cardamom, topped with a sprinkle of pistachios. This treat is perfect for any occasion, and I’ll guide you step-by-step to create these irresistible delights. Let’s dive into the delicious world of chai-inspired baking!
Why I Love This Recipe
- Unique Flavor Profile: The combination of spices and brewed chai tea creates a warm and comforting flavor that’s perfect for any occasion.
- Easy to Make: This recipe is straightforward and doesn’t require any complicated techniques, making it accessible for bakers of all levels.
- Perfect for Sharing: With 12 cupcakes, these are ideal for gatherings, parties, or simply to enjoy with friends over a cup of tea.
- Customizable Toppings: Whether you prefer cream cheese frosting or a simple sprinkle of nuts, these cupcakes can be dressed up or down to suit your taste.
Ingredients
Dry Ingredients
– 1 ½ cups all-purpose flour
– 1 teaspoon baking powder
– ½ teaspoon baking soda
– ½ teaspoon salt
– 1 teaspoon ground cinnamon
– ½ teaspoon ground ginger
– ½ teaspoon ground cardamom
– ¼ teaspoon ground cloves
In this recipe, the dry ingredients are the base of the cupcakes. The flour gives the cupcakes structure. Baking powder and baking soda help them rise. Salt enhances the other flavors. The spices create that warm chai taste.
Wet Ingredients
– ½ cup unsalted butter, softened
– 1 cup granulated sugar
– 2 large eggs
– 1 teaspoon pure vanilla extract
– ½ cup brewed chai tea
– ½ cup milk or alternatives
The wet ingredients add moisture and flavor. Softened butter makes the cupcakes rich. Sugar sweetens and helps with texture. Eggs bind the mix together. Vanilla adds a nice aroma. Brewed chai tea is key for that spiced flavor. Milk keeps the batter smooth.
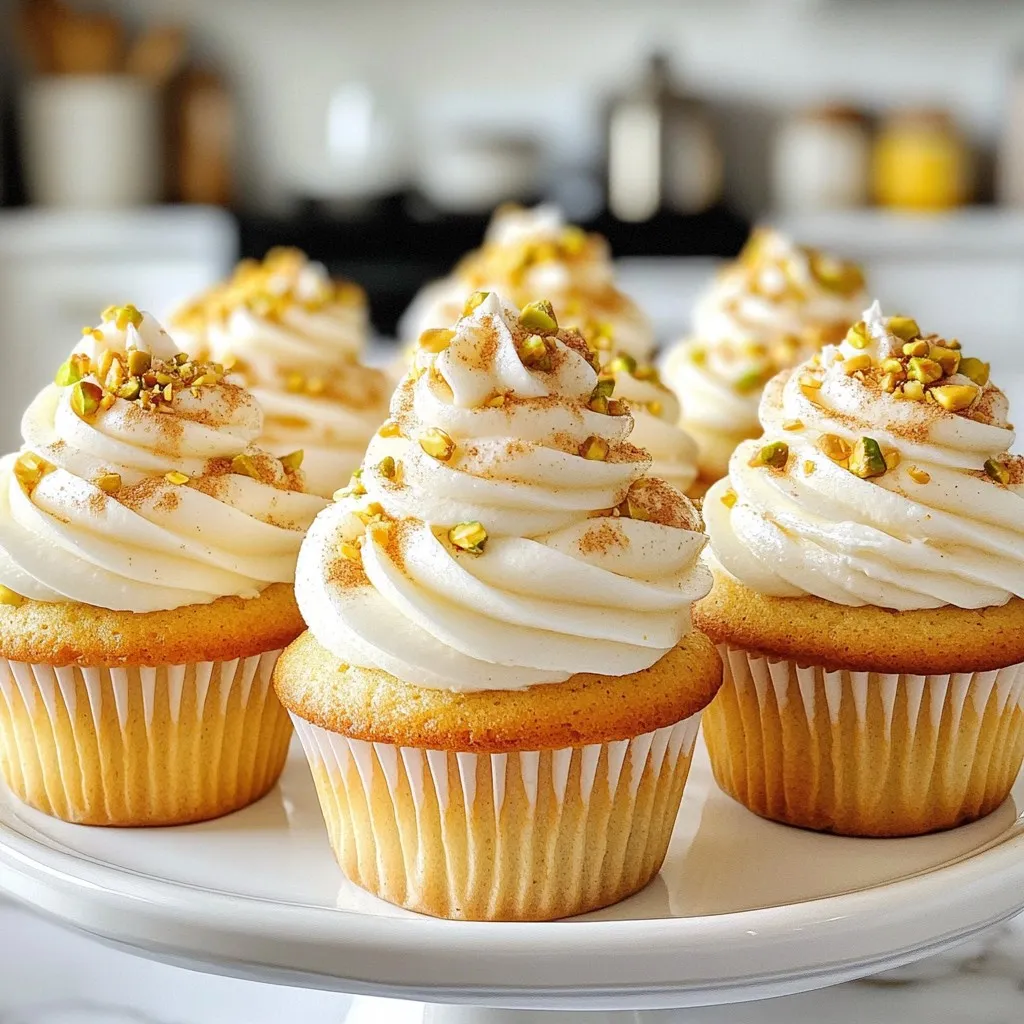
Optional Toppings
– Crushed pistachios
– Sprinkle of cinnamon
Toppings can elevate your cupcakes. Crushed pistachios give a nice crunch. A sprinkle of cinnamon adds a touch of spice and beauty. You can get creative based on your taste!

Step-by-Step Instructions
Preparing the Oven and Pan
Start by preheating your oven to 350°F (175°C). This temperature is perfect for baking cupcakes. While the oven warms up, line a standard cupcake pan with cupcake liners. This step makes for easy removal after baking.
Mixing Dry Ingredients
In a medium bowl, sift together the all-purpose flour, baking powder, baking soda, salt, and spices. The spices include ground cinnamon, ginger, cardamom, and cloves. Sifting helps combine them well and adds air, making your cupcakes light.
Creaming Butter and Sugar
Next, take a large mixing bowl. Use an electric mixer to blend the softened butter and granulated sugar together. Beat on medium-high speed until the mixture is light and fluffy, which usually takes about 3-4 minutes. This step creates a nice base for your cupcakes.
Incorporating Eggs and Vanilla
Add the large eggs to the creamed mixture, one at a time. Make sure to mix thoroughly after each addition. Following the eggs, add in the pure vanilla extract. Blend well until everything is fully combined. This adds moisture and flavor to your batter.
Combining Wet and Dry Mixtures
Now it’s time to mix the wet and dry ingredients. Gradually add the dry mixture into the wet mixture. Alternate this with the cooled chai tea and milk, starting and ending with the dry ingredients. Mix gently until everything is just combined. Be careful not to overmix, or your cupcakes may turn out dense.
Baking Process
Spoon the batter into your prepared cupcake liners. Fill each liner about two-thirds full to allow room for rising. Place the cupcake pan in the preheated oven and bake for 18-20 minutes. To check for doneness, insert a toothpick into the center of one cupcake. If it comes out clean, they are ready!
Cooling
Once baked, remove the pan from the oven and let the cupcakes cool in the pan for about 5 minutes. After that, gently transfer them to a wire rack to cool completely. This cooling step is crucial for the best texture.
Tips & Tricks
Achieving Optimal Cupcake Texture
To get the best texture, start with room temperature butter and eggs. This helps them mix better. When you cream the butter and sugar, beat until it’s fluffy. This step adds air, making the cupcakes light. Be careful not to overmix the batter. Mix just until you see no dry flour. Overmixing can make the cupcakes dense.
Checking Cupcake Doneness
Use the toothpick method to check if your cupcakes are done. Insert a toothpick into the center of one cupcake. If it comes out clean, they are ready. If there’s wet batter on the toothpick, bake a few more minutes. This simple test ensures your cupcakes are perfectly baked.
Perfect Icing Techniques
When it comes to frosting, let your cupcakes cool completely first. Warm cupcakes can melt the frosting. Use a piping bag for a neat finish. Start from the center and swirl outward. Add crushed pistachios and a sprinkle of cinnamon for a touch of flair. This not only looks good but adds extra flavor.
Pro Tips
- Use Fresh Chai Tea: For the best flavor, use freshly brewed chai tea instead of pre-packaged tea. This enhances the spices and gives a richer taste to your cupcakes.
- Don’t Overmix: When combining wet and dry ingredients, mix just until incorporated. Overmixing can lead to dense cupcakes instead of light and fluffy ones.
- Room Temperature Ingredients: Ensure your eggs and butter are at room temperature. This helps in achieving a smooth batter and better rise while baking.
- Cool Completely Before Frosting: Allow your cupcakes to cool completely before adding frosting. This prevents the frosting from melting and ensures a beautiful finish.
Variations
Flavor Twists
You can add fun flavors to your spiced chai latte cupcakes. One great idea is to mix in chocolate. The rich taste of chocolate pairs well with the chai spices. Just add a half cup of cocoa powder to the dry ingredients. This twist makes your cupcakes extra special.
Another fun flavor is citrus. Try adding orange zest to the batter. It brings a bright, fresh taste. Use the zest from one orange for a nice balance with the chai spices. Your cupcakes will have a lovely, zesty kick.
Dietary Modifications
Making these cupcakes to fit your diet is easy. For a gluten-free option, you can swap the all-purpose flour for a gluten-free blend. Make sure it has a one-to-one ratio. This change keeps the texture light and fluffy.
If you want a vegan version, substitute the eggs with flax eggs. Just mix one tablespoon of flaxseed meal with three tablespoons of water. Let it sit for a few minutes to thicken. Also, use a dairy-free milk, like almond or oat milk. These swaps keep the chai flavor while making it vegan-friendly.
Creative Serving Suggestions
Pair your cupcakes with drinks for a fun treat. A hot cup of chai tea or coffee works well. The warm drink enhances the cupcake flavor.
For presentation, arrange the cupcakes on a beautiful platter. Add a few whole spices or orange slices around them. This makes your dessert table look inviting and colorful. You can also use pretty cupcake liners to match your theme. These small touches will impress your guests.
Storage Info
Proper Storage Techniques
To keep your spiced chai latte cupcakes fresh, use airtight containers. These help seal in moisture and flavor. Place the cooled cupcakes in the container. If you have frosting, store it separately to avoid sogginess. This simple step keeps your treats soft and tasty.
Refrigeration and Freezing
For longer storage, refrigerate your cupcakes. Place them in an airtight container first. This keeps them fresh for up to a week. If you want to freeze them, wrap each cupcake in plastic wrap. Then, place them in a freezer bag. They can last up to three months in the freezer. When you’re ready to eat, let them thaw overnight in the fridge.
Reheating Suggestions
To warm your cupcakes, use the microwave. Heat them for 10-15 seconds. Check if they’re warm enough. If you want a crisp top, use an oven. Heat your oven to 350°F (175°C) and place the cupcakes inside for about 5 minutes. This way, they stay moist without drying out. Enjoy your delicious cupcakes!
FAQs
What makes spiced chai latte cupcakes unique?
Spiced chai latte cupcakes stand out due to their rich flavor. I infuse warm chai spices into a basic cupcake recipe. The blend of cinnamon, ginger, cardamom, and cloves creates a cozy taste. This combination makes every bite feel like a warm hug. You get the comfort of chai in a delightful cupcake form. It’s a perfect treat for chai lovers.
Can I use homemade chai tea?
Yes, you can use homemade chai tea! Making your chai allows for a personal touch. You can adjust the spice levels to your liking. Homemade tea often has a fresher taste. It can elevate the flavor of your cupcakes. Just make sure to let it cool before adding it to the batter. This step keeps your cupcakes light and fluffy.
How do I know when my cupcakes are done baking?
To check if your cupcakes are done, use the toothpick test. Insert a toothpick into the center of a cupcake. If it comes out clean or with a few crumbs, they are ready. If it’s wet, they need more time. Typically, these cupcakes take around 18 to 20 minutes. Keep an eye on them toward the end of baking.
What frosting works best for spiced chai latte cupcakes?
I recommend cream cheese frosting or vanilla bean frosting. These flavors complement the chai spices well. Cream cheese adds a tangy note that balances sweetness. Vanilla bean brings out the warmth of the spices. You can also experiment with buttercream if you prefer. Top with crushed pistachios and a sprinkle of cinnamon for flair!
In this article, we explored how to make delicious spiced chai latte cupcakes. We covered ingredients, step-by-step baking instructions, and tips for perfect texture. You can even try fun flavor twists and modifications to suit your diet. Remember to store your cupcakes properly to keep them fresh. Now, you’re ready to bake and enjoy this unique treat. Trust me, these cupcakes will delight your taste buds and impress your friend


