If you’re looking for a snack that packs a punch, you’ve come to the right place! My Spicy Garlic Edamame is quick to make and bursting with flavor. This dish combines fresh edamame with the heat of red pepper flakes and the rich taste of garlic. Whether you’re hungry for a healthy snack or want something to impress at your next gathering, this recipe will delight your taste buds. Let’s dive into the tastiest details!
Ingredients
Main Ingredients
– 2 cups edamame (in pods)
– 3 tablespoons olive oil
– 4 cloves garlic, minced
Seasonings and Sauces
– 1 teaspoon red pepper flakes
– 2 tablespoons soy sauce
– 1 teaspoon sesame oil
Optional Garnishes
– Fresh lime juice
– Sea salt to taste
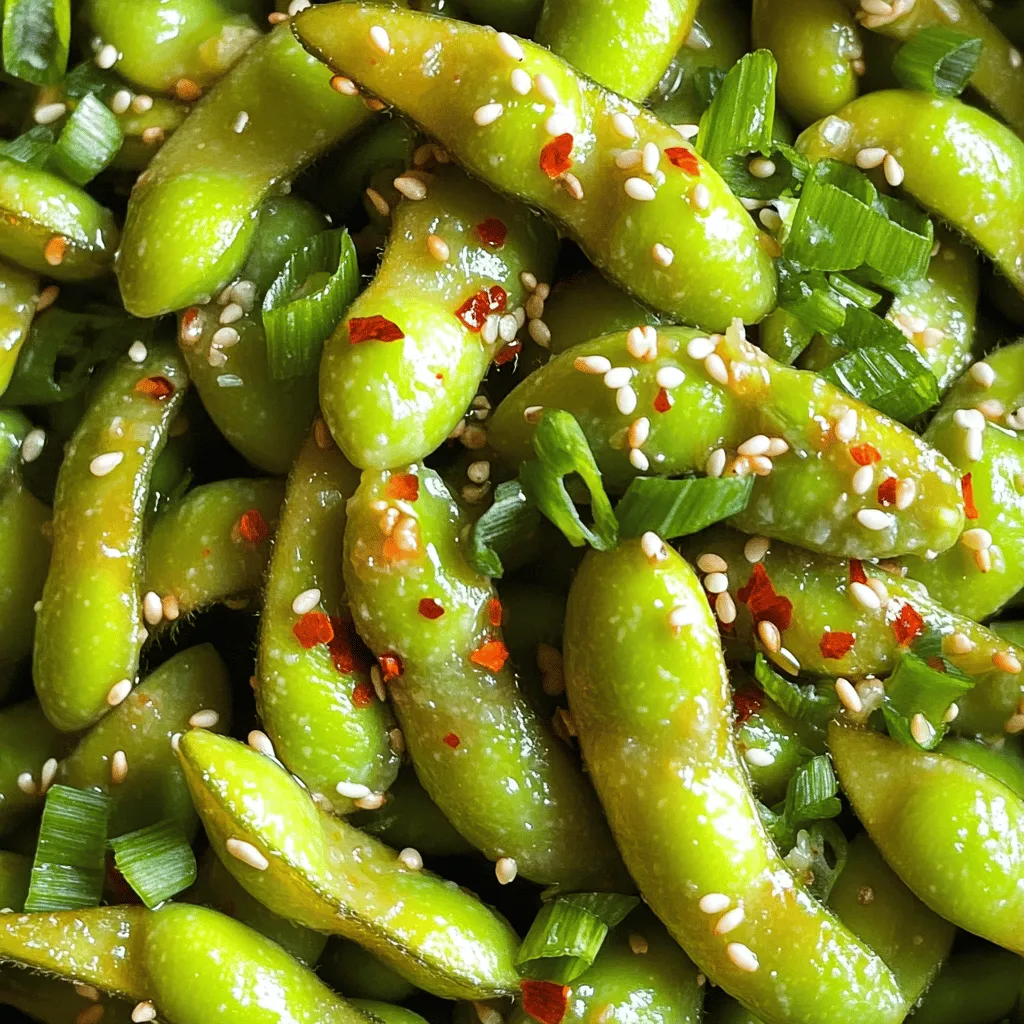
– Chopped green onions and sesame seeds
Gathering the right ingredients is key to making spicy garlic edamame. Start with two cups of fresh edamame in pods. They give a nice crunch and healthy boost. You will also need three tablespoons of olive oil. This oil brings richness and helps to sauté the garlic. Speaking of garlic, use four cloves, minced. Garlic adds a bold flavor.
Next, for a kick, grab one teaspoon of red pepper flakes. Adjust this if you want more or less heat. You will also need two tablespoons of soy sauce for that savory touch. A teaspoon of sesame oil adds a lovely aroma and taste, too.
For a zesty finish, consider fresh lime juice. It brightens up the dish. Sea salt adds seasoning, so taste as you go. Lastly, if you want to impress, chop some green onions and sprinkle sesame seeds on top. These optional garnishes not only add color but also enhance the flavor.
Step-by-Step Instructions
Preparing the Edamame
– Boil water and season with salt.
– Cook edamame pods for 5-7 minutes.
Start by filling a medium pot with water and placing it on the stove. Bring the water to a rapid boil. Once boiling, add a generous pinch of salt. This step is key to enhancing the flavor of the edamame. Carefully add the edamame pods and let them cook for about 5-7 minutes. You want the pods to be tender and bright green. After cooking, drain the edamame in a colander and set them aside.
Cooking the Garlic Mixture
– Heat olive oil in skillet.
– Sauté garlic and red pepper flakes.
Next, take a large skillet and pour in 3 tablespoons of olive oil. Warm it over medium heat. Watch for signs of shimmering; that means it’s ready. Now, add the minced garlic and red pepper flakes. Sauté these for about 1-2 minutes. Stir them frequently to prevent burning. The garlic should smell fragrant, but not brown.
Combining Ingredients
– Add cooked edamame to skillet.
– Stir in soy sauce and sesame oil.
– Finish with lime juice and season.
Now it’s time to mix everything together. Carefully add the drained edamame to the skillet. Toss them gently so they get coated in the garlic and oil mix. Pour in 2 tablespoons of soy sauce and 1 teaspoon of sesame oil. Stir well to combine everything. Let it cook for another 2-3 minutes. This allows the edamame to absorb all the delicious flavors. Finally, remove the skillet from the heat and drizzle the fresh lime juice over the top. Season with sea salt to taste. Give it one last toss, and your spicy garlic edamame is ready to serve!
Tips & Tricks
Cooking Edamame Perfectly
To cook edamame just right, aim for 5 to 7 minutes. You want them tender and bright green. The salt you add to the boiling water is key. It helps to enhance the flavor of the pods. Without it, they might taste bland.
Enhancing Flavor
If you like spice, adjust the red pepper flakes to your taste. Start with one teaspoon and add more if you want extra heat. When sautéing garlic, keep an eye on it. You want it fragrant, not brown. This way, it stays sweet and flavorful.
Presentation Suggestions
For a fun twist, try garnishing with chopped green onions and sesame seeds. These add color and crunch. When serving, present the edamame in a large bowl. It invites guests to dig in. You can also pair it with drinks for a great snack at gatherings.

Variations
Spicy Garlic Edamame with Different Ingredients
You can make spicy garlic edamame even better by adding proteins. Try shrimp or chicken for a heartier dish. Simply cook the shrimp or chicken in the skillet before adding the garlic and edamame. This method infuses all the flavors together and creates a tasty meal.
You can also mix in different spices. For example, add fresh ginger for a warm, zesty kick. Just grate a small piece and sauté it with the garlic. This twist brightens the dish and gives it a new dimension.
Vegan-Friendly Alternatives
If you need a gluten-free version, use soy sauce substitutes. Look for options like coconut aminos or tamari. Both give the same umami flavor without gluten. They work perfectly in this spicy garlic edamame recipe.
Another great choice is garlic-infused oil. By using this instead of regular olive oil, you enhance the garlic flavor. It adds a nice depth to the dish without extra effort.
Serving as a Meal
You can turn spicy garlic edamame into a full meal. Pair it with rice or noodles for a filling dish. Just serve the edamame on top of a bed of rice. The flavors blend beautifully, making it a satisfying option.
Alternatively, use it as a salad topping. Toss the edamame with fresh greens, cucumbers, and a light dressing. This adds crunch and flavor, creating a delightful salad that is both healthy and tasty.
Storage Info
Storing Leftovers
To keep your spicy garlic edamame fresh, store it in an airtight container. Glass or plastic containers work well. Make sure the edamame is cool before sealing. You can also use a resealable bag, but remove as much air as possible. This helps prevent freezer burn and keeps flavors intact.
Reheating Methods
When reheating, you have two good choices: the microwave or the stovetop.
– Microwave: Place the edamame in a microwave-safe dish. Cover it with a lid or a damp paper towel. Heat for about 30 seconds. Stir and heat again if needed. This method is quick but may alter the texture slightly.
– Stovetop: Heat a skillet over medium heat. Add a splash of olive oil. Toss in the edamame and heat for about 2-3 minutes. Stir often to keep it from burning. This method keeps the flavors strong and the texture crisp.
Shelf Life
For best taste, enjoy your spicy garlic edamame within 3-4 days. It stays fresh in the fridge. You can freeze it for up to 3 months. Look for any off smells or changes in color. If it smells sour or has a mushy texture, it’s time to toss it.
FAQs
Can I use frozen edamame for this recipe?
Yes, you can use frozen edamame. Just cook it according to package instructions. Frozen edamame saves time and is often just as tasty. You’ll want to thaw it before cooking it in the skillet with garlic and spices. This way, you still get that warm, flavorful snack.
How can I adjust the spice level in Spicy Garlic Edamame?
To adjust the spice level, change the amount of red pepper flakes. Start with less if you want mild heat. You can always add more later. For a kick, try adding fresh chopped chili peppers or hot sauce. Taste as you go to find your perfect heat.
What are the health benefits of edamame?
Edamame is a great source of protein and fiber. Here are some benefits:
– High in Protein: Edamame offers a complete protein, making it ideal for vegans.
– Rich in Fiber: It helps with digestion and keeps you full.
– Packed with Vitamins: Edamame is full of vitamins like A, C, and K.
– Good for Heart Health: It contains healthy fats that support heart health.
With all these benefits, enjoying spicy garlic edamame is a tasty way to be healthy!
In this blog post, we explored how to make delicious Spicy Garlic Edamame. We covered essential ingredients, preparation steps, and helpful tips to get it just right. The optional garnishes add extra zing to your dish. You can also try various variations for different flavors. Don’t forget about storage tips to keep leftovers fresh. Spicy Garlic Edamame is simple, tasty, and versatile. Enjoy it on its own or as a side. You’ll impress your family and friends with this dish!


