Spicy Garlic Shrimp Tacos Flavorful and Fresh Meal

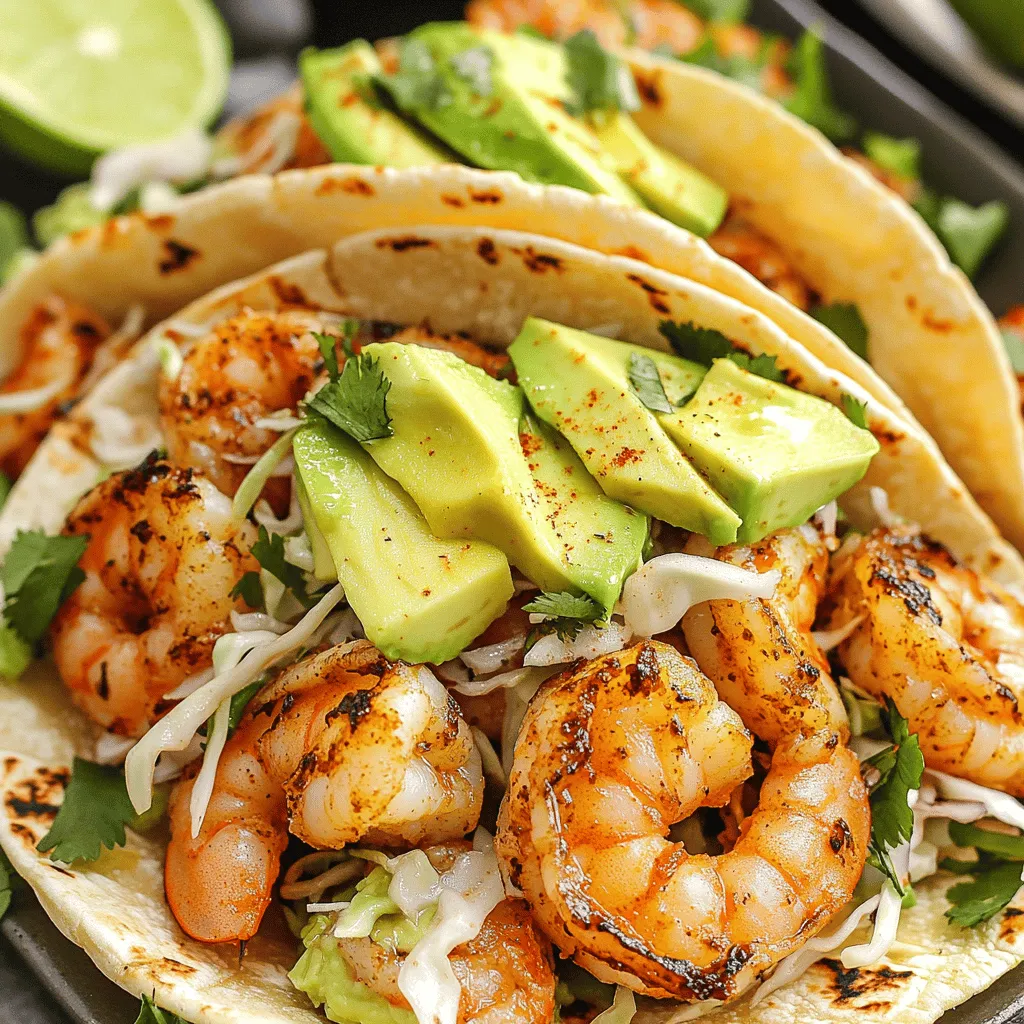
Get ready to taste something special with Spicy Garlic Shrimp Tacos! This fresh meal bursts with flavor, merging succulent shrimp with spicy garlic, lime, and bright toppings. Each bite promises a fiesta for your taste buds. In this blog, I’ll guide you through the easy steps to create these delicious tacos, ensuring you impress your family or guests. Let’s dive into the ingredients and start cooking!
Ingredients
List of Ingredients
– 1 pound large shrimp, peeled and deveined
– 4 cloves of garlic, finely minced
– 2 tablespoons extra virgin olive oil
– 1 teaspoon smoked paprika
– 1 teaspoon cayenne pepper (or adjust to spice preference)
– 1 teaspoon ground cumin
– Juice of 1 fresh lime
– Salt and freshly ground black pepper to taste
– 8 small corn tortillas
– 1 ripe avocado, sliced into thin wedges
– 1 cup green cabbage, finely shredded
– Fresh cilantro leaves, for garnish
– Lime wedges, for serving
For these spicy garlic shrimp tacos, you need fresh and simple ingredients. Start with one pound of large shrimp. Make sure they are peeled and deveined for ease. You will also need four cloves of garlic. Mince them finely to release their flavor.
Use two tablespoons of extra virgin olive oil for cooking. This oil adds richness to the shrimp. Then, grab some spices. You will need one teaspoon of smoked paprika and one teaspoon of ground cumin. These spices bring warmth and depth.
If you love spice, add one teaspoon of cayenne pepper. You can adjust this based on your taste. Next, squeeze the juice from one fresh lime. This adds a zesty kick.
Don’t forget salt and black pepper to taste. For the tacos, use eight small corn tortillas. They hold everything together perfectly.
Add one ripe avocado, sliced into thin wedges. This will provide creaminess to your tacos. You also need one cup of finely shredded green cabbage. It adds crunch and freshness.
Finally, garnish your tacos with fresh cilantro leaves. Serve lime wedges on the side for that extra burst of flavor. Each ingredient plays a key role in making your spicy garlic shrimp tacos both vibrant and delicious.
Step-by-Step Instructions
Preparing the Shrimp Marinade
– In a medium bowl, add 1 pound of shrimp.
– Add 4 cloves of minced garlic.
– Pour in 2 tablespoons of olive oil.
– Sprinkle in 1 teaspoon of smoked paprika.
– Add 1 teaspoon of cayenne pepper for spice.
– Mix in 1 teaspoon of ground cumin.
– Squeeze the juice of 1 lime over the shrimp.
– Season with salt and black pepper.
– Stir well to coat the shrimp.
– Let the shrimp marinate for at least 15 minutes.
Marinating allows the shrimp to soak up all the great flavors. The longer you let it sit, the more taste it gets.
Cooking the Shrimp
– Heat a large skillet over medium-high heat.
– Carefully add the marinated shrimp in a single layer.
– Cook the shrimp for 2-3 minutes on each side.
– Look for the shrimp to turn pink and opaque.
– Once cooked, take them off the heat.
Cooking shrimp is quick. You want them to be just right, so keep an eye on them.
Preparing the Tortillas
– Take another skillet or grill.
– Warm 8 small corn tortillas for about 30 seconds on each side.
– Make sure they are soft and pliable.
Warming the tortillas helps bring out their flavor. Soft tortillas make the tacos so much better.
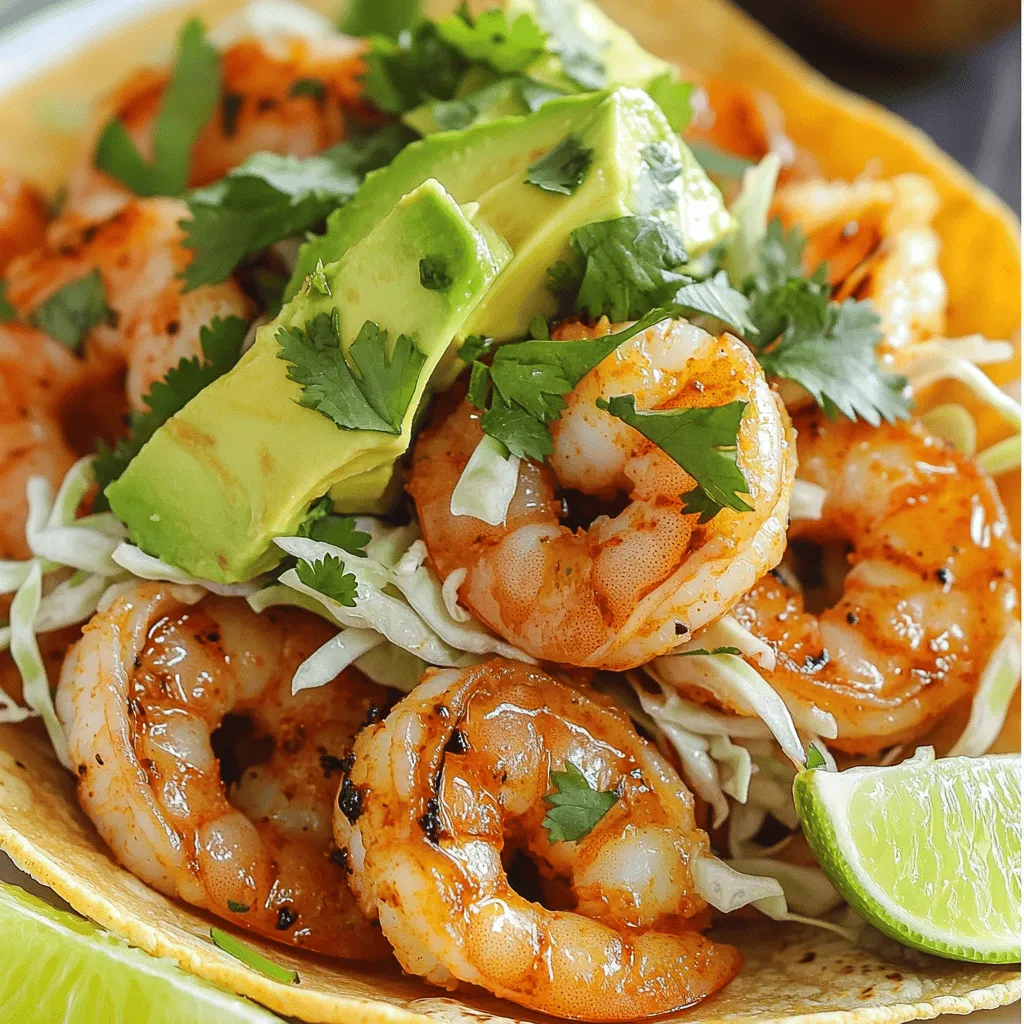
Assembling the Tacos
– Place a few shrimp in each tortilla.
– Add several slices of ripe avocado.
– Top with a generous amount of shredded cabbage.
– Garnish with fresh cilantro leaves.
– Serve with lime wedges on the side.
Layering the shrimp, avocado, and cabbage makes the tacos fun and tasty. The lime adds a zesty kick that everyone loves.
Tips & Tricks
Enhancing Flavor
To make your spicy garlic shrimp tacos even better, try these ideas:
– Add a pinch of chili powder for more heat.
– Mix in some fresh lime zest for a bright flavor.
– Use fresh herbs like parsley or dill for a twist.
– Try different tortillas like flour or spinach for variety.
Cooking Techniques
Cooking shrimp can be tricky. Here are my best tips:
– Make sure your skillet is hot before adding shrimp. This helps them cook evenly.
– Don’t crowd the shrimp in the pan. Cook them in batches if needed.
– Cook shrimp just until they turn pink. Overcooking makes them tough.
– For a smoky flavor, consider grilling the shrimp.
Presentation Ideas
Make your tacos stand out with these fun tips:
– Use a colorful platter to display your tacos.
– Stack tacos in a taco holder for a nice touch.
– Add extra lime wedges around the platter for color.
– Sprinkle fresh cilantro over the top to make it pop.
These ideas will help you create a meal that looks as good as it tastes!

Variations
Different Proteins
You can swap shrimp for other proteins. Fish like tilapia or cod works well. Chicken is another great choice. Simply grill or sauté it with the same spices. If you want a plant-based option, use tofu. Just press it well, then marinate and cook like shrimp. Each protein adds its own twist to the flavor.
Spice Level Adjustments
Want to change the heat? You can easily adjust the cayenne pepper. Use less for a milder flavor. If you love spice, add more. You can also use fresh jalapeños or hot sauce for extra kick. Experiment with different spices like chipotle to find your perfect balance.
Topping Ideas
Toppings can make your tacos special. Try adding fresh salsa for a zesty kick. Cheese lovers can sprinkle on some crumbled feta or cotija. A dollop of sour cream adds creaminess and cools the spice. You can also add pickled onions for a tangy crunch. Get creative with your toppings to match your taste!
Storage Info
Storing Leftovers
To keep your spicy garlic shrimp tacos fresh, store leftovers properly. First, separate the shrimp from the tortillas and toppings. Use airtight containers for best results. Place the shrimp in one container. Store the tortillas in another. You can keep these in the fridge for up to three days. Make sure the shrimp cool down before sealing the container. This helps prevent any moisture buildup.
Reheating Instructions
When it’s time to enjoy your leftovers, reheating is key. For the shrimp, heat a skillet on medium heat. Add a splash of olive oil to keep them moist. Cook for about two minutes until warmed through. Avoid cooking too long, or the shrimp can become tough. For the tortillas, warm them on a dry skillet for about 15 seconds on each side. This keeps them soft and tasty.
Freezing Options
If you want to save your shrimp tacos for later, freezing is a great option. Cooked shrimp can freeze well for up to three months. Place the shrimp in a freezer-safe bag. Remove as much air as possible before sealing. The tortillas can also be frozen. Just stack them with parchment paper in between to prevent sticking. When ready to eat, thaw overnight in the fridge before reheating. This keeps everything fresh and flavorful.
FAQs
How do I know when shrimp are fully cooked?
To tell if shrimp are done, look for a few key signs. Cooked shrimp turn pink and opaque. They curl into a C shape, which means they are ready. If they stay straight or look gray, they need more time. Also, check the internal temperature. It should reach 120°F. For perfect tacos, don’t overcook the shrimp. They should be tender and juicy, not rubbery.
Can I make tacos ahead of time?
Yes, you can prep ingredients in advance. Marinate the shrimp a few hours before cooking. This way, the flavors soak in deeply. You can also shred the cabbage and slice the avocado ahead of time. Just keep the avocado in lemon juice to prevent browning. Warm the tortillas right before serving for the best taste. This makes for quick assembly when it’s time to eat.
What sides pair well with spicy garlic shrimp tacos?
Several sides complement spicy garlic shrimp tacos well. Consider serving black beans for protein and fiber. A fresh corn salad adds sweetness and crunch. You might also enjoy a simple green salad with lime vinaigrette. For a zesty touch, serve pickled red onions on the side. These sides enhance the meal and provide a variety of flavors.
You now have a great recipe for spicy garlic shrimp tacos. We covered each step, from marinating the shrimp to assembling the tacos. You learned tips for flavor, cooking shrimp, and creative presentations. Variations allow you to experiment with different proteins and toppings.
Feel free to store and reheat leftovers safely, or freeze them for another time. Enjoy crafting these delicious tacos and impress your friends and family with your new skills!


![To make sticky orange chicken, you'll need a few simple yet flavorful items. Here is a complete list of ingredients you'll need for this recipe: - 1.5 lbs boneless, skinless chicken thighs - 1/2 cup cornstarch - 2 tablespoons vegetable oil - 3 cloves garlic, finely minced - 1-inch piece of fresh ginger, grated - 1/4 cup low sodium soy sauce - 1/2 cup freshly squeezed orange juice - Zest of 1 medium orange - 1/4 cup honey - 2 tablespoons rice vinegar - 1/2 teaspoon red pepper flakes (optional) - 2 green onions, finely chopped, for garnish - Sesame seeds, for garnish Using high-quality chicken is key for this dish. Chicken thighs stay juicy and tender. Cornstarch is essential for a crispy texture. Vegetable oil helps with frying and flavor. Fresh garlic and ginger bring bold taste to the sauce. Orange juice and zest create a bright, zesty flavor. Honey adds sweetness that balances the dish. Rice vinegar gives a touch of tang. If you like spice, add red pepper flakes for heat. Don’t forget the green onions and sesame seeds for garnish. They add color and crunch. This recipe is simple yet packed with flavor. You can find the full recipe in earlier sections. Coating with Cornstarch Start by placing the chicken pieces in a big bowl. Pour in the cornstarch. Mix it well with your hands or a spoon. Make sure all chicken pieces are covered. This step is key for a crispy finish. Sautéing the Chicken Pieces Next, heat the vegetable oil in a large skillet or wok on medium-high heat. Once hot, add the chicken in batches. Avoid crowding the pan. Cook for about 5-7 minutes. Stir it often until the chicken turns golden brown. Check that each piece reaches 165°F inside. Remove the chicken and place it on a plate with paper towels to soak up extra oil. Sautéing Garlic and Ginger Lower the heat to medium. In the same skillet, add the minced garlic and grated ginger. Sauté for about 30 seconds. You want to smell the rich aroma of garlic and ginger. This signals it’s time to mix the sauce. Mixing the Sauce Ingredients Pour in the soy sauce, orange juice, orange zest, honey, and rice vinegar. If you like some heat, add the red pepper flakes. Stir it all together. Increase the heat slightly and let it bubble. Allow the sauce to simmer for 3-5 minutes. You want it to thicken and develop a rich flavor. Glazing the Chicken Now, return the cooked chicken to the skillet. Use a spatula to toss the chicken in the sauce. Ensure every piece gets coated. Let it cook for another 2-3 minutes. This will heat the chicken through and make it sticky and flavorful. Garnishing for Serving Take the skillet off the heat. Sprinkle the chopped green onions and sesame seeds over the chicken. These add color and crunch. Serve this dish hot and enjoy the zesty flavors of your sticky orange chicken. Check the Full Recipe for more details! Importance of Cornstarch Coating Coating the chicken in cornstarch is key for a crispy bite. It helps create a crunchy layer when you fry it. The cornstarch seals in moisture, keeping the chicken juicy. You want to ensure every piece is coated well. This simple step makes a big difference in texture and taste. Avoiding Overcrowding the Pan Do not overcrowd the pan when cooking the chicken. If you add too much at once, the chicken will steam instead of fry. This means less crispiness. Cook in batches and give each piece space. This way, you get that golden-brown color you want. Using Fresh Ingredients Using fresh ingredients makes your dish taste better. Fresh garlic and ginger give a bright flavor. Squeeze your own orange juice for the best taste. Fresh zest adds a lovely aroma. These small details make your sticky orange chicken shine. Adjusting Spice Levels If you like heat, add red pepper flakes. Start with a small amount and taste as you go. You can always add more if you want a kick. If you prefer a milder dish, skip the spice. Tailor the recipe to your taste buds. Pairing with Sides This sticky orange chicken goes well with many sides. Serve it over fluffy jasmine rice for a complete meal. Steamed broccoli or green beans also work nicely. These sides balance the sweetness of the chicken. Presentation Ideas Make your dish look as good as it tastes. Use a white plate to make the orange color pop. Drizzle some extra sauce on top. Sprinkle sesame seeds and green onions for a final touch. A pretty plate makes every meal special. For the full recipe, check out the Sticky Orange Chicken Delight. {{image_4}} You can easily switch up the protein in this dish. - Using Chicken Breasts: You can replace chicken thighs with chicken breasts. They are leaner and will still taste great. Just be sure to cook them until they are juicy. - Substituting with Tofu or Tempeh: For a plant-based option, try tofu or tempeh. Cut them into bite-sized pieces and follow the same steps as the chicken. They soak up the sauce well and give a nice texture. Feel free to play with flavors to make this dish your own. - Adding More Citrus: Want more zing? Add lime or lemon juice. A splash at the end brightens the dish and gives it a fresh twist. - Experimenting with Herbs and Spices: You can also try adding fresh herbs like cilantro or basil. A sprinkle of these can add depth and freshness. This recipe can fit many dietary needs. - Gluten-Free Modifications: If you're gluten-free, use tamari instead of soy sauce. This keeps the flavor while making it safe for your diet. - Low-Sugar Alternatives: For a low-sugar version, substitute honey with a sugar-free sweetener. This still gives sweetness without the extra calories. These variations help you enjoy Sticky Orange Chicken in your own way. Check the Full Recipe for more details! After you enjoy your sticky orange chicken, you may have some leftovers. To keep them fresh, store the chicken in an airtight container. Place it in the fridge. It will last for about 3 to 4 days. When reheating, use the microwave or a skillet. Heat it gently to avoid drying it out. A splash of water can help keep it moist. If you want to keep your sticky orange chicken longer, consider freezing it. Allow the chicken to cool completely before freezing. Place it in a freezer-safe bag or container. Remove as much air as possible to prevent freezer burn. It can stay in the freezer for up to 3 months. When you're ready to use it, thaw the chicken overnight in the fridge. For a quicker method, you can use the defrost setting on your microwave. Just be careful not to start cooking it. To maintain the best flavor, always serve your sticky orange chicken fresh. If you prepare it ahead of time, store the sauce separately. This will help keep the chicken crispy. When you are ready to serve, reheat both the chicken and sauce. Toss them together just before serving for that sticky goodness. For more details on how to make this dish, check out the Full Recipe. You can enjoy Sticky Orange Chicken with a few tasty sides. Here are some great options: - Fluffy jasmine rice - Steamed broccoli - Fried rice - Sautéed snap peas - Crisp green salad For drinks, pair it with: - Iced tea - Sparkling water with lemon - A light white wine These sides and drinks will balance the sweet and sticky flavors of the chicken. To kick up the heat in your Sticky Orange Chicken, try these tips: - Adding Heat with Pepper Flakes: Sprinkle red pepper flakes into the sauce. Start with a little and add more if needed. This gives a nice kick without overpowering the dish. - Experimenting with Hot Sauces: Mix in your favorite hot sauce. A few drops can add flavor and heat. Choose a sauce that complements the orange taste. You can adjust the heat to match your taste! Yes, you can prep Sticky Orange Chicken in advance. Here’s how: - Prep Tips for Making in Advance: Marinate the chicken in the sauce for a few hours or overnight. This adds great flavor. You can also chop the garlic and ginger ahead of time. - Adjusting Cooking Times: When cooking, make sure the chicken is heated through. If you make it ahead, just warm it on low heat in the skillet. This keeps it from drying out. These tips help you enjoy a delicious meal even on busy days. For the full recipe, check out the [Full Recipe]. This blog post guided you through making Sticky Orange Chicken, from ingredients to storage tips. Remember to coat the chicken in cornstarch for that perfect crunch. Use fresh ingredients to enhance flavor and feel free to experiment with proteins and spices. With these straightforward steps and variations, you can enjoy a tasty meal that suits your needs. Keep these tips in mind for a delicious outcome every time. Now, it’s time to bring this vibrant dish to your table!](https://joymealplan.com/wp-content/uploads/2025/06/0fb5afb5-059d-4b64-a6dc-9cc9d9794f9b-768x768.webp)

