Spicy Garlic Shrimp Zoodle Bowls Simple and Healthy Meal

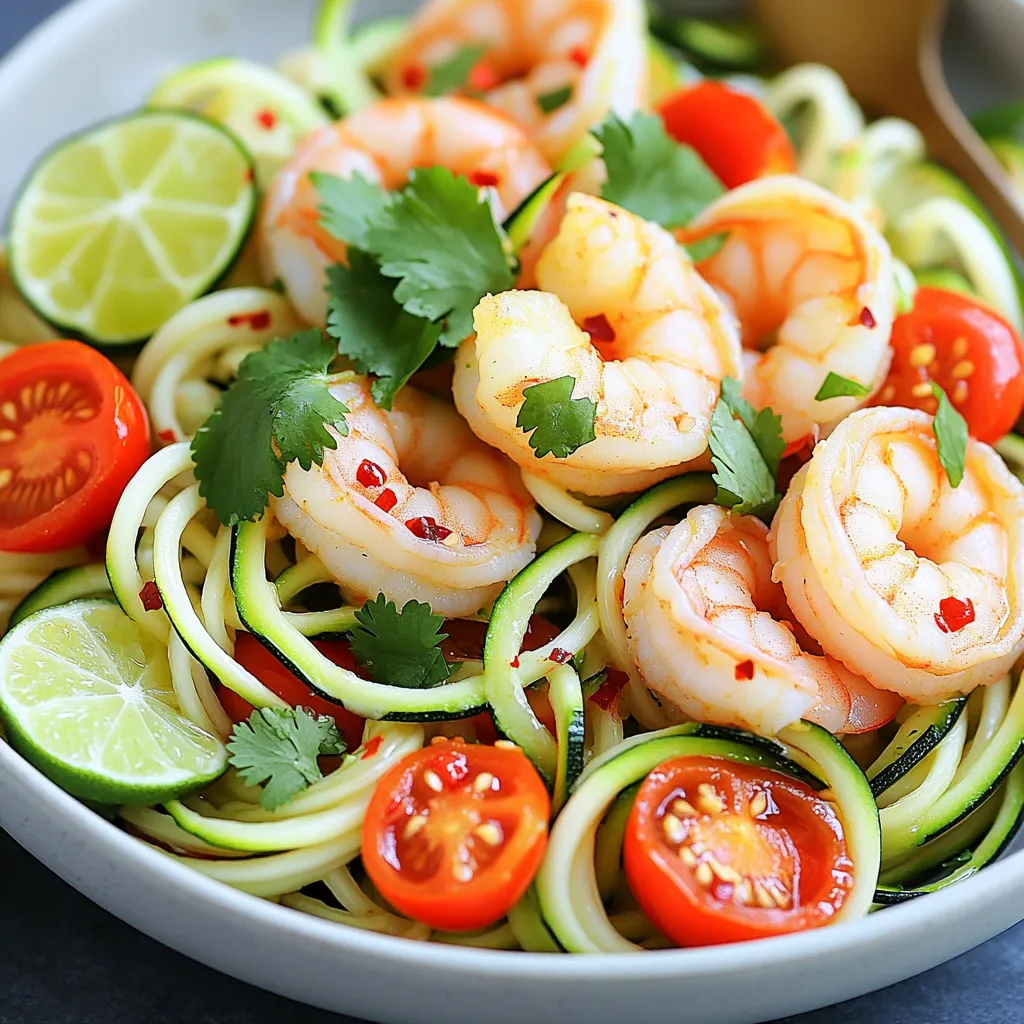
Looking for a quick, healthy meal that bursts with flavor? My Spicy Garlic Shrimp Zoodle Bowls are just what you need! This dish combines fresh zucchini noodles with juicy shrimp and a punchy garlic sauce. It’s simple to make, packed with nutrients, and perfect for any night. Let’s explore how to whip up this delicious meal that will impress your taste buds and fit your healthy lifestyle!
Ingredients
Main Ingredients for Spicy Garlic Shrimp Zoodle Bowls
– 1 pound large shrimp, peeled and deveined
– 3 medium zucchinis, spiralized
– 4 cloves garlic, minced
– 2 tablespoons olive oil
– 1 teaspoon red pepper flakes (adjust according to your spice preference)
– 1 bell pepper, thinly sliced (any color)
– 1 cup cherry tomatoes, halved
– 2 tablespoons soy sauce (or tamari for a gluten-free option)
– 1 tablespoon fresh lime juice
– Fresh cilantro, chopped (for garnish)
– Salt and freshly ground black pepper to taste
Optional Ingredients for Customization
You can add some other great flavors to your zoodle bowl. Consider these options:
– Avocado slices for creaminess
– Spinach or kale for extra greens
– Chopped green onions for crunch
– Sesame seeds for a nutty taste
– Different peppers, like jalapeño for more heat
Nutritional Benefits of Each Ingredient
– Shrimp: High in protein, low in calories, and rich in omega-3 fatty acids.
– Zucchini: Low in carbs and calories, high in vitamins A and C.
– Garlic: Boosts the immune system and adds flavor with few calories.
– Olive Oil: A source of healthy fats that can help reduce heart disease.
– Red Pepper Flakes: Can boost metabolism and add flavor without extra calories.
– Bell Pepper: Full of vitamins A and C, adds color and crunch.
– Cherry Tomatoes: Packed with antioxidants and vitamins, and they add sweetness.
– Soy Sauce: Adds umami flavor, just watch the sodium content.
– Lime Juice: Adds tang and vitamin C, brightening the dish.
– Cilantro: Fresh herb that adds flavor and is packed with vitamins.
Step-by-Step Instructions
Preparing the Zoodles: Tips for Perfect Spiralizing
To make zoodles, start with fresh zucchinis. Use a spiralizer for long, noodle-like strands. If you don’t have a spiralizer, a julienne peeler works too. Once you spiralize the zucchinis, place them on paper towels. This helps absorb excess moisture. If zoodles are too wet, they can make your dish watery. Let them sit for about 10 minutes. This simple step makes a big difference in your final dish.
Marinating and Cooking the Shrimp
Next, prep your shrimp. In a medium bowl, combine 1 pound of shrimp with salt and black pepper. Add half a teaspoon of red pepper flakes for some heat. Toss everything together so the shrimp are well coated. Let them marinate for about 10 minutes. This step enhances the shrimp’s flavor.
Now, heat 1 tablespoon of olive oil in a skillet over medium-high heat. Once hot, add the marinated shrimp. Cook for 2-3 minutes until they turn pink and opaque. This shows they are done. Remove the shrimp from the skillet and keep them on a plate.
Sautéing the Vegetables for Optimal Flavor
In the same skillet, add another tablespoon of olive oil. Next, toss in the minced garlic and sliced bell pepper. Sauté for about 2 minutes. Stir often to keep the garlic from burning. You want the garlic to smell great and the bell pepper to soften a bit.
Now, add halved cherry tomatoes to the skillet. Follow this with your spiralized zoodles. Stir gently, cooking for 2-3 minutes more. You want your veggies tender but still crunchy. This way, they keep their bright colors and flavors.
After everything cooks, return the shrimp to the skillet. Drizzle with soy sauce and fresh lime juice for zest. Add the rest of the red pepper flakes. Toss all ingredients together and heat for another minute. This melds the flavors beautifully.
Now you’re ready to serve!
Tips & Tricks
How to Avoid Watery Zoodles
To keep your zoodles from being watery, follow these steps:
– After spiralizing the zucchinis, lay them on paper towels.
– Sprinkle a little salt on the zoodles. This draws out excess moisture.
– Let them sit for about ten minutes.
– Pat them dry with another paper towel before cooking.
This simple method makes sure your dish stays fresh and tasty.
Best Practices for Cooking Shrimp
Cooking shrimp can be quick and easy. Here are my tips:
– Always use fresh, peeled, and deveined shrimp. This saves time and effort.
– Marinate shrimp for about ten minutes with salt, pepper, and red pepper flakes.
– Heat the oil in the pan before adding shrimp. This helps them cook evenly.
– Cook shrimp for only 2-3 minutes. They cook fast and should turn pink and opaque.
– Avoid overcooking. Overcooked shrimp can become tough and rubbery.
These practices ensure your shrimp will be perfect every time.
Flavor Enhancements and Seasoning Suggestions
Want to boost the flavor of your zoodle bowls? Here are some ideas:
– Add a splash of soy sauce or tamari for a savory kick.
– Try a squeeze of fresh lime juice to brighten the dish.
– Toss in fresh herbs like basil or mint for extra freshness.
– Experiment with different spices like cumin or paprika for unique flavor twists.
These enhancements can take your Spicy Garlic Shrimp Zoodle Bowls to the next level.

Variations
Substitutions for Shrimp
If you want to swap shrimp, chicken works great. Use thinly sliced chicken breast. Cook it for 5-7 minutes until it’s no longer pink. You can also use tofu for a vegetarian option. Press and drain the tofu first. Then, cut it into cubes and pan-fry until golden.
Vegan-Friendly Options
To make this dish vegan, replace shrimp or chicken with chickpeas or tempeh. Chickpeas add protein and a nice texture. Use one can, drained and rinsed. Tempeh has a great bite. Cut it into small cubes and sauté until golden.
Spice Level Adjustments and Alternatives
If you love heat, add more red pepper flakes. Start with one teaspoon and adjust to taste. For a milder dish, skip the red pepper flakes altogether. You can also try smoked paprika for a different flavor without the heat. Add just a pinch to keep it subtle.
Storage Info
Best Practices for Storing Leftovers
To keep your Spicy Garlic Shrimp Zoodle Bowls fresh, store them in an airtight container. Make sure to cool the dish to room temperature before sealing it. This helps prevent condensation, which can make the zoodles soggy. Place your shrimp and zoodles in separate containers if you can. This keeps the flavors intact and the texture right.
Reheating Tips to Maintain Flavor and Texture
When it’s time to reheat, do so gently. You can use a skillet over low heat. Add a splash of water or broth to keep the zoodles from drying out. Stir gently to avoid breaking the shrimp. If using a microwave, place the bowl in for short bursts. Heat in 30-second intervals, stirring in between. This ensures even heating without overcooking.
How Long Can You Keep Spicy Garlic Shrimp Zoodle Bowls?
You can keep these bowls in the fridge for up to three days. After that, the zoodles may start to lose their crunch. If you notice any off smell or changes in color, it’s best to toss them. Always check before eating leftovers to ensure they are still good.
FAQs
Can I make this recipe ahead of time?
Yes, you can prepare the shrimp and zoodles in advance. Cook the shrimp and store it in the fridge for up to two days. Spiralize the zucchini and keep it in a container with a paper towel to absorb moisture. Just wait to cook the zoodles until you are ready to serve. This keeps them fresh and crunchy.
What should I serve with Spicy Garlic Shrimp Zoodle Bowls?
These zoodle bowls are great on their own. However, you can serve them with a side salad for extra greens. A light cucumber salad pairs well, too. If you want more protein, add grilled chicken or tofu on the side. A slice of crusty bread can also be a nice touch.
Is this recipe suitable for meal prep?
Absolutely! The Spicy Garlic Shrimp Zoodle Bowls work well for meal prep. Just separate the shrimp and zoodles into individual containers. When it’s time to eat, reheat the shrimp and sauté the zoodles quickly. This keeps your meal fresh and tasty. Enjoy them throughout the week!
Spicy Garlic Shrimp Zoodle Bowls offer fresh flavors and rich benefits. You learned about key ingredients, preparation tips, and how to customize your dish. I shared helpful tricks to avoid watery zoodles and enhance flavors. You can even swap shrimp for chicken or tofu, making this meal fit anyone’s taste. Store leftovers properly to enjoy later. Armed with this knowledge, you can confidently create this tasty, healthy dish anytime. Enjoy making your zoodle bowls!


![To make Easy Chicken Shawarma, gather these items: - 500g boneless, skinless chicken thighs - 2 tablespoons extra virgin olive oil - 3 cloves garlic, finely minced - 1 tablespoon ground cumin - 1 tablespoon ground coriander - 1 tablespoon smoked paprika - 1 teaspoon ground turmeric - 1 teaspoon ground cinnamon - 1 teaspoon sea salt - ½ teaspoon freshly ground black pepper - Juice of 1 large lemon - 4 soft pita breads - Fresh parsley, finely chopped, for garnish - Tomato, cucumber, and red onion, thinly sliced, for serving - Creamy yogurt or rich tahini sauce, for drizzling This list covers all you need for vibrant flavors. You can swap chicken thighs for chicken breasts if you prefer leaner meat. If you're short on spices, try a ready-made shawarma mix for ease. To prepare this dish, you'll need: - A medium mixing bowl for the marinade - A whisk to blend the ingredients - A grill or large skillet for cooking - A meat thermometer to check doneness - Storage containers for leftovers Using a meat thermometer ensures you cook the chicken to 75°C (165°F). This keeps it juicy and safe to eat. Store any leftovers in airtight containers for up to three days. Enjoy your flavorful meal, and don't forget to check the [Full Recipe] for all the steps! To start, we need to make a tasty marinade. Take a medium mixing bowl and combine these ingredients: - 2 tablespoons extra virgin olive oil - 3 cloves garlic, finely minced - 1 tablespoon ground cumin - 1 tablespoon ground coriander - 1 tablespoon smoked paprika - 1 teaspoon ground turmeric - 1 teaspoon ground cinnamon - 1 teaspoon sea salt - ½ teaspoon freshly ground black pepper - Juice of 1 large lemon Whisk these together until mixed well. This mix makes your chicken full of flavor. Next, add the 500g boneless, skinless chicken thighs. Make sure every piece is coated in the marinade. Cover the bowl tightly with plastic wrap. For the best taste, let it sit in the fridge for at least 1 hour. If you can, leave it overnight for even better flavor. When you are ready to cook, preheat your grill or a large skillet on medium-high heat. You want it nice and hot. Take the marinated chicken out of the fridge. Let it sit at room temperature for about 10 minutes. This helps it cook evenly. Place the chicken on the hot grill or skillet. Cook for about 6-8 minutes on each side. You want the chicken to have a nice char and be fully cooked. Check that the internal temperature reaches 75°C (165°F). Once cooked, let the chicken rest for 5 minutes. Then slice it into thin strips. This gives you a tender texture. Now, it’s time to fill our pitas. Take your warm pita bread and place a good amount of sliced chicken inside. For extra crunch and color, add some fresh toppings: - Fresh parsley, finely chopped - Tomato, thinly sliced - Cucumber, thinly sliced - Red onion, thinly sliced Finish your shawarma with a drizzle of creamy yogurt or zesty tahini sauce. Wrap the pita up tight, and it's ready to eat! Enjoy your homemade shawarma delight! For a complete guide, check out the Full Recipe. To achieve the best char marks on your chicken, start with a hot grill or skillet. Make sure the grill is preheated to medium-high heat. Cook the chicken without moving it too much. Let it sit for about 6 to 8 minutes on each side. This allows those crispy, golden marks to form. Resting the chicken before slicing is also key. Once you take the chicken off the heat, let it rest for 5 minutes. This helps the juices stay inside the meat. When you slice it, the chicken will be tender and juicy. Pair your chicken shawarma with tasty side dishes. A fresh tabbouleh salad makes a great choice. You can also serve hummus or baba ganoush for dipping. These flavors complement the shawarma well. For drinks, a chilled lemonade or mint tea works nicely. These drinks balance the spices and add a refreshing touch. Want to spice things up? Try adding a pinch of cayenne pepper to the marinade. This will give your chicken an extra kick. You can also drizzle some sriracha or harissa sauce over the finished shawarma for added heat. If you prefer milder flavors, simply reduce the spices. Use less cumin or paprika in the marinade. This way, you can adjust the taste to suit your preferences. For more variety, try adding fresh herbs like mint or dill for a burst of freshness. For the full recipe, check the section above. {{image_4}} You can easily make this dish plant-based. Use chickpeas or tofu instead of chicken. For chickpeas, drain and rinse one can. Toss them with the same marinade. If you choose tofu, press it to remove water and cut it into cubes. Marinate the tofu just like the chicken. For a veggie-loaded option, try grilled vegetables. Zucchini, bell peppers, and mushrooms work great. Slice them into strips and marinate them. Grill until they are tender and slightly charred. If you do not have a grill, don’t worry! You can use an Instant Pot. Cook the marinated chicken on high pressure for about 8 minutes. This keeps the chicken juicy. You can also use an oven. Preheat it to 200°C (400°F). Place the chicken on a baking sheet and roast for 20-25 minutes. Check that the chicken reaches 75°C (165°F) inside. Another great choice is the slow cooker. Add the marinated chicken and cook on low for 6-8 hours. This makes the chicken very tender and flavorful. To make your shawarma extra special, try new toppings. Feta cheese adds a nice salty flavor. Pickled vegetables can give a tangy crunch. You can also experiment with sauces. A spicy harissa or cool tzatziki can change the flavor. Consider regional spices too. Try za'atar for a herby taste or sumac for tartness. Each spice can make your shawarma unique. For the full recipe, check out Shawarma Delight: Easy Chicken Edition. To keep your chicken shawarma fresh, store it properly. Place the leftover chicken in an airtight container. This will help maintain its flavor and moisture. For the best taste, eat leftovers within three days. If you have assembled pitas, store the chicken and veggies separately. This keeps the pita from getting soggy. You can keep the sliced chicken in the fridge for three days, too. When it's time to enjoy your leftovers, reheating is key. Use a skillet or oven to heat the chicken. This method helps keep the chicken juicy. Avoid using a microwave, as it can dry out the meat. Heat the chicken over medium heat for about five minutes. Stir it gently to keep it moist. If the chicken seems dry, add a splash of water or broth. You can freeze leftover chicken shawarma for later. Place the cooled chicken in a freezer-safe container. Make sure to remove excess air to prevent freezer burn. It can last up to three months in the freezer. When you're ready to eat, thaw the chicken in the fridge overnight. Reheat it on the stove for the best texture. You can enjoy that delicious flavor anytime! Chicken shawarma is a popular dish from the Middle East. It has roots in the Levant region. Traditionally, cooks stack marinated meat on a vertical spit. They cook it slowly, letting the juices flow down. The meat is then shaved off in thin strips. The spices in shawarma are what make it special. Common spices include cumin, coriander, and paprika. These give the chicken a warm, rich flavor. Shawarma is often served in pita bread with fresh veggies and sauce. Yes, you can prep chicken shawarma in advance. Marinate the chicken the night before. This helps the flavors mix well. When you are ready to cook, take it out of the fridge. Cook it fresh for the best taste. You can also slice the cooked chicken and store it. Place it in an airtight container in the fridge. It will last for about 3 days. Just reheat it when you are ready to eat. If you want to change things up, try these alternatives to pita bread: - Flatbreads - Tortillas - Naan bread - Lettuce wraps for a low-carb option These options work well with the chicken and veggies. You can also serve shawarma over rice or in a bowl with salad. To make a gluten-free chicken shawarma, choose gluten-free pita or flatbreads. Look for brands that clearly state they are gluten-free. You can also use lettuce as a wrap. Always check the spice blend for gluten. Some pre-made spices might contain gluten. Make your own mix using cumin, paprika, and other safe spices. The best sauces for chicken shawarma include: - Creamy yogurt sauce - Rich tahini sauce Yogurt sauce is smooth and tangy. It cools down the spices. Tahini sauce is nutty and flavorful. Both add a wonderful touch to your shawarma. Drizzle them on top or serve them on the side for dipping. For the full recipe, check out Shawarma Delight: Easy Chicken Edition. In this guide, we explored how to make Easy Chicken Shawarma from start to finish. We covered essential ingredients, tools, marinating techniques, cooking methods, and clever tips for serving and storing leftovers. You can easily customize this dish for various tastes and dietary needs, ensuring everyone enjoys it. With a little practice, you’ll master the art of shawarma. Get ready to impress your family and friends with your new skills in the kitchen!](https://joymealplan.com/wp-content/uploads/2025/07/dcd86bca-5250-4056-852d-a4436d844aa2-768x768.webp)
![- 4 medium zucchinis - 1 pound ground turkey (or beef) - 1 small onion, finely diced - 2 cloves garlic, minced - 1 tablespoon taco seasoning - 1 can (14 oz) diced tomatoes, drained - 1 cup canned black beans, rinsed and drained - 1 cup corn kernels (fresh or frozen) - 1 cup shredded cheese (cheddar or Mexican blend) - 2 tablespoons olive oil - Fresh cilantro, chopped (for garnish) - Sour cream (optional) - Salt and pepper to taste When picking zucchinis, look for ones that are firm and bright. They should feel heavy for their size. Avoid any that are soft or have blemishes. For measuring, use a scale for the ground meat and a measuring cup for the beans and corn. When chopping onions and garlic, a sharp knife helps avoid tears. This ensures even cooking and great flavor in your dish. This taco stuffed zucchini boats recipe is full of fun and taste. You can find the full recipe above. Enjoy every bite! - Preheat your oven to 375°F (190°C). - Take 4 medium zucchinis and cut them in half lengthwise. Scoop out the seeds carefully. Leave enough flesh for support. - Brush the insides of the zucchini halves with 2 tablespoons of olive oil. Arrange them cut-side up on a baking sheet. - In a large skillet, heat 1 tablespoon of olive oil over medium heat. - Add 1 small onion, finely diced, and sauté until it is soft, about 3-4 minutes. - Next, add 2 minced cloves of garlic. Sauté for another minute until fragrant. - Add 1 pound of ground turkey (or beef) to the skillet. Break the meat apart with a spatula. Cook until it is browned, about 5-7 minutes. - Season with 1 tablespoon taco seasoning, salt, and pepper to taste. - Stir in 1 can of drained diced tomatoes, 1 cup of rinsed black beans, and 1 cup of corn kernels. Cook for another 2-3 minutes until everything is hot. - Remove from heat and fold in half of the 1 cup of shredded cheese until it melts slightly. - Carefully fill each zucchini boat with the taco mixture. Press down gently to pack it in. - Sprinkle the remaining cheese over the top of each stuffed zucchini. - Place the baking sheet in the oven and bake for 20-25 minutes. Check for tenderness and ensure the cheese is melted and golden. - Once cooked, remove from the oven and garnish each zucchini with chopped cilantro. - Serve warm with a dollop of sour cream, if desired. For the full recipe, check the Full Recipe section above. To make your zucchinis tender yet not mushy, follow these tips: - Choose medium zucchinis: They cook evenly and hold their shape well. - Scoop carefully: Leave enough flesh for support, but remove the seeds. - Preheat your oven: A hot oven helps the zucchinis cook just right. For sautéing your filling, use these methods: - Heat your skillet well: This helps to cook onions and garlic faster. - Add oil before ingredients: Olive oil prevents sticking and enhances flavor. - Stir often: This keeps your mixture from burning and ensures even cooking. Garnishing your taco stuffed zucchini boats adds a fresh touch. Here are some ideas: - Chop fresh cilantro: Sprinkle it on top for a pop of color and flavor. - Add a dollop of sour cream: It adds creaminess and balances the spice. Pair your zucchini boats with sides or salads. Some great options include: - Rice or quinoa: These grains add texture and heartiness. - A fresh garden salad: Crisp greens complement the warm, savory boats. For the full recipe, check out the [Full Recipe]. {{image_4}} You can change the meat in this dish easily. Ground chicken works great in place of turkey or beef. It gives a lighter flavor while still being filling. If you want a plant-based option, try using lentils or crumbled tofu. Both can soak up the tasty taco seasoning. You can also swap out the black beans. Try pinto beans or kidney beans for a new twist. They add different textures and flavors that make the dish fun. Adding spices can really change the taste. Try cumin or smoked paprika for an extra kick. You could also mix in some chili powder if you like it hot. Each spice brings its own personality to your zucchini boats. Cheese is another place to get creative. Instead of cheddar, use pepper jack for a spicy twist. Or, try a mix of different cheeses for depth. Condiments can also change the game. Consider adding salsa or guacamole on top. These add fresh flavors and make every bite exciting. You can find the full recipe for Taco Stuffed Zucchini Boats to explore all these variations! Store leftover zucchini boats in an airtight container. Use parchment paper to separate layers if stacking. This keeps them fresh for up to three days. Make sure to cool them down before sealing to avoid moisture buildup. To maximize freshness, place them in the fridge as soon as they cool. Reheat zucchini boats in the oven for the best results. Set your oven to 350°F (175°C) and bake for about 10-15 minutes. This method warms them evenly and keeps the texture nice. If you want a quicker option, use the microwave. Heat them for 1-2 minutes, but watch for sogginess. To avoid this, place a paper towel under the zucchini boats while reheating. This helps absorb extra moisture. For detailed cooking steps, check the Full Recipe. Enjoy your tasty leftovers! To make taco stuffed zucchini boats healthier, use low-fat ground turkey instead of beef. You can also choose low-fat cheese or skip it entirely for a lighter option. Adding more veggies boosts the nutrition. Consider mixing in diced bell peppers, spinach, or mushrooms. You can also serve them with a side salad for extra greens. This way, you enjoy a tasty dish while keeping it nutritious! Yes, you can freeze taco stuffed zucchini boats! Start by letting them cool completely. Wrap each boat in plastic wrap or foil. Place them in a freezer bag to save space. They can stay in the freezer for up to three months. When you’re ready to eat, let them thaw overnight in the fridge. Then, heat them in the oven until warm. Taco stuffed zucchini boats pair well with rice or quinoa. You can also serve them with tortilla chips and salsa for a fun crunch. For gatherings, consider adding some guacamole as a dip. Fresh fruit like watermelon or mango is a great side too. These options make your meal more exciting and flavorful! Taco stuffed zucchini boats offer a fun and tasty twist on dinner. You learned how to prepare fresh ingredients, cook a hearty filling, and assemble a dish that's sure to please. Remember, you can mix and match proteins and spices to fit your taste. Storing and reheating tips will help you enjoy leftovers without losing flavor. Dive into this dish for a healthy meal that’s easy to make and customize. Enjoy experimenting and sharing your tasty creations!](https://joymealplan.com/wp-content/uploads/2025/07/a6f85fbf-686b-42b4-a399-5784f990ec67-768x768.webp)
 for all the details! {{image_4}} You can switch up the protein in Chicken Alfredo Stuffed Shells easily. Ground turkey or beef works well. Both give a rich taste and fit well in the shells. If you want a lighter option, ground chicken is great too. For vegetarian options, you can use mushrooms or spinach. They add flavor and nutrients without meat. Tofu is also a good choice. It soaks up the sauce nicely and adds protein. You can play with the sauce to create different flavors. Try adding garlic or herbs to the Alfredo sauce. This gives it a fresh taste. You might also enjoy a white wine cream sauce for a twist. Adding roasted vegetables to the sauce works wonders too. Think peppers, zucchini, or even spinach. This makes the dish colorful and healthy. Cheese can change the whole vibe of your dish. You can mix in different cheeses like fontina or gouda. These cheeses melt beautifully and add a new flavor. If you want a lighter option, try part-skim mozzarella. For those who avoid dairy, vegan cheese is a great alternative. Look for brands made from nuts or soy. They can also melt well and taste great. To store Chicken Alfredo stuffed shells in the fridge, let them cool first. Place them in an airtight container. Keep them in the fridge for up to three days. For best freshness, cover the top with a bit of extra Alfredo sauce. This keeps the shells moist and tasty. To freeze stuffed shells, first let them cool completely. Then, place them in a single layer on a baking sheet. Freeze until solid, about two hours. After that, pack them in a freezer-safe container or bag. They can last for up to three months in the freezer. When you’re ready to eat, thaw them in the fridge overnight. Reheat in the oven at 350°F (175°C) for about 25 minutes. Cover with foil to avoid drying out. Enjoy your delicious meal again! Can I use non-dairy substitutes? Yes, you can! Use non-dairy cheese and a plant-based Alfredo sauce. This keeps the dish creamy without dairy. How long does it take to cook from frozen? If you cook from frozen, add about 15 to 20 minutes to the baking time. This ensures everything heats through well. What can I serve with Chicken Alfredo Stuffed Shells? These shells pair great with a fresh green salad or warm garlic bread. Both options add balance to your meal. Why are my shells falling apart? Overcooking the pasta shells can cause this. Make sure to cook them just until al dente. How can I prevent the filling from spilling out? Don’t overfill the shells. Fill them just enough, but leave some space at the top. This helps keep the filling secure. What's the best way to know when it's fully cooked? Check if the cheese on top is bubbly and golden brown. You can also insert a knife to see if it’s hot inside. Can I make this dish ahead of time? Absolutely! You can prepare the shells and store them in the fridge. Just bake them when you're ready to eat. For details, check the Full Recipe. In this article, we explored how to make Chicken Alfredo Stuffed Shells. We covered the key ingredients, including pasta shells, chicken, and cheeses. I shared clear steps for preparation, filling, and baking. We also discussed tips for perfecting your dish and variations to suit your taste. Remember, cooking is fun and can be creative. Don't hesitate to try new flavors or ingredients. Enjoy your delicious stuffed shells and share them with friends and family!](https://joymealplan.com/wp-content/uploads/2025/07/ca290995-1373-40bc-abd5-a22e15d03aa0-768x768.webp)
